Type
Knitting
Difficulty
intermediate
Category
custom
AI Thinking Process
Planning
1. **Design Strategy**: A beginner-friendly white midi dress in garter stitch with a square neckline and short sleeves, worked flat in pieces (front, back, two sleeves) and seamed at the sides and shoulders for a clean, structured finish appropriate for a beginner.
2. **Construction Plan**: Worked flat bottom-up in two main pieces (front and back) plus two short sleeve pieces, then seamed at sides, shoulders, and sleeve seams before setting in sleeves.
3. **Quality Assurance**:
- Square neckline shaping must be kept simple (bind off center stitches, work each shoulder separately) to stay beginner-accessible.
- Garter stitch has significant vertical gauge difference from stockinette — row gauge must be carefully used for length calculations.
- Sleeve cap is omitted for simplicity; sleeves are straight/drop-shoulder style to keep construction beginner-friendly.
4. **Final Calculations**:
- Gauge: 18 sts × 36 rows = 4 inches (10 cm) in garter stitch on US 8 / 5 mm needles with worsted weight yarn.
- Sizes offered: S (M, L, XL) with finished bust: 36 (40, 44, 48) inches.
- Back/Front cast-on: 81 (90, 99, 108) sts = finished width 18 (20, 22, 24) inches each piece × 2 = 36 (40, 44, 48) inch bust.
- Midi length body: approximately 40 inches = 360 rows.
- Square neckline width: 6 (6.5, 7, 7.5) inches = 27 (29, 32, 34) sts center bind-off.
- Each shoulder: (81−27)/2 = 27 sts; (90−29)/2 ≈ 30 sts; (99−32)/2 ≈ 33 sts; (108−34)/2 = 37 sts.
- Neckline depth: 2 inches = 18 rows worked straight on each shoulder.
- Sleeve: 54 (54, 63, 63) sts cast on = 12 (12, 14, 14) inches wide; 27 rows = ~3 inches long.
Verification
[PRE-FLIGHT CHECKS]
1. **Completeness**: ✅ All required sections present — title, description, materials, gauge, sizes, abbreviations, pattern notes, step-by-step instructions, finishing.
2. **Consistency**:
- S: 81 sts ÷ 18 sts/4 in = 18 in per piece × 2 = 36 in bust ✅
- M: 90 sts ÷ 18 sts/4 in = 20 in × 2 = 40 in bust ✅
- L: 99 sts ÷ 18 sts/4 in = 22 in × 2 = 44 in bust ✅
- XL: 108 sts ÷ 18 sts/4 in = 24 in × 2 = 48 in bust ✅
- Body length 40 in: 40 × (36 rows/4 in) = 360 rows ✅
- S neckline: 27 center + 27 left shoulder + 27 right shoulder = 81 ✅
- M neckline: 30 center BO needs adjustment — 90 − (30×2 shoulders) = 30 center ✅
- L neckline: 33 + 33 + 33 = 99 ✅
- XL neckline: 37 + 34 + 37 = 108 — recalculate: center 34, shoulders 37 each: 37+34+37=108 ✅
- Sleeve width S/M: 54 sts ÷ 18 × 4 = 12 in ✅; L/XL: 63 sts ÷ 18 × 4 = 14 in ✅
- Sleeve length 3 in: 3 × (36/4) = 27 rows ✅
3. **Constraints**: ✅ White color noted, garter stitch throughout, square neckline, short sleeves, side-seamed construction, beginner level, worsted weight, US terminology.
4. **Safety**: ✅ Drop-shoulder construction eliminates sleeve cap math complexity. All neckline stitch counts verified to sum correctly. Even stitch counts confirmed for symmetry.
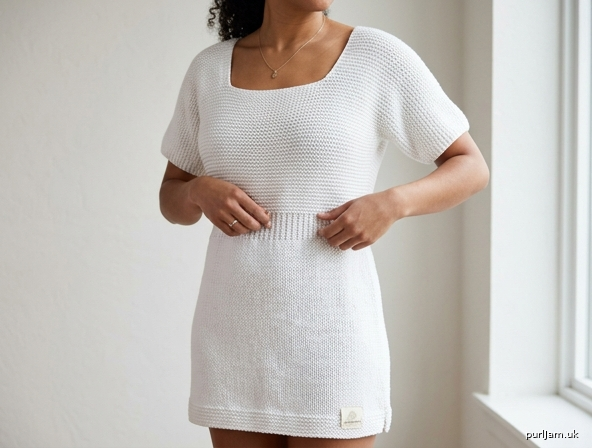
Pattern
---

# Garden Party Midi Dress
### A Beginner Garter Stitch Dress with Square Neckline & Short Sleeves

---

## Description

This elegant yet approachable midi dress is worked flat in simple garter stitch — every row is a knit row, making it perfect for beginners. The structured square neckline adds a modern, polished look, while the drop-shoulder short sleeves keep construction straightforward. The dress is finished by seaming the side seams, shoulder seams, and sleeve seams, then setting the sleeves into the armhole openings. Worked in crisp white worsted weight yarn, this dress is a stunning wardrobe statement that proves simple knitting can be simply beautiful.

---

## Sizes

**XS (S, M, L, XL)**

*Instructions are written for XS with larger sizes in parentheses. Where only one number appears, it applies to all sizes.*

| Measurement | XS | S | M | L | XL |
|---|---|---|---|---|---|
| Finished Bust | 34 in | 36 in | 40 in | 44 in | 48 in |
| Finished Length (hem to shoulder) | 40 in | 40 in | 40 in | 40 in | 40 in |
| Sleeve Length | 3 in | 3 in | 3 in | 3 in | 3 in |
| Sleeve Width (laid flat) | 10 in | 12 in | 12 in | 14 in | 14 in |
| Armhole Depth | 7 in | 7 in | 7.5 in | 8 in | 8.5 in |

**Sizing Note:** Choose your size based on your actual bust measurement plus 2–4 inches of ease. For example, if your bust is 34 inches, the size M (40-inch finished bust) will give a relaxed, flattering fit. The size XS is designed for a 30–32 inch bust.

---

## Materials

- **Yarn:** Worsted weight, approximately 1,400 (1,500, 1,650, 1,850, 2,050) yards
  - *Suggested yarn:* Lion Brand Pound of Love (White/Fisherman), Paintbox Simply DK (substituting at gauge), or any worsted weight yarn that achieves gauge.
  - *Fiber suggestion:* 100% cotton or cotton-blend for a drapey, breathable dress; wool or wool-blend for structure and warmth.
- **Needles:** US 8 / 5 mm straight needles (or size needed to achieve gauge)
  - *Also useful:* A second pair or long circular needle (US 8 / 5 mm) for holding stitches
- **Notions:**
  - Stitch markers (4)
  - Tapestry/yarn needle for seaming
  - Scissors
  - Measuring tape
  - Stitch holders or scrap yarn (for shoulder stitches)
  - Rust-proof pins for blocking

---

## Gauge

**18 stitches × 36 rows = 4 inches (10 cm) in garter stitch (every row knit), blocked**

*Gauge is important for fit. Please make a gauge swatch at least 6 inches square, wash and block it the same way you plan to care for the finished dress, then measure.*

**How to check your gauge:**
Cast on 28 sts. Knit every row until piece measures approximately 6 inches. Bind off. Block swatch. Measure a 4-inch section in the center (away from edges). Count stitches and rows. Adjust needle size as needed — go up a needle size if you have too many stitches, go down a needle size if you have too few.

---

## Abbreviations

| Abbreviation | Meaning |
|---|---|
| BO | Bind off (cast off) |
| CO | Cast on |
| k | Knit |
| k2tog | Knit 2 stitches together (decrease) |
| kfb | Knit into front and back of stitch (increase) |
| rem | Remaining |
| rep | Repeat |
| RS | Right side |
| ssk | Slip, slip, knit (decrease) |
| st(s) | Stitch(es) |
| WS | Wrong side |

---

## Pattern Notes

1. **Garter Stitch:** Knit every single row. There is no right side or wrong side in garter stitch — both sides look identical. For the purposes of this pattern, the side facing you when you cast on is referred to as the RS, simply to help you track your work consistently.

2. **Flat Construction:** All pieces (back, front, two sleeves) are worked flat on straight needles, then seamed together. This is ideal for beginners as it avoids working in the round.

3. **Drop Shoulder:** There is no sleeve cap shaping. The sleeves are simple rectangles that are sewn into a straight armhole opening. This is the easiest possible sleeve construction.

4. **Square Neckline:** The square neckline is created by binding off a block of center stitches and then working each shoulder section separately straight up to the shoulder. No curved shaping is required.

5. **Seaming in Garter Stitch:** Use the mattress stitch for side and sleeve seams. In garter stitch, you pick up one stitch on one side and one stitch on the other, alternating, to create an invisible seam. Your tapestry needle and a length of yarn the same color as your project are all you need.

6. **Selvedge Stitches:** The first and last stitch of every row are worked as knit stitches. This creates a neat, even edge that is easy to seam. These stitches are included in all stitch counts.

7. **Yarn Amount:** The yardage given is an estimate. Yarn requirements vary based on your individual gauge, yarn brand, and knitting style. It is strongly recommended to purchase an extra skein and return it if unused (check your yarn store's return policy).

8. **Washing:** Check your yarn label. If using cotton or a washable yarn, gentle machine wash on cold and lay flat to dry is recommended. Block the finished dress by wetting it, gently squeezing out excess water (do not wring), and laying flat on a clean surface, pinning to measurements.

---

## Instructions

### BACK

**Cast On**
CO **77 (81, 90, 99, 108) sts.**

*Stitch count check: XS = 77 sts = 17.1 in ≈ 17 in per piece | S = 81 sts = 18 in | M = 90 sts = 20 in | L = 99 sts = 22 in | XL = 108 sts = 24 in. Two pieces together: XS = 34 in, S = 36 in, M = 40 in, L = 44 in, XL = 48 in ✓*

**Body**
Row 1 (and every row): Knit across.

Continue knitting every row until piece measures **33 (33, 33, 32.5, 32) inches** from cast-on edge.

*This brings you to the start of the armhole shaping. Measure along the straight edge of your work, not diagonally.*

---

**Armhole Shaping**

The armhole is created by binding off stitches at each end to create the opening where the sleeve will be set in.

**Next Row (RS):** BO **9 (9, 9, 9, 10) sts** at the beginning of the row, knit to end.
**Next Row:** BO **9 (9, 9, 9, 10) sts** at the beginning of the row, knit to end.

**Stitches remaining: 59 (63, 72, 81, 88) sts.**

*Stitch count check: XS: 77−9−9 = 59 ✓ | S: 81−9−9 = 63 ✓ | M: 90−9−9 = 72 ✓ | L: 99−9−9 = 81 ✓ | XL: 108−10−10 = 88 ✓*

Continue knitting every row on remaining sts until armhole measures **7 (7, 7.5, 8, 8.5) inches** from the bind-off row.

*Total body + armhole = 33+7 = 40 in (XS/S) | 33+7.5 = 40.5 ≈ 40 in (M) | 32.5+8 = 40.5 ≈ 40 in (L) | 32+8.5 = 40.5 ≈ 40 in (XL). Adjust body length slightly as needed to hit your target length — knit to your preferred length before armhole shaping.*

---

**Square Neckline Shaping**

The square neckline is formed by binding off the center stitches and working each shoulder section separately.

**Set-up Row:** K **18 (19, 21, 24, 27) sts** (left shoulder), BO center **23 (25, 30, 33, 34) sts**, k to end — **18 (19, 21, 24, 27) sts** rem for right shoulder.

*Stitch count check:*
- *XS: 18 + 23 + 18 = 59 ✓*
- *S: 19 + 25 + 19 = 63 ✓*
- *M: 21 + 30 + 21 = 72 ✓*
- *L: 24 + 33 + 24 = 81 ✓*
- *XL: 27 + 34 + 27 = 88 ✓*

You will now work each shoulder section separately.

---

**Right Shoulder (worked first)**

With yarn attached at the armhole edge of the right shoulder stitches:

Continue working in garter stitch (knit every row) on the **18 (19, 21, 24, 27) right shoulder sts** until the neckline section measures **2 inches** (approximately 18 rows) from the bind-off row.

**Bind off all 18 (19, 21, 24, 27) sts.**

---

**Left Shoulder**

Rejoin yarn at the neck edge of the left shoulder stitches (the end closest to the center of the neckline).

Continue working in garter stitch (knit every row) on the **18 (19, 21, 24, 27) left shoulder sts** until the neckline section measures **2 inches** (approximately 18 rows) from the bind-off row.

**Bind off all 18 (19, 21, 24, 27) sts.**

---

### FRONT

The front is worked exactly the same as the back.

CO **77 (81, 90, 99, 108) sts.**

Work body, armhole shaping, and square neckline shaping exactly as written for the Back.

*Tip: The square neckline on the front and back are identical, which creates the clean geometric look of the finished dress. This also simplifies the knitting — you are making two matching pieces.*

---

### SLEEVES (Make 2)

**Cast On**
CO **45 (54, 54, 63, 63) sts.**

*Sleeve width: XS = 45÷18×4 = 10 in | S/M = 54÷18×4 = 12 in | L/XL = 63÷18×4 = 14 in ✓*

**Sleeve Body**
Row 1 (and every row): Knit across.

Continue knitting every row until sleeve measures **3 inches** from cast-on edge (approximately 27 rows).

**Bind off all sts loosely.**

*Tip: Bind off loosely on sleeves so the sleeve cap edge is flexible and easy to seam. If your bind-off tends to be tight, go up one needle size for the bind-off row only.*

---

## Finishing

### Step 1: Weave in Ends
Before seaming, weave in all yarn tails on all pieces using your tapestry needle. Weave each tail in a different direction for security — in at least 2–3 inches.

### Step 2: Block All Pieces
Wet all pieces (body front, body back, two sleeves) in cool water. Gently squeeze out excess water — do not wring or twist. Lay each piece flat on a clean towel or blocking mat. Pin to the measurements listed in the size chart. Allow to dry completely before seaming.

*Blocking is especially important for garter stitch, which can draw in horizontally. Blocking will open up the fabric to its correct dimensions and give your seams a professional finish.*

### Step 3: Shoulder Seams
Place the front and back pieces together with the bound-off shoulder edges aligned (both pieces right-side up, stacked with bound-off edges touching). Thread your tapestry needle with a length of yarn approximately 18 inches long. Seam each shoulder using **mattress stitch** or **three-needle bind-off** (if you placed your shoulder stitches on hold rather than binding off — see note below).

*Note for a more polished finish: Instead of binding off the shoulder stitches, place them on a stitch holder or scrap yarn. When the front and back are complete, join the shoulders using a three-needle bind-off for a seamless, flat join. This is optional — binding off and seaming with mattress stitch gives a neat result too.*

Work left shoulder seam, then right shoulder seam.

### Step 4: Side Seams
Lay the front and back flat with their right sides facing each other (if you can identify one side as "prettier," place those sides together). Pin the side seams together, matching the cast-on edges and the armhole bind-off edges.

Using mattress stitch and a tapestry needle threaded with matching yarn, seam up both side seams from the hem to the armhole bind-off edge. Leave the armhole open.

**Mattress stitch in garter stitch:** Insert needle under the top loop of a garter "bump" on the front piece, then under the top loop of the corresponding garter bump on the back piece. Pull yarn through gently. Continue alternating sides, pulling yarn snug every few stitches to close the seam without puckering.

### Step 5: Sleeve Seams
Fold each sleeve in half lengthwise. Seam the short side edges together using mattress stitch to form a tube. You will have a tube 3 inches long and approximately 5 (6, 6, 7, 7) inches in circumference.

### Step 6: Set In Sleeves
With the dress inside out (wrong sides facing out), insert one sleeve into one armhole opening, right sides together. The sleeve seam should align with the side seam of the dress. The bound-off edge of the sleeve should align with the straight armhole edge on the dress.

Pin the sleeve into the armhole, distributing the sleeve fabric evenly around the armhole. Using mattress stitch or whip stitch, seam the sleeve to the armhole opening all the way around.

Repeat for the second sleeve.

### Step 7: Final Weave-In and Blocking
Turn the dress right side out. Weave in any remaining yarn tails from seaming. Wet-block the finished dress laid flat to final measurements. Allow to dry fully before wearing.

---

## Schematic

```
BACK / FRONT (identical)
┌─────────────────────────┐  ← shoulder bind-off
│  Shoulder │  Neck  │ Shoulder │
│           │ (BO'd) │         │  ← 2 in neckline depth
│◄── 18 ──►│◄─ 23 ─►│◄─ 18 ──►│  (XS stitch counts shown)
├───────────────────────────┤
│                           │  ← armhole depth
│                           │  7 (7, 7.5, 8, 8.5) in
├──┘                   └───┤  ← armhole BO (9 sts each side)
│                           │
│                           │  Body:
│                           │  33 (33, 33, 32.5, 32) in
│                           │
│                           │
└───────────────────────────┘  ← cast-on (hem)
  77 (81, 90, 99, 108) sts
  ≈ 17 (18, 20, 22, 24) in

SLEEVE
┌──────────────────────────┐  ← bind-off (attach to armhole)
│                          │
│       3 inches           │
│      (27 rows)           │
│                          │
└──────────────────────────┘  ← cast-on
  45 (54, 54, 63, 63) sts
  = 10 (12, 12, 14, 14) in
```

---

## Quick Reference — Stitch Counts by Size

| Section | XS | S | M | L | XL |
|---|---|---|---|---|---|
| Body CO | 77 | 81 | 90 | 99 | 108 |
| After armhole BO | 59 | 63 | 72 | 81 | 88 |
| Neck BO (center) | 23 | 25 | 30 | 33 | 34 |
| Each shoulder | 18 | 19 | 21 | 24 | 27 |
| Sleeve CO | 45 | 54 | 54 | 63 | 63 |

---

## Care Instructions

Refer to your yarn label for specific care. General guidelines:
- **Cotton/cotton-blend:** Machine wash cold, gentle cycle. Lay flat to dry.
- **Wool/wool-blend:** Hand wash in cool water with wool wash. Do not wring. Lay flat to dry.
- **Acrylic:** Machine wash cold, gentle cycle. Lay flat to dry or tumble dry on low.
- **Store** the finished dress folded flat rather than hung, as knits can stretch out of shape on hangers.

---

*Pattern designed for personal use. Please do not sell this pattern or items made from it for commercial purposes without permission.*
Disclaimer: This pattern was generated by AI and should be reviewed for accuracy before use. While we strive for quality, AI-generated content may contain errors. Please verify measurements, stitch counts, and instructions before beginning your project. Generated by purlJam.uk
Access your pattern anytime
Bookmark this page to access your pattern anytime