Type
Crochet
Difficulty
beginner
Category
blanket
AI Thinking Process
Planning
Verification
Pattern
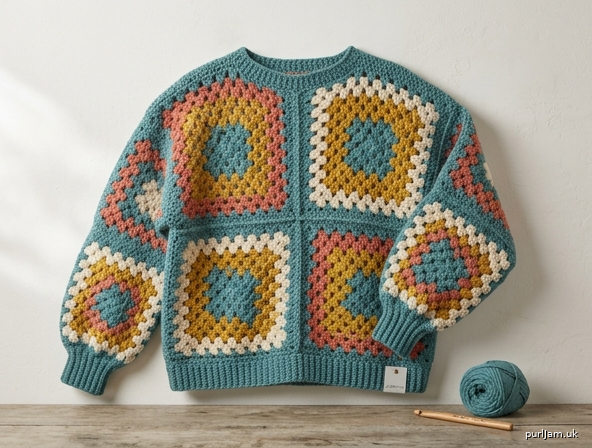
Giant Granny Square Jumper
A boxy, drop-shoulder pullover made from four giant granny squares: two for the body and two for the sleeves. Classic granny stitch, worsted-weight yarn, and whip-stitch assembly. Designed for an easy, vintage silhouette with generous ease.
Skill level: Easy
Terminology: US crochet terms throughout
Sizes
XS (S, M, L, XL, 2X, 3X)
Shown in size M. Instructions are written for the smallest size, with larger sizes in parentheses. When only one number is given, it applies to all sizes.
To fit bust: 32 (36, 40, 44, 48, 52, 56)" (81.5 [91.5, 101.5, 112, 122, 132, 142] cm)
Choose the size closest to your actual bust plus the ease you want. This jumper is designed with about 4–8" (10–20 cm) of positive ease and a square, drop-shoulder fit.
Finished Measurements (blocked)
- Bust: 36 (40, 44, 48, 52, 56, 60)" (91.5 [101.5, 112, 122, 132, 142, 152.5] cm)
(2 × 18 [20, 22, 24, 26, 28, 30]" body width = 36 [40, 44, 48, 52, 56, 60]" ✓) - Length (shoulder to hem, including hem band): 19½ (21½, 23½, 25½, 27½, 29½, 31½)" (49.5 [54.5, 59.5, 65, 70, 75, 80] cm)
- Body square: 18 (20, 22, 24, 26, 28, 30)" (45.5 [51, 56, 61, 66, 71, 76] cm) each side
- Sleeve square: 16 (17, 18, 18, 19, 20, 21)" (40.5 [43, 45.5, 45.5, 48.5, 51, 53.5] cm) each side
- Upper arm circumference: 16 (17, 18, 18, 19, 20, 21)" (40.5 [43, 45.5, 45.5, 48.5, 51, 53.5] cm)
- Armhole depth: 8 (8½, 9, 9, 9½, 10, 10½)" (20.5 [21.5, 23, 23, 24, 25.5, 26.5] cm)
(sleeve side ÷ 2 = 16÷2=8, 17÷2=8.5, 18÷2=9, 18÷2=9, 19÷2=9.5, 20÷2=10, 21÷2=10.5 ✓) - Shoulder width (each): 4 (4¾, 5½, 6¼, 7, 8, 9)" (10 [12, 14, 16, 18, 20.5, 23] cm)
- Neck opening width (before edging): 10 (10½, 11, 11½, 12, 12, 12)" (25.5 [26.5, 28, 29, 30.5, 30.5, 30.5] cm)
(shoulder + neck + shoulder = body width: 4+10+4=18, 4.75+10.5+4.75=20, 5.5+11+5.5=22, 6.25+11.5+6.25=24, 7+12+7=26, 8+12+8=28, 9+12+9=30 ✓) - Cuff circumference (ribbed band): 8 (8½, 9, 9½, 10, 10½, 11)" (20.5 [21.5, 23, 24, 25.5, 26.5, 28] cm)
- Cuff / hem band depth: about 1½" (4 cm)
- Sleeve length from body edge, including cuff: 17½ (18½, 19½, 19½, 20½, 21½, 22½)" (44.5 [47, 49.5, 49.5, 52, 54.5, 57] cm)
The body is a true square, so garment length matches body width before the hem is added. Smaller sizes read slightly cropped; larger sizes read longer. See Pattern Notes for an optional length tweak.
Materials
Yarn: Worsted weight (category 4), 900 (1050, 1200, 1400, 1600, 1800, 2000) yd / 825 (960, 1100, 1280, 1460, 1645, 1830) m total.
A smooth wool, acrylic, or wool-blend worsted shows the granny clusters clearly and drapes well for a jumper.
Color options
- Solid: use one color throughout.
- Classic granny (4 colors): Color A (main — last round of every square, plus all finishing) 360 (420, 480, 560, 640, 720, 800) yd / 330 (385, 440, 510, 585, 660, 730) m; Colors B, C, and D 180 (210, 240, 280, 320, 360, 400) yd / 165 (190, 220, 255, 295, 330, 365) m each.
(A + B + C + D = 360+180+180+180 = 900 yd for XS; 800+400+400+400 = 2000 yd for 3X ✓)
Hooks
- US I/9 (5.5 mm), or size needed to obtain gauge, for the squares
- US H/8 (5 mm) for hem, neck, and cuffs
Notions
- Yarn needle
- 8 stitch markers
- Measuring tape
- Scissors
- Blocking mats and pins (or wires)
Gauge
Blocked granny square: 4 rounds = 6 × 6" (15 × 15 cm) with US I/9 (5.5 mm)
Each additional round adds about 1½" (4 cm) to the total width of the square (about ¾" / 2 cm per side).
Gauge affects drape and yardage. Because the squares are worked to measurement, a small gauge difference will not change the finished size, but it will change how many rounds you work and how much yarn you use. If your 4-round swatch is larger than 6", go down a hook size; if it is smaller, go up a hook size.
Abbreviations (US)
- beg — beginning
- BLO — back loop only
- ch — chain
- dc — double crochet
- pm — place marker
- rep — repeat
- rnd(s) — round(s)
- RS — right side
- sc — single crochet
- sc2tog — single crochet 2 stitches together (decrease)
- sk — skip
- sl st — slip stitch
- sp(s) — space(s)
- st(s) — stitch(es)
- WS — wrong side
Pattern Notes
- Ch 3 at the start of a round counts as 1 dc.
- Join each round with a sl st to the top of the beginning ch-3 unless otherwise stated.
- The first corner of each new round is worked in the same ch-2 corner space where you joined.
- Change color at the join if you like: finish the last yarn over of the joining sl st with the new color, or fasten off and join the new color in any ch-2 corner.
- Work over yarn tails for a few stitches, then weave in remaining ends after blocking.
- Block all four squares to the stated measurements before joining. Granny squares relax and even out with blocking; seaming unblocked squares will distort the jumper.
- The last round of every square should be the same color (Color A if using leftovers) so the seams and edges look unified.
- Join-as-you-go is excellent for blankets, but this jumper is assembled in three dimensions from squares of two different sizes. Whip stitch after blocking is the joining method used here.
Optional extra body length: If you want a longer jumper without widening the bust, complete the body square to the target width, then work extra rows of granny stitch across the bottom edge only (turn at each end: corner, side clusters, corner). Add the same number of extra rows to front and back. Sleeve placement is unchanged because it is measured down from the shoulder.
Special Stitch
Granny cluster: 3 dc in the same space. Written out as “3 dc” in the instructions.
Traditional corner: (3 dc, ch 2, 3 dc) in a ch-2 space.
Instructions
Giant Granny Square (make 4)
Make 2 body squares and 2 sleeve squares. All four start the same way. Stop when each square reaches its target measurement.
Foundation
With larger hook and Color A (or any color), ch 4. Sl st in first ch to form a ring.
(Alternatively, make a magic ring. Ch-4 is easier and fully secure.)
Round 1
Ch 3 (counts as dc here and throughout), 2 dc in ring, ch 2, (3 dc in ring, ch 2) 3 times, sl st in top of beg ch-3.
4 clusters, 4 corner ch-2 sps (4 × 1 = 4 clusters ✓).
Fasten off if changing color.
Round 2
Join next color (or continue) with sl st in any ch-2 corner sp. Ch 3, 2 dc in same sp, ch 2, 3 dc in same sp (first corner), ch 1, *(3 dc, ch 2, 3 dc) in next ch-2 sp, ch 1; rep from * 2 more times, sl st in top of beg ch-3.
2 clusters per side, 8 clusters total (4 × 2 = 8 ✓).
Round 3
Sl st in each st to the next ch-2 corner sp (or fasten off and rejoin in a corner). Ch 3, 2 dc in same sp, ch 2, 3 dc in same sp, ch 1, 3 dc in next ch-1 sp, ch 1, *(3 dc, ch 2, 3 dc) in next ch-2 sp, ch 1, 3 dc in next ch-1 sp, ch 1; rep from * 2 more times, sl st in top of beg ch-3.
3 clusters per side, 12 clusters total (4 × 3 = 12 ✓).
Round 4 and all following rounds
Sl st to the next ch-2 corner sp. Ch 3, 2 dc in same sp, ch 2, 3 dc in same sp, ch 1, *3 dc in next ch-1 sp, ch 1; rep from * to next corner, (3 dc, ch 2, 3 dc) in corner ch-2 sp, ch 1; continue this way around, working (3 dc, ch 2, 3 dc, ch 1) in every corner and (3 dc, ch 1) in every side ch-1 sp. Join with sl st in top of beg ch-3.
Each round adds 1 cluster to each side.
After rnd n you will have n clusters per side and 4n clusters total (rnd 5: 5 per side, 4 × 5 = 20 ✓; rnd 8: 8 per side, 4 × 8 = 32 ✓).
Change color every round, every 2 rounds, or work solid, as you prefer. Work the final round of every square in Color A.
Body Squares (make 2)
Continue working in pattern until the square measures 18 (20, 22, 24, 26, 28, 30)" (45.5 [51, 56, 61, 66, 71, 76] cm) across, blocked or gently patted flat and measured through the center, edge to edge.
Approximate rounds at given gauge: 12 (13, 15, 16, 17, 19, 20)
(12 × 1.5" = 18", 16 × 1.5" = 24", 20 × 1.5" = 30" ✓ — use the tape measure as the authority, not the round count.)
Fasten off, leaving a 24" (61 cm) tail if you want to seam with the same yarn; otherwise leave a 6" (15 cm) tail and seam with Color A later.
Sleeve Squares (make 2)
Work as for the body squares until the square measures 16 (17, 18, 18, 19, 20, 21)" (40.5 [43, 45.5, 45.5, 48.5, 51, 53.5] cm) across.
Approximate rounds at given gauge: 11 (11, 12, 12, 13, 13, 14)
Fasten off as for the body squares.
Block
Weave in ends that will be trapped inside clusters. Pin each square to its target size, keeping corners at 90 degrees and sides straight. Spray-block or wet-block and let dry completely.
You should have:
- 2 body squares at 18 (20, 22, 24, 26, 28, 30)"
- 2 sleeve squares at 16 (17, 18, 18, 19, 20, 21)"
Assembly
Use Color A and a yarn needle. Whip stitch through the back loops of the dc stitches (and through one loop of each ch) for a flat, flexible seam. Work with RS together so the seam sits on the WS. Keep the seam relaxed — granny fabric should not be cinched.
1. Shoulder seams
Lay Front and Back together, RS facing, matching the top edges.
On the top edge of each piece, measure in from the left corner 4 (4¾, 5½, 6¼, 7, 8, 9)" (10 [12, 14, 16, 18, 20.5, 23] cm) and pm. Repeat from the right corner.
The unmarked center between markers is the neck: 10 (10½, 11, 11½, 12, 12, 12)" (25.5 [26.5, 28, 29, 30.5, 30.5, 30.5] cm).
Whip stitch the two marked shoulder sections only. Do not sew the neck.
2. Place sleeve markers on the body
Spread the joined Front and Back open, RS up, so the shoulder seams run across the top.
On the right side edge (Front + Back treated as one continuous side), measure down from the shoulder seam 8 (8½, 9, 9, 9½, 10, 10½)" (20.5 [21.5, 23, 23, 24, 25.5, 26.5] cm) on the Front and the same distance on the Back. Pm at both points. These two markers are the armhole opening; the distance between them along the edge equals the sleeve-square side:
8 + 8 = 16, 8.5+8.5=17, 9+9=18, 9.5+9.5=19, 10+10=20, 10.5+10.5=21 ✓.
Repeat on the left side edge.
3. Attach sleeves
Take one sleeve square. Pm at the midpoint of one side (the side that will be sewn to the body). That midpoint matches the shoulder seam.
Pin that sleeve edge to the body armhole, matching:
- sleeve midpoint → shoulder seam
- sleeve corners → the two armhole markers
Whip stitch this edge in place. Repeat for the second sleeve on the other side.
4. Side and underarm seams
Fold the jumper RS together along the shoulder line so Front and Back align, and each sleeve square folds into a tube.
On each side, sew one continuous seam: from the cuff edge of the sleeve, along the sleeve (underarm), through the underarm join, and down the body side to the hem.
Try the jumper on before fastening off the last few inches of each side seam if you want to tweak body length or hip ease; then finish the seams.
Finishing
Switch to the smaller hook (US H/8 / 5 mm) and Color A. All edging is worked with RS facing.
Hem
Join yarn at one side seam on the bottom edge.
Rnd 1: Ch 1, sc evenly around the entire hem. Work 2 sc in each ch-2 corner leftover from the original squares so the hem stays flat, and about 1 sc in each dc and 1 sc in each ch-1 sp along the sides. Join with sl st to first sc.
Aim for 144 (160, 176, 192, 208, 224, 240) sc — that is 4 sc per inch around the finished bust
(36 × 4 = 144, 40 × 4 = 160, 44 × 4 = 176, 48 × 4 = 192, 52 × 4 = 208, 56 × 4 = 224, 60 × 4 = 240 ✓).
Rnds 2–5: Ch 1, sc in each sc around, join.
Fasten off. Hem depth is about 1½" (4 cm). For a deeper hem, work extra rounds.
Neck edging
Join yarn at one shoulder seam on the neck opening.
Rnd 1: Ch 1, sc evenly around the neck. Work 1 sc in each dc and 1 sc in each ch along the granny edge. Join with sl st to first sc.
Aim for 80 (84, 88, 92, 96, 96, 96) sc — about 4 sc per inch around the neck circumference
(neck width × 2 = 20 [21, 22, 23, 24, 24, 24]" circumference; 20 × 4 = 80, 21 × 4 = 84, 22 × 4 = 88, 23 × 4 = 92, 24 × 4 = 96 ✓).
Rnd 2: Ch 1, sc in each sc around, join.
Rnd 3: Ch 1, sc in each sc around, join.
Fasten off.
For a slightly closer neck, on Rnds 2 and 3 work sc2tog at each of the two shoulder-seam points (2 decreases per rnd × 2 rnds = 4 sts removed ✓).
Cuffs (make 2)
The sleeve opening is 16 (17, 18, 18, 19, 20, 21)" around — too wide for a wrist. Each cuff is a short ribbed band. The extra sleeve fabric is eased in when you sew the band on.
Ribbed band
With smaller hook and Color A, ch 7.
Row 1: Sc in 2nd ch from hook and in each ch across — 6 sc. Turn.
Row 2: Ch 1, sc BLO in each sc across — 6 sc. Turn.
Repeat Row 2 until the band measures 8 (8½, 9, 9½, 10, 10½, 11)" (20.5 [21.5, 23, 24, 25.5, 26.5, 28] cm) when slightly stretched. Do not fasten off until you have checked the fit around your wrist; add or remove rows so the band is snug but comfortable.
Fasten off, leaving a 12" (30.5 cm) tail. Whip stitch the two short ends together to form a ring.
Attach cuff to sleeve
Turn the jumper WS out (or work from the WS of the sleeve edge). Pin the cuff ring to the sleeve opening, matching the cuff seam to the underarm seam. The sleeve edge is longer than the cuff; distribute the extra fabric evenly all the way around (pin at quarter points first: underarm, opposite point, and two midpoints).
Whip stitch the cuff to the sleeve, taking one stitch in the cuff edge for every stitch you need on the sleeve side, easing the extra granny fabric in as you go. Do not let gathers bunch in one spot.
Repeat for the second cuff.
Final Finishing
- Weave in every remaining end on the WS.
- Steam-block the seams and edgings lightly, or spritz and pat them flat. Do not stretch the ribbed cuffs.
- If a corner pokes at the underarm, tack it down on the WS with a couple of stitches in Color A.
Color-Change Guide (optional)
A simple four-color stripe that reads as classic granny:
| Rounds | Color |
|---|---|
| 1, 5, 9, 13, 17 | A |
| 2, 6, 10, 14, 18 | B |
| 3, 7, 11, 15, 19 | C |
| 4, 8, 12, 16, 20 | D |
Always work the last round of each square in A, even if that breaks the stripe, so seams and edges match.
For a color-block jumper, work each square in one color and use A only for joining and finishing.
Fit Notes
- Drop shoulder: The shoulder seam sits off the natural shoulder. Sleeve length is measured from the side of the body, not from the collar.
- Boxy body: There is no waist shaping. Side seams are straight.
- Head opening: The neck is a wide, easy pullover opening. If it feels too wide after Rnd 1 of the neck edging, add sc2tog at the shoulders as described.
- Length: Small sizes are cropped; large sizes are longer, because the body is a square. Use the optional extra granny rows at the bottom of both body squares if you want more coverage on XS–M.
Care
Follow the ball-band for your yarn. Most worsted acrylics are machine wash cold, tumble low. Wool blends: hand wash, lay flat to dry. Reshape the squares while damp if the jumper is washed.
End of pattern.
Disclaimer: This pattern was generated by AI and should be reviewed for accuracy before use. While we strive for quality, AI-generated content may contain errors. Please verify measurements, stitch counts, charts, and instructions before beginning your project. Generated by purlJam.uk
Love this pattern?
Save this pattern to your free PurlJam libraryAccess your pattern anytime
Bookmark this page to access your pattern anytime