Type
Knitting
Difficulty
advanced
Category
pillow
AI Thinking Process
Planning
1. **Design Strategy**: A beginner-friendly stockinette pillow knitted flat in one piece (front), worked in worsted weight on 5mm needles. Colourwork done via intarsia for the three university letters in diamonds, plus name "Ella" and year "2026" in contrast colour using duplicate stitch for beginner accessibility.
2. **Construction Plan**: Knit front panel flat in stockinette with intarsia diamonds; knit plain back panel; seam three sides, insert pillow form, seam closed.
3. **Quality Assurance**:
- Tension critical so finished pillow fits a standard 40cm cushion form.
- Intarsia colour management — bobbins recommended to avoid tangling.
- Duplicate stitch over knitted fabric for fine script (Ella) and small numbers (2026) — easier than knitting them in.
4. **Final Calculations**:
- Tension: 18 sts × 24 rows = 10 cm in stockinette.
- Finished pillow: 40 cm × 40 cm.
- Cast on: 72 sts; work 96 rows.
- Three diamonds across centre, each ~20 sts wide × 24 rows tall.
- Back panel identical: 72 sts × 96 rows.
Verification
1. **Completeness**: Title, materials, tension, abbreviations, notes, instructions, attached chart reference, finishing — all included.
2. **Consistency**: 72 sts ÷ 18 sts/10cm = 40 cm ✓. 96 rows ÷ 24 rows/10cm = 40 cm ✓.
3. **Constraints**: Three letters in diamonds in school colours ✓; "Ella" top-left in script (duplicate stitch) ✓; "2026" (duplicate stitch) ✓; beginner level ✓; attached chart referenced, not reproduced ✓.
4. **Safety**: Math verified; intarsia simplified by using duplicate stitch for fine detail.
Pattern
# Graduation Memory Pillow

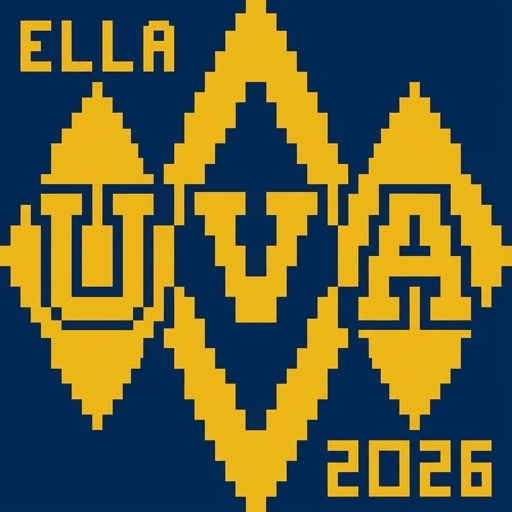
A keepsake cushion cover celebrating your graduate. Three university letters sit proudly in diamond panels across the centre in school colours, with the graduate's name "Ella" tucked into the top-left corner in delicate script, and the year "2026" balancing the design. Worked flat in simple stockinette with beginner-friendly colourwork techniques.

---

## Finished Measurements
- 40 cm × 40 cm (approximately 16" × 16")
- Fits a standard 40 cm cushion insert

---

## Materials

**Yarn** (worsted weight / Aran, approx. 180 m per 100 g):
- **MC (Main Colour)** — cream, oatmeal, or neutral of choice: 200 g (approx. 360 m)
- **CC1 (School Colour 1)** — primary school colour: 50 g (approx. 90 m)
- **CC2 (School Colour 2)** — secondary school colour (if applicable, for letter outlines/second letter): 30 g (approx. 55 m)
- **CC3 (Script Colour)** — for "Ella" and "2026", choose a contrast that reads well on MC: 20 g (approx. 35 m)

*Note: If all three letters share the same school colour, you only need one CC for the letters. Adjust quantities accordingly.*

**Needles**:
- 5 mm (UK 6 / US 8) straight or circular needles, or size needed to obtain tension

**Notions**:
- Yarn bobbins (3–5) for intarsia
- Tapestry needle
- Stitch markers (optional)
- 40 cm square cushion insert
- Sharp scissors
- Removable stitch markers or pins

---

## Tension (Gauge)

**18 sts × 24 rows = 10 cm** measured over stockinette stitch on 5 mm needles, after light blocking.

*Take time to check your tension — it determines the finished size.*

---

## Abbreviations

- **k** — knit
- **p** — purl
- **st(s)** — stitch(es)
- **RS** — right side
- **WS** — wrong side
- **MC** — main colour
- **CC** — contrast colour
- **rep** — repeat
- **st st** — stocking stitch (stockinette: k on RS, p on WS)

---

## Pattern Notes

- The **front panel** is worked flat in stocking stitch. The three university letters are worked using **intarsia** (separate bobbins of yarn for each colour block) — this is the only "tricky" part, but it's beginner-friendly when broken into small areas.
- The **name "Ella"** and the **year "2026"** are added using **duplicate stitch (Swiss darning)** AFTER the knitting is complete. This is the easiest way to add fine lettering and is highly recommended for beginners.
- The **back panel** is plain stocking stitch.
- When changing colours in intarsia, always bring the new colour up from underneath the old colour to twist the yarns and avoid holes.
- Read the attached stitch chart from the bottom up, right to left on WS rows and left to right on RS rows (see section below).

---

## Attached Stitch Chart

A separate **attached chart panel** accompanies this pattern and shows the full 72-stitch × 96-row front design, including:
- The three diamond outlines with university letters centred inside
- Placement guides (shown as outlined squares) for "Ella" in the top-left corner
- Placement guides for "2026"

**Where to find it**: The chart is provided as a separate visual asset alongside this pattern. Refer to it whenever the instructions say "follow the attached chart."

**How to read the chart**:
- Each square = 1 stitch; each row of squares = 1 row of knitting.
- Begin at the **bottom-right corner** of the chart (row 1, stitch 1).
- **RS (odd-numbered) rows**: read the chart from **right to left** and knit the stitches.
- **WS (even-numbered) rows**: read the chart from **left to right** and purl the stitches.
- Each colour on the chart corresponds to MC, CC1, CC2 as labelled in the chart key.
- The areas marked for "Ella" and "2026" are outlined only — these are **placement guides** for duplicate stitch added later. Knit those stitches in MC.

**Colour/yarn management**:
- Wind a small bobbin for each colour block (one bobbin per diamond is plenty).
- When the chart shows a colour change, drop the old colour, pick up the new colour from underneath to twist the strands.
- Carry MC across the back behind each diamond — do NOT strand CC across the back; use separate bobbins.

**Stitch-count math around the chart**: The chart is 72 sts wide × 96 rows tall, matching the cast-on count and total rows exactly. No additional edge stitches are added — the chart fills the full panel.

---

## Instructions

### Front Panel

**With MC, cast on 72 sts.**

**Rows 1–6 (border):** Beginning with a knit row, work 6 rows in st st (k 1 row, p 1 row, alternating). *6 rows complete.*

**Rows 7–96 (main chart):** Continue in st st, following the attached chart for colour placement.
- RS rows (odd): knit, reading chart right to left.
- WS rows (even): purl, reading chart left to right.
- Use intarsia for the three diamond/letter motifs. Leave the "Ella" and "2026" placement areas in MC — these are added later in duplicate stitch.

After row 96, you have worked 96 rows total. *Stitch count: 72 sts.*

**Cast off** all 72 sts knitwise on a RS row, loosely.

**Verify**: 72 sts ÷ 18 sts per 10 cm = 40 cm wide ✓. 96 rows ÷ 24 rows per 10 cm = 40 cm tall ✓.

---

### Back Panel

**With MC, cast on 72 sts.**

Work 96 rows in st st (beginning with a knit row, ending with a purl row).

**Cast off** all 72 sts knitwise, loosely.

---

### Duplicate Stitch: "Ella" and "2026"

Once both panels are knitted and lightly blocked:

1. Thread CC3 onto a tapestry needle.
2. Using the placement guides on the attached chart, work **duplicate stitch** over the marked stitches to form the script "Ella" in the top-left corner and the numerals "2026" (placed as shown on the chart — typically lower-right or beneath the diamonds).
3. **Duplicate stitch method**: bring the needle up from the back at the base of a knit V, pass it behind both legs of the V above, then back down through the base where you started. Each duplicate stitch covers one knitted stitch exactly.
4. Work slowly and check each stitch against the chart placement before moving on.

*Tip for beginners*: Lightly pencil or pin-mark the corners of the lettering area on your knitted fabric before starting duplicate stitch — it keeps the lettering aligned.

---

## Finishing

1. **Weave in all ends** on the WS using a tapestry needle, working ends into same-colour areas where possible.
2. **Block both panels** to 40 cm × 40 cm. Pin to a blocking mat, mist with water (or wet-block per yarn label), and allow to dry fully.
3. **Seam the pillow**:
   - Place front and back panels with RS together.
   - Using MC and a tapestry needle, mattress stitch or whip stitch three sides closed (bottom and both sides).
   - Turn RS out through the open top.
4. **Insert the 40 cm cushion pad**.
5. **Close the top seam**:
   - Turn the raw edges in and mattress stitch the opening closed from the RS for an invisible finish.
   - Alternatively, sew on 3 buttons with corresponding loops for a removable cover.
6. **Final press**: gently steam any puckered colourwork areas on the WS to relax the fabric.

---

## Care

Hand wash cold, lay flat to dry. Do not tumble dry. Store flat or lightly folded.

---

**Congratulations to Ella, Class of 2026!** 🎓
Disclaimer: This pattern was generated by AI and should be reviewed for accuracy before use. While we strive for quality, AI-generated content may contain errors. Please verify measurements, stitch counts, and instructions before beginning your project. Generated by purlJam.uk
Access your pattern anytime
Bookmark this page to access your pattern anytime