Type
Crochet
Difficulty
intermediate
Category
tank
AI Thinking Process
Planning
Verification
Pattern
Granny Square Shirt Tank
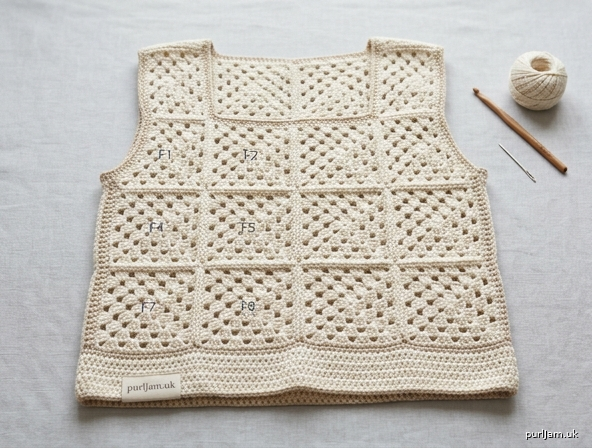
A sleeveless, shirt-like tank built from classic granny squares. Straight body, square neck, and wide seamed shoulders. The fabric is open (see-through); wear over a cami or sew in a lining if you want opacity.
Construction: Route A, modular — Front and Back panels of blocked granny squares, seamed at sides and shoulders, finished with a short hem band and single-crochet edging.
Difficulty: Intermediate (confident beginners who can make even granny squares, block to size, and seam neatly will succeed).
Sizes
XS (S, M, L, XL, XXL)
Shown in the pattern as: XS (S, M, L, XL, XXL)
To choose a size: Granny fabric has almost no stretch. Pick the finished bust closest to your actual bust + 1–3 in (2.5–7.5 cm). If you are between sizes, size up.
Finished measurements (blocked)
| XS | S | M | L | XL | XXL | |
|---|---|---|---|---|---|---|
| Bust | 33 in (84 cm) | 36 in (91.5 cm) | 40½ in (103 cm) | 45 in (114.5 cm) | 48 in (122 cm) | 52½ in (133.5 cm) |
| Square size | 5½ in (14 cm) | 6 in (15 cm) | 6¾ in (17 cm) | 7½ in (19 cm) | 8 in (20.5 cm) | 8¾ in (22 cm) |
| Front/back width | 16½ in (42 cm) | 18 in (45.5 cm) | 20¼ in (51.5 cm) | 22½ in (57 cm) | 24 in (61 cm) | 26¼ in (66.5 cm) |
| Length, shoulder to hem | 18 in (45.5 cm) | 19½ in (49.5 cm) | 21¾ in (55 cm) | 24 in (61 cm) | 25½ in (65 cm) | 27¾ in (70.5 cm) |
| Armhole depth | 7½ in (19 cm) | 8 in (20.5 cm) | 8½ in (21.5 cm) | 9 in (23 cm) | 9½ in (24 cm) | 10 in (25.5 cm) |
| Square-neck width | 5½ in (14 cm) | 6 in (15 cm) | 6¾ in (17 cm) | 7½ in (19 cm) | 8 in (20.5 cm) | 8¾ in (22 cm) |
| Front neck drop | 5½ in (14 cm) | 6 in (15 cm) | 6¾ in (17 cm) | 7½ in (19 cm) | 8 in (20.5 cm) | 8¾ in (22 cm) |
| Shoulder / strap width | 5½ in (14 cm) | 6 in (15 cm) | 6¾ in (17 cm) | 7½ in (19 cm) | 8 in (20.5 cm) | 8¾ in (22 cm) |
Ease: about 1–3 in (2.5–7.5 cm) positive ease (standard to slightly relaxed). Bust check: 6 × square size = 6 × 5½ (6, 6¾, 7½, 8, 8¾) in = 33 (36, 40½, 45, 48, 52½) in ✓
Length is a standard tank on smaller sizes and a longer, shirt-like hem on XL–XXL. For a crop, omit the hem band.
Materials
Yarn: Worsted weight (4), cotton or cotton blend (breathable; best for a summer shirt). Acrylic works but is less cool.
Yardage: 750 (900, 1100, 1300, 1500, 1800) yd / 685 (825, 1005, 1190, 1370, 1645) m
Approximately 4 (5, 6, 7, 8, 9) skeins of 200 yd / 183 m worsted.
Color plan (pick one):
- Shirt (recommended): one main color (MC) for every square; optional contrast (CC) for joining and edging.
- Classic granny: change color each round; join and edge in MC.
- Scrappy: leftover worsted for the squares; join and edge in one unifying MC.
Hook: US H/8 (5 mm), or size needed to obtain gauge. Optional US G/6 (4 mm) for a firmer edging.
Notions: Stitch markers (removable), tapestry needle, scissors, blocking pins and mats, tape measure.
Gauge
Blocked classic granny square, 4 rounds: 4½ × 4½ in (11.5 × 11.5 cm) with US H/8 (5 mm).
This 4-round square is your swatch. Make one, wet-block, and measure.
- Larger than 4½ in (11.5 cm) → go down a hook size.
- Smaller than 4½ in (11.5 cm) → go up a hook size.
Then keep that hook and work extra rounds until each square matches the Square size for your size (see table). All 17 squares must be the same measurement after blocking.
Abbreviations (US terms)
| Abbr. | Meaning |
|---|---|
| ch | chain |
| sl st | slip stitch |
| sc | single crochet |
| hdc | half double crochet |
| dc | double crochet |
| sc BLO | single crochet in back loop only |
| sp | space |
| st(s) | stitch(es) |
| rnd(s) | round(s) |
| rep | repeat |
| beg | beginning |
| RS | right side |
| WS | wrong side |
Stitch guide
Classic granny corner: (3 dc, ch 2, 3 dc) in the same ch-2 sp.
Classic granny side group: 3 dc in the next ch-1 sp.
Join yarn with a sl st unless stated otherwise.
Pattern notes
- Instructions are for XS (S, M, L, XL, XXL). When one number is given, it applies to all sizes.
- Ch 3 at the start of a granny round counts as 1 dc.
- Ch 2 at the start of the hem counts as 1 hdc.
- The body is a straight rectangle — no waist shaping — so it hangs like a sleeveless shirt.
- Block every square to size before joining. Do not skip this.
- The fabric is open and see-through. Plan a lining, a cami, or a bralette underneath.
- Length is easy to change: add or omit hem-band rows, or add one more granny round to every square (that also adds 6 in / 15 cm to the bust — only do this if you want a roomier shirt).
- Weave ends along solid 3-dc groups, never across a ch-sp.
Granny Square
Make 17 identical squares.
Leave a 12 in (30.5 cm) tail on the last round if you will sew the joins; fasten off short if you prefer a slip-stitch join with a new strand.
Begin
Make a magic ring,
or ch 4, sl st in first ch to form a ring.
Rnd 1: Ch 3 (counts as dc here and throughout), 2 dc in ring, ch 2, (3 dc in ring, ch 2) 3 times, sl st in top of beg ch-3 to join.
4 groups of 3 dc, 4 ch-2 sps.
Rnd 2: Sl st in each of next 2 dc and into the next ch-2 sp. (Ch 3, 2 dc, ch 2, 3 dc) in same ch-2 sp (corner), ch 1, *(3 dc, ch 2, 3 dc) in next ch-2 sp, ch 1; rep from * 2 more times, sl st in top of beg ch-3.
8 groups of 3 dc, 4 ch-2 sps, 4 ch-1 sps.
Rnd 3: Sl st in each of next 2 dc and into the next ch-2 sp. (Ch 3, 2 dc, ch 2, 3 dc) in same ch-2 sp, ch 1, 3 dc in next ch-1 sp, ch 1, *(3 dc, ch 2, 3 dc) in next ch-2 sp, ch 1, 3 dc in next ch-1 sp, ch 1; rep from * 2 more times, sl st in top of beg ch-3.
12 groups of 3 dc.
Rnd 4: Sl st in each of next 2 dc and into the next ch-2 sp. (Ch 3, 2 dc, ch 2, 3 dc) in same ch-2 sp, ch 1, (3 dc in next ch-1 sp, ch 1) twice, *(3 dc, ch 2, 3 dc) in next ch-2 sp, ch 1, (3 dc in next ch-1 sp, ch 1) twice; rep from * 2 more times, sl st in top of beg ch-3.
16 groups of 3 dc.
Square should measure 4½ in (11.5 cm) blocked. This is gauge.
Continue to size
Rnd 5 and all following rnds: Sl st to the next ch-2 sp. (Ch 3, 2 dc, ch 2, 3 dc) in same ch-2 sp, ch 1, *3 dc in next ch-1 sp, ch 1; rep from * to next corner, **(3 dc, ch 2, 3 dc) in next ch-2 sp, ch 1, *3 dc in next ch-1 sp, ch 1; rep from * to next corner; rep from ** around, sl st in top of beg ch-3.
Each round adds 4 groups of 3 dc (one extra group per side).
Work even rounds until the unblocked square is about ¼ in (6 mm) smaller than your target, then fasten off. Wet-block to the exact Square size:
5½ (6, 6¾, 7½, 8, 8¾) in / 14 (15, 17, 19, 20.5, 22) cm.
Typical round counts at this gauge (yours may differ by ±1; the tape measure wins):
- XS: 5 rnds → 5½ in (14 cm)
- S: 5–6 rnds → 6 in (15 cm)
- M: 6 rnds → 6¾ in (17 cm)
- L: 7 rnds → 7½ in (19 cm)
- XL: 7–8 rnds → 8 in (20.5 cm)
- XXL: 8 rnds → 8¾ in (22 cm)
If you are more than ½ in (1.5 cm) short after blocking, add one more round and re-block. All 17 squares must match.
Block
Wet-block every square. Pin each one as a true square to 5½ (6, 6¾, 7½, 8, 8¾) in, square the corners, and let dry fully. Do not join unblocked squares.
Layout
Lay squares RS up.
FRONT (8 squares)                 BACK (9 squares)

[ F7 ]   neck    [ F8 ]           [ B7 ] [ B8 ] [ B9 ]
[ F4 ] [ F5 ] [ F6 ]              [ B4 ] [ B5 ] [ B6 ]
[ F1 ] [ F2 ] [ F3 ]              [ B1 ] [ B2 ] [ B3 ]
        hem                               hem
- Front is 3 squares wide × 3 tall, with the center top square omitted (that hole is the square neck).
- Back is a full 3 × 3 grid (higher back neck, more shirt-like).
- Shoulder seams: F7 to B7 and F8 to B9.
- Side seams: left F1–F4–(part of F7) to B1–B4–(part of B7); right F3–F6–(part of F8) to B3–B6–(part of B9).
Check before joining:
- Front width = 3 × square = 16½ (18, 20¼, 22½, 24, 26¼) in ✓
- Back width = same ✓
- Bust = Front + Back = 33 (36, 40½, 45, 48, 52½) in ✓
Join squares into panels
Join with whip stitch or mattress stitch, edges abutting (do not overlap, or the bust will come up small). Use MC or CC. Work through the outer loops of the dc and through the ch-sps so the join lies flat.
Alternative: sl st join on the WS, one sl st in each dc and each ch.
Front
- Join F1 to F2 and F2 to F3 (bottom row).
- Join F4 to F5 and F5 to F6 (middle row).
- Join the bottom row to the middle row along the full 3-square edge.
- Join F7 on top of F4 only (left shoulder). Join F8 on top of F6 only (right shoulder).
Leave the top of F5 open — that is the bottom of the square neck.
Front = 8 squares.
Back
- Join B1–B2–B3, B4–B5–B6, and B7–B8–B9 into three rows.
- Join the three rows to each other along the full 3-square edges.
Back = 9 squares.
Weave those join tails now, running each tail along a 3-dc group.
Hem band
Worked separately on Front and Back, before side seams, so the band is included in the side seam.
With RS facing, join yarn at the bottom-right corner of the panel.
Row 1 (RS): Ch 2 (counts as hdc), work hdc evenly across the 3-square hem: 1 hdc in each dc and 1 hdc in each ch-sp, 1 hdc in each square-to-square join, and 2 hdc in each end ch-2 sp. Adjust by skipping or adding 1 hdc at the two joins so you land on:
54 (60, 66, 72, 78, 84) hdc.
(18 (20, 22, 24, 26, 28) hdc per square × 3 = 54 (60, 66, 72, 78, 84) ✓)
Rows 2–4: Ch 2, turn, hdc in each st across.
54 (60, 66, 72, 78, 84) hdc.
Fasten off. 4 rows ≈ 1½ in (4 cm).
Repeat for the other panel.
Finished length check: 3 × square + 1½ in hem = 18 (19½, 21¾, 24, 25½, 27¾) in ✓
For a crop, skip the hem band (or work only Row 1 as a tidy edge). For a longer shirt, work 2–4 extra hdc rows on both panels.
Shoulder seams
With RS together (or WS together if you prefer the seam on the inside — mattress stitch is worked from the RS with pieces flat), join the top edge of F7 to the top edge of B7, and the top edge of F8 to the top edge of B9.
Seam the full square width: 5½ (6, 6¾, 7½, 8, 8¾) in. These are the wide shirt straps.
Use mattress stitch or whip stitch. Pin first and match corners.
Side seams and armholes
Still with pieces together, pin the side edges from the hem upward.
Seam from the hem up, leaving the top open for the armhole:
Leave unseamed 7½ (8, 8½, 9, 9½, 10) in down from the shoulder seam on each side.
(Armhole depth is measured along the side edge, not along the square grid. Do not seam “one square’s worth” and hope — use the tape.)
Mark the underarm point on Front and Back with removable markers before you sew.
Seam with mattress stitch or whip stitch through the square edges and through the hem-band rows so the band is closed at the sides.
Repeat for the other side.
Try on (or measure on a dress form) before fastening off. The armhole should sit comfortably under the arm without cutting in; because the fabric does not stretch, a snug armhole will not give. If it feels tight, open another ½ in (1.5 cm) of seam.
Edging
Use MC or CC. Same hook, or drop to US G/6 (4 mm) for a firmer, more “shirt hem” finish.
Work 1 sc in each dc, 1 sc in each ch-sp, 1 sc in each seam, 2 sc in each hdc-row end, and 3 sc in each inner corner (neck corners and underarm corners) so the edging does not pull.
Neckline
With RS facing, join yarn at one shoulder seam.
Rnd 1: Sc evenly around the square neck: down the inner edge of the front shoulder square, across the top of F5, up the other front shoulder, across the back neck (top of B7–B8–B9), and back to the start. Work 3 sc in each of the two front neck corners. Sl st in first sc.
Rnd 2: Ch 1, sc in each sc around, 3 sc in each of the two front-corner sc. Sl st in first sc. Fasten off.
Do not decrease. If the neck wants to flare, use the smaller hook for Rnd 2 only.
Armholes
With RS facing, join yarn at the underarm seam.
Rnd 1: Sc evenly around the armhole, working 3 sc in the underarm corner (the top of the side seam) so it does not cup. Sl st in first sc.
Rnd 2: Ch 1, sc in each sc around, 3 sc in the underarm corner st. Sl st in first sc. Fasten off.
Repeat for the second armhole.
Hem (optional tidy pass)
If you want the hem to match the neck and arms, join yarn at a side seam and work 1 rnd sc around the entire hem, sl st to join. Fasten off.
Finishing
- Weave in every remaining end along a solid 3-dc column.
- Re-block the finished tank: pin the square neck square, pin the hem straight, and set the armholes. Light steam (hover the iron; do not crush the clusters) or wet-block again.
- If the body is too sheer, sew a woven or jersey lining to the WS along the neck, armholes, and hem, or wear a close-fitting cami the same color as the joining yarn.
Optional: higher front neck (L–XXL)
On L, XL, and XXL the omitted center square makes a deep square neck (7½ (8, 8¾) in drop). For a higher, more shirt-like neck:
After the Front squares are joined and before shoulder seams, join yarn at the inner top corner of F7. Work granny-stitch rows across the neck gap (3 dc in each ch-1 sp, (3 dc, ch 2, 3 dc) if you need to turn a corner at F5, ch 1 between groups) for 2 (—, —, 3, 4, 5) rows, ending when the remaining neck drop is about 5–6 in (12.5–15 cm). Fasten off. Then seam shoulders and edge as written.
Schematic (not to scale)
        |<- strap 5½–8¾ in ->|    neck    |<- strap ->|
        +--------------------+------------+--------------------+  ← shoulder seams
        |      F7 / B7       |            |      F8 / B9       |
        |                    |  square    |                    |  armhole
        +--------------------+   neck     +--------------------+  7½–10 in
        |         F4         |     F5     |         F6         |
        |                    |            |                    |
        |         F1         |     F2     |         F3         |
        +--------------------+------------+--------------------+
        |                   1½ in hdc hem                      |
        +------------------------------------------------------+
        |<----------- 16½ (18, 20¼, 22½, 24, 26¼) in --------->|
Back is the same width and length, with B8 filling the neck space so the back neck sits at the shoulder line.
End of pattern.
Disclaimer: This pattern was generated by AI and should be reviewed for accuracy before use. While we strive for quality, AI-generated content may contain errors. Please verify measurements, stitch counts, charts, and instructions before beginning your project. Generated by purlJam.uk
Love this pattern?
Save this pattern to your free PurlJam libraryAccess your pattern anytime
Bookmark this page to access your pattern anytime