Type
Knitting
Difficulty
intermediate
Category
custom
AI Thinking Process
Planning
Verification
Pattern
Growing Horseshoe Cable Sleeve
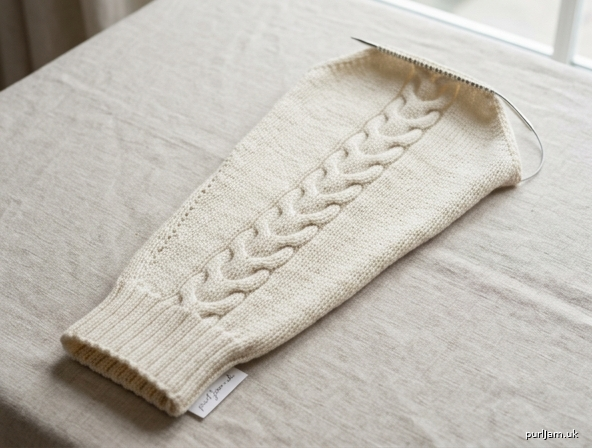
A beginner-friendly in-the-round sleeve: a 2×2 rib cuff on 40 stitches grows into stockinette with a centered 8-stitch horseshoe cable (C4B and C4F). Underarm increases take you from 40 stitches to 60 stitches over 100 rounds, ready to join a sweater body.
The cable “grows out of” the rib in a simple way: after the cuff, the two purl columns that sit inside the future 8-stitch panel are worked as knits, so K2, P2, K2, P2 becomes K8. Those 8 knits are then crossed with C4B, C4F. Everything else becomes stockinette, and all extra stitches are added at the underarm — the cable itself never changes width.
Materials
Yarn: Worsted weight (CYC 4), wool or wool-blend preferred for rib elasticity and cable definition.
- About 200 yd (183 m) per sleeve; 400 yd (366 m) for the pair.
- A smooth, light-colored yarn makes C4B/C4F easier to see while you learn.
Needles:
- US 6 / 4 mm, 16 in (40 cm) circular, DPNs, or long circular for magic loop — cuff.
- US 8 / 5 mm, same configuration — main fabric.
- If you have only one needle size, use US 8 / 5 mm throughout; the cuff will be a little looser.
Notions:
- Cable needle
- 3 stitch markers (1 unique for beginning of round / underarm; 2 matching for the cable panel)
- Row counter (strongly recommended)
- Tapestry needle
- Waste yarn or a stitch holder
Gauge
20 stitches and 28 rounds = 4 in (10 cm) in stockinette stitch on US 8 / 5 mm, blocked.
Please swatch in the round. Cable fabric pulls in; the 8-stitch panel will measure about 1–1¼ in (2.5–3 cm) across rather than the 1½ in (4 cm) those stitches would occupy in plain stockinette. That draw-in is already reflected in the finished measurements below.
Size and Finished Measurements
One size, matching a 40-stitch rib cuff that grows to 60 stitches.
| Measurement | Imperial | Metric |
|---|---|---|
| Cuff circumference, unstretched (2×2 rib on US 6) | fits wrist 6½–8 in | 16.5–20.5 cm |
| Upper-sleeve circumference (after Round 100) | about 11½ in | 29 cm |
| Length, cast-on to Round 100 | about 14¼ in | 36 cm |
These stitch counts were requested (40 → 60 over 100 rounds). If your sweater uses different numbers, this sleeve will not automatically match; use the same yarn and needles as the rest of the garment.
Abbreviations (US)
| Abbrev. | Meaning |
|---|---|
| BOR | beginning of round |
| C4B | cable 4 back: slip 2 sts to CN, hold at back, k2 from left needle, k2 from CN |
| C4F | cable 4 front: slip 2 sts to CN, hold at front, k2 from left needle, k2 from CN |
| CN | cable needle |
| CO | cast on |
| k | knit |
| M1L | make 1 left (left-leaning increase): with left needle, lift the running strand between sts from front to back; knit through the back loop |
| M1R | make 1 right (right-leaning increase): with left needle, lift the running strand between sts from back to front; knit through the front loop |
| p | purl |
| pm | place marker |
| rnd(s) | round(s) |
| sm | slip marker |
| st(s) | stitch(es) |
| St st | stockinette stitch (knit every rnd in the round) |
Pattern Notes
- Make 2 identical sleeves. The horseshoe cable is symmetrical, so there is no left/right version.
- Worked in the round from the cuff up. Join without twisting and keep the unique marker as BOR — this is the underarm.
- Cable panel: Always the 8 stitches between the two matching markers. Never increase or decrease inside those markers. After the cuff those 8 stitches are knit every round except cable-cross rounds, when they are worked C4B, C4F.
- How the cable grows from 2×2 rib: The cuff is k2, p2 around. The 8 stitches that will become the cable start as K2, P2, K2, P2. From Round 17 those purls are knit, so the panel becomes K8, and cabling begins. All other purl columns also become knit (sleeve body in St st).
- Increases sit at the underarm, one on each side of BOR:
k1, M1Rat the start of the round andM1L, k1at the end. This adds 2 stitches per increase round and slants the new stitches away from a neat underarm line. - There are 10 increase rounds and 10 cable-cross rounds. They never fall on the same round.
- Use a row counter. Tick it at the end of every round before you put the work down.
C4B and C4F, slowly (first time):
- Slide the next 2 stitches purlwise onto the cable needle.
- For C4B, let the CN hang at the back (away from you). For C4F, let it hang at the front (toward you).
- Knit the next 2 stitches from the left needle as usual.
- Knit the 2 stitches off the cable needle.
- Give the 8-stitch panel a gentle tug so the cross sits neatly.
If a stitch tries to run when it is on the CN, hold the CN in your right fingers like a second needle while you knit the first pair.
Sleeve (make 2)
Cuff (2×2 rib)
With US 6 / 4 mm and worsted yarn, CO 40 sts using a long-tail cast-on worked slightly loosely (rib needs stretch). Join to work in the round, being careful not to twist, and pm for BOR.
Rounds 1–16: *K2, p2; repeat from * to end of rnd. (40 sts)
The rib should read as a continuous K2, P2 spiral — because 40 is a multiple of 4, the join lines up (last p2 meets first k2).
Set up the cable panel and change needles
Change to US 8 / 5 mm.
Round 17 (set-up, Cable Rnd 1): K16, pm (cable start), k8, pm (cable end), k16. (40 sts)
You have just converted the old rib purls to knits. The 8 stitches between the new markers were K2, P2, K2, P2 on the cuff; they are now K8. That is the cable growing out of the rib.
From here to Round 100 the fabric is:
[right side panel in St st] [8-st cable] [left side panel in St st]
with BOR at the underarm, opposite the cable.
Body of sleeve — Rounds 18–100
Work every round as written. After each increase the new stitch count is given.
How to read a plain round: Knit every stitch, slipping markers as you meet them. The 8 cable stitches are also knit.
How to read an increase round: K1, M1R, knit to cable-start marker, sm, knit 8, sm, knit to 1 st before BOR, M1L, k1.
How to read a cable-cross round: Knit to cable-start marker, sm, C4B, C4F, sm, knit to end. (The 8 cable stitches stay 8: C4B uses 4, C4F uses 4.)
Repeat 1 — Rounds 18–24 (40 sts, then 42)
Rounds 18–21: Knit. (40 sts)
Round 22 (increase): K1, M1R, knit to cable-start marker, sm, k8, sm, knit to 1 st before BOR, M1L, k1. (2 increases → 40 + 2 = 42 sts ✓) Side panels are now 17 sts each: 17 + 8 + 17 = 42 ✓
Round 23: Knit. (42 sts)
Round 24 (cable cross): Knit to cable-start marker, sm, C4B, C4F, sm, knit to end. (42 sts)
Repeat 2 — Rounds 25–32 (42 sts, then 44)
Rounds 25–29: Knit. (42 sts)
Round 30 (increase): K1, M1R, knit to cable-start marker, sm, k8, sm, knit to 1 st before BOR, M1L, k1. (2 increases → 42 + 2 = 44 sts ✓) Side panels 18 + 8 + 18 = 44 ✓
Round 31: Knit. (44 sts)
Round 32 (cable cross): Knit to cable-start marker, sm, C4B, C4F, sm, knit to end. (44 sts)
Repeat 3 — Rounds 33–40 (44 sts, then 46)
Rounds 33–37: Knit. (44 sts)
Round 38 (increase): K1, M1R, knit to cable-start marker, sm, k8, sm, knit to 1 st before BOR, M1L, k1. (2 increases → 44 + 2 = 46 sts ✓) Side panels 19 + 8 + 19 = 46 ✓
Round 39: Knit. (46 sts)
Round 40 (cable cross): Knit to cable-start marker, sm, C4B, C4F, sm, knit to end. (46 sts)
Repeat 4 — Rounds 41–48 (46 sts, then 48)
Rounds 41–45: Knit. (46 sts)
Round 46 (increase): K1, M1R, knit to cable-start marker, sm, k8, sm, knit to 1 st before BOR, M1L, k1. (2 increases → 46 + 2 = 48 sts ✓) Side panels 20 + 8 + 20 = 48 ✓
Round 47: Knit. (48 sts)
Round 48 (cable cross): Knit to cable-start marker, sm, C4B, C4F, sm, knit to end. (48 sts)
Repeat 5 — Rounds 49–56 (48 sts, then 50)
Rounds 49–53: Knit. (48 sts)
Round 54 (increase): K1, M1R, knit to cable-start marker, sm, k8, sm, knit to 1 st before BOR, M1L, k1. (2 increases → 48 + 2 = 50 sts ✓) Side panels 21 + 8 + 21 = 50 ✓
Round 55: Knit. (50 sts)
Round 56 (cable cross): Knit to cable-start marker, sm, C4B, C4F, sm, knit to end. (50 sts)
Repeat 6 — Rounds 57–64 (50 sts, then 52)
Rounds 57–61: Knit. (50 sts)
Round 62 (increase): K1, M1R, knit to cable-start marker, sm, k8, sm, knit to 1 st before BOR, M1L, k1. (2 increases → 50 + 2 = 52 sts ✓) Side panels 22 + 8 + 22 = 52 ✓
Round 63: Knit. (52 sts)
Round 64 (cable cross): Knit to cable-start marker, sm, C4B, C4F, sm, knit to end. (52 sts)
Repeat 7 — Rounds 65–72 (52 sts, then 54)
Rounds 65–69: Knit. (52 sts)
Round 70 (increase): K1, M1R, knit to cable-start marker, sm, k8, sm, knit to 1 st before BOR, M1L, k1. (2 increases → 52 + 2 = 54 sts ✓) Side panels 23 + 8 + 23 = 54 ✓
Round 71: Knit. (54 sts)
Round 72 (cable cross): Knit to cable-start marker, sm, C4B, C4F, sm, knit to end. (54 sts)
Repeat 8 — Rounds 73–80 (54 sts, then 56)
Rounds 73–77: Knit. (54 sts)
Round 78 (increase): K1, M1R, knit to cable-start marker, sm, k8, sm, knit to 1 st before BOR, M1L, k1. (2 increases → 54 + 2 = 56 sts ✓) Side panels 24 + 8 + 24 = 56 ✓
Round 79: Knit. (56 sts)
Round 80 (cable cross): Knit to cable-start marker, sm, C4B, C4F, sm, knit to end. (56 sts)
Repeat 9 — Rounds 81–88 (56 sts, then 58)
Rounds 81–85: Knit. (56 sts)
Round 86 (increase): K1, M1R, knit to cable-start marker, sm, k8, sm, knit to 1 st before BOR, M1L, k1. (2 increases → 56 + 2 = 58 sts ✓) Side panels 25 + 8 + 25 = 58 ✓
Round 87: Knit. (58 sts)
Round 88 (cable cross): Knit to cable-start marker, sm, C4B, C4F, sm, knit to end. (58 sts)
Repeat 10 — Rounds 89–96 (58 sts, then 60)
Rounds 89–93: Knit. (58 sts)
Round 94 (increase, last increase): K1, M1R, knit to cable-start marker, sm, k8, sm, knit to 1 st before BOR, M1L, k1. (2 increases → 58 + 2 = 60 sts ✓) Side panels 26 + 8 + 26 = 60 ✓ Running total: 10 increase rounds × 2 sts = 20 sts added; 40 + 20 = 60 ✓
Round 95: Knit. (60 sts)
Round 96 (cable cross): Knit to cable-start marker, sm, C4B, C4F, sm, knit to end. (60 sts)
Even rounds to length
Rounds 97–100: Knit. (60 sts)
The 8 cable stitches are knit (no cross on these last 4 rounds). You may stop after a cable-cross round if you prefer the top of the sleeve to show a finished horseshoe; if so, end at Round 96 and omit 97–100 — you would then have 96 rounds, not 100. For the requested 100 rounds, work through Round 100.
Checkpoint (end of Round 100)
- Stitch count: 60
- Layout: 26 St st, 8-st cable, 26 St st (26 + 8 + 26 = 60 ✓)
- Cable crosses completed on Rounds 24, 32, 40, 48, 56, 64, 72, 80, 88, and 96 (10 crosses)
- Increases completed on Rounds 22, 30, 38, 46, 54, 62, 70, 78, 86, and 94 (10 increase rounds)
Do not bind off if this sleeve will be joined to a sweater body.
Finishing
- Cut yarn, leaving a 12 in (30 cm) tail. Slip all 60 sts to waste yarn or a holder. (If you prefer live stitches on the needle for an immediate join, leave them on the US 8 / 5 mm needle.)
- Work the second sleeve the same way.
- Weave in the cast-on tail on the wrong side of the cuff, splitting the plies so the join stays stretchy. Leave the top tail for seaming or joining later.
- Block the sleeves flat or on sleeve blockers, pinning to about 14¼ in (36 cm) long and about 11½ in (29 cm) wide at the top (5¾ in / 14.5 cm folded). Do not stretch the rib cuff aggressively; let it stay springy. Cables bloom with blocking — a short soak in lukewarm water with a little wool wash, then dry flat, is enough.
- Join to your sweater following that pattern’s sleeve-join or set-in instructions, matching the 60 live stitches to the armhole. BOR is the underarm; the cable sits at the top/outer arm.
Quick reference card
Keep this beside your row counter.
| What | When |
|---|---|
| 2×2 rib cuff | Rounds 1–16 (40 sts, US 6 / 4 mm) |
| Place cable markers, switch to US 8 | Round 17: k16, pm, k8, pm, k16 |
| Increase (+2) | Rounds 22, 30, 38, 46, 54, 62, 70, 78, 86, 94 |
| Cable cross (C4B, C4F on the 8 marked sts) | Rounds 24, 32, 40, 48, 56, 64, 72, 80, 88, 96 |
| Knit even at 60 sts | Rounds 95–100 (no inc after 94; last cross is 96) |
| Final count | 60 sts (26 + 8 + 26) |
Increase round (copy this): K1, M1R, knit to cable marker, sm, k8, sm, knit to 1 st before BOR, M1L, k1.
Cable-cross round (copy this): Knit to cable marker, sm, C4B, C4F, sm, knit to end.
Disclaimer: This pattern was generated by AI and should be reviewed for accuracy before use. While we strive for quality, AI-generated content may contain errors. Please verify measurements, stitch counts, charts, and instructions before beginning your project. Generated by purlJam.uk
Love this pattern?
Save this pattern to your free PurlJam libraryAccess your pattern anytime
Bookmark this page to access your pattern anytime