Type
Crochet
Difficulty
beginner
Category
blanket
AI Thinking Process
Planning
Verification
Pattern
Half-Moon Granny Square Blanket
Beginner Crochet Pattern (US Terms)
Finished Size (example blanket): 48" x 48" (122 cm x 122 cm) before border, using 144 squares (12 x 12). Easily customizable — make any number of squares.
Skill Level: Beginner
Yarn: Worsted weight (category 4) acrylic or wool-blend.
- Main Color (MC): approx 1200 yd (1100 m) for example blanket
- Contrast Color (CC) for moons: approx 400 yd (365 m)
(Example uses 1 skein CC and 3–4 skeins MC; adjust for your size.)
Hook: US I-9 / 5.5 mm (or size needed to obtain gauge)
Notions: Yarn needle, scissors, stitch markers (optional)
Gauge: One finished square (after Rnd 4) = 4" x 4" (10 cm x 10 cm).
Check gauge by making one square; adjust hook if needed so square lies flat.
Abbreviations (US):
ch – chain
sl st – slip stitch
sc – single crochet
dc – double crochet
sp – space
st(s) – stitch(es)
MC – main color
CC – contrast color
comm – beginning
rep – repeat
rnd – round
Half-Moon Granny Square (make 144 for example blanket)
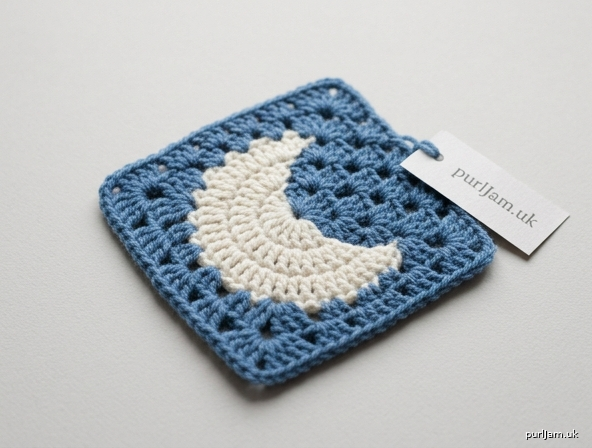
Each square features a simple half-moon worked in CC in the center, then finished as a classic granny square in MC. The half-moon is created with a solid curved side of dc stitches that transitions cleanly into granny clusters.
Note: Work tightly on color changes to avoid gaps. Squares should measure 4" after Rnd 4 and block lightly if needed.
Rnd 1 (CC – moon foundation): With CC, ch 4, join with sl st in first ch to form ring.
Ch 3 (counts as first dc here and throughout), work 7 dc into ring. (8 dc)
Do not join; you will work the half-moon as a semi-circle. Fasten off CC. (8 dc ✓)
Rnd 2 (CC – build half-moon curve): Join CC with sl st in top of beg ch-3.
Ch 3, dc in same st, 2 dc in each of next 7 dc. (16 dc)
Fasten off CC. This solid half-circle is your half-moon. (16 dc ✓)
Rnd 3 (MC – start square shaping): Join MC with sl st in first dc of Rnd 2.
Ch 3, 2 dc in same st (first corner made), ch 2,
*skip next dc, 3 dc in next dc, ch 1; rep from * twice more,
skip next dc, (3 dc, ch 2, 3 dc) in next dc (second corner),
ch 1, skip next dc, 3 dc in next dc, ch 1, skip next dc, 3 dc in next dc, ch 1,
skip next dc, (3 dc, ch 2, 3 dc) in next dc (third corner),
ch 1, skip next dc, 3 dc in next dc, ch 1, skip next dc, 3 dc in last dc, ch 1,
join with sl st to top of beg ch-3.
(You now have 4 corner ch-2 sps and the half-moon nestled along one side.)
Fasten off if changing colors, or continue. Stitch check: 4 corners + 8 side clusters ✓
Rnd 4 (MC – complete square): Sl st to next ch-2 corner sp (or join MC there).
Ch 3, (2 dc, ch 2, 3 dc) in same corner sp, ch 1,
*(3 dc, ch 1) in each ch-1 sp across side, (3 dc, ch 2, 3 dc, ch 1) in next corner ch-2 sp; rep from * around,
working final side and joining with sl st to top of beg ch-3.
(4 corners, 3 clusters per side.)
Fasten off, weave in all ends. Square should measure 4" x 4". (Final count: 4 corner groups + 12 side clusters = balanced square ✓)
Tip for beginners: The half-moon sits naturally against one side of the square. When joining, you can orient all moons the same way or rotate them for a playful scattered look.
Joining the Squares
Make all squares first. Block lightly if edges curl (pin to 4" and spritz with water; dry flat).
Option A: Whip Stitch (easiest for beginners)
- Arrange squares in desired layout (e.g., 12 rows of 12) on a flat surface, moons oriented as preferred.
- With MC and yarn needle, hold two squares wrong sides together (or right sides for a ridge).
- Whip stitch through both loops of corresponding stitches along edges, matching corners carefully.
- Join in rows first, then join the rows together. Weave in ends as you go.
Option B: Join-As-You-Go (JAYG) – continuous join
Work Rnd 4 of each new square while attaching it to previous squares:
- When you reach a side that needs joining, instead of ch-1 between clusters, drop loop, insert hook in corresponding ch-1 sp (or corner) of adjacent square, pick up loop, and pull through, then continue 3 dc in next sp of current square.
- At corners: work 3 dc, drop loop, join to corner ch-2 of adjacent square(s), ch 1 (or ch 2 if outer), 3 dc to finish corner.
Join in strips, then join strips the same way. This creates a nearly seamless look.
Optional Border
After all squares are joined, work a simple border around the entire blanket for a clean finish.
Rnd 1: Join MC in any corner ch-2 sp. Ch 3, (2 dc, ch 2, 3 dc) in same sp,
*ch 1, 3 dc in next ch-1 sp (or join space); rep across to next corner, (3 dc, ch 2, 3 dc) in corner; rep from * around, join with sl st to beg ch-3.
Rnd 2: Sl st to corner ch-2 sp, ch 1, *(sc, ch 2, sc) in corner, sc in each dc and ch-1 sp across side; rep from * around, join. Fasten off.
Rnd 3 (optional picot edge): Join CC if desired, *sc in next 3 sts, ch 3, sl st in first ch of ch-3 (picot made); rep around, working (sc, picot, sc) in each corner. Join and fasten off.
Weave in all remaining ends.
Finishing
- Steam-block or wet-block the finished blanket to even stitches and open the half-moons.
- Lay flat to dry.
- Care: Follow yarn label; most worsted acrylics are machine-wash gentle, lay flat to dry.
Customization Ideas
- Make fewer/more squares for baby blanket (e.g., 6 x 6 = 24" square) or throw.
- Use scrap CC for multicolored moons.
- Orient half-moons to form larger patterns (rows of moons, circles, etc.).
Enjoy your celestial granny blanket! Each half-moon adds a sweet handmade touch while the classic granny construction keeps it relaxing and beginner-friendly.
Disclaimer: This pattern was generated by AI and should be reviewed for accuracy before use. While we strive for quality, AI-generated content may contain errors. Please verify measurements, stitch counts, charts, and instructions before beginning your project. Generated by purlJam.uk
Love this pattern?
Save this pattern to your free PurlJam libraryAccess your pattern anytime
Bookmark this page to access your pattern anytime