Type
Knitting
Difficulty
intermediate
Category
custom
AI Thinking Process
Planning
Verification
Pattern
Hawthorn Buttoned Neck Scarf
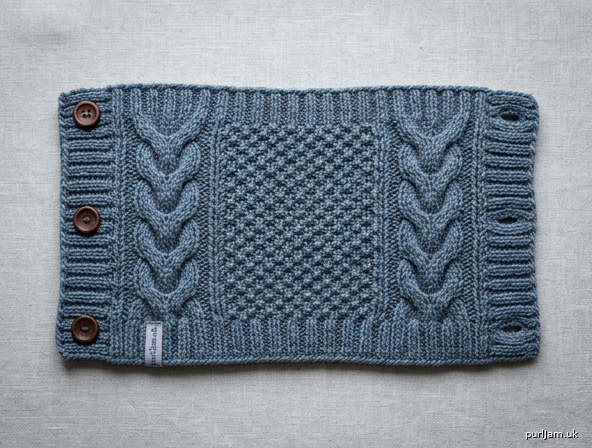
A tailored DK neck scarf worked flat from the bottom up. Twin rope cables frame a field of moss stitch, with ribbed hems and button bands and three buttons for a secure close. Wrap it around the neck and fasten at the front — smart enough for town, warm enough for a windy walk.
Skill level: Intermediate (cables, 2-row buttonholes, and several stitch patterns on the same row)
Finished measurements
One adult size, after blocking:
- Width (wraps around the neck): 54cm (21¼in)
- Height (bottom edge to top edge): 22cm (8¾in)
The piece overlaps at the front by about 6–8cm (2½–3¼in), giving a comfortable worn circumference of roughly 46–48cm (18–19in) over a jumper.
To widen or narrow the wrap, add or subtract stitches in the centre moss panel in multiples of 2 (keep an odd number). Every 2 sts changes the width by about 1cm (½in).
Materials
Yarn: DK (double knitting); 250 metres (273 yards) / 100g. Wool or a wool-rich blend is recommended for warmth and cable definition.
A smooth merino or wool/nylon DK with about 225–250m per 100g is ideal. The sample estimate assumes a typical DK; textured or lofty yarns may need a little more.
Needles: 4mm (UK 8) straight needles, or a 4mm circular needle at least 60cm long (easier to hold 123 sts).
Notions:
- Cable needle
- 8 stitch markers (optional but strongly recommended)
- 3 buttons, 18mm (¾in) diameter
- Tapestry needle
- Sewing needle and thread to attach buttons
Tension (gauge)
22 sts and 30 rows = 10cm (4in) over moss stitch on 4mm needles, after blocking.
An 8-st rope cable measures approximately 3cm (1¼in) wide.
Check your tension. If you have too few stitches to 10cm, switch to a smaller needle; if you have too many, switch to a larger needle. Height is easy to adjust as you knit; width is not.
Abbreviations
| Abbr. | Meaning |
|---|---|
| beg | beginning |
| C8B | cable 8 back: slip next 4 sts to cable needle and hold at back of work, k4, then k4 from cable needle |
| C8F | cable 8 front: slip next 4 sts to cable needle and hold at front of work, k4, then k4 from cable needle |
| cn | cable needle |
| cont | continue |
| k | knit |
| p | purl |
| pm | place marker |
| rem | remain(ing) |
| rep | repeat |
| rev st st | reverse stocking stitch (purl on RS, knit on WS) |
| RS | right side |
| sm | slip marker |
| st(s) | stitch(es) |
| WS | wrong side |
Pattern notes
- The scarf is a rectangle worked flat, from the bottom up. You cast on the long lower edge (the edge that sits nearest the collarbone) and work towards the top.
- The 7 sts at each end are worked in 1×1 rib throughout and form the button bands. Buttonholes sit in the band at the beginning of RS rows.
- The buttonhole band overlaps the button band when worn. If you prefer the opposite overlap, work the buttonholes at the end of RS rows instead, in the final 7 sts.
- Use markers between every panel. Once they are in place, “work as set” means: rib the bands, purl the gutters on RS (knit them on WS), cable or knit the 8-st panels, and moss the centre.
- Stitch count is 123 sts on every row. There is no shaping.
- Cable crosses fall on RS rows only. Do not cross on a buttonhole row if that row is not a cable row; keep the 8-row cable rhythm as set and work the buttonhole only in the first 7 sts.
Stitch-count check for the set-up row: 7 (rib) + 4 (gutter) + 8 (cable) + 4 (gutter) + 77 (moss) + 4 (gutter) + 8 (cable) + 4 (gutter) + 7 (rib) = 123 sts ✓
Stitch patterns
1×1 rib (over 7 band sts)
- RS: k1, p1, k1, p1, k1, p1, k1
- WS: p1, k1, p1, k1, p1, k1, p1
Moss stitch (UK; over the 77 centre sts, an odd number)
Every row: k1, *p1, k1; rep from * to end of the 77 sts.
Reverse stocking stitch gutters (over 4 sts)
- RS: p4
- WS: k4
Right cable panel (first 8-st panel on RS rows)
- Cable row (RS): C8F
- Other RS rows: k8
- WS rows: p8
Left cable panel (second 8-st panel on RS rows)
- Cable row (RS): C8B
- Other RS rows: k8
- WS rows: p8
The two cables lean inwards and frame the moss field.
Buttonhole
Worked over the first 7 sts of a RS row. The rest of the row is worked as set.
Buttonhole row (RS): k1, p1, cast off 2 sts, k1, p1, k1 (7 sts of band accounted for: 2 worked + 2 cast off + 3 worked ✓), then work the remainder of the row as set.
Next row (WS): work as set to the last 5 sts, p1, k1, p1, turn, cable cast on 2 sts, turn, k1, p1. (3 sts + 2 cast on + 2 sts = 7 band sts ✓)
The 2-st hole stretches to fit an 18mm button in rib. If your buttons are larger than 20mm, cast off/cast on 3 sts instead and keep the band at 7 sts by working 2, cast off 3, work 2.
Instructions
Cast on and lower rib
Using 4mm needles and the long-tail method, cast on 123 sts.
Row 1 (RS): *k1, p1; rep from * to last st, k1.
Row 2 (WS): *p1, k1; rep from * to last st, p1.
These 2 rows set 1×1 rib across the full width (123 is odd, so every RS row begins and ends with k1 ✓).
Rows 3–4: as Rows 1–2.
Row 5 (RS) — buttonhole 1: work the Buttonhole row, rib to end.
Row 6 (WS): work the WS buttonhole row, rib to end. (Still 123 sts ✓)
Rows 7–10: cont in 1×1 rib as set.
The lower rib measures about 3cm (1¼in). First buttonhole sits about 1.5–2cm (¾in) from the cast-on edge.
Set the pattern
Row 11 (RS) — set-up and first cable cross: k1, p1, k1, p1, k1, p1, k1, pm, p4, pm, C8F, pm, p4, pm, k1, *p1, k1; rep from * 38 more times (77 moss sts: 1 + 38 × 2 = 77 ✓), pm, p4, pm, C8B, pm, p4, pm, k1, p1, k1, p1, k1, p1, k1.
(7 + 4 + 8 + 4 + 77 + 4 + 8 + 4 + 7 = 123 sts ✓)
Row 12 (WS): Work 7 sts in 1×1 rib, sm, k4, sm, p8, sm, k4, sm, k1, *p1, k1; rep from * to next marker (77 moss sts), sm, k4, sm, p8, sm, k4, sm, work 7 sts in 1×1 rib.
Cable rhythm for the body
Keep the bands, gutters, and moss as set on every row. For the two 8-st cable panels only, work this 8-row repeat:
- Row 1 (RS): C8F on the right panel, C8B on the left panel.
- Row 2 and all WS rows: p8 on each cable panel.
- Rows 3, 5 and 7 (RS): k8 on each cable panel.
- Row 8 (WS): p8 on each cable panel.
Row 11 already counted as Row 1 of this repeat. Cont from Row 2.
Work as set until the piece measures 11cm (4¼in) from the cast-on edge, ending with a WS row.
Next row (RS) — buttonhole 2: work the Buttonhole row, then work as set to end (keep the cable panels on whatever row of the 8-row repeat they have reached; do not force a cross).
Next row (WS): work the WS buttonhole row, then work as set to end. (123 sts ✓)
Cont in pattern until the piece measures 19cm (7½in) from the cast-on edge, ending with a WS row. Aim to end after a Row 8 of the cable repeat if you can, so the top rib sits just after a cross; if the measurement arrives first, stop at 19cm anyway.
Upper rib
Resume 1×1 rib across all 123 sts, as for the lower rib (RS: *k1, p1; rep from * to last st, k1).
Rows 1–2 of upper rib: work in 1×1 rib.
Row 3 (RS) — buttonhole 3: work the Buttonhole row, rib to end.
Row 4 (WS): work the WS buttonhole row, rib to end. (123 sts ✓)
Rows 5–10 of upper rib: cont in 1×1 rib.
The full height is now about 22cm (8¾in) (19cm body + 3cm upper rib ✓).
Cast off in 1×1 rib, keeping the tension even — not tight, or the top edge will draw in.
Finishing
- Weave in all ends on the WS.
- Block. Soak in lukewarm water with a little wool wash, press out water in a towel (do not wring), and pin to 54cm (21¼in) wide × 22cm (8¾in) high. Let dry fully. Blocking evens the moss and opens the cables; do this before sewing on buttons.
- Lay the scarf RS up, buttonholes on the right. On the left rib band, mark three button positions directly opposite the three holes, about 1.5cm (½in) in from the side edge.
- Sew on the three 18mm buttons firmly, using the sewing thread (knitting yarn is bulky for this). Take the stitches through both legs of the rib so the buttons sit flat.
- Fasten the buttons through the holes to check alignment. If a hole feels tight, stretch it gently with a knitting needle; rib recovers.
To wear: wrap the scarf around the neck with the RS facing out and the lower edge towards the collarbone. Overlap the buttonhole band on top of the button band and fasten.
Schematic (not to scale)
          54cm (21¼in)
   |------------------------------|
   | BH  ║     moss stitch     ║  |   22cm
   |  ≡  ║    (77 sts)         ║  |   (8¾in)
   |  ≡  ║                     ║  |
   |------------------------------|
     ^                         ^
  buttonholes               buttons
  (right band)            (left band)
≡ = 8-st rope cable BH = buttonhole band
Tips
- If the 123 sts feel crowded on straight needles, use a 60–80cm circular and work back and forth.
- Count the 77 moss sts after the first two body rows; once the markers are trusted, you only need to count when something looks off.
- A cable needle with a slight bend holds DK stitches more securely than a straight one.
- For a firmer hem, work the 10 rib rows at each edge on 3.75mm needles and the body on 4mm. Return to 3.75mm for the upper rib and cast-off.
Disclaimer: This pattern was generated by AI and should be reviewed for accuracy before use. While we strive for quality, AI-generated content may contain errors. Please verify measurements, stitch counts, charts, and instructions before beginning your project. Generated by purlJam.uk
Love this pattern?
Save this pattern to your free PurlJam libraryAccess your pattern anytime
Bookmark this page to access your pattern anytime