Type
Knitting
Difficulty
intermediate
Category
amigurumi
AI Thinking Process
Planning
Verification
Pattern
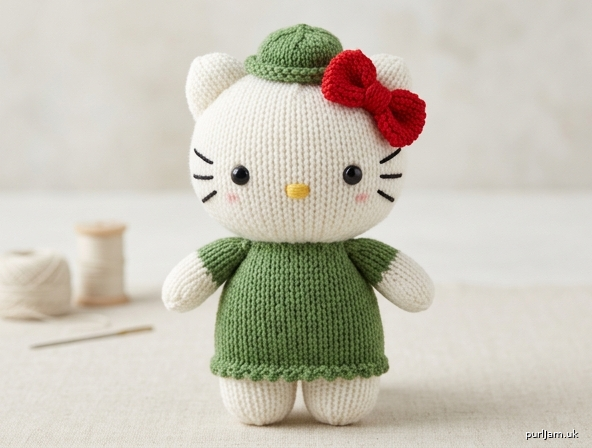
Hello Kitty Amigurumi in Green Cap & Gown
Simple Knitted Soft Toy – Beginner
A small knitted Hello Kitty amigurumi (approx. 6.5" / 16.5 cm tall) with white head and body, green gown, green cap perched on the right ear, and classic red bow on the left ear. Worked in stockinette stitch in the round. Perfect first amigurumi project.
Materials
- Worsted weight yarn (approx. totals):
- White: 40 yd (37 m) – head, body, ears, arms, legs
- Green: 35 yd (32 m) – gown, cap
- Red: 10 yd (9 m) – bow
- Small amounts black and yellow embroidery floss (or scrap yarn) for face
- US 5 (3.75 mm) DPNs or 32–40" circular for Magic Loop (1–2 sizes smaller than yarn label for tight fabric)
- Polyester fiberfill stuffing (approx. 1–1.5 oz / 30–40 g)
- 9 mm safety eyes (pair) or black embroidery floss
- Tapestry needle, stitch marker, scissors
- Optional: blush/pink yarn scrap for cheeks
Gauge
5 sts and 7 rnds = 1" (2.5 cm) in stockinette stitch in the round. Tight, even fabric is more important than exact gauge so stuffing does not show. Adjust needle size if needed.
Abbreviations (US)
CO – cast on
k – knit
kfb – knit front and back (increase 1)
k2tog – knit 2 together (decrease 1)
st(s) – stitch(es)
rnd(s) – round(s)
rep – repeat
pm – place marker
Pattern Notes
- Worked in the round; use marker for beginning of rnd.
- Stuff each piece firmly as you go, before closing.
- All pieces in stockinette (knit every rnd).
- Mattress stitch for seaming.
- Safety eyes inserted before closing head.
Head (White)
CO 6 sts. Join to work in the round, being careful not to twist; pm. Rnd 1: kfb around (12 sts). Rnd 2: *k1, kfb; rep from * around (18 sts). Rnd 3: *k2, kfb; rep from * around (24 sts). Rnd 4: *k3, kfb; rep from * around (30 sts). Rnd 5: *k4, kfb; rep from * around (36 sts). Rnds 6–14: k around (9 rnds even). Insert safety eyes between Rnds 9–10, spaced approx. 7 sts apart, centered on face. Rnd 15: *k4, k2tog; rep from * around (30 sts). Rnd 16: *k3, k2tog; rep from * around (24 sts). Rnd 17: *k2, k2tog; rep from * around (18 sts). Stuff head firmly. Rnd 18: *k1, k2tog; rep from * around (12 sts). Rnd 19: k2tog around (6 sts). Cut yarn, thread tail through remaining sts, pull tight, and secure. Weave end inside.
Body (White)
CO 6 sts. Join, pm. Rnd 1: kfb around (12 sts). Rnd 2: *k1, kfb; rep from * around (18 sts). Rnd 3: *k2, kfb; rep from * around (24 sts). Rnd 4: *k3, kfb; rep from * around (30 sts). Rnds 5–14: k around (10 rnds). Stuff firmly as you go. Rnd 15: *k3, k2tog; rep from * around (24 sts). Rnd 16: *k2, k2tog; rep from * around (18 sts). Rnd 17: *k1, k2tog; rep from * around (12 sts). Rnd 18: k2tog around (6 sts). Cut yarn, thread through remaining sts, pull tight, secure. Leave long tail for seaming to head.
Gown (Green)
CO 36 sts. Join, pm. Rnds 1–3: k around. Rnd 4 (optional picot edge hint): *k2tog, yo; rep from * around (still 36 sts) – or simply k for plain hem. Rnds 5–16: k around (12 rnds total length ≈ 2.25"). Bind off loosely. Weave ends. (Gown is an open tube slipped over body later.)
Arms (White – make 2)
CO 6 sts. Join, pm. Rnd 1: kfb around (12 sts). Rnds 2–10: k around. Lightly stuff. Rnd 11: k2tog around (6 sts). Cut yarn, thread through sts, pull tight. Leave long tail for seaming.
Legs (White – make 2)
CO 6 sts. Join, pm. Rnd 1: kfb around (12 sts). Rnds 2–8: k around. Lightly stuff. Rnd 9: k2tog around (6 sts). Cut yarn, thread through sts, pull tight. Leave long tail for seaming.
Ears (White – make 2)
CO 6 sts. Join, pm. Rnd 1: kfb around (12 sts). Rnds 2–5: k around. Bind off, leaving long tail. Lightly stuff if desired (or leave flat). Flatten and seam base closed later if needed.
Cap (Green – sits on right ear)
CO 6 sts. Join, pm. Rnd 1: kfb around (12 sts). Rnd 2: *k1, kfb; rep from * around (18 sts). Rnds 3–6: k around. Rnd 7: *k1, k2tog; rep from * around (12 sts). Rnd 8: k2tog around (6 sts). Cut yarn, thread through sts, pull tight to close top. Leave long tail for attachment. (Small rounded cap.)
Bow (Red)
Worked flat for simplicity. CO 10 sts. Rows 1–6: knit (garter stitch for firmness). Bind off. Cinch center tightly with a length of red yarn wrapped several times; secure. Shape into bow. Leave tails for sewing.
Face Embroidery (after head is closed)
Using black floss/yarn and tapestry needle:
- Whiskers: 3 short straight stitches each side of face, starting near eye level and angling outward. Using yellow:
- Nose: small vertical or oval satin stitch centered below eyes (approx. 2–3 sts tall). Optional: tiny pink stitches or blush for cheeks.
Assembly
- Seam head to top of body with mattress stitch, matching center fronts. Weave ends inside.
- Slip green gown over body; tack in place at shoulders/under arms with a few green stitches so it stays put (gown should cover body from neck to above legs).
- Attach legs to bottom of body, evenly spaced and symmetric, using mattress stitch. Ensure Kitty sits or stands stably.
- Attach arms to sides of body at shoulder level (just below head/gown top), angled slightly forward.
- Attach ears to top of head: left ear and right ear, spaced about 8–10 sts apart, upright.
- Sew green cap securely onto the right ear (perch it so it sits jauntily on/over the right ear).
- Sew red bow securely to the base of the left ear (classic Hello Kitty position).
- Weave in all remaining ends securely inside the body. Check symmetry of limbs and ears.
- Final shaping: roll and smooth pieces; add extra stuffing through seams if any soft spots remain, then close.
Finishing
Your Hello Kitty is ready! Spot clean only. Keep small parts (if using safety eyes) away from babies and pets who might chew them.
Enjoy your beginner knitted amigurumi!
Disclaimer: This pattern was generated by AI and should be reviewed for accuracy before use. While we strive for quality, AI-generated content may contain errors. Please verify measurements, stitch counts, and instructions before beginning your project. Generated by purlJam.uk
Love this pattern?
Save this pattern to your free PurlJam libraryAccess your pattern anytime
Bookmark this page to access your pattern anytime