Type
Knitting
Difficulty
intermediate
Category
custom
AI Thinking Process
Planning
Verification
Pattern
Home Sweet Home Cottage
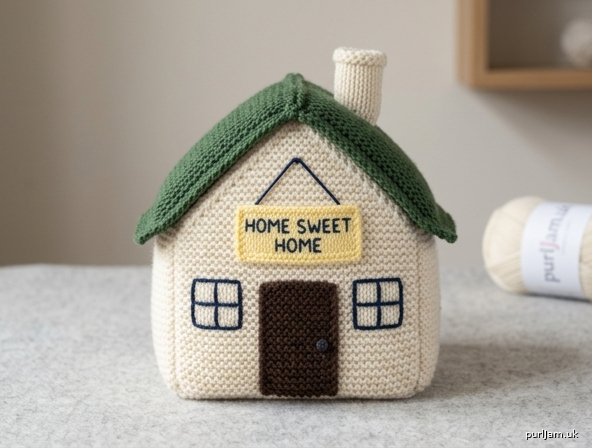
A small stuffed knitted house with a pitched roof, a front door, embroidered windows, and a hanging “HOME SWEET HOME” sign. Worked flat in garter stitch and seamed — a cozy beginner project for a shelf, mantel, or gift.
Materials
Yarn (worsted weight; approx. 180 yd / 165 m total)
- Color A (walls): 55 yd (50 m) — cream, oat, or pale gray
- Color B (roof and chimney): 25 yd (23 m) — rust, barn red, or forest green
- Color C (door): 8 yd (7 m) — warm brown
- Color D (sign): 8 yd (7 m) — butter yellow or white
- Color E (windows, lettering, doorknob): 8 yd (7 m) — charcoal or navy
Needles
- US 7 (4.5 mm) straight or circular needles, or size needed to obtain gauge
Notions
- Tapestry needle
- Polyester fiberfill (small handful)
- Pins or clips
- Scissors
- Optional: 4 × 3" (10 × 7.5 cm) piece of cardboard or plastic canvas to stiffen the base
- Optional: 2 stitch markers to mark door placement
Gauge
20 stitches and 32 rows (16 garter ridges) = 4" (10 cm) in garter stitch, after light blocking.
Tip: 2 rows = 1 garter ridge. Count ridges when measuring height.
Gauge affects finished size more than fit; a slightly tighter or looser fabric is fine if all pieces are worked at the same gauge.
Finished Size
One size: about 4" (10 cm) wide × 3" (7.5 cm) deep × 5" (12.5 cm) tall, including roof.
Abbreviations
- BO — bind off
- CO — cast on
- k — knit
- k2tog — knit 2 stitches together (1 stitch decreased)
- rep — repeat
- rem — remain(ing)
- RS — right side
- st(s) — stitch(es)
- WS — wrong side
Garter stitch = knit every row.
Pattern Notes
- The entire house is worked in garter stitch so pieces lie flat and edges are easy to seam.
- The first row after casting on is a WS row; the public side of each wall is the side with the cast-on tail at the lower right when the piece faces you.
- When a row says “k2tog, k to last 2 sts, k2tog,” 2 stitches are decreased.
- Seams: use mattress stitch or a neat whipstitch. Garter ridges make both easy. On corners where stitches meet row-ends, ease evenly (see Finishing).
- Weave in ends as you go when you can; leave 12" (30 cm) tails on bind-offs that will be used for seaming.
- Stuff firmly so the cottage stands, but do not stretch the walls out of square.
- The sign is embroidered with backstitch — no charted colorwork required.
House Pieces
Front (make 1 in A)
CO 20 sts.
Work 24 rows in garter stitch (12 ridges). Piece measures 3" (7.5 cm) from the cast-on edge.
Shape gable
- Row 1 (dec): K2tog, k to last 2 sts, k2tog. (18 sts rem ✓)
- Row 2: Knit.
- Rep Rows 1–2 seven more times. (8 decrease rows total: 20 − 16 = 4 sts rem ✓; 16 gable rows = 2" / 5 cm ✓)
BO remaining 4 sts. Cut yarn, leaving a 12" (30 cm) tail.
Back (make 1 in A)
Work exactly as for Front.
Sides (make 2 in A)
CO 15 sts.
Work 24 rows in garter stitch (12 ridges). Piece measures 3" (7.5 cm) from the cast-on edge. (15 sts = 3" / 7.5 cm ✓)
BO. Cut yarn, leaving a 12" (30 cm) tail.
Base (make 1 in A)
CO 20 sts.
Work 24 rows in garter stitch (12 ridges). Piece measures 3" (7.5 cm) from the cast-on edge. (20 sts = 4" / 10 cm wide; 24 rows = 3" / 7.5 cm deep ✓)
BO. Cut yarn, leaving a 12" (30 cm) tail.
Roof Panels (make 2 in B)
CO 15 sts.
Work 22 rows in garter stitch (11 ridges). Piece measures about 2¾" (7 cm). (15 sts matches the 3" / 7.5 cm house depth ✓)
BO. Cut yarn, leaving a 16" (40 cm) tail.
Door (make 1 in C)
CO 8 sts.
Work 16 rows in garter stitch (8 ridges). Piece measures 2" (5 cm) tall × about 1½" (4 cm) wide. (8 sts = 1.6" / 4 cm ✓)
BO. Cut yarn, leaving an 18" (45 cm) tail for sewing.
Sign (make 1 in D)
CO 18 sts.
Work 12 rows in garter stitch (6 ridges). Piece measures 1½" (4 cm) tall × about 3½" (9 cm) wide. (18 sts = 3.6" / 9 cm ✓)
BO. Cut yarn, leaving a 12" (30 cm) tail.
Chimney (make 1 in B)
CO 8 sts.
Work 12 rows in garter stitch (6 ridges).
BO. Cut yarn, leaving a 12" (30 cm) tail.
Finishing
1. Embroider the front (before seaming)
Lay the Front piece flat, RS facing, cast-on edge at the bottom.
Door placement (do not sew yet): Center the Door on the Front. With 20 sts across, leave 6 sts on each side of the 8-st door (6 + 8 + 6 = 20 ✓). Bottom of door sits on the cast-on edge. Pin.
Windows: With E and the tapestry needle, embroider two square window frames in backstitch, one on each side of the door, about ¾" (2 cm) square. Place them roughly ½" (1.5 cm) in from each side edge and 1" (2.5 cm) up from the cast-on. Add a plus-sign (+) inside each square for windowpanes. Keep stitches on the RS; do not pull so tight that the fabric puckers.
Set Front aside.
2. Embroider the sign
With E, backstitch the words on the Sign, RS facing:
  HOME SWEET
     HOME
Center the lettering. Keep letters about 2 rows tall with 1 stitch between letters. Short words (HOME) sit on the lower half; HOME SWEET sits on the upper half. A simple block or print letter style is easiest. Weave in embroidery ends on the WS.
3. Assemble the box
Use A and mattress stitch or whipstitch. Pin first.
- Sew one Side to the Front: join the 24 row-end edges (both pieces are 24 rows tall ✓). Repeat, sewing the second Side to the other Front edge.
- Sew the Back to the remaining Side edges, same way. You now have a four-walled tube. All vertical seams are row-end to row-end.
- Sew the Base to the four cast-on edges:
- Base CO edge (20 sts) to Front CO (20 sts) ✓
- Base BO edge (20 sts) to Back CO (20 sts) ✓
- Base side edges (12 ridges / 24 row-ends) to Side CO edges (15 sts). Ease evenly: about 4 ridges to every 5 sts. Do not force a 1-to-1 match.
Optional: slip the cardboard rectangle into the base before closing the last seam.
Leave a 2" (5 cm) gap in one base seam for stuffing.
4. Stuff
Stuff the house firmly and evenly so the walls stand straight and the base sits flat. Add extra fill in the corners. Close the gap.
5. Roof
- Join the two Roof panels along one 15-st edge (cast-on to cast-on, or bind-off to bind-off) to form the ridge. (15 sts to 15 sts ✓)
- Place the roof on the house so the ridge runs from Front gable peak to Back gable peak.
- Sew each sloped gable edge (the decrease edges of Front and Back) to the matching row-end edges of the roof, easing the 22 roof rows to the 16-row gable slope. Extra length becomes a small eave at the left and right.
- Tack the remaining 15-st eaves edges to the top (BO) edges of the Side walls (15 sts to 15 sts ✓), or leave them free for a slight overhang. A few hidden stitches on the inside are enough.
Do not stuff the roof; it should sit as a hollow peak. A pinch of fill in the gable triangles is optional if they look concave.
6. Chimney
Fold the Chimney piece in half so it is 4 sts wide. Whipstitch the long side and the top into a small tube. Stuff lightly. Sew the open end to the roof, just off-center toward the back, straddling the ridge.
7. Door
Sew the Door to the Front along the placement pinned earlier. With E, embroider a small French knot or a tiny satin-stitch circle for a doorknob on the right side of the door, about halfway up.
8. Hang the sign
Cut two 6" (15 cm) lengths of E (or A). Attach one end of each to the top corners of the Sign (WS). Attach the other ends to the Front, just below the gable, so the sign hangs centered above the door like a little shop sign. The sign should sit clear of the door and windows. Trim tails on the WS.
9. Weave and shape
Weave in every remaining end on the WS or inside the stuffing. Steam-block very lightly if needed: hover a steam iron above the roof and walls — do not press flat or you will crush the stuffing. Pat the cottage into a square footprint and a straight peak.
Helpful Tips
- Counting: 24 wall rows = 12 ridges. Place a pin every 4 ridges if you lose count.
- Even decreases: On gable decrease rows, k2tog at each end keeps the slope tidy. No slip-stitch decrease is needed at this gauge.
- Seaming garter: Insert the needle into the bump at the end of each ridge. One ridge to one ridge on wall corners; ease as noted on the base.
- Lettering: If backstitch feels tight on 12 rows, work the Sign in 14 rows instead (same 18 sts) for extra room — finished height becomes about 1¾" (4.5 cm).
- Standing: If the house leans, add more stuffing in the low corner or a second scrap of cardboard against a side wall.
Your cottage is ready to welcome anyone home.
Disclaimer: This pattern was generated by AI and should be reviewed for accuracy before use. While we strive for quality, AI-generated content may contain errors. Please verify measurements, stitch counts, charts, and instructions before beginning your project. Generated by purlJam.uk
Love this pattern?
Save this pattern to your free PurlJam libraryAccess your pattern anytime
Bookmark this page to access your pattern anytime