Type
Knitting
Difficulty
beginner
Category
amigurumi
AI Thinking Process
Planning
1. **Design Strategy**:
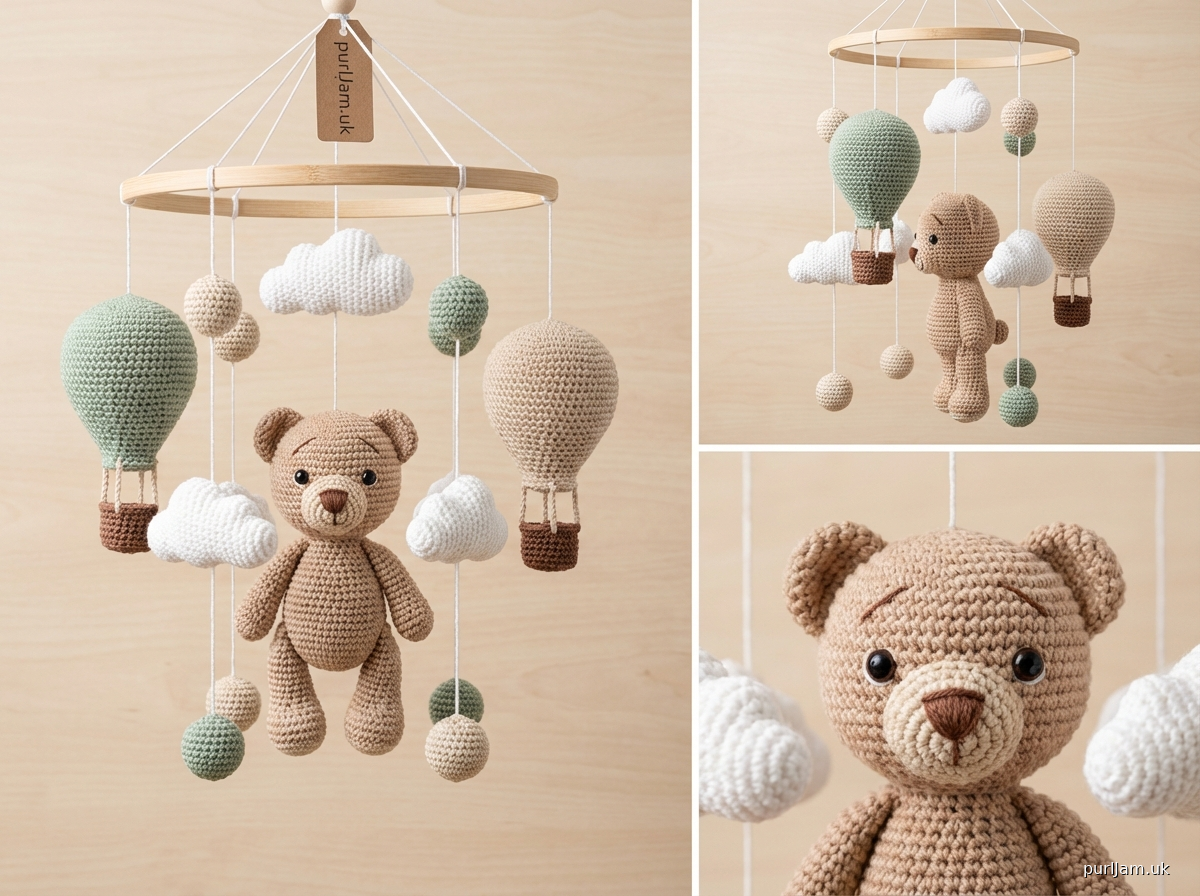
- Creating a baby mobile with 5 distinct components: teddy bear, 2 hot air balloons with baskets, 2 clouds, and several hanging spheres
- Using sport weight yarn for delicate, lightweight mobile pieces suitable for hanging
- Focusing on beginner-friendly amigurumi techniques with basic shapes (spheres, ovals, cylinders)
- Color palette: light brown/beige for bear, sage green and beige for balloons, white for clouds, mixed beige/sage for spheres
- Safety-first approach: securely fastened pieces, no small detachable parts for baby safety
2. **Construction Plan**:
- Each component worked separately in the round using basic amigurumi technique
- Teddy bear: sphere head, oval body, small sphere limbs and ears
- Hot air balloons: modified sphere (balloon portion) with small cylinder basket
- Clouds: flat or 3D puff shape using clusters or modified spheres
- Small spheres: basic sphere pattern in varying sizes
- Assembly: pieces attached to wooden hoop with coordinated string lengths for visual balance
- Hook size: US D-3 (3.25mm) for tight, stuffed pieces with sport weight yarn
3. **Quality Assurance**:
- Addressing beginner concerns: detailed magic ring instructions, increase/decrease clarity
- Ensuring pieces are lightweight enough to hang without tipping the mobile
- Providing assembly diagram for string placement and lengths
- Safety notes about secure fastening and adult supervision
- Consistent stitch counts verified at each round
- Clear stuffing instructions to prevent pieces from sagging
4. **Final Calculations**:
- Sport weight yarn with D-3 hook: approximately 6 sts/inch in amigurumi
- Teddy bear: head ~2.5", body ~3", total height ~6-7"
- Hot air balloons: ~2.5" diameter, baskets ~1"
- Clouds: ~3" wide
- Small spheres: 1-1.5" diameter
- Wooden hoop: 10-12" diameter recommended
- Total project uses approximately 200-250 yards of yarn across all colors
Verification
[PRE-FLIGHT CHECKS]
1. **Completeness**:
✓ Materials list with all yarn colors, hook size, stuffing, safety eyes, wooden hoop
✓ Detailed instructions for all 5+ components
✓ Assembly instructions with string lengths and placement
✓ Abbreviations and stitch explanations
✓ Beginner tips throughout
✓ Encouraging, professional tone
2. **Consistency**:
✓ Sport weight yarn with US D-3 (3.25mm) hook appropriate for tight amigurumi
✓ Stitch counts verified for each component
✓ Sphere patterns follow standard 6-stitch magic ring progression
✓ All measurements calculated based on sport weight gauge
3. **Constraints**:
✓ Beginner-friendly language and techniques only
✓ US terminology (sc, hdc, dc)
✓ Imperial measurements with metric in parentheses
✓ Safety considerations for baby mobile included
✓ All components from the image included
✓ Template structure for simple shapes followed
4. **Safety**:
✓ Increase rounds: 6→12→18→24 progression verified (doubling check: 6×2=12 ✓, increments of 6 maintained ✓)
✓ Decrease rounds: reverse of increases, maintaining stitch count integrity
✓ No mathematical errors in pattern repeats
✓ Safety eyes sized appropriately and secured before stuffing
✓ All pieces securely fastened to prevent choking hazards
Pattern
<pattern>

# Sweet Dreams Baby Mobile
## A Beginner-Friendly Crochet Pattern

Create this adorable nursery mobile featuring a cuddly teddy bear, whimsical hot air balloons, fluffy clouds, and charming hanging spheres. Perfect for beginners learning amigurumi techniques!

---

## SKILL LEVEL
**Beginner** – Requires knowledge of basic crochet stitches and working in the round.

---

## FINISHED MEASUREMENTS
- **Mobile Diameter**: 10-12" (25-30cm) wooden hoop
- **Teddy Bear**: Approximately 6-7" (15-18cm) tall
- **Hot Air Balloons**: Approximately 2.5" (6.5cm) diameter
- **Clouds**: Approximately 3" (7.5cm) wide
- **Small Spheres**: 1-1.5" (2.5-4cm) diameter
- **Total Hanging Length**: Adjustable, approximately 20-24" (51-61cm) from hoop to lowest piece

---

## MATERIALS

### Yarn
**Sport Weight (Category 2) Yarn** – approximately 200-250 yards (183-229m) total

**Color A**: Light Brown/Beige – 80 yards (73m) for teddy bear and some spheres
**Color B**: Sage Green – 50 yards (46m) for balloon, spheres
**Color C**: Beige/Natural – 50 yards (46m) for balloon, spheres
**Color D**: White – 40 yards (37m) for clouds
**Color E**: Dark Brown – 20 yards (18m) for baskets and bear details

*Recommended: 100% cotton or cotton blend for washability and weight*

### Hook & Notions
- **Crochet Hook**: US D-3 (3.25mm)
- **Fiberfill Stuffing**: Polyester, approximately 6-8 oz
- **Safety Eyes**: 6mm, 2 pairs (for bear face, optional for bear body decoration)
- **Yarn Needle**: For weaving in ends and assembly
- **Stitch Marker**: To mark beginning of rounds
- **Scissors**
- **Pins**: For positioning pieces during assembly

### Hanging Structure
- **Wooden Embroidery Hoop**: 10-12" (25-30cm) diameter (use outer ring only)
- **Embroidery Floss or Strong Thread**: White or coordinating color, 15-20 yards for hanging pieces
- **Ribbon or Cord**: For hanging mobile from ceiling (18-24"/46-61cm)
- **Measuring Tape**

### Optional
- **Embroidery Thread**: Black for bear facial details if not using safety eyes
- **Fabric Stiffener**: Light coat for clouds to help them hold shape
- **Small Bell**: Placed inside one element for gentle sound (ensure securely enclosed)

---

## GAUGE
**In Single Crochet (amigurumi style)**:
- 6 stitches and 6 rounds = 1" (2.5cm) worked in continuous rounds
- *Gauge is not critical for this project, but maintaining tight, even stitches is important for stuffed pieces*

**Gauge Tip for Beginners**: Amigurumi requires tighter stitches than regular crochet so stuffing doesn't show through. Your hook should be 1-2 sizes smaller than the yarn label recommends. If you can see stuffing between stitches, use a smaller hook.

---

## ABBREVIATIONS
- **ch**: chain
- **sc**: single crochet
- **hdc**: half double crochet
- **dc**: double crochet
- **inc**: increase (work 2 sc in same stitch)
- **dec**: invisible decrease (insert hook in front loops of next 2 sts, yarn over, pull through both loops, yarn over, pull through 2 loops on hook)
- **sl st**: slip stitch
- **st(s)**: stitch(es)
- **rnd(s)**: round(s)
- **rep**: repeat
- **BLO**: back loop only
- **FLO**: front loop only
- **[ ]**: total stitch count at end of round
- **( )**: repeat instructions within parentheses

---

## SPECIAL TECHNIQUES FOR BEGINNERS

### Magic Ring (Magic Circle)
This creates a tight, adjustable starting circle with no hole in the center.

1. Wrap yarn around your fingers to form a ring
2. Insert hook through ring, yarn over, pull up a loop
3. Chain 1 (does not count as a stitch)
4. Work required number of single crochets into the ring
5. Pull the tail end to tighten the ring closed
6. Join with slip stitch to first sc (or continue in spiral)

**Beginner Alternative**: Chain 2, work required stitches into 2nd chain from hook.

### Working in Continuous Rounds
Most amigurumi is worked in a spiral without joining each round.

1. Place a stitch marker in the first stitch of the round
2. Work continuously, moving the marker up as you complete each round
3. This creates a seamless look without a visible seam

### Invisible Decrease (dec)
Creates a smoother decrease than standard sc2tog.

1. Insert hook into front loop only of next stitch
2. Insert hook into front loop only of following stitch (2 loops on hook)
3. Yarn over, pull through both front loops (2 loops on hook)
4. Yarn over, pull through both loops (1 loop on hook)

### Stuffing Tips
- Stuff firmly but not overstuffed (pieces should feel like a firm pillow)
- Stuff as you go when the opening gets small
- Use small pieces of stuffing and poke into place with the back of your hook
- For spheres, stuff more firmly at the center for better shape
- Leave about 1/3 of the bottom unstuffed to make assembly easier

---

## PATTERN NOTES

- All pieces are worked in continuous rounds (spiral) unless otherwise noted
- Use a stitch marker to track the beginning of each round
- Maintain tight, even tension for best results
- Weave in ends as you complete each piece
- Do not join rounds unless specified
- For color changes, complete the last yarn over of the previous stitch with new color

**Safety First**: This mobile is decorative and should be hung securely out of baby's reach. Always supervise when baby is near the mobile. Ensure all pieces are securely attached and check regularly for wear.

---

## INSTRUCTIONS

### COMPONENT 1: TEDDY BEAR

The teddy bear is the centerpiece of your mobile. We'll make each part separately, then assemble.

#### Bear Head (Color A - Light Brown)

**Rnd 1**: 6 sc in magic ring [6]
- *Tip: Pull tail tight to close ring completely*

**Rnd 2**: inc in each st around [12]
- *Math check: 6 increases = 6 × 2 = 12 ✓*

**Rnd 3**: (sc, inc) around [18]
- *Pattern: 1 sc, 1 inc, repeated 6 times = 12 + 6 = 18 ✓*

**Rnd 4**: (2 sc, inc) around [24]
- *Pattern: 2 sc, 1 inc, repeated 6 times = 18 + 6 = 24 ✓*

**Rnd 5**: (3 sc, inc) around [30]
- *Pattern: 3 sc, 1 inc, repeated 6 times = 24 + 6 = 30 ✓*

**Rnds 6-10**: sc around [30]
- *5 rounds of even stitches for head height*

**Rnd 11**: (3 sc, dec) around [24]
- *Pattern: 3 sc, 1 dec, repeated 6 times = 30 - 6 = 24 ✓*

**Rnd 12**: (2 sc, dec) around [18]
- *Pattern: 2 sc, 1 dec, repeated 6 times = 24 - 6 = 18 ✓*

**Insert safety eyes** between Rnds 9 and 10, approximately 7 stitches apart.

**Begin stuffing head firmly**.

**Rnd 13**: (sc, dec) around [12]
- *Pattern: 1 sc, 1 dec, repeated 6 times = 18 - 6 = 12 ✓*

**Add more stuffing** to create a round, firm shape.

**Rnd 14**: dec around [6]
- *6 decreases = 12 ÷ 2 = 6 ✓*

Fasten off, leaving a 12" (30cm) tail for sewing. Use yarn needle to weave through remaining 6 stitches and pull tight to close. Weave in end securely.

#### Bear Snout/Muzzle (Color A - Light Brown)

**Rnd 1**: 6 sc in magic ring [6]

**Rnd 2**: inc in each st around [12]

**Rnd 3**: (sc, inc) around [18]

**Rnds 4-5**: sc around [18]

Fasten off, leaving a 10" (25cm) tail. Stuff lightly (this should be flatter than the head). Sew centered on the lower half of the head, slightly below the eyes.

**Embroider nose and mouth** with Color E (Dark Brown): Create a small triangle nose at the top center of the muzzle, then stitch a simple Y-shape for the mouth.

#### Bear Ears (Make 2 - Color A)

**Rnd 1**: 6 sc in magic ring [6]

**Rnd 2**: inc in each st around [12]

**Rnd 3**: (sc, inc) around [18]

**Rnds 4-5**: sc around [18]

Fasten off, leaving a 10" (25cm) tail. Do not stuff. Flatten the opening and pinch the edges together. Sew to top sides of head at Rnd 5, positioned slightly to the back.

#### Bear Body (Color A - Light Brown)

**Rnd 1**: 6 sc in magic ring [6]

**Rnd 2**: inc in each st around [12]

**Rnd 3**: (sc, inc) around [18]

**Rnd 4**: (2 sc, inc) around [24]

**Rnd 5**: (3 sc, inc) around [30]

**Rnds 6-12**: sc around [30]
- *7 rounds for body length*

**Rnd 13**: (3 sc, dec) around [24]

**Begin stuffing body**.

**Rnd 14**: (2 sc, dec) around [18]

**Rnd 15**: (sc, dec) around [12]

**Add more stuffing** to create an oval body shape.

**Rnd 16**: dec around [6]

Fasten off, leaving a 12" (30cm) tail. Close opening as with head. Set aside (we'll attach head after making limbs).

#### Bear Arms (Make 2 - Color A)

**Rnd 1**: 6 sc in magic ring [6]

**Rnd 2**: inc in each st around [12]

**Rnds 3-8**: sc around [12]
- *6 rounds for arm length*

Stuff the bottom half of the arm lightly. Leave the top unstuffed for easier sewing.

**Rnd 9**: dec around [6]

Fasten off, leaving a 10" (25cm) tail. Flatten opening. Sew to sides of body at Rnd 10-11, angled slightly forward.

#### Bear Legs (Make 2 - Color A)

**Rnd 1**: 6 sc in magic ring [6]

**Rnd 2**: inc in each st around [12]

**Rnd 3**: (sc, inc) around [18]

**Rnds 4-5**: sc around [18]

**Rnd 6**: (sc, dec) around [12]

**Rnds 7-10**: sc around [12]
- *4 rounds for leg length*

Stuff the foot (Rnds 1-6) firmly. Stuff the leg portion lightly.

**Rnd 11**: dec around [6]

Fasten off, leaving a 10" (25cm) tail. Flatten opening. Sew to bottom of body at Rnd 14-15, positioned slightly to the front so bear sits upright.

#### Bear Assembly

1. **Attach head to body**: Position head on top of body. Use the long tail from the body to sew around the connection point, making sure it's very secure. Weave through several
Disclaimer: This pattern was generated by AI and should be reviewed for accuracy before use. While we strive for quality, AI-generated content may contain errors. Please verify measurements, stitch counts, and instructions before beginning your project. Generated by purlJam.uk
Access your pattern anytime
Bookmark this page to access your pattern anytime