Type
Knitting
Difficulty
intermediate
Category
Pattern
Pattern
# Japanese Knot Crossbody Bag - Tunisian Simple Stitch
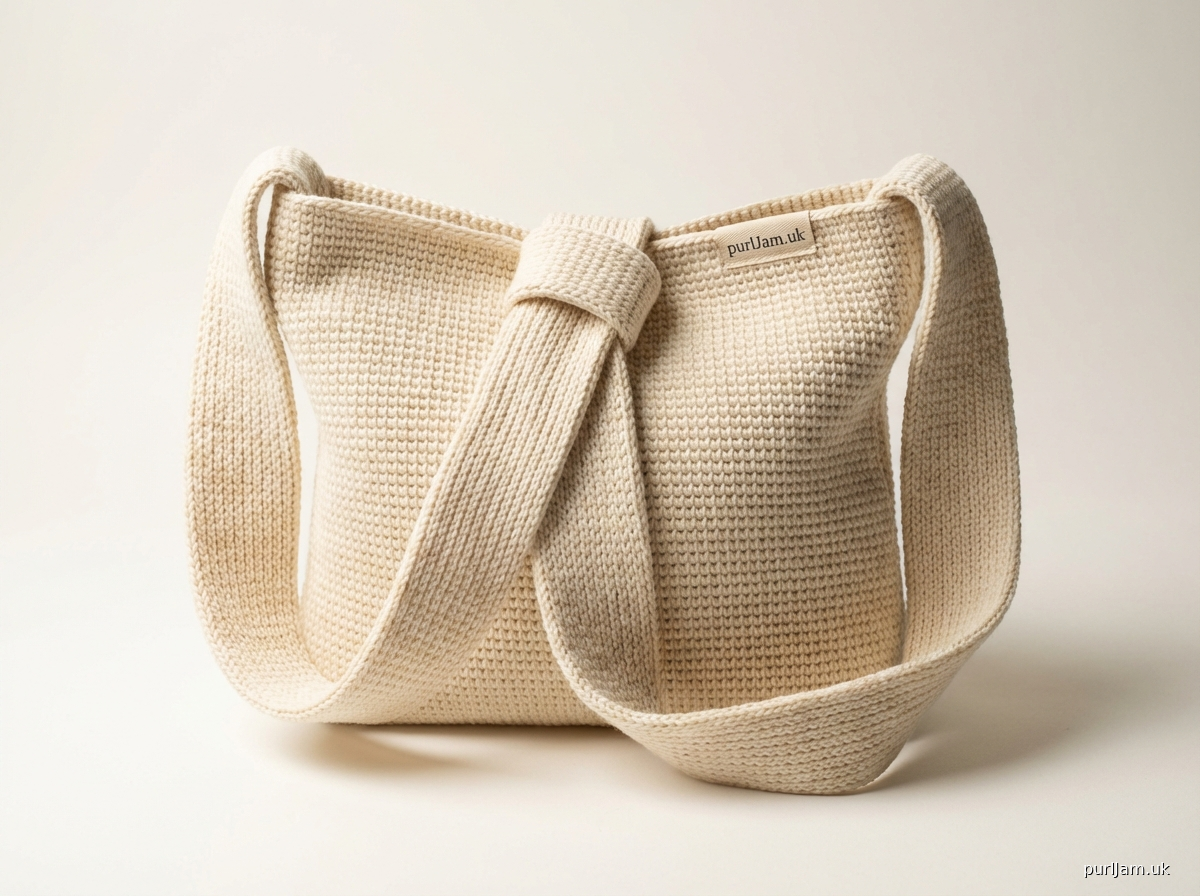
This pattern creates a sturdy and stylish crossbody bag, featuring a unique Japanese knot (Muso bag) closure that keeps your belongings secure and hidden. The wide, integrated strap is designed for comfortable carrying, distributing weight evenly, much like a baby sling, making it ideal for loads up to 7 kg (approximately 15.4 lbs). Crafted with dense Tunisian Simple Stitch, this bag offers exceptional durability and minimal stretch.
**Difficulty Level:** Intermediate
**Finished Measurements:**
* **Bag Body**: Approximately 12 inches (30.5 cm) wide x 14 inches (35.5 cm) tall
* **Shorter Strap (from bag body top)**: Approximately 4.5 inches (11.5 cm) wide x 9 inches (23 cm) long
* **Longer Strap (from bag body top)**: Approximately 4.5 inches (11.5 cm) wide x 30 inches (76 cm) long
* **Total Bag + Strap Length (Longer Side)**: Approximately 48 inches (122 cm)
**Materials:**
* **Yarn**: Worsted weight (Category 4) 100% cotton yarn
* Approximately 1000-1200 yards (915-1100 meters)
* *Example*: Lion Brand 24/7 Cotton, Dishie Cotton, or similar
* **Hook**: US K / 10.5 (6.5 mm) Tunisian crochet hook with a cable (at least 16 inches / 40 cm long)
* **Notions**: Yarn needle, scissors, measuring tape
**Gauge (Tunisian Simple Stitch):**
16 TSS stitches x 14 rows = 4 inches (10 cm)
*It is crucial to check your gauge. Adjust hook size if necessary to achieve the stated gauge, as variations will affect the bag's size and strap lengths.*
---
**Abbreviations (US Crochet Terminology):**
* **ch**: chain
* **FwdP**: Forward Pass
* **Lp**: Loop
* **Rem**: Remaining
* **RetP**: Return Pass
* **sc**: single crochet
* **sl st**: slip stitch
* **st(s)**: stitch(es)
* **TSS**: Tunisian Simple Stitch (insert hook under vertical bar, yarn over, pull up a loop)
* **TSS2tog**: Tunisian Simple Stitch 2 together (insert hook under first vertical bar, yarn over, pull up a loop; insert hook under next vertical bar, yarn over, pull up a loop; yarn over, pull through all 3 loops on hook) - *Note: This is a common decrease method, effectively making 2 vertical bars into 1.*
**Special Stitch Instructions:**
* **Tunisian Simple Stitch (TSS)**:
* **FwdP**: Insert hook under the front vertical bar of the next stitch, yarn over, pull up a loop. Keep all loops on hook. Repeat across.
* **RetP**: Yarn over, pull through 1 loop (chain 1, forms edge stitch); [yarn over, pull through 2 loops] repeat until 1 loop remains on hook.
* **TSS Decrease (TSS2tog)**: To decrease one stitch, work a TSS into the first vertical bar, then immediately work another TSS into the next vertical bar. Yarn over, pull through both loops on the hook. This effectively works two stitches together.
* *Note on TSS2tog*: For this pattern, when TSS2tog is specified at the *beginning* of a row, skip the first vertical bar (which is the edge stitch) and work TSS2tog into the next two vertical bars. When working at the *end* of a row, work TSS2tog into the last two vertical bars before the final edge stitch.
---
**Pattern Notes:**
* The bag is worked in two flat panels (Front and Back), which are then seamed together. This ensures the best appearance for Tunisian Simple Stitch.
* Each panel consists of the bag body, a transition section where the width is decreased for the strap, and the strap itself.
* The first vertical bar on the hook is always counted as the first stitch.
* Always insert your hook under the two vertical loops of the last stitch of the previous row (often called the "full stitch" or "chain-like stitch") to create a neat edge.
---
### **Panel 1: Front Panel with Shorter Strap**
**Bag Body (Worked Flat):**
**Row 1 (FwdP):** Ch 48. Insert hook into the 2nd ch from hook, yarn over, pull up a loop. Pull up a loop in each rem ch across. (48 loops on hook)
**Row 1 (RetP):** Work RetP. (48 TSS sts)
**Row 2 (FwdP):** Skip the first vertical bar (the one under the loop on your hook). Work TSS in each vertical bar across until the last st. Work TSS into the last st (insert hook under the two vertical loops of the last stitch). (48 loops on hook)
**Row 2 (RetP):** Work RetP.
**Rows 3-49:** Repeat Row 2 FwdP and RetP.
* *Validation*: After Row 49, the panel should measure approximately 12 inches (30.5 cm) wide by 14 inches (35.5 cm) tall. (49 rows * (4 inches / 14 rows) = 14 inches). (48 stitches * (4 inches / 16 stitches) = 12 inches).
**Strap Transition (Decreasing for Strap Width):**
* In this section, you will decrease the stitch count from 48 sts to 18 sts over 15 rows, narrowing the strap to 4.5 inches (11.5 cm). This means you will be decreasing 1 st at each end of the FwdP in 15 rows (total of 30 sts decreased).
**Row 50 (FwdP):** Skip the first vertical bar. TSS2tog over the next 2 vertical bars. Work TSS in each vertical bar across until the last 3 sts. TSS2tog over the next 2 vertical bars. Work TSS into the last st. (46 loops on hook)
**Row 50 (RetP):** Work RetP.
**Row 51 (FwdP):** Skip the first vertical bar. TSS2tog over the next 2 vertical bars. Work TSS in each vertical bar across until the last 3 sts. TSS2tog over the next 2 vertical bars. Work TSS into the last st. (44 loops on hook)
**Row 51 (RetP):** Work RetP.
**Row 52 (FwdP):** Skip the first vertical bar. TSS2tog over the next 2 vertical bars. Work TSS in each vertical bar across until the last 3 sts. TSS2tog over the next 2 vertical bars. Work TSS into the last st. (42 loops on hook)
**Row 52 (RetP):** Work RetP.
**Row 53 (FwdP):** Skip the first vertical bar. TSS2tog over the next 2 vertical bars. Work TSS in each vertical bar across until the last 3 sts. TSS2tog over the next 2 vertical bars. Work TSS into the last st. (40 loops on hook)
**Row 53 (RetP):** Work RetP.
**Row 54 (FwdP):** Skip the first vertical bar. TSS2tog over the next 2 vertical bars. Work TSS in each vertical bar across until the last 3 sts. TSS2tog over the next 2 vertical bars. Work TSS into the last st. (38 loops on hook)
**Row 54 (RetP):** Work RetP.
**Row 55 (FwdP):** Skip the first vertical bar. TSS2tog over the next 2 vertical bars. Work TSS in each vertical bar across until the last 3 sts. TSS2tog over the next 2 vertical bars. Work TSS into the last st. (36 loops on hook)
**Row 55 (RetP):** Work RetP.
**Row 56 (FwdP):** Skip the first vertical bar. TSS2tog over the next 2 vertical bars. Work TSS in each vertical bar across until the last 3 sts. TSS2tog over the next 2 vertical bars. Work TSS into the last st. (34 loops on hook)
**Row 56 (RetP):** Work RetP.
**Row 57 (FwdP):** Skip the first vertical bar. TSS2tog over the next 2 vertical bars. Work TSS in each vertical bar across until the last 3 sts. TSS2tog over the next 2 vertical bars. Work TSS into the last st. (32 loops on hook)
**Row 57 (RetP):** Work RetP.
**Row 58 (FwdP):** Skip the first vertical bar. TSS2tog over the next 2 vertical bars. Work TSS in each vertical bar across until the last 3 sts. TSS2tog over the next 2 vertical bars. Work TSS into the last st. (30 loops on hook)
**Row 58 (RetP):** Work RetP.
**Row 59 (FwdP):** Skip the first vertical bar. TSS2tog over the next 2 vertical bars. Work TSS in each vertical bar across until the last 3 sts. TSS2tog over the next 2 vertical bars. Work TSS into the last st. (28 loops on hook)
**Row 59 (RetP):** Work RetP.
**Row 60 (FwdP):** Skip the first vertical bar. TSS2tog over the next 2 vertical bars. Work TSS in each vertical bar across until the last 3 sts. TSS2tog over the next 2 vertical bars. Work TSS into the last st. (26 loops on hook)
**Row 60 (RetP):** Work RetP.
**Row 61 (FwdP):** Skip the first vertical bar. TSS2tog over the next 2 vertical bars. Work TSS in each vertical bar across until the last 3 sts. TSS2tog over the next 2 vertical bars. Work TSS into the last st. (24 loops on hook)
**Row 61 (RetP):** Work RetP.
**Row 62 (FwdP):** Skip the first vertical bar. TSS2tog over the next 2 vertical bars. Work TSS in each vertical bar across until the last 3 sts. TSS2tog over the next 2 vertical bars. Work TSS into the last st. (22 loops on hook)
**Row 62 (RetP):** Work RetP.
**Row 63 (FwdP):** Skip the first vertical bar. TSS2tog over the next 2 vertical bars. Work TSS in each vertical bar across until the last 3 sts. TSS2tog over the next 2 vertical bars. Work TSS into the last st. (20 loops on hook)
**Row 63 (RetP):** Work RetP.
**Row 64 (FwdP):** Skip the first vertical bar. TSS2tog over the next 2 vertical bars. Work TSS in each vertical bar across until the last 3 sts. TSS2tog over the next 2 vertical bars. Work TSS into the last st. (18 loops on hook)
**Row 64 (RetP):** Work RetP.
* *Validation*: After Row 64, you should have 18 active loops on your hook. The transition section should measure approximately 4.28 inches (10.8 cm) (15 rows * (4 inches / 14 rows)).
**Shorter Strap (Straight Section):**
**Rows 65-96:** Repeat Row 2 FwdP and RetP, maintaining 18 TSS sts per row.
* *Validation*: This section adds 32 rows to the strap. (32 rows * (4 inches / 14 rows) = 9.14 inches (23.2 cm)). The shorter strap (after transition) should measure approximately 9 inches (23 cm) in length.
**Bind Off for Shorter Strap:**
**Row 97 (Bind Off):** Skip the first vertical bar. Insert hook under the next vertical bar, yarn over, pull up a loop, pull through the loop on your hook (sl st made). Repeat across, making 1 sl st in each vertical bar until the last st. Make a sl st into the last st (insert hook under the two vertical loops). (18 sl sts)
Fasten off, leave a long tail for seaming (approx. 20 inches / 50 cm).
---
### **Panel 2: Back Panel with Longer Strap**
**Bag Body (Worked Flat):**
**Row 1 (FwdP):** Ch 48. Insert hook into the 2nd ch from hook, yarn over, pull up a loop. Pull up a loop in each rem ch across. (48 loops on hook)
**Row 1 (RetP):** Work RetP. (48 TSS sts)
**Row 2 (FwdP):** Skip the first vertical bar. Work TSS in each vertical bar across until the last st. Work TSS into the last st. (48 loops on hook)
**Row 2 (RetP):** Work RetP.
**Rows 3-49:** Repeat Row 2 FwdP and RetP.
* *Validation*: After Row 49, the panel should measure approximately 12 inches (30.5 cm) wide by 14 inches (35.5 cm) tall. (49 rows * (4 inches / 14 rows) = 14 inches). (48 stitches * (4 inches / 16 stitches) = 12 inches).
**Strap Transition (Decreasing for Strap Width):**
**Rows 50-64:** Repeat Rows 50-64 from "Panel 1: Strap Transition" section. You should again end with 18 loops on your hook.
* *Validation*: After Row 64, you should have 18 active loops on your hook. The transition section should measure approximately 4.28 inches (10.8 cm).
**Longer Strap (Straight Section):**
**Rows 65-169:** Repeat Row 2 FwdP and RetP, maintaining 18 TSS sts per row.
* *Validation*: This section adds 105 rows to the strap. (105 rows * (4 inches / 14 rows) = 30 inches (76 cm)). The longer strap (after transition) should measure approximately 30 inches (76 cm) in length.
**Bind Off for Longer Strap:**
**Row 170 (Bind Off):** Skip the first vertical bar. Insert hook under the next vertical bar, yarn over, pull up a loop, pull through the loop on your hook (sl st made). Repeat across, making 1 sl st in each vertical bar until the last st. Make a sl st into the last st (insert hook under the two vertical loops). (18 sl sts)
Fasten off, leave a long tail for seaming (approx. 20 inches / 50 cm).
---
### **Assembly & Finishing**
1. **Seaming the Bag Body:**
* Place the Front Panel and Back Panel together, wrong sides facing.
* Using the long tail from one panel and a yarn needle, or a separate piece of yarn for seaming, stitch together the bottom edge and both side edges of the bag body. Use a sturdy seaming method like the mattress stitch or whip stitch through both loops for durability.
* *Validation*: Ensure the bag body forms a secure pouch, approximately 12 inches (30.5 cm) wide x 14 inches (35.5 cm) deep.
* Weave in all remaining loose ends securely.
2. **Optional Edging (Single Crochet):**
* For a neater finish, you can add a single crochet border around the opening of the bag and along the edges of the straps.
* With right side facing, attach yarn with a sl st to any point on the bag opening or strap edge. Ch 1, then work sc sts evenly around the entire opening and both strap edges. For flat edges, aim for 1 sc per row. For corners, work 3 sc in the same st. Join with a sl st to the first sc. Fasten off and weave in ends.
3. **Japanese Knot Closure:**
* Lay the bag flat. The shorter strap (from Panel 1) will form a loop.
* Take the end of the shorter strap and pull it through the opening created by the bag body (the unseamed top edge of the bag), creating a loop on one side.
* Take the end of the longer strap (from Panel 2) and thread it *through* the loop formed by the shorter strap.
* Pull the longer strap through until the bag is securely closed and the opening is no longer visible. The weight of the bag's contents will help secure the knot.
* Adjust the knot and straps for a comfortable crossbody fit.
**Care Instructions:**
* Machine wash cold on gentle cycle. Lay flat to dry to maintain shape and prevent stretching.
---
*End of Pattern*
Disclaimer: This pattern was generated by AI and should be reviewed for accuracy before use. While we strive for quality, AI-generated content may contain errors. Please verify measurements, stitch counts, and instructions before beginning your project. Generated by purlJam.uk
Access your pattern anytime
Bookmark this page to access your pattern anytime