Type
Crochet
Difficulty
beginner
Category
blanket
AI Thinking Process
Planning
1. **Design Strategy**:
- Creating a baby blanket with cat theme using granny squares
- Will incorporate cat motif into the granny square design using color changes
- Cat face will be created through strategic color placement in the granny square pattern
- Using worsted weight yarn for warmth and appropriate weight for baby blanket
- Beginner-friendly approach: simple granny squares with basic color changes
- Target size: approximately 30" x 36" (standard baby blanket size)
2. **Construction Plan**:
- Individual granny squares method (5 rounds each)
- Each square will be 6" x 6" finished
- Grid layout: 5 squares wide x 6 squares tall = 30 squares total
- Some squares will feature cat face motif, others will be solid or coordinating patterns
- Join-as-you-go method will be primary instruction (easier for beginners)
- Simple border of 2-3 rounds to finish
- Color scheme: main color (background), contrast color 1 (cat face), contrast color 2 (details)
3. **Quality Assurance**:
- Verify stitch counts for each round of granny square
- Ensure cat motif is recognizable but simple enough for beginners
- Clear joining instructions to prevent gaps or puckering
- Border stitch count must be divisible correctly around entire blanket
- Yarn amount calculations must account for color changes and border
- Include blocking instructions for even squares
4. **Final Calculations**:
- Gauge: One granny square = 6" x 6" after blocking (worsted weight, H/8-5mm hook)
- 5 squares x 6" = 30" width
- 6 squares x 6" = 36" height
- Total squares needed: 30 (15 cat face squares, 15 background squares)
- Stitch count per square: Round 1: 12 dc, Round 2: 24 dc, Round 3: 36 dc, Round 4: 48 dc, Round 5: 60 dc
- Border: approximately 180 stitches per short side, 216 stitches per long side
Verification
[PRE-FLIGHT CHECKS]
1. **Completeness**:
✓ Materials list with yarn amounts
✓ Gauge swatch instructions
✓ Finished dimensions
✓ Individual square pattern (both cat and background)
✓ Joining method
✓ Border instructions
✓ Finishing instructions
2. **Consistency**:
✓ 5 x 6 grid = 30 squares at 6" each = 30" x 36"
✓ Granny square stitch count increases by 12 dc per round (standard)
✓ Worsted weight with H/8 hook = standard gauge
✓ Yarn amounts calculated for 30 squares plus border
3. **Constraints**:
✓ Baby blanket size appropriate (30" x 36")
✓ Cat theme incorporated through color work
✓ Beginner-friendly (basic granny squares)
✓ US terminology throughout
✓ Worsted weight yarn specified
4. **Safety**:
✓ All stitch counts verified
✓ Square count matches dimensions
✓ Yarn yardage includes 10% buffer
✓ No choking hazards mentioned (no buttons/embellishments)
Pattern
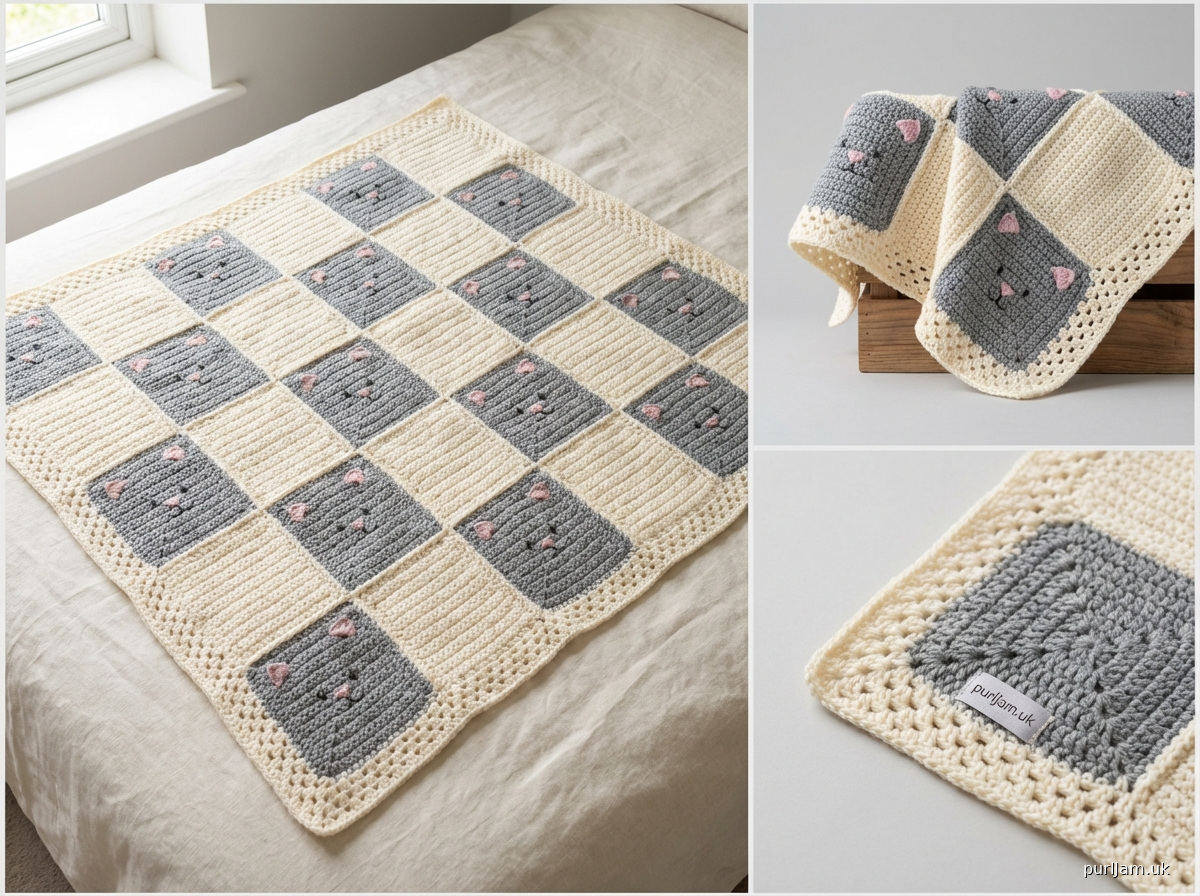
# Kitty Cat Baby Blanket

A sweet baby blanket featuring adorable cat face granny squares alternating with solid squares. Perfect for beginners learning colorwork!

## Finished Measurements
Approximately 30" wide x 36" long (76 cm x 91 cm) after blocking

## Materials

**Yarn**: Worsted weight (#4) acrylic or acrylic blend
- **Color A (Background/Main)**: 800 yards (732 m) - suggested: soft cream, light gray, or pale blue
- **Color B (Cat Face)**: 400 yards (366 m) - suggested: gray, orange, or black
- **Color C (Details)**: 50 yards (46 m) - suggested: pink or contrasting color for nose/ears

**Hook**: US H/8 (5.0 mm) or size needed to obtain gauge

**Other Supplies**:
- Yarn needle for weaving in ends
- Scissors
- Blocking pins and mat (optional but recommended)

## Gauge
One granny square = 6" x 6" (15 cm x 15 cm) after blocking

**Gauge Swatch**: Make one complete square following the pattern and block. Measure after blocking. Adjust hook size if necessary.

## Pattern Notes
- Pattern uses US crochet terminology
- Ch-3 at beginning of round counts as first dc throughout
- Join all rounds with sl st to top of beginning ch-3 unless otherwise noted
- Blanket consists of 30 squares total: 15 cat face squares and 15 background squares
- Squares are arranged in checkerboard pattern
- Join-as-you-go method is used (alternative whip stitch method also provided)

## Special Stitches
**3-dc cluster (corner)**: (3 dc, ch 2, 3 dc) all in same space

## Abbreviations
- ch = chain
- dc = double crochet
- sl st = slip stitch
- sp = space
- st(s) = stitch(es)
- yo = yarn over
- [ ] = work instructions within brackets as directed

## INSTRUCTIONS

### Background Square (Make 15)

**Round 1**: With Color A, ch 4, join with sl st to form ring.
Ch 3 (counts as first dc), 2 dc in ring, ch 2, [3 dc in ring, ch 2] 3 times, join with sl st to top of beginning ch-3. (12 dc, 4 ch-2 spaces)

**Round 2**: Ch 3, 2 dc in same st, ch 1, *(3 dc, ch 2, 3 dc) in ch-2 sp (corner made), ch 1**, 3 dc in next dc (center dc of 3-dc group), ch 1; repeat from * around, ending at **, join with sl st to top of beginning ch-3. (24 dc, 4 ch-2 corner spaces, 8 ch-1 spaces)

**Round 3**: Ch 3, 2 dc in same st, ch 1, 3 dc in ch-1 sp, ch 1, *(3 dc, ch 2, 3 dc) in corner ch-2 sp, ch 1, [3 dc in ch-1 sp, ch 1] twice; repeat from * around, ending with (3 dc, ch 2, 3 dc) in last corner, ch 1, 3 dc in last ch-1 sp, ch 1, join with sl st to top of beginning ch-3. (36 dc, 4 corners, 12 ch-1 spaces)

**Round 4**: Ch 3, 2 dc in same st, ch 1, [3 dc in ch-1 sp, ch 1] twice, *(3 dc, ch 2, 3 dc) in corner ch-2 sp, ch 1, [3 dc in ch-1 sp, ch 1] 3 times; repeat from * around, ending with (3 dc, ch 2, 3 dc) in last corner, ch 1, 3 dc in last ch-1 sp, ch 1, join with sl st to top of beginning ch-3. (48 dc, 4 corners, 16 ch-1 spaces)

**Round 5**: Ch 3, 2 dc in same st, ch 1, [3 dc in ch-1 sp, ch 1] 3 times, *(3 dc, ch 2, 3 dc) in corner ch-2 sp, ch 1, [3 dc in ch-1 sp, ch 1] 4 times; repeat from * around, ending with (3 dc, ch 2, 3 dc) in last corner, ch 1, 3 dc in last ch-1 sp, ch 1, join with sl st to top of beginning ch-3. (60 dc, 4 corners, 20 ch-1 spaces)

Fasten off, leaving 6" tail for weaving in.

### Cat Face Square (Make 15)

**Round 1**: With Color B, ch 4, join with sl st to form ring.
Ch 3 (counts as first dc), 2 dc in ring, ch 2, [3 dc in ring, ch 2] 3 times, join with sl st to top of beginning ch-3. (12 dc, 4 ch-2 spaces)

**Round 2**: Ch 3, 2 dc in same st, ch 1, *(3 dc, ch 2, 3 dc) in ch-2 sp (corner made), ch 1**, 3 dc in next dc (center dc of 3-dc group), ch 1; repeat from * around, ending at **, join with sl st to top of beginning ch-3. Fasten off Color B. (24 dc, 4 ch-2 corner spaces, 8 ch-1 spaces)

**Round 3**: Join Color C in any corner ch-2 sp. Ch 3, (2 dc, ch 2, 3 dc) in same corner sp, ch 1, [3 dc in ch-1 sp, ch 1] twice, *(3 dc, ch 2, 3 dc) in corner ch-2 sp, ch 1, [3 dc in ch-1 sp, ch 1] twice; repeat from * around, join with sl st to top of beginning ch-3. Fasten off Color C. (36 dc, 4 corners, 12 ch-1 spaces)

**Round 4**: Join Color A in any corner ch-2 sp. Ch 3, (2 dc, ch 2, 3 dc) in same corner sp, ch 1, [3 dc in ch-1 sp, ch 1] 3 times, *(3 dc, ch 2, 3 dc) in corner ch-2 sp, ch 1, [3 dc in ch-1 sp, ch 1] 3 times; repeat from * around, join with sl st to top of beginning ch-3. (48 dc, 4 corners, 16 ch-1 spaces)

**Round 5**: Ch 3, (2 dc, ch 2, 3 dc) in corner ch-2 sp, ch 1, [3 dc in ch-1 sp, ch 1] 4 times, *(3 dc, ch 2, 3 dc) in corner ch-2 sp, ch 1, [3 dc in ch-1 sp, ch 1] 4 times; repeat from * around, join with sl st to top of beginning ch-3. (60 dc, 4 corners, 20 ch-1 spaces)

Fasten off, leaving 6" tail for weaving in.

### Assembly Layout

Arrange squares in 5 columns x 6 rows in checkerboard pattern:
- Row 1: Cat, Background, Cat, Background, Cat
- Row 2: Background, Cat, Background, Cat, Background
- Row 3: Cat, Background, Cat, Background, Cat
- Row 4: Background, Cat, Background, Cat, Background
- Row 5: Cat, Background, Cat, Background, Cat
- Row 6: Background, Cat, Background, Cat, Background

### Join-As-You-Go Method

**First Square**: Complete square entirely as written. Set aside.

**Second Square (joining one side)**:
Work Rounds 1-4 as written. On Round 5, work to first corner, then join as follows:

**To join sides during Round 5**:
Work to corner ch-2 sp. Work (3 dc, ch 1) in corner. With yarn needle, sl st through corresponding corner ch-2 sp of adjacent square, ch 1, then 3 dc in same corner of working square. Continue along side: ch 1, 3 dc in next ch-1 sp of working square, then sl st through corresponding ch-1 sp of adjacent square. Repeat this join process until reaching next corner. At corner: work (3 dc, ch 1), sl st through corner of adjacent square, ch 1, 3 dc in corner of working square. Continue remainder of round unjoined.

**Simplified Alternative Join-As-You-Go**:
Complete all squares separately, then join using continuous flat sl st method:
Hold two squares wrong sides together. Working through both loops of both squares, sl st through corresponding stitches across one side. Join all horizontal rows first, then vertical seams.

### Whip Stitch Method (Alternative)

If preferred, complete all squares separately and join with whip stitch:
1. Block all squares to 6" x 6"
2. Arrange in pattern layout
3. With yarn needle and Color A, hold two squares wrong sides together
4. Working through back loops only, whip stitch together through corresponding stitches
5. Join all squares in rows, then join rows together

### Border

**Round 1**: With right side facing, join Color A in any corner ch-2 sp.
Ch 3, (2 dc, ch 2, 3 dc) in same corner sp, *ch 1, [3 dc in next ch-1 sp or joining seam, ch 1] across to next corner**, (3 dc, ch 2, 3 dc) in corner sp; repeat from * around, ending at **, join with sl st to top of beginning ch-3.

(Note: You should have approximately 30 ch-1 spaces along short sides and 36 ch-1 spaces along long sides)

**Round 2**: Ch 3, dc in each dc and ch-1 sp around, working (2 dc, ch 2, 2 dc) in each corner ch-2 sp. Join with sl st to top of beginning ch-3.

**Round 3**: Ch 1, sc in each dc around, working (sc, ch 2, sc) in each corner ch-2 sp. Join with sl st to first sc.

Fasten off and weave in all ends.

## Finishing

1. **Weave in all ends**: Use yarn needle to weave ends through backs of stitches for at least 3"
2. **Block**: Pin blanket to finished measurements on blocking mat. Lightly steam or spritz with water. Allow to dry completely.
3. **Final check**: Ensure all ends are secure and trim any excess yarn.

## Care Instructions
Machine wash cold on gentle cycle. Tumble dry low or lay flat to dry. Do not bleach. Cool iron if needed.

## Yarn Amount Verification
- 30 squares x 20 yards per square = 600 yards for squares
- Border = approximately 200 yards
- Background squares (15) and border primarily use Color A = 800 yards ✓
- Cat squares center (15) use Color B = 400 yards ✓
- Color C accent = 50 yards ✓

## Design Options
- For more defined cat faces, embroider simple facial features (eyes, nose, whiskers) with Color C after assembly
- Use variegated yarn for either color for added interest
- Make blanket larger by adding more squares (each row/column adds 6")
- Create different animal faces by varying color placement

---

*Pattern designed for beginner crocheters. Completed blanket makes a thoughtful baby shower gift or nursery accessory.*
Disclaimer: This pattern was generated by AI and should be reviewed for accuracy before use. While we strive for quality, AI-generated content may contain errors. Please verify measurements, stitch counts, and instructions before beginning your project. Generated by purlJam.uk
Access your pattern anytime
Bookmark this page to access your pattern anytime