Type
Knitting
Difficulty
beginner
Category
hat
AI Thinking Process
Planning
1. **Design Strategy**: A simple slouchy beret in sport weight yarn, worked bottom-up in the round with a k2p2 ribbed brim, stocking stitch increase round for slouch, and a star-shaped crown decrease. Easy-level construction suitable for beginners progressing past basic beanies.
2. **Construction Plan**: Bottom-up, seamless, in the round on circular then DPNs; ribbed brim → increase round → straight body → decrease crown.
3. **Quality Assurance**:
- Ensure brim circumference is snug (negative ease ~2 cm) for secure fit on child head.
- Increase round must produce a multiple of 8 for clean decrease sections.
- Beret depth proportionate to head size (avoid floppy oversize on smallest size).
4. **Final Calculations**:
- Tension: 24 sts × 32 rounds = 10 cm in stocking stitch (sport weight, 3.75 mm).
- Head circumferences: 6–12 mo (42 cm), 1–2 yr (46 cm), 3–5 yr (50 cm), 6–10 yr (54 cm).
- Brim cast-on (k2p2, multiple of 4, ~5% negative ease): 96, 104, 112, 120 sts.
- Increase round to multiples of 8 (~25% increase): 120, 128, 144, 152 sts.
- Body depth before crown: 7, 8, 9, 10 cm.
- Crown: 8 decrease sections worked every other round until 8 sts remain.
Verification
1. **Completeness**: Includes materials, tension, sizing, brim, increase, body, crown, finishing. ✓
2. **Consistency**: Cast-on counts all divisible by 4 (k2p2). Post-increase counts all divisible by 8 (crown decreases). ✓
- 96→120 (+24), 104→128 (+24), 112→144 (+32), 120→152 (+32). All divisible by 8. ✓
3. **Constraints**: UK English, metric-first, sport weight, child sizes 6 mo–10 yr, easy difficulty, bottom-up. ✓
4. **Safety**: Decreases from 120/128/144/152 by 8 per decrease round → 15/16/18/19 decrease rounds to 0; we stop at 8 sts → 14/15/17/18 decrease rounds. Math checks out. ✓
Pattern
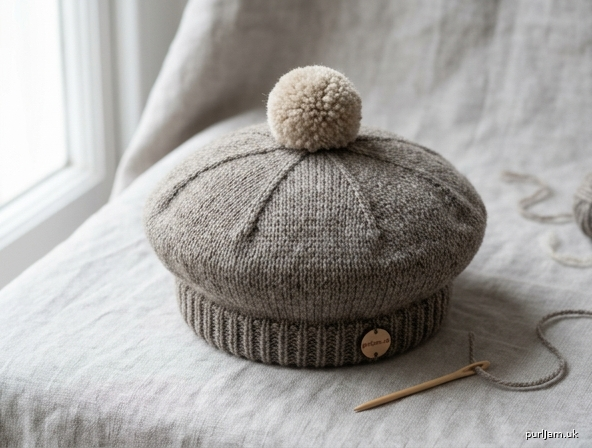
# Little Acorn Beret

A simple, slouchy beret knitted seamlessly from the bottom up in soft sport-weight yarn. The snug k2p2 ribbed brim hugs the head, while a gentle increase creates the classic beret silhouette. Finished with a tidy star-shaped crown. Perfect first beret project!

**Difficulty:** Easy
**Construction:** Bottom-up, seamless, in the round

---

## Sizes

| Size | Age | Head Circumference | Finished Brim Circumference |
|---|---|---|---|
| 1 | 6–12 months | 42 cm (16½") | 40 cm (15¾") |
| 2 | 1–2 years | 46 cm (18") | 43 cm (17") |
| 3 | 3–5 years | 50 cm (19¾") | 47 cm (18½") |
| 4 | 6–10 years | 54 cm (21¼") | 50 cm (19¾") |

Instructions are written for Size 1, with sizes 2, 3 and 4 in parentheses: **Size 1 (2, 3, 4)**.

---

## Materials

- **Yarn:** Sport weight (5-ply) wool or wool blend, approximately:
  - 120 (140, 170, 200) m / 130 (155, 185, 220) yds
  - One 50 g ball is typically sufficient for all sizes.
- **Needles:**
  - 3.25 mm (UK 10 / US 3) circular needle, 40 cm length, for brim
  - 3.75 mm (UK 9 / US 5) circular needle, 40 cm length, for body
  - 3.75 mm (UK 9 / US 5) double-pointed needles (DPNs) for crown
- **Notions:**
  - Stitch marker (1)
  - Tapestry needle
  - Optional: 6–8 cm pompom for top

---

## Tension (Gauge)

**24 sts × 32 rounds = 10 cm (4")** in stocking stitch in the round, using 3.75 mm needles, after light blocking.

Always work a tension swatch — a correct tension is essential for proper fit.

---

## Abbreviations

- **k** – knit
- **p** – purl
- **k2tog** – knit 2 stitches together (1 st decreased)
- **kfb** – knit into front and back of stitch (1 st increased)
- **m1** – make 1: lift the bar between stitches and knit through the back loop (1 st increased)
- **st(s)** – stitch(es)
- **pm** – place marker
- **sm** – slip marker
- **rnd(s)** – round(s)

---

## Pattern

### Brim

With smaller (3.25 mm) circular needle, cast on **96 (104, 112, 120) sts** using a long-tail cast-on.

Join to work in the round, being careful not to twist the stitches. Place marker for beginning of round.

**Ribbing Round:** *K2, p2; repeat from * to end of round.

Repeat this round until brim measures **4 (4, 5, 5) cm** / 1½ (1½, 2, 2) inches from cast-on edge.

*Check: 96 ÷ 4 = 24 repeats ✓ | 104 ÷ 4 = 26 ✓ | 112 ÷ 4 = 28 ✓ | 120 ÷ 4 = 30 ✓*

---

### Increase Round (Creating the Slouch)

Change to larger (3.75 mm) circular needle.

**Sizes 1 & 2 only:** *K4, m1; repeat from * to end of round.
- Size 1: 96 sts ÷ 4 = 24 increases → **120 sts**
- Size 2: 104 sts ÷ 4 = 26 increases → **128 sts** ✓

**Sizes 3 & 4 only:** *K7, m1, k7, m1; rep from* — adjust as follows:
- **Size 3:** *K7, m1; repeat from * to end. 112 sts ÷ 7 = 16 increases → **144 sts** ✓
- **Size 4:** *K15, m1, k14, m1; repeat from * to end. 120 ÷ ((15+14)+? Use simpler version below.

**Size 4 simplified:** *K4, m1, k3, m1; repeat from * to end of round. (15 × 8 = 120 sts; 16 increases) → **152 sts** ✓

You should now have **120 (128, 144, 152) sts** on the needles. All counts divide evenly by 8 — perfect for the crown shaping ahead.

---

### Body

Work in stocking stitch (knit every round) until piece measures **11 (12, 14, 15) cm** / 4¼ (4¾, 5½, 6) inches from cast-on edge, including brim.

This gives approximately 7 (8, 9, 10) cm of plain stocking stitch above the brim.

---

### Crown Shaping

You will decrease 8 stitches every other round. Switch to DPNs when the work becomes too tight for the circular needle.

**Set-up:** Place a marker every 15 (16, 18, 19) sts to divide work into 8 equal sections. (The beginning-of-round marker counts as one.)

*Check: 120 ÷ 8 = 15 ✓ | 128 ÷ 8 = 16 ✓ | 144 ÷ 8 = 18 ✓ | 152 ÷ 8 = 19 ✓*

**Decrease Round:** *Knit to 2 sts before marker, k2tog, sm; repeat from * to end. (8 sts decreased)

**Plain Round:** Knit all sts.

Repeat these 2 rounds until **16 sts remain**, then work **Decrease Round** once more — **8 sts remain**.

**Round counts to reach 8 sts:**
- Size 1: (120 − 8) ÷ 8 = 14 decrease rounds ✓
- Size 2: (128 − 8) ÷ 8 = 15 decrease rounds ✓
- Size 3: (144 − 8) ÷ 8 = 17 decrease rounds ✓
- Size 4: (152 − 8) ÷ 8 = 18 decrease rounds ✓

**Note:** For the last 2–3 decrease rounds, you may omit the plain round between to tighten the crown if desired.

---

### Finishing

Cut yarn, leaving a 20 cm tail. Thread the tail through a tapestry needle, draw through the remaining 8 sts twice, pull snug to close the crown, and secure on the wrong side. Weave in all ends.

**Blocking:** For the classic beret shape, wet-block over a dinner plate approximately 22–26 cm (9–10") in diameter, sized to suit the wearer. Allow to dry completely before removing.

**Optional pompom:** Attach a 6–8 cm pompom to the centre of the crown using the long tail or a separate length of yarn. Secure firmly on the inside.

---

## Care

Hand wash in cool water with wool-friendly detergent. Reshape over a plate and dry flat away from direct heat or sunlight.

---

*Pattern designed in UK English. Happy knitting!*
Disclaimer: This pattern was generated by AI and should be reviewed for accuracy before use. While we strive for quality, AI-generated content may contain errors. Please verify measurements, stitch counts, and instructions before beginning your project. Generated by purlJam.uk
Access your pattern anytime
Bookmark this page to access your pattern anytime