Type
Knitting
Difficulty
intermediate
Category
custom
AI Thinking Process
Planning
Verification
Pattern
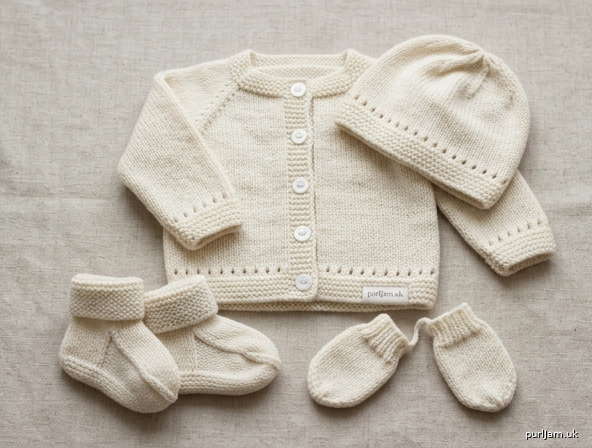
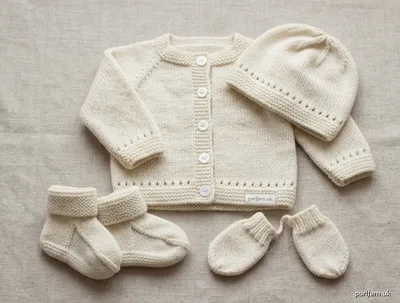
Little Blossom Newborn Layette
A matching 4-piece set for a baby girl: drop-shoulder cardigan, beanie, booties, and thumbless mittens. Everything is knit flat and seamed. Stockinette fabric, garter hems and bands, and one easy eyelet row give a delicate look without advanced stitches.
Skill level: Beginner
Construction: Flat, seamed
Size
Newborn (about 5½–9 lb / 2.5–4 kg)
Finished measurements
- Cardigan chest (buttoned): 16" (40.5 cm)
- Cardigan length: 9½" (24 cm)
- Sleeve length: 6" (15 cm)
- Hat circumference: 13¼" (33.5 cm)
- Hat height: 5½" (14 cm)
- Bootie foot length: 3½" (9 cm)
- Mitten length: 3½" (9 cm)
Materials
- Yarn: 500 yards (457 m) worsted weight (CYC 4). Superwash wool, acrylic, or a washable wool/acrylic blend is recommended. Light pink, cream, peach, or lavender all suit the design.
- Needles: US 8 / 5 mm straight needles, or size needed to obtain gauge
- Notions:
- 4 buttons, ½" (13 mm)
- Tapestry needle
- Measuring tape
- Scissors
- Sewing needle and thread (to attach buttons)
- 2 stitch markers (optional)
Yardage guide: Cardigan ~280 yd (256 m); hat ~80 yd (73 m); booties ~70 yd (64 m); mittens ~50 yd (46 m). Buy 500 yd so you do not run short.
Gauge
18 stitches and 24 rows = 4" (10 cm) in stockinette stitch, blocked.
Please swatch. A 4" (10 cm) square should measure 18 sts and 24 rows. If you have more than 18 sts in 4", go up a needle size; if fewer, go down a size.
Abbreviations (US)
- BO — bind off
- CO — cast on
- k — knit
- p — purl
- k2tog — knit 2 stitches together (1 stitch decreased)
- kfb — knit into the front and back of the same stitch (1 stitch increased)
- st(s) — stitch(es)
- RS — right side
- WS — wrong side
- yo — yarn over
- st st — stockinette stitch (knit RS rows, purl WS rows)
- garter st — knit every row
- rep — repeat
- rem — remain(ing)
Pattern Notes
- The entire set is worked flat (back and forth). A circular needle is not required; if you use one, work back and forth, not in the round.
- Stockinette: Knit on RS rows, purl on WS rows. Garter: Knit every row.
- Girl’s cardigan: Buttonholes are worked on the Right Front (wearer’s right). Buttons are sewn to the Left Front.
- Lengths are given in inches (cm). When the pattern says “until piece measures X", measure from the cast-on edge, not including the needle.
- The eyelet row is optional. To skip it, work that row as a plain knit row instead.
- Baby safety: Sew buttons on very firmly with sewing thread, then take a few extra stitches through the yarn. Check them often. Do not add ties, ribbons, or a pom-pom around the neck or hat.
- Weave in ends as you go when you can; it makes finishing faster.
- Block pieces lightly before seaming so edges lie flat.
1. Cardigan
Worked in five pieces: Back, Left Front, Right Front, and two Sleeves. Shoulders, sides, and sleeves are seamed. A small garter neckband is picked up last.
Back
CO 36 sts.
Garter hem
Knit 8 rows (garter st). Piece measures about 1" (2.5 cm). (36 sts)
Eyelet row (RS): *Yo, k2tog; rep from * to end. (36 sts)
Next row (WS): Purl.
Body
Work in st st (k RS, p WS) until piece measures 9½" (24 cm) from cast-on edge, ending after a WS row.
BO all 36 sts knitwise. Cut yarn, leaving a 24" (61 cm) tail for seaming.
(36 sts × 4 ÷ 18 = 8" / 20.5 cm wide ✓)
Left Front (buttons will be sewn here)
This is the wearer’s left side. The 4-st garter band sits at the beginning of every RS row (center front).
CO 20 sts.
Garter hem
Knit 8 rows. (20 sts)
Eyelet row (RS): K4, *yo, k2tog; rep from * to end. (4 garter + 8 eyelets on 16 sts = 20 ✓)
Next row (WS): Purl to last 4 sts, k4.
Body — keep the 4-st garter band
- RS: K4, knit to end.
- WS: Purl to last 4 sts, k4.
Work as established until piece measures 7½" (19 cm) from cast-on, ending after a WS row. (20 sts)
Shape neck
The neck edge is the garter-band edge (beginning of RS rows).
Next row (RS): BO 4 sts, knit to end. (16 sts remain: 20 − 4 = 16 ✓)
Next row (WS): Purl.
Decrease at the neck edge every RS row 6 times as follows:
- RS (decrease row): K1, k2tog, knit to end. (1 st decreased)
- WS: Purl.
After 6 decrease rows: 16 − 6 = 10 sts ✓.
Work even in st st on these 10 sts until piece measures 9½" (24 cm) from cast-on, ending after a WS row.
BO 10 sts knitwise. Cut yarn, leaving an 18" (46 cm) tail.
(Shoulder = 10 sts × 4 ÷ 18 = 2¼" / 5.5 cm ✓)
Right Front (buttonholes)
This is the wearer’s right side. The 4-st garter band sits at the end of every RS row (center front).
CO 20 sts.
Garter hem
Knit 8 rows. (20 sts)
Eyelet row (RS): *Yo, k2tog; rep from * to last 4 sts, k4. (20 sts)
Next row (WS): K4, purl to end.
Body — keep the 4-st garter band
- RS: Knit to last 4 sts, k4.
- WS: K4, purl to end.
Buttonholes
Work a buttonhole on a RS row each time the piece measures approximately ½" (1.5 cm), 2¾" (7 cm), 5" (12.5 cm), and 7¼" (18.5 cm) from the cast-on.
Buttonhole row (RS): Knit to last 4 sts, k1, yo, k2tog, k1. (20 sts — yo + k2tog keeps the count: 4 band sts remain ✓)
Next row (WS): K4, purl to end. Knit the yo as a normal stitch; it forms the hole.
Continue in established pattern, working the four buttonholes at the lengths above, until piece measures 7½" (19 cm) from cast-on, ending after a RS row (so the WS is next, ready to bind off at the neck).
Shape neck
The neck edge is the garter-band edge (beginning of WS rows).
Next row (WS): BO 4 sts, purl to end. (16 sts remain: 20 − 4 = 16 ✓)
Decrease at the neck edge every RS row 6 times as follows:
- RS (decrease row): Knit to last 3 sts, k2tog, k1. (1 st decreased)
- WS: Purl.
After 6 decrease rows: 16 − 6 = 10 sts ✓.
Work even in st st on these 10 sts until piece measures 9½" (24 cm) from cast-on, matching the Left Front, ending after a WS row.
BO 10 sts knitwise. Cut yarn, leaving an 18" (46 cm) tail.
Sleeves (make 2)
CO 28 sts.
Garter cuff
Knit 8 rows. Piece measures about 1" (2.5 cm). (28 sts)
Eyelet row (RS): *Yo, k2tog; rep from * to end. (28 sts)
Next row (WS): Purl.
Increase for sleeve
Work in st st, and increase 1 st at each end of the next RS row, then every 6th row 3 more times (4 increase rows total):
Increase row (RS): K1, kfb, knit to last 2 sts, kfb, k1. (2 sts increased)
Stitch counts after each increase row: 30, then 32, then 34, then 36.
(4 increase rows × 2 sts = 8; 28 + 8 = 36 ✓)
After the last increase row, work even in st st on 36 sts until sleeve measures 6" (15 cm) from cast-on, ending after a WS row.
BO 36 sts knitwise. Cut yarn, leaving a 24" (61 cm) tail.
(36 sts × 4 ÷ 18 = 8" / 20.5 cm wide at upper arm ✓)
Cardigan finishing
Block the five pieces to measurements:
- Back: 8" × 9½" (20.5 × 24 cm)
- Each front: 4½" × 9½" (11.5 × 24 cm)
- Each sleeve: 8" wide at top × 6" long (20.5 × 15 cm)
1. Shoulder seams
With RS together (or use mattress stitch with RS facing you), join 10 sts of the Left Front shoulder to 10 sts at the left edge of the Back. Join 10 sts of the Right Front shoulder to 10 sts at the right edge of the Back.
The center 16 Back sts stay free for the neck. (10 + 16 + 10 = 36 ✓)
2. Set in sleeves
Fold one sleeve in half to find the center of the bound-off edge. Match that center to the shoulder seam. Sew the sleeve bound-off edge along the side of the body, 4" (10 cm) down the Back and 4" (10 cm) down the Front from the shoulder. Repeat for the second sleeve.
(Sleeve width 8" ÷ 2 = 4" armhole depth; body length 9½" − 4" = 5½" side seam ✓)
3. Side and sleeve seams
Sew each side seam from the hem up to the underarm, then continue along the sleeve from underarm to cuff. Repeat on the other side.
4. Neckband
With RS facing, beginning at the Right Front neck edge (just above the button band), pick up and knit:
- 11 sts evenly along the Right Front neck slope
- 16 sts across the Back neck
- 11 sts evenly along the Left Front neck slope
(11 + 16 + 11 = 38 sts ✓)
Tip for picking up: Insert the needle one stitch in from the edge, wrap the working yarn as if to knit, and pull a loop through. Aim for about 3 stitches picked up for every 4 rows on the slopes.
Knit 5 rows (garter st). BO knitwise. Cut yarn.
5. Buttons
Sew 4 buttons to the Left Front garter band, opposite the buttonholes. Use sewing thread, pass through the button several times, and knot on the WS. Tug firmly to test.
6. Weave in remaining ends.
2. Hat
Knit flat as a rectangle, then seamed up the back. The crown is gathered.
CO 60 sts.
Garter brim
Knit 8 rows. Piece measures about 1" (2.5 cm). (60 sts)
Eyelet row (RS): *Yo, k2tog; rep from * to end. (60 sts)
Next row (WS): Purl.
Body
Work in st st until piece measures 5" (12.5 cm) from cast-on, ending after a WS row. (60 sts)
(60 sts × 4 ÷ 18 = 13.3" / 34 cm circumference before seaming ✓)
Crown
Row 1 (RS): *K2tog; rep from * to end. (30 sts: 60 ÷ 2 = 30 ✓)
Row 2 (WS): Purl.
Row 3 (RS): *K2tog; rep from * to end. (15 sts: 30 ÷ 2 = 15 ✓)
Row 4 (WS): *P2tog; rep from * to last st, p1. (8 sts: 7 decreases + 1 = 8 ✓)
Cut yarn, leaving a 24" (61 cm) tail. Thread the tail through the remaining 8 sts, pull tight, and fasten on the WS. Use the same tail to mattress-stitch the back seam from crown to brim. Weave in ends.
Finished circumference about 13¼" (33.5 cm); height about 5½" (14 cm).
3. Booties (make 2)
Simple cuff-down tubes with a closed toe. Garter cuff stays put on a newborn foot without ties.
CO 28 sts.
Cuff
Knit 16 rows (garter st). Piece measures about 2" (5 cm). (28 sts)
Foot
Beginning with a RS knit row, work in st st until the stockinette section measures 3" (7.5 cm), ending after a WS row. Total length from cast-on is about 5" (12.5 cm). (28 sts)
BO all 28 sts knitwise. Cut yarn, leaving a 24" (61 cm) tail.
Finishing each bootie
- Fold the piece in half with RS facing you so the two side edges meet (this is the center back).
- Mattress-stitch the back seam from the top of the cuff down to the bound-off edge.
- At the bound-off edge (the toe), fold so the back seam is at the center of the sole. Whip-stitch the toe closed from one side to the other.
- Weave in ends. Turn RS out.
(28 sts × 4 ÷ 18 = 6.2" / 15.5 cm around — easy to slip on ✓. Foot length = 3" stockinette + toe seam ≈ 3½" / 9 cm ✓)
4. Mittens (make 2)
Thumbless newborn mittens, knit flat and seamed. No ties.
CO 22 sts.
Cuff
Knit 12 rows (garter st). Piece measures about 1½" (4 cm). (22 sts)
Hand
Beginning with a RS knit row, work in st st until the stockinette section measures 2" (5 cm), ending after a WS row. Total length from cast-on is about 3½" (9 cm). (22 sts)
Top
Next row (RS): *K2tog; rep from * to end. (11 sts: 22 ÷ 2 = 11 ✓)
Next row (WS): Purl.
Cut yarn, leaving an 18" (46 cm) tail. Thread the tail through the remaining 11 sts, pull tight, and fasten. Use the same tail to mattress-stitch the side seam from top to cuff. Weave in ends. Turn RS out.
(22 sts × 4 ÷ 18 = 4.9" / 12.5 cm around ✓)
Finishing the Set
- Weave in any remaining ends on all pieces.
- Block the cardigan, hat, booties, and mittens. For acrylic, use a steam block held above the fabric (do not crush with a hot iron). For wool, wet-block: soak in lukewarm water, press out water in a towel, pin to measurements, and dry flat.
- Recheck buttons after blocking and after the first wash.
- Wash on a gentle cycle (or by hand) and lay flat to dry.
Wear order: Put the cardigan on first, then the hat. Booties and mittens last so they stay on.
Quick Reference — Cast-On Numbers
| Piece | Cast on | Finished key number |
|---|---|---|
| Cardigan back | 36 sts | 8" wide |
| Each front | 20 sts | 10 sts at shoulder |
| Each sleeve | 28 sts | 36 sts at upper arm |
| Hat | 60 sts | gather to 8 sts |
| Each bootie | 28 sts | — |
| Each mitten | 22 sts | gather to 11 sts |
Chest check: 8" back + 4.44" + 4.44" fronts − 0.89" band overlap = 16" buttoned ✓
Disclaimer: This pattern was generated by AI and should be reviewed for accuracy before use. While we strive for quality, AI-generated content may contain errors. Please verify measurements, stitch counts, charts, and instructions before beginning your project. Generated by purlJam.uk
Love this pattern?
Save this pattern to your free PurlJam libraryAccess your pattern anytime
Bookmark this page to access your pattern anytime