Type
Crochet
Difficulty
intermediate
Category
bag
AI Thinking Process
Planning
Verification
Pattern
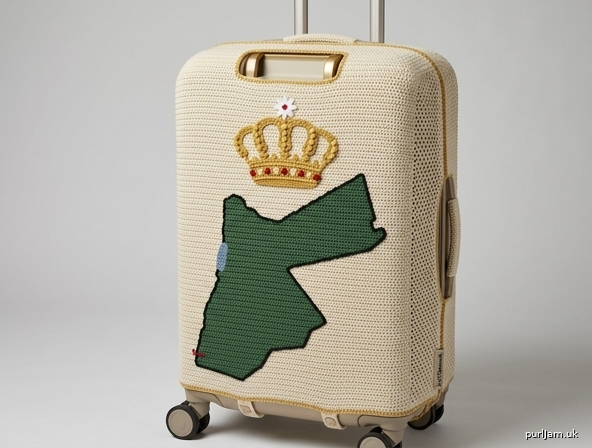
Map of Jordan Travel Suitcase Cover with Hashemite Royal Crown
A fitted, stretchy crochet cover for a standard carry-on suitcase. The piece is worked in joined rounds from the open lower hem up, like a market tote, but it is a cover, not a bag: there are no carrying handles. Mesh on the sides and back gives stretch (side grab-handles of the suitcase can pass through the mesh). The front is solid single crochet so you can display a Map of Jordan with the Hashemite royal crown above it. A solid top panel includes a slot for the telescoping trolley handle. Buttoned straps under the case keep the cover from riding up.
Skill Level
Intermediate. You should be comfortable working in the round, keeping a stitch marker on a moving “front” section, simple increases, and sewing on applique.
Finished Measurements
To fit a carry-on about 21–23 in (53.5–58.5 cm) tall × 13–15 in (33–38 cm) wide × 8–10 in (20.5–25.5 cm) deep.
Cover (unstretched)
- Circumference: 48 in (122 cm)
- Tube height (lower hem to top rim): 23½ in (59.5 cm)
- Front panel: 14 in (35.5 cm) wide, solid
- Each side: 10 in (25.5 cm) wide, mesh
- Back: 14 in (35.5 cm) wide, mesh
- Top panel: 14 × 10 in (35.5 × 25.5 cm) with a centered handle slot about 8 × 1¾ in (20.5 × 4.5 cm)
Mesh stretch and 2 in (5 cm) of ease over a 46 in (117 cm) suitcase perimeter (2 × (14 + 9) = 46) let the cover slide on. Measure your suitcase before you start; a customization formula is in Notes.
Materials
Yarn: Worsted weight (medium / 4) cotton or cotton blend, tightly spun. Cotton is recommended for a travel cover because it holds shape, breathes, and washes.
- Color A (main — cream, sand, or light stone): 1,200 yd / 1,100 m
- Color B (forest green — land of the map): 90 yd / 82 m
- Color C (gold — crown): 50 yd / 46 m
- Color D (black — map outline and optional edge): 40 yd / 37 m
- Color E (red — crown jewels / star accent): 30 yd / 27 m
- Color F (white — seven-pointed star): 20 yd / 18 m
- Color G (optional dusty blue — Dead Sea): 15 yd / 14 m
Yardage is for the size given. A taller or wider suitcase will need more Color A.
Hook: US H-8 / 5 mm (main fabric). US G-6 / 4 mm (optional, for denser map and crown appliques).
Notions
- 4 stitch markers (ideally 2 contrasting colors)
- Yarn needle
- Four 1 in (25 mm) buttons
- Scissors, measuring tape, blocking mats and pins
- A printed outline of Jordan about 9 in (23 cm) tall (as a shaping template for the map — any clear outline is fine)
- Sewing needle and strong thread for buttons
Gauge
16 single crochet and 18 rows = 4 in (10 cm) in solid single crochet with US H-8 / 5 mm hook, unstretched, after light blocking.
Work a 6 × 6 in (15 × 15 cm) swatch, measure the inner 4 in (10 cm). A travel cover should be firm. If you have more than 16 sc in 4 in (10 cm), go down a hook size; if fewer, go up a size. Mesh sections will measure slightly wider under stretch; that is intended.
Stitches Used (US)
Written in full here so you do not need outside abbreviations. Short forms after this list are used only as a reminder.
- chain (ch)
- slip stitch (sl st)
- single crochet (sc)
- double crochet (dc)
- treble crochet (tr)
- skip (sk)
- stitch / stitches (st / sts)
- round (rnd)
- row
- space (sp)
- place marker (pm)
- magic ring: wrap yarn around a finger, work the first stitches over the ring, then pull the tail to close.
- popcorn (used on the crown): 5 double crochet in the same stitch, remove the hook from the working loop, insert the hook from front to back in the first of those 5 double crochet, pick up the working loop, and pull it through.
All stitches are US names. Do not substitute UK double crochet for US single crochet.
Notes
- The cover is worked in joined rounds, right side always facing, from the open lower hem (wheel end) up. Do not turn at the end of a round unless a row is specified (top panel, straps, appliques).
- Join every round with a slip stitch in the first single crochet, then chain 1. That chain 1 does not count as a stitch. The first single crochet of the next round goes in the same stitch as the join.
- Front 56 stitches stay solid single crochet on every body round. Mesh is used only on the two sides and the back. Move the front markers up every round.
- Keep the join at the start of the front (left edge of the front as the suitcase faces you) so the join line sits at a corner, not in the middle of the map.
- Side grab-handles: do not cut openings. After the cover is on, push each side handle through a convenient mesh window. If you want a neater window, later work a round of single crochet around that mesh opening.
- Wheels and zippers: the lower hem is meant to sit above the wheels. Bottom straps pass between the wheels, not over them. Do not cover TSA locks, zipper pulls you need, or the airline ID tag; you may leave a mesh window over the tag pocket.
- Customize the circumference: measure width + depth of the packed suitcase. Foundation stitch count = 2 × (width + depth + 1 in ease) × 4, rounded to an even number. Front stitch count = width × 4, rounded to even. Recalculate side stitches so front + side + back + side = total. Example for this pattern: 2 × (14 + 9 + 1) = 48 in; 48 × 4 = 192 sts ✓
- Colorwork note: the map and crown are written as appliques so the pattern is complete on its own. If you prefer to work the motifs in tapestry single crochet on the 56 front stitches, center the map on the lower two-thirds of the front and the crown above it, using Color B for land, Color C for the crown, Color D for a thin outline, and Color G only for a small Dead Sea notch on the west. Do not rely on a numbered grid in this text; follow a chart only if you have one you trust, and keep the front stitch count at 56 every round.
- Weave in ends as you go. A suitcase cover takes abrasion.
Cover Body
With Color A and US H-8 / 5 mm hook, chain 192. Being careful not to twist, join with a slip stitch in the first chain to form a ring.
Set-up round: Chain 1, single crochet in each chain around, join. (192 single crochet ✓)
Place markers:
- Marker 1 = stitch 1 (start of front)
- Marker 2 = stitch 57 (start of left side)
- Marker 3 = stitch 97 (start of back)
- Marker 4 = stitch 153 (start of right side)
Counts: front 56 sts, left side 40 sts, back 56 sts, right side 40 sts. 56 + 40 + 56 + 40 = 192 ✓
At gauge, that is 14 in + 10 in + 14 in + 10 in = 48 in ✓
Lower band (solid, sits above the wheels)
Rounds 1–8: Chain 1, single crochet in each stitch around, join. (192 sc; 8 rounds = 8/18 × 4 = 1¾ in ✓)
Optional royal edge: work Round 1 in Color C (gold), Rounds 2–8 in Color A.
Body (solid front + mesh sides and back)
Work 90 rounds as follows. Move markers up every round. The front 56 stitches are always solid.
Body round 1 (mesh set-up): Chain 1, single crochet in each of the next 56 front stitches, *single crochet in the next stitch, chain 1, skip the next stitch; repeat from * 67 more times (68 mesh repeats over 136 stitches: 68 × 2 = 136 ✓), join. (56 solid sc + 68 sc + 68 chain-1 spaces = 192 stitch-equivalents ✓)
Body rounds 2–90: Chain 1, single crochet in each of the next 56 front stitches, *single crochet in the next chain-1 space, chain 1, skip the next single crochet; repeat from * around the sides and back, join.
90 body rounds = 90/18 × 4 = 20 in ✓
The fabric will look like a solid 14 in (35.5 cm) “billboard” on the front and an open, stretchy mesh everywhere else.
Upper band (solid)
Round 91: Chain 1, single crochet in each of the 56 front stitches, then single crochet in each single crochet and in each chain-1 space around the mesh section (136 stitches restored), join. (56 + 136 = 192 sc ✓)
Rounds 92–98: Chain 1, single crochet in each stitch around, join. (192 sc)
Lower band 8 + body 90 + upper band 8 = 106 rounds. 106/18 × 4 = 23½ in (59.5 cm) ✓
Fasten off Color A, leaving a long tail only if you want it for seaming the top panel; otherwise weave in.
Top Panel
The top panel covers the 14 × 9 in (35.5 × 23 cm) top of the suitcase, with 1 in (2.5 cm) ease in the depth direction to match the 10 in (25.5 cm) sides.
With Color A, chain 57.
Row 1: Single crochet in the second chain from the hook and in each chain across, turn. (56 sc ✓)
Rows 2–10: Chain 1, single crochet in each stitch across, turn. (56 sc; 10 rows = 10/18 × 4 = 2¼ in ✓)
These 10 rows sit toward the back of the suitcase (trolley-handle side).
Handle slot (work the two sides separately)
Right column (8 rows): Chain 1, single crochet in the first 12 stitches only, turn. (12 sc)
Repeat this 12-stitch row 7 more times (8 rows total on these 12 stitches). 8/18 × 4 = 1¾ in ✓
Fasten off.
Left column (8 rows): With the right side facing, skip the center 32 stitches of Row 10 (32/4 = 8 in ✓), join Color A in the next stitch, chain 1, single crochet in the remaining 12 stitches, turn. (12 + 32 skipped + 12 = 56 ✓)
Work 7 more 12-stitch rows (8 rows total). Fasten off.
Bridge row (Row 19): With right side facing, join Color A at the outer edge of the right column. Chain 1, single crochet in each of the 12 right-column stitches, chain 32, single crochet in each of the 12 left-column stitches, turn. (12 + 32 chains + 12 = 56 ✓)
Row 20: Chain 1, single crochet in each of the first 12 stitches, single crochet in each of the 32 chains, single crochet in each of the last 12 stitches, turn. (56 sc ✓)
Rows 21–45: Chain 1, single crochet in each stitch across, turn. (56 sc)
Rows 21–45 = 25 rows plus Row 20 = 26 rows after the bridge. 10 + 8 + 1 + 26 = 45 rows ✓
45/18 × 4 = 10 in (25.5 cm) depth ✓
Fasten off, leaving a long seaming tail.
Bottom Straps (make 4)
Straps button under the suitcase, between the wheels, so the cover cannot ride up.
With the lower hem facing you and Color A, pick up and single crochet 8 stitches along the hem in each of these four locations (count on the Set-up round stitches):
- Front: stitches 9–16 and stitches 41–48
- Back: the matching 8-stitch blocks on the back 56 (stitches 9–16 and 41–48 of the back section)
Check: 8 (edge) + 8 (strap) + 24 (center) + 8 (strap) + 8 (edge) = 56 ✓
That inset keeps the straps off the corner wheels.
On each picked-up set of 8 stitches:
Rows 1–48: Chain 1, single crochet in each stitch across, turn. (8 sc)
48/18 × 4 = 10⅔ in (27 cm) ✓
On the two BACK straps only, make a buttonhole on Row 49: Chain 1, single crochet in the first 3 stitches, chain 2, skip 2 stitches, single crochet in the last 3 stitches, turn.
Row 50 (back straps): Chain 1, single crochet in the first 3 stitches, 2 single crochet in the chain-2 space, single crochet in the last 3 stitches. (8 sc ✓)
On the two FRONT straps: work Rows 49–50 as plain single crochet (no buttonhole). (8 sc)
Fasten off. Straps are 50 rows = 50/18 × 4 = 11 in (28 cm) ✓
Map of Jordan Applique
Worked in rows in Color B (forest green) with the smaller hook if you want a dense fabric. This is a shape-following applique, not a stitch chart. Pin or tape a printed outline of Jordan so the country is about 9 in (23 cm) from Aqaba in the south to the northern border, and about 5½–6½ in (14–16.5 cm) across at the widest northern part. North is the top of the applique.
Read the country’s outline before you crochet
- The south (Aqaba) is a narrow tip.
- The land widens as you move north through Wadi Araba.
- The western edge (right edge if north is up and you are looking at the map in the usual way) indents at the Dead Sea, then fills out again.
- The north (Irbid / Syrian border) is the widest zone and ends in a fairly straight top edge.
- The eastern edge is long and almost straight (the desert border).
Method
- With Color B, chain 6. Single crochet in the second chain from the hook and across. (5 sc) This is the Aqaba tip.
- Work back and forth in single crochet. At the beginning and/or end of a row, increase (2 single crochet in the edge stitch) or decrease (single crochet 2 together) so the fabric stays inside your printed outline. Check the paper template every 4–6 rows and pin the crochet to it.
- When you reach the Dead Sea latitude, decrease on the western edge only for several rows to form the notch, then increase again. Keep the eastern edge almost straight.
- At the northern third, increase to the widest point, then work even, then decrease slightly if your outline tapers at the far north, and fasten off along the northern border.
- Weave in ends on the wrong side. Block the map to the template until it is flat and the outline is recognizable.
Optional Dead Sea (Color G): Make a small, narrow oval or crescent about 2 in (5 cm) tall in single crochet, starting with a chain of 8–10 and working 2–3 rounds/rows with a flattened inner (western) edge. Sew it into the western notch after the map is on the cover, or sew it to the map first.
Optional Aqaba accent: A few Color E (red) surface stitches at the southern tip for the port city.
Do not invent a stitch-by-stitch grid for governorates or roads; a clear national silhouette is the goal.
Hashemite Royal Crown Applique
A small heraldic crown in gold, with a jewelled band, five arches (the center arch taller), a monde (orb) on the center arch, and Jordan’s seven-pointed star on the orb. Finished crown is about 5 in (12.5 cm) wide × 3 in (7.5 cm) tall including the star.
Crown body
With Color C (gold) and US G-6 / 4 mm (or H-8 / 5 mm), chain 26.
Row 1 (right side): Single crochet in the second chain from the hook and in each chain across, turn. (25 sc ✓)
Rows 2–3: Chain 1, single crochet in each stitch across, turn. (25 sc)
Row 4 (jewels): Chain 1, single crochet in the first 2 stitches, *popcorn in the next stitch, single crochet in the next 4 stitches; repeat from * 3 more times, popcorn in the next stitch, single crochet in the last 2 stitches, turn.
Count: 2 sc + 4 repeats of (popcorn + 4 sc) + popcorn + 2 sc = 2 + 20 + 1 + 2 = 25, with 5 popcorns ✓
Row 5: Chain 1, single crochet in each stitch across, turn. (25 sc)
Row 6 (arches): Chain 1, single crochet in the first 2 stitches, skip 1 stitch, 5 double crochet in the next stitch, skip 1 stitch, single crochet in the next 2 stitches, skip 1 stitch, 5 double crochet in the next stitch, skip 1 stitch, single crochet in the next 2 stitches, skip 1 stitch, 7 double crochet in the next stitch (center arch), skip 1 stitch, single crochet in the next 2 stitches, skip 1 stitch, 5 double crochet in the next stitch, skip 1 stitch, single crochet in the next 2 stitches, skip 1 stitch, 5 double crochet in the next stitch, skip 1 stitch, single crochet in the last 2 stitches.
Count: 6 groups of 2 sc (= 12) + 8 skips + 5 shells = 12 + 8 + 5 = 25 ✓
Five arches, center arch taller (7 double crochet). Fasten off Color C.
With Color E (red), embroider a small stitch or French knot on the center of each popcorn jewel. Weave in ends.
Monde (orb)
With Color C, make a magic ring.
Round 1: 6 single crochet in the ring, join. (6 sc)
Round 2: Chain 1, 2 single crochet in each stitch around, join. (6 increases → 6 + 6 = 12 sc ✓)
Fasten off, leaving a tail. Sew the monde to the top of the center arch.
Seven-pointed star
With Color F (white), make a magic ring, leaving a short tail.
(Chain 4, slip stitch in the second chain from the hook, slip stitch in each of the next 2 chains, slip stitch in the ring) 7 times. Pull the ring closed so the seven points sit evenly. Fasten off.
Sew the star on top of the monde. A tiny Color E stitch in the star center is optional.
Block the crown flat so the arches stand up slightly.
Finishing
1. Block the tube, top panel, map, and crown. Pin the front so it is a true 14 × 23½ in (35.5 × 59.5 cm) rectangle. Pin the mesh so it is even but do not stretch it to death; you still need that ease to get the cover on.
2. Place the motifs on the front (before seaming the top, while the front lies flat).
- Map: Center it left-to-right on the solid front. The southern tip (Aqaba) points down. The bottom of the map should sit about 4 in (10 cm) above the lower hem so it clears the strap zone and reads as “standing on the land.” The map occupies roughly the lower two-thirds of the front.
- Crown: Center it left-to-right above the map, about ¾–1 in (2–2.5 cm) above the northern border (or just kissing that border). The crown should sit below the upper band, not on the top panel.
Sew with matching yarn, using small whipstitches through the back loops of the applique so stitches do not show on the right side.
3. Outline the map (Color D, black). With a yarn needle or with surface slip stitch, run a thin black outline around the entire country so the silhouette is sharp from a distance. This step does more for “readability” than any inner detail.
4. Sew the top panel to the top rim of the tube.
- 56-st back edge of the tube to the Row-1 (handle-near) edge of the panel.
- 56-st front edge of the tube to Row 45 of the panel.
- Each 40-st side (10 in) to a 10 in side of the panel, easing the 40 stitches evenly along the row-ends (45 row-ends along 10 in). 40 stitches at gauge = 10 in, panel depth = 10 in ✓
The handle slot should sit near the back of the top, which is where a telescoping trolley handle emerges. Reinforce the slot with one round of single crochet in Color A (or Color C) around the entire opening, working 3 single crochet in each corner so the slot stays flat. (Optional: a second round in Color C for a gold “frame.”)
5. Buttons. Sew the four buttons to the front straps, about 1 in (2.5 cm) from the strap ends, aligned with the back-strap buttonholes.
6. Ends and wear points. Weave in every remaining tail on the wrong side. Add a few extra stitches where straps meet the hem. If you will put this cover on checked luggage, consider an inner fabric lining for the solid front only, stitched invisibly around the edge; the mesh sides should stay unlined so they can stretch.
7. Fit check. Open the suitcase’s trolley handle. Slide the cover on from the top, feeding the handle through the slot. Push side grab-handles through the mesh. Button the four straps under the case, between the wheels, snugly but not so tight that wheels cannot roll. The lower band should sit above the wheel housings.
Care
Machine wash cold on gentle in a bag, or hand wash. Lay flat to dry. Do not high-heat dry; cotton can shrink and throw off the 48 in (122 cm) circumference. Re-block the front if the map puckers.
Travel note
This cover is a textile accessory. It will scuff on conveyor belts; that is normal. Repair snags in the mesh with a yarn needle as soon as you see them so they do not run. Do not use the cover as a lifting handle — always lift by the suitcase’s own handle.
Disclaimer: This pattern was generated by AI and should be reviewed for accuracy before use. While we strive for quality, AI-generated content may contain errors. Please verify measurements, stitch counts, charts, and instructions before beginning your project. Generated by purlJam.uk
Love this pattern?
Save this pattern to your free PurlJam libraryAccess your pattern anytime
Bookmark this page to access your pattern anytime