Type
Knitting
Difficulty
intermediate
Category
hat
AI Thinking Process
Planning
Verification
Pattern
Marquette Cabled Hat with Logo & Pompom
An unofficial fan pattern. Not affiliated with, sponsored by, or endorsed by Marquette University.
A snug, structured beanie in Marquette navy and gold: six rope-cable panels alternate with reverse-stockinette valleys, a stockinette front panel carries the University logo from the attached chart, and a gold pompom finishes the crown. Intermediate: cables, in-the-round colorwork, and pattern-aware shaping.
Skill level: Intermediate
Sizes
Adult Small (Medium, Large)
Instructions are written for Small with Medium and Large in parentheses. When only one number is given, it applies to all sizes.
To fit head circumference: 20–21 (21½–22½, 23–24)" [51–53.5 (54.5–57, 58.5–61) cm]
Finished hat circumference (unstretched, in pattern): 18 (19½, 21)" [45.5 (49.5, 53.5) cm]
Finished height, brim to crown, excluding pompom: 8½ (9, 9½)" [21.5 (23, 24) cm]
Choose the size 1½–2½" (4–6.5 cm) smaller than the wearer’s head circumference.
Yarn
Worsted-weight wool or wool-blend (approx. 200–220 yd / 180–200 m per 100 g)
MC (Navy): 150 (165, 180) yd [137 (151, 165) m]
CC (Gold): 50 (55, 60) yd [46 (50, 55) m] — logo and pompom
A machine-washable wool blend is practical for a fan hat; 100% wool gives sharper cables.
Shown/suggested colors: deep navy and Marquette gold.
Needles
- US 6 / 4 mm, 16" (40 cm) circular — brim
- US 8 / 5 mm, 16" (40 cm) circular — body
- US 8 / 5 mm DPNs, or a long circular for magic loop — crown
Or sizes needed to obtain gauge.
Notions
- Stitch markers (1 distinct for beginning of round, plus 2 for the Front Panel, plus 8 for crown)
- Cable needle
- Tapestry needle
- Pompom maker or 3" (7.5 cm) cardboard
- Optional: balloon or hat form for blocking
Gauge
20 stitches and 26 rounds = 4" (10 cm) in stockinette stitch on US 8 / 5 mm, blocked.
One 8-stitch rope cable measures about 1¼" (3 cm) wide after blocking.
Check gauge. Cables draw the fabric in; the finished circumference above already accounts for that.
Abbreviations (US)
BOR — beginning of round C4B — sl 2 sts to cn, hold to back, k2, k2 from cn C6B — sl 3 sts to cn, hold to back, k3, k3 from cn C8B — sl 4 sts to cn, hold to back, k4, k4 from cn CC — contrasting color (gold) cn — cable needle k — knit k2tog — knit 2 together (right-leaning decrease) MC — main color (navy) p — purl p2tog — purl 2 together pm — place marker rep — repeat rnd(s) — round(s) RS — right side sl — slip sm — slip marker ssk — slip 1 knitwise, slip 1 knitwise, knit those 2 sts together through the back loop (left-leaning decrease) st(s) — stitch(es) St st — stockinette stitch (knit every rnd in the round) wyib — with yarn in back
Pattern Notes
- Worked in the round from brim to crown.
- Reverse stockinette in the round = purl every round.
- The Front Panel is stockinette (knit every round) so the logo sits on a smooth field.
- Keep cable crosses on their own 8-round schedule even while the logo chart is in progress.
- Do not carry CC around the back of the hat. Use CC only across the Front Panel on chart rounds.
- Catch CC floats at least every 3–4 stitches. Loose floats = a hat that still stretches; tight floats = a stiff logo patch.
- On cable-cross rounds during the crown, if a knit panel no longer has 8 stitches, work a smaller back cross on the remaining knit stitches (see Special Stitches). If 3 or fewer knit stitches remain, knit them with no cross.
- The pattern is an unofficial fan design. Do not sell items as official Marquette merchandise.
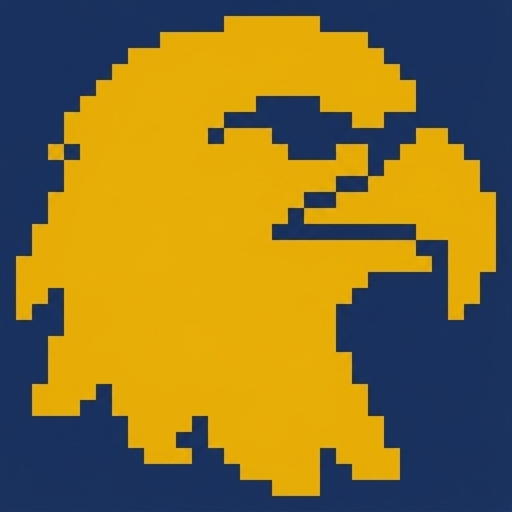
Attached Stitch Chart
Use the separate attached chart panel for the visual grid of the Marquette University logo. Do not look for an ASCII or symbol grid in this text; the chart lives in the accompanying attachment, placed beside this pattern as the logo stitch chart.
Where it is worked: Centered on the Front Panel, beginning after the brim, once the cable setup is established (Body, Logo Chart). The Front Panel is the marked stockinette section at the start of the round.
How to read the chart (knitting, in the round):
- Each chart row is one round. There are no wrong-side rows.
- Read every row from right to left.
- Begin at the bottom row (Round 1 of the chart) and work upward.
- Background squares = MC (navy). Motif squares = CC (gold). Follow the attachment’s color key if it differs.
- One chart stitch = one knit stitch.
Color / yarn management:
- Join CC at the right edge of the first CC stitch on Chart Round 1, leaving a 6" (15 cm) tail.
- Strand CC only across the Front Panel. Drop CC at the left edge of the motif; pick it up again on the next round.
- Twist MC and CC when they meet to close holes.
- Catch the unused color every 3–4 stitches on long runs. If the chart has 5 or more consecutive MC stitches, catch the CC float in the middle of that run.
- Hold CC slightly to the left (as the dominant/motif color) so the gold sits on top of the navy.
- When the last chart round is complete, break CC, leaving a 6" (15 cm) tail. Remaining Front Panel rounds are MC stockinette only.
Stitch-count integration: Let C = the number of stitches in one row of the attached chart. Front Panel width P = 24 (28, 32).
Remaining panel stitches: P − C. Right padding R = floor of (P − C) ÷ 2. Left padding L = (P − C) − R. (Example: P = 24 and C = 20 → 24 − 20 = 4; R = 2, L = 2 ✓.)
On every chart round, across the Front Panel only: Work R sts in MC, work the chart over C sts, work L sts in MC. (R + C + L = P ✓.)
If C is less than P, the extra stitches are always MC stockinette — they form a navy frame. If C equals P, the chart fills the Front Panel with no padding. If C is greater than P on Small, work the chart centered as far as it fits and convert the nearest reverse-stockinette stitches (not cable stitches) to knit for those chart rounds only, then return them to purl after the chart. Do not pull floats across a cable.
Special Stitches
C8B (8-st right rope): Slip 4 stitches to cn, hold to back, k4, k4 from cn.
C6B (crown only): Slip 3 stitches to cn, hold to back, k3, k3 from cn.
C4B (crown only): Slip 2 stitches to cn, hold to back, k2, k2 from cn.
Front Panel: Knit every stitch (MC, or MC+CC following the chart).
Pattern
Brim
With MC and smaller circular needle, using a long-tail cast-on, CO 96 (104, 112) stitches. Place BOR marker and join to work in the round, being careful not to twist.
Rib rnd: *K2, p2; rep from * to end of rnd. (96 (104, 112) is a multiple of 4 → 24 (26, 28) rib repeats ✓.)
Work Rib rnd until brim measures 1¾ (1¾, 2)" [4.5 (4.5, 5) cm] from the cast-on edge.
Body — Cable Setup
Change to larger circular needle.
Setup rnd: With MC, establish panels and markers as follows.
Small (96 sts): Knit 24 (Front Panel), pm, p2, k8, p4, k8, p4, k8, p4, k8, p4, k8, p4, k8, p2. (Front 24 + six cables 48 + valleys 2+4+4+4+4+4+2 = 24 → 24+48+24 = 96 ✓.)
Medium (104 sts): Knit 28 (Front Panel), pm, p3, k8, p4, k8, p5, k8, p4, k8, p5, k8, p4, k8, p3. (Front 28 + cables 48 + valleys 3+4+5+4+5+4+3 = 28 → 28+48+28 = 104 ✓.)
Large (112 sts): Knit 32 (Front Panel), pm, p4, k8, p4, k8, p6, k8, p4, k8, p6, k8, p4, k8, p4. (Front 32 + cables 48 + valleys 4+4+6+4+6+4+4 = 32 → 32+48+32 = 112 ✓.)
The BOR marker sits at the right edge of the Front Panel (left of the logo as worn, if the hat is oriented with the panel at the forehead). The second marker sits at the left edge of the Front Panel. Optional: add extra markers before each k8 cable to make crosses easier to find.
You now have:
- 1 Front Panel in stockinette, 24 (28, 32) sts
- 6 rope-cable panels, 8 sts each
- Reverse-stockinette valleys between them
Body — Cable Repeat and Logo
Work the cable repeat below. Begin the attached logo chart on Body Round 3 (or when the piece measures 2" / 5 cm from the cast-on, if you prefer to place the motif by measurement). Until the chart starts, and after it ends, knit the Front Panel in MC.
Cable Repeat
Rnds 1–7: Knit the Front Panel (chart or MC); purl the reverse-stockinette valleys; knit each 8-st cable panel. Slip markers as you meet them.
Rnd 8 (cable cross): Knit the Front Panel (chart or MC); purl the valleys; C8B on each 8-st cable panel.
Repeat Rnds 1–8 for the rest of the body, keeping the six cables on this 8-round clock.
Logo Chart (worked at the same time): On Body Round 3, begin Round 1 of the attached chart, centered on the Front Panel using the padding math in Attached Stitch Chart. Continue one chart round per hat round until the chart is complete, then break CC and knit the Front Panel in MC only.
Continue in pattern until the piece measures 6¼ (6½, 6¾)" [16 (16.5, 17) cm] from the cast-on edge, ending after a non-cross round if possible. The logo should be complete before the crown; if a few chart rounds remain, finish them, then begin the crown.
Stitch count is unchanged: 96 (104, 112) ✓.
Crown
Change to DPNs (or magic loop) when the circular becomes tight.
The crown keeps the cables as long as possible: decreases eat the reverse-stockinette valleys and the Front Panel first; remaining knit panels are crossed as smaller ropes (C8B → C6B → C4B).
Crown setup rnd: Removing the old panel markers as you go, place 8 new markers, dividing the round into 8 equal sections: *K 12 (13, 14), pm; rep from * to end of rnd, using the BOR marker as the first marker. (8 × 12 = 96 ✓; 8 × 13 = 104 ✓; 8 × 14 = 112 ✓.)
Work stitches as they appear (knit the knits, purl the purls) except at the decreases. On any cable-cross round that occurs during the crown, cross only those knit panels that still have 8, 6, or 4 knit stitches (C8B, C6B, or C4B); otherwise knit them.
Dec rnd: *Work in pattern to 2 sts before marker, k2tog (if those 2 sts are knit, or a knit+purl) or p2tog (if those 2 sts are both purl), sm; rep from * to end of rnd. 8 stitches decreased.
Even rnd: Work in pattern to end of rnd, slipping markers.
Work Dec rnd, then Even rnd, 4 times. (4 × 8 = 32 sts decreased → 96−32 = 64; 104−32 = 72; 112−32 = 80 ✓.) 64 (72, 80) sts.
Now work Dec rnd every round (no even rounds) until 16 stitches remain:
- Small: 64 → 56 → 48 → 40 → 32 → 24 → 16 (6 dec rnds × 8 = 48; 64−48 = 16 ✓)
- Medium: 72 → 64 → 56 → 48 → 40 → 32 → 24 → 16 (7 dec rnds × 8 = 56; 72−56 = 16 ✓)
- Large: 80 → 72 → 64 → 56 → 48 → 40 → 32 → 24 → 16 (8 dec rnds × 8 = 64; 80−64 = 16 ✓)
Next rnd: K2tog around, removing markers. 8 sts. (16 ÷ 2 = 8 ✓.)
Break MC, leaving an 8" (20 cm) tail. Thread tail through the remaining 8 stitches, pull snug, and fasten on the inside. Weave the end around the hole a second time so the crown does not gape under the pompom.
Pompom
With CC, make a 3" (7.5 cm) pompom.
Cardboard method: Cut two 3" (7.5 cm) cardboard disks with a ¾" (2 cm) center hole. Hold them together and wrap CC through the hole and around the disks about 100 times (more wraps = denser pompom). Slide scissors between the disks and cut around the outer edge. Pass a 12" (30 cm) length of CC between the disks and tie as tightly as possible, knotting twice. Remove cardboard. Trim to a smooth 3" (7.5 cm) sphere, leaving the tie strands long.
Two-tone option: Wrap 70 times with CC and 30 times with MC for a navy-flecked gold pompom.
Finishing
Weave in all ends on the wrong side. For colorwork tails, weave each color into stitches of the same color.
Wet-block the hat. Roll in a towel to remove excess water, then dry over a balloon, bowl, or hat form about 18 (19½, 21)" [45.5 (49.5, 53.5) cm] around so the cables settle and the logo panel lies flat. Do not stretch the ribbing.
When fully dry, tie the pompom securely to the crown on the inside, threading the tie tails through the gathered stitches and knotting several times. Weave the remaining tails.
Schematic (measurements)
Head / hat (unstretched)
To fit:     20–21 (21½–22½, 23–24)"
Finished:   18 (19½, 21)"

Height, no pompom:  8½ (9, 9½)"
  Brim:             1¾ (1¾, 2)"
  Body to crown:    to 6¼ (6½, 6¾)" from CO
  Crown:            approx. 2¼–2¾"

Front Panel width:  24 (28, 32) sts  ≈  4¾ (5½, 6½)" in St st
Each cable:         8 sts  ≈  1¼"
Pompom:             3" diameter
Quick-check math (do not skip)
| Checkpoint | Small | Medium | Large |
|---|---|---|---|
| Cast-on (÷4 for 2×2) | 96 ✓ | 104 ✓ | 112 ✓ |
| Front + 6 cables + valleys | 24+48+24=96 ✓ | 28+48+28=104 ✓ | 32+48+32=112 ✓ |
| After 4 (dec+even) pairs | 96−32=64 ✓ | 104−32=72 ✓ | 112−32=80 ✓ |
| Every-rnd dec to 16 | 64−48=16 ✓ | 72−56=16 ✓ | 80−64=16 ✓ |
| Close | 16÷2=8 ✓ | 16÷2=8 ✓ | 16÷2=8 ✓ |
Work the attached Marquette logo chart on the Front Panel only; the six rope cables run around the rest of the hat and draw together through the crown into the gold pompom.
Disclaimer: This pattern was generated by AI and should be reviewed for accuracy before use. While we strive for quality, AI-generated content may contain errors. Please verify measurements, stitch counts, charts, and instructions before beginning your project. Generated by purlJam.uk
Love this pattern?
Save this pattern to your free PurlJam libraryAccess your pattern anytime
Bookmark this page to access your pattern anytime