Type
Crochet
Difficulty
intermediate
Category
tank
AI Thinking Process
Planning
Verification
Pattern
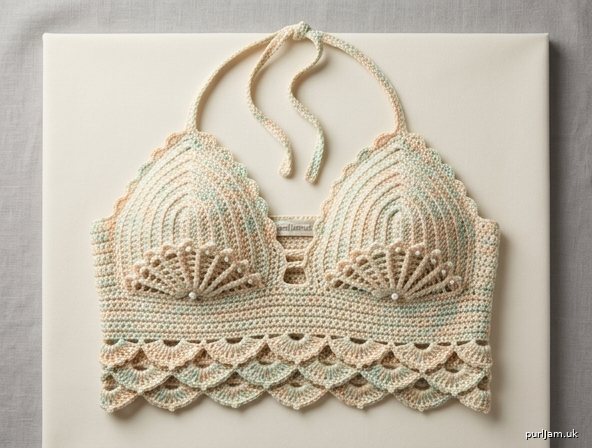
Mermaid Seashell Bra Top
A close-fitting bralette with two ridged seashell cups, a picot-scallop neckline, a stretchy underbust band, and a short stacked-shell hem. Designed for a mermaid costume (pair with a separate tail or skirt).
Construction: Route C — modular cups, joined to a bust band, body worked downward. Cups are worked flat from the underbust up. Short-row shaping cups the fabric. A flare row sets up stacked picot-shells. Both cups are joined with a center bridge and a back chain, then the band and hem are worked in the round. Halter ties finish the neckline.
Difficulty: Intermediate. You should be comfortable with hdc, dc, working in the back loop, joining pieces, and following stitch counts. Short rows and the cup-to-band join are the new skills; a confident beginner who has finished a fitted accessory can manage this.
Sizes
XS (S, M, L, XL, XXL)
Shown in instructions as XS (S, M, L, XL, XXL). Choose size by full bust. The band is close-fitting with stretch; when between sizes, choose the smaller size if you want a snug costume fit.
Finished measurements (after blocking, band unstretched / worn)
| XS | S | M | L | XL | XXL | |
|---|---|---|---|---|---|---|
| To fit bust | 30–32 in (76–81 cm) | 34–36 in (86–91 cm) | 38–40 in (97–102 cm) | 42–44 in (107–112 cm) | 46–48 in (117–122 cm) | 50–52 in (127–132 cm) |
| Finished bust (worn) | 30 in (76 cm) | 34 in (86 cm) | 38 in (97 cm) | 42 in (107 cm) | 46 in (117 cm) | 50 in (127 cm) |
| Intended ease | 0 to −2 in (0 to −5 cm) | same | same | same | same | same |
| Band circumference, unstretched | 25½ in (65 cm) | 28½ in (72 cm) | 33 in (84 cm) | 36 in (91 cm) | 39 in (99 cm) | 43½ in (110 cm) |
| Band stitch count | 102 | 114 | 132 | 144 | 156 | 174 |
| Cup width at underbust | 6 in (15 cm) | 7¼ in (18 cm) | 8¼ in (21 cm) | 9½ in (24 cm) | 10½ in (27 cm) | 11¾ in (30 cm) |
| Cup height including scallops | 6 in (15 cm) | 6¼ in (16 cm) | 6¾ in (17 cm) | 7¼ in (18.5 cm) | 7¾ in (19.5 cm) | 8¼ in (21 cm) |
| Length, cup peak to hem | 9½ in (24 cm) | 10 in (25.5 cm) | 10½ in (26.5 cm) | 11½ in (29 cm) | 12 in (30.5 cm) | 13 in (33 cm) |
Fit is close / negative ease at the ribcage. The BLO band stretches about 15–25% to the finished bust numbers above. Length is cropped: the hem sits a little below the underbust, not at the waist.
Materials
Yarn: Worsted weight (4), cotton or cotton blend preferred for stitch definition and warm-weather costume wear. Acrylic is acceptable for a budget costume. Pearl, ivory, blush, coral, champagne, seafoam, or a lightly variegated “shell” color all read as mermaid.
- Yardage: 280 (340, 400, 480, 560, 660) yd / 255 (310, 365, 440, 510, 605) m
- About 2 (2, 2, 3, 3, 4) skeins of 220 yd / 200 m per 100 g
Optional contrast: use a second color for the band and ties (about 80 (90, 110, 120, 140, 160) yd / 75 (80, 100, 110, 130, 145) m).
Hook: US H-8 / 5 mm, or size needed to obtain gauge. A US 7 / 4.5 mm hook makes denser, less see-through cups if you tend to crochet loosely — still match gauge.
Notions:
- 4 stitch markers (2 removable for strap placement)
- Tapestry needle
- Scissors
- Optional: 2 sew-in foam cups or lining fabric
- Optional: 6–8 mm pearl beads for picots
- Optional: ¾–1 in (2–2.5 cm) wide elastic, equal to your ribcage minus 2 in (5 cm), to thread through the band for performance wear
Gauge
Worked flat, measured after blocking.
- Cups (hdc): 14 sts and 11 rows = 4 in / 10 cm
- Band (hdc BLO, unstretched): 16 sts and 14 rows = 4 in / 10 cm
Swatch at least 6 in / 15 cm square in hdc, block, and measure the center 4 in / 10 cm. Size the hook to the cup gauge; the BLO band is meant to pull in and stretch.
Abbreviations (US terms)
| Abbr | Meaning |
|---|---|
| BLO | back loop only |
| ch | chain |
| dc | double crochet |
| hdc | half double crochet |
| pm | place marker |
| rep | repeat |
| rnd | round |
| RS | right side |
| sc | single crochet |
| sk | skip |
| sl st | slip stitch |
| st(s) | stitch(es) |
| WS | wrong side |
picot: ch 3, sl st in 3rd ch from hook.
picot-shell: (3 dc, picot, 4 dc) in the same st — a 7-dc seashell with a picot at the peak.
5-dc shell: 5 dc in the same st or space.
Turning ch-1 at the start of an hdc row or rnd does not count as a stitch. The sl st that joins a round does not count as a stitch.
Notes
- Cups are identical; there is no left/right shaping. Short rows sit in the center of each cup and create projection without using bra-cup letter sizes.
- The cup fabric (hdc BLO) is largely opaque in worsted. The picot-shell neckline and the stacked-shell hem are open. For a costume on stage or in photos, line the cups or sew in foam cups. The hem can stay unlined.
- Measure cup height at the side edge. The center will be taller — that is the dome.
- Try the band on before starting the hem. BLO ribbing should feel snug and spring back.
- Try on before fastening the halter ties. Tie length is easier to shorten than to add.
- Stitch counts appear at the end of every row/round. Work the number that matches your size.
Cups (make 2)
Worked flat, bottom-up. Foundation edge = underbust (joins to the band). Final row = scalloped top.
Ch 22 (26, 30, 34, 38, 42).
Row 1 (WS): Hdc in 2nd ch from hook and in each ch across, turn. — 21 (25, 29, 33, 37, 41) hdc
Row 2 (RS): Ch 1, hdc BLO in each st across, turn. — 21 (25, 29, 33, 37, 41) hdc
Row 3: Ch 1, hdc BLO in each st across, turn. — 21 (25, 29, 33, 37, 41) hdc
Row 4: Ch 1, hdc BLO in each st across, turn. — 21 (25, 29, 33, 37, 41) hdc
The side edge should measure about 1½ in (4 cm).
Short-row shaping (center dome)
Do not chain extra at the turns; ch 1 counts as the turning ch only. Leave unworked stitches waiting on the needle-less side — they are worked later and the stitch count does not change.
Short Row 1 (RS): Ch 1, hdc BLO in next 14 (16, 19, 22, 25, 28) sts, turn, leaving 7 (9, 10, 11, 12, 13) sts unworked. — 14 (16, 19, 22, 25, 28) hdc
Short Row 2: Ch 1, hdc BLO in next 7 (7, 9, 11, 13, 15) sts, turn. — 7 (7, 9, 11, 13, 15) hdc
Short Row 3: Ch 1, hdc BLO in next 9 (9, 11, 13, 15, 17) sts, turn. — 9 (9, 11, 13, 15, 17) hdc
Short Row 4: Ch 1, hdc BLO in next 11 (11, 13, 15, 17, 19) sts, turn. — 11 (11, 13, 15, 17, 19) hdc
Next row (close the first side): Ch 1, hdc BLO in each st to the end of the full row, working into every remaining unworked st from Short Row 1, turn. — 21 (25, 29, 33, 37, 41) hdc
Next row (full row): Ch 1, hdc BLO in each st across, turn. — 21 (25, 29, 33, 37, 41) hdc
Work even in hdc BLO until the side edge measures 5 (5¼, 5¾, 6¼, 6¾, 7¼) in / 12.5 (13.5, 14.5, 16, 17, 18.5) cm from the foundation, ending with a RS row. Turn.
Flare row (WS)
Ch 1, hdc BLO across, increasing 4 (0, 2, 4, 6, 8) sts evenly.
Even placement (2 hdc in the same st = 1 increase):
- XS: [2 hdc in next st, hdc BLO in next 4 sts] 4 times, hdc BLO in last st. (4 increases → 21 + 4 = 25 ✓)
- S: Hdc BLO in each st (no increases). (25 + 0 = 25 ✓)
- M: Hdc BLO in 14 sts, 2 hdc in next st, hdc BLO in 13 sts, 2 hdc in last st. (2 increases → 29 + 2 = 31 ✓)
- L: [Hdc BLO in next 7 sts, 2 hdc in next st] 4 times, hdc BLO in last st. (4 increases → 33 + 4 = 37 ✓)
- XL: [Hdc BLO in next 5 sts, 2 hdc in next st] 6 times, hdc BLO in last st. (6 increases → 37 + 6 = 43 ✓)
- XXL: [Hdc BLO in next 4 sts, 2 hdc in next st] 8 times, hdc BLO in last st. (8 increases → 41 + 8 = 49 ✓)
— 25 (25, 31, 37, 43, 49) hdc. Turn.
Picot-shell row (RS) — seashell lip
Ch 1, sc in first st, *sk 2 sts, picot-shell in next st, sk 2 sts, sc in next st; rep from * across.
— 4 (4, 5, 6, 7, 8) picot-shells and 5 (5, 6, 7, 8, 9) sc. (6 sts per shell + 1 = 25 (25, 31, 37, 43, 49) ✓)
Fasten off. Weave in the starting tail along the foundation (you will pick up into this edge). Leave the finishing tail or weave it down a solid column of hdc, not across a picot.
Make the second cup to match.
Optional (recommended) seashell grooves: With RS facing and a tapestry needle or hook, surface sl st 4 (4, 5, 6, 7, 8) lines on each cup, radiating from the center of the foundation up to the center dc of each picot-shell. Keep the lines in the BLO ridges so they sit in the grooves. Fasten off.
Join cups and work the band
Hold both cups with RS facing you, scalloped edges at the top, foundation edges at the bottom, inner side-edges toward the center (about 1–2 in / 2.5–5 cm apart).
Pickup round: Join yarn with sl st in the outer foundation corner of the Left cup (as worn). Ch 1.
- Sc in each of the 21 (25, 29, 33, 37, 41) foundation sts of the Left cup,
- Ch 5 (5, 5, 7, 7, 9) for the center bridge,
- Sc in each of the 21 (25, 29, 33, 37, 41) foundation sts of the Right cup,
- Ch 55 (59, 69, 71, 75, 83) for the back,
- Join with sl st to the first sc.
Do not turn. The join sits at the left underarm. Pm in the 28th (30th, 35th, 36th, 38th, 42nd) ch of the back chain for center back.
Band Rnd 1: Ch 1, hdc in each sc and in each ch around, join with sl st to first hdc.
— 102 (114, 132, 144, 156, 174) hdc
XS check: 21 + 5 + 21 + 55 = 102 ✓
S: 25 + 5 + 25 + 59 = 114 ✓
M: 29 + 5 + 29 + 69 = 132 ✓
L: 33 + 7 + 33 + 71 = 144 ✓
XL: 37 + 7 + 37 + 75 = 156 ✓
XXL: 41 + 9 + 41 + 83 = 174 ✓
Band Rnds 2–8: Ch 1, hdc BLO in each st around, join with sl st to first hdc. — 102 (114, 132, 144, 156, 174) hdc each rnd
Band should measure about 2 in / 5 cm from the pickup. Work 1 rnd more or less if needed so the band is 2 in / 5 cm, keeping the same stitch count.
Do not fasten off if you are continuing the hem in the same color.
Shell hem (body, worked downward)
Still RS facing, working away from the cups. Shells stack: each 5-dc shell sits on the sc of the round below, and each sc sits on the center dc of the shell below.
Hem Rnd 1: Ch 1, *sc in next st, sk 2 sts, 5-dc shell in next st, sk 2 sts; rep from * around, join with sl st to first sc.
— 17 (19, 22, 24, 26, 29) shells (102 ÷ 6 = 17 ✓; 114 ÷ 6 = 19 ✓; 132 ÷ 6 = 22 ✓; 144 ÷ 6 = 24 ✓; 156 ÷ 6 = 26 ✓; 174 ÷ 6 = 29 ✓)
Hem Rnd 2: Sl st to the 3rd dc of the first shell, ch 1, sc in that same 3rd dc, *5-dc shell in next sc, sc in 3rd dc of next shell; rep from * around, ending with 5-dc shell in last sc, join with sl st to first sc. — 17 (19, 22, 24, 26, 29) shells
Hem Rnd 3: Ch 1, *5-dc shell in next sc, sc in 3rd dc of next shell; rep from * around, join with sl st to first dc of first shell. — 17 (19, 22, 24, 26, 29) shells
Hem Rnd 4 (large scallop): Ch 1, *sc in 3rd dc of next shell, 7 dc in next sc; rep from * around, join with sl st to first sc. — 17 (19, 22, 24, 26, 29) large shells
Fasten off.
For a true bra-length (no hem), skip Hem Rnds 1–4 and instead work one picot-shell round into Band Rnd 8: *sc, sk 2, picot-shell in next st, sk 2; rep from * around, join, fasten off.
Cup-side edging
This firms the armhole edges and keeps the outer scallops from flaring off the body.
With RS facing, join yarn at the band where the outer foundation corner of one cup meets the band. Sc evenly up the side of the cup (about 1 sc in each row-end) to the first (or last) sc of the picot-shell row. Sl st in that sc. Fasten off.
Repeat on the remaining three cup sides (outer and inner edge of each cup). Do not sc across the picot-shells — the scallops stay open.
Halter ties (make 2)
Try the top on and mark the inner-top sc of each cup (the sc at the center-front end of each picot-shell row) with removable markers. Those are the strap points.
Cord: Ch 111 (116, 121, 126, 131, 136). Sc in 2nd ch from hook and in each ch across. — 110 (115, 120, 125, 130, 135) sc, about 28 (30, 32, 34, 36, 38) in / 71 (76, 81, 86, 91, 97) cm plus drape.
Fasten off, leaving a 10 in / 25 cm tail. Sew or sl st one end of each tie securely to a marked inner-top sc. Weave ends down the cup side edging, not across a picot.
Ties wrap the neck and knot at the nape. If you prefer a single loop, sew both ties to the cups first, then knot them to length after trying on.
Optional outer stabilizer (recommended for dancing): Make two shorter cords, each ch 31 (31, 36, 36, 41, 41), sc back — 30 (30, 35, 35, 40, 40) sc. Attach one end to the outer-top sc of each cup and the other end to the band at the underarm, with a little slack. This stops the outer scallops from lifting.
Finishing
- Weave in all remaining ends along solid hdc columns, never across a ch-space or picot.
- Block the cups over a bowl (or a dress-form cup) that matches the finished cup width. Pin each picot open. Lightly steam cotton (hover the iron; do not crush the picots) or wet-block acrylic and dry over the bowl. Block the band and hem flat so the scallops lie even.
- If using foam cups or lining, sew them to the WS of each crochet cup with whipstitch around the foundation and side edges only, leaving the picot-shells free.
- Optional: stitch a pearl bead to each picot.
- Optional performance elastic: weave through Band Rnd 4 or 5 with a tapestry needle, overlap 1 in / 2.5 cm, and sew the ends. The crochet band hides it.
Fit notes and modifications
- Fuller bust, same ribcage: Keep the band size; add one extra pair of short rows (work Short Rows 3–4 once more, adding 2 sts on each pass) before the closing full rows.
- Tie-back band: On the pickup round, do not chain the back or join in the round. After Band Rnd 1 is worked flat across the front only, work 8 rows of hdc BLO on the front, then pick up along each short side of the band and work a 14 in / 35.5 cm hdc-BLO tie. Pair with the same halter.
- Two-color mermaid: Cups and picot-shells in pearl; band, hem, and ties in coral, gold, or seafoam.
- No halter: Attach spaghetti straps from each inner-top sc to the back of the band, 1–2 in / 2.5–5 cm either side of center back. Same cord method; shorter length — try on before sewing the back end.
The BLO ridges, radiating surface-sl-st grooves, and 7-dc picot-shells are what turn a plain bralette into a pair of seashells. Wear it snug; the band does the supporting, and the ties keep the scallops sitting on the bust.
Disclaimer: This pattern was generated by AI and should be reviewed for accuracy before use. While we strive for quality, AI-generated content may contain errors. Please verify measurements, stitch counts, charts, and instructions before beginning your project. Generated by purlJam.uk
Love this pattern?
Save this pattern to your free PurlJam libraryAccess your pattern anytime
Bookmark this page to access your pattern anytime