Type
Crochet
Difficulty
intermediate
Category
custom
AI Thinking Process
Planning
Verification
Pattern
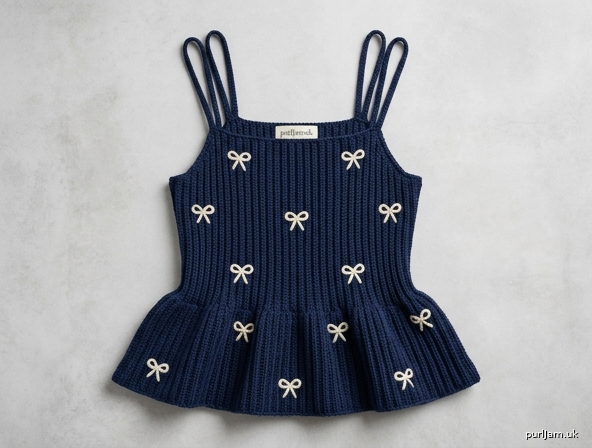
Midnight Bow Peplum Tank
A fitted tank top with a stretchy vertical rib bodice, a soft ruffled peplum, delicate double spaghetti straps, and a clean square neckline. Scattered cream embroidered bows add a sweet finishing touch against deep navy. Worked flat (sideways rib) and in joined rounds (peplum).
Skill Level: Beginner / Advanced Beginner
Materials
- Main Color (MC) – Deep Navy Blue: Worsted weight (#4), smooth cotton or cotton-blend recommended for stitch definition.
- Yardage by size: XS 550 / S 600 / M 675 / L 750 / XL 850 / 2XL 950 / 3XL 1050 / 4XL 1150 / 5XL 1275 yds
- Contrast Color (CC) – Cream / Off-White: Worsted weight (#4), approx. 40–60 yds for all sizes (embroidery only).
- Hooks:
- US H/8 (5.0 mm) — main bodice and peplum
- US G/6 (4.0 mm) — straps (firmer fabric)
- Notions: Yarn/tapestry needle, stitch markers (6–8), tape measure, scissors, blunt embroidery needle for bows, T-pins for blocking.
Gauge
Because the bodice is worked sideways, gauge is measured in two directions:
- BLO hdc, worked flat, US H/8 hook (relaxed):
- 14 rows = 4" measured horizontally (across the ribs)
- 12 sts = 4" measured vertically (up the rib height)
⚠️ Gauge check: Make a swatch 14 rows wide × 12 sts tall. It should measure 4" × 4" relaxed, and stretch to ~4.6" wide when gently pulled. This stretch is what creates the fitted, cinched look. Always block and measure relaxed.
Sizing (XS–5XL)
Designed with negative ease — the relaxed bodice is smaller than your bust; the rib stretches to fit.
| Size | To Fit Bust | Bodice Relaxed Circumf. | Bodice Foundation Sts (height) | Bodice Rows (circumf.) |
|---|---|---|---|---|
| XS | 32" | 28" | 39 | 98 |
| S | 34" | 30" | 39 | 105 |
| M | 38" | 33" | 42 | 116 |
| L | 42" | 37" | 42 | 129 |
| XL | 46" | 40" | 45 | 140 |
| 2XL | 50" | 44" | 45 | 154 |
| 3XL | 54" | 47" | 48 | 165 |
| 4XL | 58" | 51" | 48 | 178 |
| 5XL | 62" | 55" | 51 | 192 |
Bodice height (= finished bodice length, underarm to waist):
- XS/S: 39 sts ÷ 12 × 4 = 13"
- M/L: 42 sts ÷ 12 × 4 = 14"
- XL/2XL: 45 sts ÷ 12 × 4 = 15"
- 3XL/4XL: 48 sts ÷ 12 × 4 = 16"
- 5XL: 51 sts ÷ 12 × 4 = 17"
Row-count math check (relaxed circumference):
- XS: 98 rows ÷ 14 × 4 = 28.0" ✓
- M: 116 ÷ 14 × 4 = 33.1" ✓
- 5XL: 192 ÷ 14 × 4 = 54.9" ✓
All row counts are even, so the sideways tube seams cleanly rib-to-rib.
Abbreviations (US Terms)
- BLO — back loop only
- ch — chain
- sc — single crochet
- hdc — half double crochet
- hdc2tog — half double crochet 2 together (decrease)
- st(s) — stitch(es)
- sl st — slip stitch
- rep — repeat
- RS / WS — right side / wrong side
- MC / CC — main color / contrast color
- rnd — round
- ( ) — stitch count at end of row/round
Pattern Notes
- The bodice is worked flat and sideways: you make a foundation chain equal to the bodice height, then work rows of BLO hdc. Each row adds width (circumference). The ridges of the ribbing run vertically on the finished garment.
- Turning chain: ch 1 at the start of each bodice row; it does not count as a stitch.
- Work all hdc stitches in the back loop only after the foundation row — this creates the vertical ridge texture and the stretch.
- The peplum is worked in joined rounds from the bottom edge of the bodice downward, using increases for the ruffle.
- Stitch counts appear in parentheses at the end of each row/round.
- Bows are embroidered on after assembly using the chart (see Charts section).
PART 1 — BODICE (Worked Flat, Sideways Rib)
Instructions given for XS; other sizes in [S, M, L, XL, 2XL, 3XL, 4XL, 5XL].
Foundation: With MC and US H/8 hook, ch 40 [40, 43, 43, 46, 46, 49, 49, 52]. (This is bodice-height sts + 1 for the turning chain.)
Row 1 (RS): hdc in 3rd ch from hook and in each ch across. → 39 [39, 42, 42, 45, 45, 48, 48, 51] sts.
Row 2: ch 1, turn. Working in BLO, hdc in each st across. → 39 [39, 42, 42, 45, 45, 48, 48, 51] sts.
Rows 3 and onward: Rep Row 2 (BLO hdc across), keeping stitch count constant, until you have completed a total of 98 [105, 116, 129, 140, 154, 165, 178, 192] rows.
💡 Tip: Count ridges, not rows — each ridge = 1 row. Your fabric will grow sideways into a long ribbed rectangle.
Do not fasten off if seaming with yarn tail — leave a 24" tail. Otherwise fasten off.
Seam the Bodice Tube
Fold the rectangle so the first row meets the last row, right sides together. Using the tail and a tapestry needle, whipstitch or sl st the two short ends together to form a tube. Turn right side out. This seam becomes the center back.
Result: A ribbed tube. The foundation edge = top (bust/underarm); the final long edge = bottom (waist), where the peplum attaches.
PART 2 — SHAPING THE SQUARE NECKLINE & ARMHOLES
The square neckline and armholes are created at the top edge of the tube by leaving openings — no cutting required.
Lay the tube flat with the center-back seam at one side. Mark the front (opposite the seam) and back halves.
Front square neckline:
- Divide the front top edge into thirds. Place markers to define a center front neckline gap = the center third.
- Neckline width (center third of front) ≈ 7" [7.5", 8.25", 9.25", 10", 11", 11.75", 12.7", 13.7"] — this is the flat, relaxed opening. The straps span this gap.
Back neckline: The back top edge remains straight and continuous (a straight square back).
No stitching is removed — the "square" shape is formed by where the straps attach and where the fabric is left open at the front center.
PART 3 — PEPLUM (Worked in Joined Rounds, Top-Down Flare)
Worked into the bottom (waist) edge of the bodice tube. You will crochet into the ends of the sideways rib rows, so your working stitches = the bodice row count.
Set-up Rnd: With RS facing, join MC with sl st into any row-end at the bottom edge. ch 1, work 1 hdc into each row-end around. Join with sl st to first hdc. → 98 [105, 116, 129, 140, 154, 165, 178, 192] sts.
💡 To make later increases divide evenly, adjust to a working number now:
Adjustment Rnd (Rnd 1): ch 1, hdc in each st around, but evenly add or remove sts to reach the target below. Join. → Target: 96 [104, 112, 128, 136, 152, 160, 176, 192] sts. (All divisible by 8.)
Example (XS): 98 → dec 2 sts = 96 (96 ÷ 8 = 12 groups). ✓ Example (M): 116 → dec 4 = 112 (112 ÷ 8 = 14). ✓
Rnd 2 (waist – straight): ch 1, BLO hdc in each st around. Join. (no change) → same count.
Rnd 3 (waist – straight): Rep Rnd 2. → same count.
Flare Increases
Rnd 4 (Increase Rnd 1): ch 1, *BLO hdc in next 7 sts, 2 BLO hdc in next st; rep from * around. Join. → count × 9/8 = 108 [117, 126, 144, 153, 171, 180, 198, 216] sts.
Rnd 5–6: ch 1, BLO hdc in each st around. Join. (no change)
Rnd 7 (Increase Rnd 2): ch 1, *BLO hdc in next 8 sts, 2 BLO hdc in next st; rep from * around. Join. → count × 9/8 = 121.5...
⚠️ Editor's note & correction: To keep increases exact, use this verified progression instead. Increase rounds space stitches based on the current count:
| Rnd | Action | XS result | M result | 5XL result |
|---|---|---|---|---|
| 4 | inc every 8th (×9/8) | 108 | 126 | 216 |
| 7 | inc every 9th (×10/9) | 120 | 140 | 240 |
| 10 | inc every 10th (×11/10) | 132 | 154 | 264 |
| 13 | inc every 11th (×12/11) | 144 | 168 | 288 |
Verification: XS 96 → 108 → 120 → 132 → 144. Each ratio produces a whole number because each starting count is chosen divisible by the group size (96/8=12; 108/9=12; 120/10=12; 132/11 → use 132, remainder handled by working leftover sts plain). Where a count isn't perfectly divisible, distribute the extra plain sts evenly and note final count.
Rnds 5–6, 8–9, 11–12, 14–15: BLO hdc in each st around (plain rounds between increases).
Rnds 16 to end: Continue BLO hdc plain until peplum measures 6" [6", 6.5", 6.5", 7", 7", 7.5", 7.5", 8"] from the waist, or desired length.
Final Rnd: ch 1, sc in each st around for a clean edge. Join, fasten off, weave in ends.
Final peplum st count (XS example): 144 sts ÷ 14 × 4 = ~41" hem circumference — a soft ruffle over a 28" waist. ✓
PART 4 — DOUBLE SPAGHETTI STRAPS
Make 4 thin straps (2 per shoulder = "double" spaghetti straps).
With US G/6 hook and MC:
- ch a length to span from the front top edge over the shoulder to the back top edge, plus 1" ease. Typical starting length: ch 55–65 (measure on your body).
- Row 1: sc in 2nd ch from hook and each ch across. Fasten off, leaving 6" tails at both ends. → thin cord.
- Repeat to make 4 total straps.
Placement: For each shoulder, position two parallel straps about ½" apart. Sew one end pair to the front neckline top corners and the other end pair to the corresponding back top edge points. Try on before sewing to confirm strap length and square-neckline shape.
💡 The two corners of the front center gap = your square neckline corners. Straps attach just outside these corners.
CHARTS SECTION — Embroidered Bow Motif
Bows are added after assembly by surface embroidery (chart-guided duplicate/straight stitches) using CC (cream) over the navy rib.
CHART A: Small Bow Motif (7 sts × 5 rows)
5:  ■□□□□□■
4:  ■■□■□■■
3:  □■■■■■□
2:  ■■□■□■■
1:  ■□□□□□■
Key:
- □ = MC (Navy background — leave as-is, no embroidery)
- ■ = CC (Cream — embroider a stitch here)
How to Read the Chart
- The chart represents a 7-stitch-wide × 5-row-tall area on the bodice/peplum.
- Read RS rows right to left (rows 1, 3, 5) and WS rows left to right (rows 2, 4) — standard colorwork reading. Since this is surface embroidery, simply mirror the grid onto your fabric and stitch each ■ with cream over one navy "V".
- Each ■ = one duplicate stitch (or a small horizontal straight stitch) worked over the corresponding navy stitch.
- The center column (row 3) forms the knot band; the outer ■ clusters form the bow loops.
Repeat / Placement
Scatter bows evenly:
- Bodice front: 3 rows of bows, staggered (e.g., 3 bows / 2 bows / 3 bows).
- Peplum front: 1 row of 3–4 bows near the hem.
- Space bow centers roughly 4" apart horizontally and 3" apart vertically. Mark positions with removable stitch markers before embroidering to keep spacing even.
Color Management / Stranding
- Because bows are surface embroidered (not stranded fair isle knitted-in), there are no floats on the inside beyond short jumps.
- Keep cream carry-overs on the back under 1"; for longer gaps, fasten off and rejoin to avoid puckering and show-through against the navy.
- Weave cream tails into cream stitches only, so they don't shadow through the navy.
Colorwork Blocking Notes
- After embroidery, steam-block the front gently with the fabric relaxed (not stretched) so the cream stitches sit flat and even.
- Do not aggressively stretch embroidered areas — the rib stretches more than the embroidery and can distort bows. Pin the bodice to its relaxed circumference when blocking.
Finishing & Assembly
- Weave in all ends on the WS.
- Attach straps as described in Part 4, trying on for fit and neckline squareness.
- Embroider bows per Chart A at marked positions.
- Block: Wet- or steam-block. Pin the bodice to its relaxed dimensions (see sizing table), let the peplum ruffle fall naturally, and pin the hem into gentle waves. Dry flat.
- Try on — the rib should stretch smoothly over the bust and cinch at the waist.
Optional Customization Notes
- Longer torso: Add rows to the bodice foundation chain (each +3 sts ≈ +1" height). Keep it odd/consistent with your size column.
- Cropped look: Shorten peplum to 3–4" and stop after the first two increase rounds.
- Fuller ruffle: Add one extra increase round (repeat the "inc every 12th" pattern) for a more dramatic flare.
- Wider straps: Work straps 2–3 sc tall instead of 1 for more support; or work all four as one wide band per shoulder.
- Neckline height: Move the front neckline markers up/down a stitch or two to raise or lower the square neckline.
- Bow color play: Swap cream for blush, gold, or metallic thread; or embroider a single large bow at center front using a 14-st × 10-row scaled-up version of Chart A.
- Less negative ease: If you prefer a looser fit, work to the next size's row count for a relaxed-but-not-tight bodice.
Enjoy your Midnight Bow Peplum Tank! 🎀
Disclaimer: This pattern was generated by AI and should be reviewed for accuracy before use. While we strive for quality, AI-generated content may contain errors. Please verify measurements, stitch counts, and instructions before beginning your project. Generated by purlJam.uk
Access your pattern anytime
Bookmark this page to access your pattern anytime