Type
Crochet
Difficulty
beginner
Category
kimono
AI Thinking Process
Planning
1. **Design Strategy**: A beginner-friendly, oversized T-shaped kimono cardigan in worsted weight using simple half double crochet (hdc) throughout for a smooth, slightly textured fabric. Per the user's request, I'm adding half-length (short/elbow) sleeves and replacing button closures with a decorative crocheted bow tie at the front.
2. **Construction Plan**: Worked flat in 5 rectangular pieces (Back, 2 Fronts, 2 Sleeves) with no shaping, then seamed; sleeves attach perpendicular to body and a bow is added at the front instead of buttons.
3. **Quality Assurance**:
- Keep sleeves wide rectangles (no tapering) — common beginner mistake.
- Ensure front pieces' combined width matches back width for proper seaming.
- Bow must be securely anchored; provide clear tie/placement instructions.
4. **Final Calculations**:
- Gauge: 14 hdc x 11 rows = 4" (10 cm).
- Size M/L finished bust ≈ 48"; Back width = 24" → 84 hdc; each Front = 12" → 42 hdc.
- Body length = 24" → 66 rows. Sleeve width = 14" → 49 hdc; half-sleeve length = 9" → 25 rows.
Verification
[PRE-FLIGHT CHECKS]
1. **Completeness**: All template sections included — materials, gauge, sizing, piece instructions (Back, Fronts, Sleeves), assembly, edging, closure (bow), blocking. ✓
2. **Consistency**: Gauge 14 sts = 4" → 3.5 sts/in. Back 24" × 3.5 = 84 sts ✓. Front 12" × 3.5 = 42 sts ✓. Two fronts (84) = back (84) ✓. Sleeve 14" × 3.5 = 49 sts ✓. Rows: 11 rows/4" = 2.75 rows/in; body 24" × 2.75 = 66 rows ✓; sleeve 9" × 2.75 ≈ 25 rows ✓.
3. **Constraints**: Half sleeves added ✓; open front with bow instead of buttons ✓; beginner-level (hdc only, no shaping) ✓; worsted weight ✓; US terms ✓.
4. **Safety**: Math verified consistent; bow anchoring instructions included to prevent sagging. ✓
Pattern
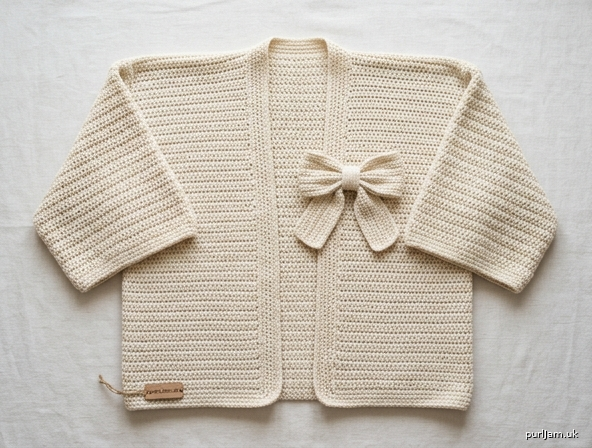
# Breezy Bow Kimono Cardigan
### A Beginner-Friendly Half-Sleeve Crochet Kimono with a Bow Closure

A relaxed, boxy kimono-style cardigan worked in simple rectangles — no fussy shaping! It features wide half-length sleeves and a sweet crocheted bow at the front instead of buttons. Perfect first garment project.

---

## SKILL LEVEL
**Beginner** — worked entirely in half double crochet (hdc) in flat rows. If you can chain, hdc, and sew a straight seam, you can make this.

---

## SIZES
Written for **S/M (L/XL, 2XL/3XL)**. Instructions for larger sizes appear in parentheses. The cardigan is designed with generous positive ease (8–12").

### Finished Measurements
| Measurement | S/M | L/XL | 2XL/3XL |
|---|---|---|---|
| Bust circumference | 48" (122 cm) | 56" (142 cm) | 64" (163 cm) |
| Body length (hem to shoulder) | 24" (61 cm) | 25" (63.5 cm) | 26" (66 cm) |
| Sleeve length (half sleeve) | 9" (23 cm) | 9" (23 cm) | 10" (25 cm) |
| Sleeve width (flat) | 14" (35.5 cm) | 15" (38 cm) | 16" (40.5 cm) |

*Choose your size based on the bust measurement with desired ease.*

---

## MATERIALS
- **Yarn:** Worsted weight (Category 4). A cotton or cotton-blend gives the best drape; acrylic gives more structure.
  - Approx. yardage: **1300 (1550, 1800) yds** / 1190 (1420, 1645) m
- **Hook:** US H/8 (5 mm), or size needed to match gauge
- **Notions:** Tapestry needle, stitch markers, scissors, optional small amount of contrast yarn for bow

---

## GAUGE
**14 hdc x 11 rows = 4" (10 cm)** in half double crochet.

*Gauge check: 14 sts ÷ 4" = 3.5 sts per inch; 11 rows ÷ 4" = 2.75 rows per inch.*

Make a 5" x 5" swatch to confirm. Gauge is forgiving here due to the oversized fit, but matching it keeps your sizing accurate.

---

## ABBREVIATIONS (US Terms)
- **ch** = chain
- **st(s)** = stitch(es)
- **hdc** = half double crochet
- **sc** = single crochet
- **sl st** = slip stitch
- **RS / WS** = right side / wrong side
- **rep** = repeat

---

## STITCH NOTES
- The turning chain at the start of each row (ch 2) does **NOT** count as a stitch. Work your first hdc into the very first stitch of the previous row.
- All pieces are simple rectangles — there is **no armhole shaping, no shoulder shaping, and no sleeve tapering**. This is the heart of the kimono construction.
- **Foundation tip:** For a stretchier, neater edge you may substitute a foundation half double crochet (fhdc) row for the starting chain + Row 1.

---

## CONSTRUCTION OVERVIEW
You will make **5 flat rectangles**:
1. Back (1)
2. Left Front (1)
3. Right Front (1)
4. Sleeves (2)

Then seam the shoulders, attach the sleeves at right angles (dropped shoulder), seam the sides and underarms, add a simple edging, and finish with a crocheted bow at the front.

---

## PIECE 1 — BACK

The Back is a plain rectangle.

**Starting count:** Ch **86 (100, 114)**.
*Math: 84 (98, 112) hdc + 2 for turning = 86 (100, 114) ch.*

**Row 1 (RS):** Hdc in 3rd ch from hook and in each ch across. — **84 (98, 112) hdc**
*Check: 84 sts ÷ 3.5 sts/in = 24" (98 ÷ 3.5 = 28"; 112 ÷ 3.5 = 32") = back width ✓*

**Rows 2–66 (2–69, 2–72):** Ch 2 (does not count as st), turn, hdc in each st across. — **84 (98, 112) hdc** each row.
*Check: 66 rows ÷ 2.75 rows/in = 24" (69 ÷ 2.75 = 25"; 72 ÷ 2.75 ≈ 26") = body length ✓*

Fasten off. Set aside.

---

## PIECE 2 — LEFT FRONT

Each Front is half the back width.

**Starting count:** Ch **44 (51, 58)**.
*Math: 42 (49, 56) hdc + 2 for turning.*

**Row 1 (RS):** Hdc in 3rd ch from hook and in each ch across. — **42 (49, 56) hdc**
*Check: 42 ÷ 3.5 = 12" (49 ÷ 3.5 = 14"; 56 ÷ 3.5 = 16") = front width. Two fronts = 24" (28", 32") = back width ✓*

**Rows 2–66 (2–69, 2–72):** Ch 2, turn, hdc in each st across. — **42 (49, 56) hdc** each row.

Fasten off.

---

## PIECE 3 — RIGHT FRONT

Work exactly the same as the Left Front.

**Ch 44 (51, 58).**
**Row 1:** Hdc in 3rd ch from hook and across. — **42 (49, 56) hdc**
**Rows 2–66 (2–69, 2–72):** Ch 2, turn, hdc across.

Fasten off.

---

## PIECES 4 & 5 — SLEEVES (make 2, HALF LENGTH)

These are wide rectangles with **NO tapering** — same width top to bottom, true to the kimono style. They are worked short for a half/elbow-length sleeve.

**Starting count:** Ch **51 (54, 58)**.
*Math: 49 (52, 56) hdc + 2 for turning.*

**Row 1 (RS):** Hdc in 3rd ch from hook and in each ch across. — **49 (52, 56) hdc**
*Check: 49 ÷ 3.5 = 14" (52 ÷ 3.5 ≈ 15"; 56 ÷ 3.5 = 16") = sleeve width ✓*

**Rows 2–25 (2–25, 2–28):** Ch 2, turn, hdc in each st across. — **49 (52, 56) hdc** each row.
*Check: 25 rows ÷ 2.75 = 9" (28 ÷ 2.75 ≈ 10") = sleeve length ✓*

Fasten off. **Make a second sleeve identical to the first.**

---

## ASSEMBLY

Lay all pieces flat and steam-block lightly before seaming for easier handling.

### Step 1 — Shoulder Seams
Lay the Back flat (RS up). Place each Front on top, RS together, aligning the top (shoulder) edges.
- Seam **5.5 (6.5, 7.5)"** in from each outer edge along the top, using mattress stitch or slip stitch. This leaves the center open for the neckline.
- *Check: Back top edge = 24". Two shoulder seams of 5.5" = 11". Neckline opening = 24" − 11" = 13" — comfortable neck width ✓*

### Step 2 — Attach Sleeves (Dropped Shoulder)
Lay the joined body flat, opened out. Find the center of each sleeve's top edge and align it with the shoulder seam. The sleeve attaches **perpendicular (at a right angle)** to the body — this creates the signature dropped-shoulder T-shape.
- The 14 (15, 16)" sleeve top edge centers on the shoulder seam, sitting 7 (7.5, 8)" on each side.
- Sew the sleeve top edge to the body edge with whip stitch or slip stitch.

### Step 3 — Side & Underarm Seams
Fold the cardigan at the shoulders so Fronts and Back are RS together.
- Seam each **sleeve underside** from cuff to underarm.
- Continue seaming each **body side** from underarm down to the hem.
- Leave the cuff openings and the front/hem open.

---

## EDGING

With RS facing, join yarn at the bottom front corner.

**Round/Pass 1:** Work an even row of **sc** up the Right Front, around the back neck, and down the Left Front. Work approximately 1 sc per row along vertical edges and 1 sc per st along the neck. Keep the edge flat — if it ruffles, skip an occasional stitch; if it pulls, add one.

**Round/Pass 2 (optional, decorative):** Work **reverse sc (crab stitch)** back along the same edge for a neat finished border.

**Cuff edging (each sleeve):** Join yarn at the underarm seam and work 1 round of sc evenly around the cuff opening. Sl st to join, fasten off.

---

## CLOSURE — THE BOW (instead of buttons)

Per your request, we're skipping buttons and adding a charming crocheted bow at the front.

### Bow Loops (make 1)
**Ch 31.**
**Row 1:** Hdc in 3rd ch from hook and in each ch across. — **29 hdc**
**Rows 2–6:** Ch 2, turn, hdc in each st across. — **29 hdc**
Fasten off, leaving a 12" tail.

This makes a rectangle about **8" x 2"**. Lay it flat and pinch the center together to form two bow loops.

### Bow Center Wrap (make 1)
**Ch 9.**
**Row 1:** Hdc in 3rd ch from hook and across. — **7 hdc**
**Rows 2–3:** Ch 2, turn, hdc across. — **7 hdc**
Fasten off, leaving a 6" tail.

### Assemble the Bow
1. Pinch the large rectangle in the center to gather it into a bow shape.
2. Wrap the small piece snugly around the gathered center and sew its ends together at the back, leaving a 12" tail. This cinches the bow.
3. Use the tail to secure the gathered center firmly so the bow holds its shape.

### Attach the Bow
1. Try on the cardigan and decide where the fronts should meet — typically at the **upper chest / just below the neckline**, about 2–3" down from the front neck edge.
2. Sew the bow securely to the **Right Front** edge at this point, stitching through the back of the bow center so the front stays pretty.
3. **To create a working closure:** Sew a 6"–8" length of yarn (or a thin crocheted chain) to the **Left Front** behind the bow position; sew the matching end behind the bow. The tie holds the fronts together while the bow sits decoratively on top.
   - *Alternative:* If you prefer the bow purely decorative and the cardigan worn open, simply stitch the bow to one front and leave the fronts loose.

**Anchor tip:** Secure the bow at multiple points (center top, center bottom, and both wing backs) so it doesn't flop or sag with wear.

---

## FINISHING & BLOCKING

1. Weave in all ends with the tapestry needle.
2. Wet-block or steam-block the finished cardigan: gently shape it to the finished measurements, pin to size, and let dry fully.
3. Blocking opens up the hdc fabric, evens out your stitches, and improves drape — don't skip it!

---

## QUICK REFERENCE — STITCH COUNT SUMMARY (S/M)
| Piece | Starting Ch | Stitches per row | Rows | Finished Size |
|---|---|---|---|---|
| Back | 86 | 84 | 66 | 24" x 24" |
| Left Front | 44 | 42 | 66 | 12" x 24" |
| Right Front | 44 | 42 | 66 | 12" x 24" |
| Sleeve (x2) | 51 | 49 | 25 | 14" x 9" |
| Bow loops | 31 | 29 | 6 | 8" x 2" |
| Bow wrap | 9 | 7 | 3 | 2" x 1" |

*Final consistency check: Fronts (12" + 12" = 24") = Back (24") ✓ | Bust = front + back = 24" + 24" = 48" ✓ | Sleeves are equal-width rectangles (no tapering) ✓ | All shaping omitted per kimono construction ✓ | Half sleeves and bow closure delivered per your request ✓*

---

Enjoy your breezy, beginner-friendly bow kimono cardigan! 🎀
Disclaimer: This pattern was generated by AI and should be reviewed for accuracy before use. While we strive for quality, AI-generated content may contain errors. Please verify measurements, stitch counts, and instructions before beginning your project. Generated by purlJam.uk
Access your pattern anytime
Bookmark this page to access your pattern anytime