Type
Crochet
Difficulty
beginner
Category
hat
AI Thinking Process
Planning
Verification
Pattern
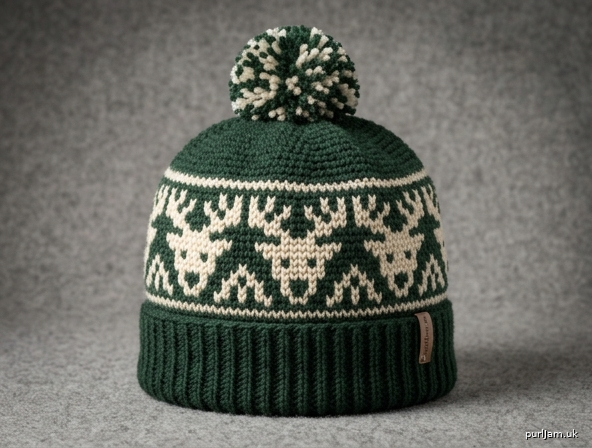
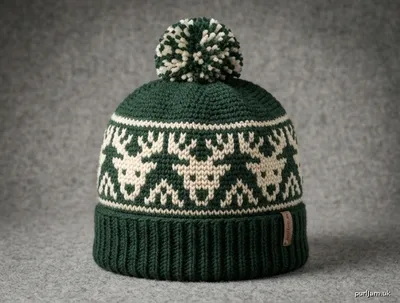
Mosaic Reindeer Beanie
Women’s Intermediate Top-Down Hat
Skill Level: Intermediate
Construction: Top-down, seamless, worked in the round. Overlay mosaic crochet colorwork band featuring a repeating reindeer motif.
Sizes
One size (Adult Woman)
To fit head circumference: 21–23" (53.5–58.5 cm)
Finished hat circumference: 20" (51 cm) — slight negative ease
Finished height (crown to brim edge, incl. ribbing): approx. 8½" (21.5 cm)
Yarn
Worsted weight yarn (Category 4), approx. 180 yd (165 m) total
- MC (Main Color): 120 yd (110 m) — suggested: deep forest green, charcoal, or cream
- CC (Contrast Color): 60 yd (55 m) — suggested: cream, red, or soft gray for reindeer
Sample used: 100% wool or wool-blend worsted, ~200 yd/100 g.
Hook & Notions
- US H/8 (5.0 mm) crochet hook, or size needed to obtain gauge
- US G/6 (4.0 mm) hook for optional tighter ribbing (optional)
- Stitch marker
- Yarn needle
- Scissors
Gauge
16 sts and 16 rnds = 4" (10 cm) in overlay mosaic pattern (sc BLO + drop-down dc) after light blocking.
Check gauge: Work a 20-st swatch in mosaic for at least 16 rnds. Adjust hook size if necessary — fabric should be dense enough to hold shape but still soft.
Abbreviations (US Terms)
- BLO — back loop only
- CC — contrast color
- ch — chain
- dc — double crochet
- inc — increase (2 sc in same st)
- MC — main color
- MR — magic ring
- rep — repeat
- rnd(s) — round(s)
- sc — single crochet
- sl st — slip stitch
- st(s) — stitch(es)
- PM — place marker
- ***** — repeat instructions following asterisk as directed
Special Stitches & Mosaic Notes
Overlay Mosaic Crochet (in the round)
- Each mosaic rnd is worked in one color only.
- Alternate colors every 2 rounds (MC for 2 rnds, CC for 2 rnds, etc.).
- Most stitches are sc BLO.
- When the chart shows a filled/contrast box on the current color’s rnd, work a drop-down dc into the front loop of the stitch 2 rounds below (skipping the sc of the previous rnd), then skip the corresponding st on the current rnd.
- Carry unused color loosely up the inside (or cut and weave if preferred for cleaner floats).
- Do not turn; work continuously in the round. Join each rnd with sl st to first st, then ch 1 to begin next rnd (ch 1 does not count as a st).
- Read chart right to left on every rnd (in-the-round convention). Each chart row = 1 crochet rnd.
- Stitch count remains constant (80) throughout mosaic section.
Drop-down dc: Yarn over, insert hook from front into the unworked front loop of the stitch 2 rounds below, yo and pull up a loop to height of current rnd, (yo, pull through 2 loops) twice. Skip the next st on the current working rnd.
Pattern Notes
- Hat begins at crown with MC and increases to 80 sts.
- Mosaic reindeer band is centered on the sides; 5 full repeats fit exactly around.
- Keep drop-down dcs snug but not tight so the motif lies flat.
- Change color in the final yarn-over of the last st of the rnd before the new color begins, or fasten off and rejoin for cleaner joins.
- Ribbed band is optional but recommended for stretch and finish.
Chart: Reindeer Repeat (16 sts × 18 rnds)
Work the 16-st repeat 5 times every rnd (80 sts).
Key:
□ = sc BLO in current color
■ = drop-down dc in current color (into front loop 2 rnds below), skip current st
Color sequence for chart rnds 1–18:
Rnds 1–2 MC, 3–4 CC, 5–6 MC, 7–8 CC, 9–10 MC, 11–12 CC, 13–14 MC, 15–16 CC, 17–18 MC.
Rnd 18 (MC): □ □ □ □ □ □ □ □ □ □ □ □ □ □ □ □
Rnd 17 (MC): □ □ □ □ □ □ □ □ □ □ □ □ □ □ □ □
Rnd 16 (CC): □ □ ■ □ □ □ □ □ □ □ □ □ ■ □ □ □
Rnd 15 (CC): □ ■ ■ ■ □ □ □ □ □ □ □ ■ ■ ■ □ □
Rnd 14 (MC): □ □ ■ □ □ □ □ ■ □ □ □ □ ■ □ □ □
Rnd 13 (MC): □ □ □ □ □ □ ■ ■ ■ □ □ □ □ □ □ □
Rnd 12 (CC): □ □ □ □ □ ■ ■ ■ ■ ■ □ □ □ □ □ □
Rnd 11 (CC): □ □ □ □ ■ ■ □ ■ □ ■ ■ □ □ □ □ □
Rnd 10 (MC): □ □ □ □ □ ■ ■ ■ ■ ■ □ □ □ □ □ □
Rnd  9 (MC): □ □ □ □ □ □ ■ ■ ■ □ □ □ □ □ □ □
Rnd  8 (CC): □ □ □ □ □ ■ □ ■ □ ■ □ □ □ □ □ □
Rnd  7 (CC): □ □ □ □ □ □ ■ ■ ■ □ □ □ □ □ □ □
Rnd  6 (MC): □ □ □ □ □ □ □ ■ □ □ □ □ □ □ □ □
Rnd  5 (MC): □ □ □ □ □ □ ■ ■ ■ □ □ □ □ □ □ □
Rnd  4 (CC): □ □ □ □ □ ■ □ □ □ ■ □ □ □ □ □ □
Rnd  3 (CC): □ □ □ □ ■ □ □ □ □ □ ■ □ □ □ □ □
Rnd  2 (MC): □ □ □ □ □ □ □ □ □ □ □ □ □ □ □ □
Rnd  1 (MC): □ □ □ □ □ □ □ □ □ □ □ □ □ □ □ □
(Antlers form on rnds 3–6; head/ears 7–12; body/legs 13–16; solid border 1–2 & 17–18.)
Instructions
Crown (MC only)
With MC and larger hook, make a magic ring.
Rnd 1: Ch 1, 8 sc in MR, join with sl st to first sc, ch 1. (8 sts)
Pull ring closed. PM in first st of rnd and move up each rnd.
Rnd 2: Inc in each st around, join, ch 1. (16 sts) — 8 inc → 8 + 8 = 16 ✓
Rnd 3: *Sc in next st, inc in next st; rep from * around, join, ch 1. (24 sts) — 8 inc → 16 + 8 = 24 ✓
Rnd 4: *Sc in next 2 sts, inc in next st; rep from * around, join, ch 1. (32 sts) — 8 inc → 24 + 8 = 32 ✓
Rnd 5: *Sc in next 3 sts, inc in next st; rep from * around, join, ch 1. (40 sts) — 8 inc → 32 + 8 = 40 ✓
Rnd 6: *Sc in next 4 sts, inc in next st; rep from * around, join, ch 1. (48 sts) — 8 inc → 40 + 8 = 48 ✓
Rnd 7: *Sc in next 5 sts, inc in next st; rep from * around, join, ch 1. (56 sts) — 8 inc → 48 + 8 = 56 ✓
Rnd 8: *Sc in next 6 sts, inc in next st; rep from * around, join, ch 1. (64 sts) — 8 inc → 56 + 8 = 64 ✓
Rnd 9: *Sc in next 7 sts, inc in next st; rep from * around, join, ch 1. (72 sts) — 8 inc → 64 + 8 = 72 ✓
Rnd 10: *Sc in next 8 sts, inc in next st; rep from * around, join, ch 1. (80 sts) — 8 inc → 72 + 8 = 80 ✓
Crown diameter should measure approx. 6¼–6½" (16–16.5 cm).
If needed, work 1 rnd even in sc (no increases) to adjust height before mosaic: Rnd 11 (optional): Sc in each st around, join, ch 1. (80 sts)
Body — Mosaic Reindeer Band
Continue with 80 sts. Begin mosaic chart (or written instructions below).
Work all mosaic sts as sc BLO except where a drop-down dc is indicated.
Maintain 80 sts every rnd (each drop-down dc replaces one sc).
Written Mosaic (follows chart exactly; 5 reps per rnd)
Mosaic Rnds 1–2 (MC): Sc BLO in each st around, join, ch 1. (80 sts)
Mosaic Rnd 3 (CC): *Sc BLO in next 4 sts, drop-down dc, sc BLO in next 5 sts, drop-down dc, sc BLO in next 4 sts; rep from * 4 more times, join, ch 1. (80 sts)
Mosaic Rnd 4 (CC): *Sc BLO in next 5 sts, drop-down dc, sc BLO in next 3 sts, drop-down dc, sc BLO in next 5 sts; rep from * 4 more times, join, ch 1. (80 sts)
Mosaic Rnd 5 (MC): *Sc BLO in next 6 sts, drop-down dc, drop-down dc, drop-down dc, sc BLO in next 7 sts; rep from * 4 more times, join, ch 1. (80 sts)
(Placement: dc’s sit over the center valley between antler points.)
Mosaic Rnd 6 (MC): *Sc BLO in next 7 sts, drop-down dc, sc BLO in next 8 sts; rep from * 4 more times, join, ch 1. (80 sts)
Mosaic Rnd 7 (CC): *Sc BLO in next 6 sts, drop-down dc, drop-down dc, drop-down dc, sc BLO in next 7 sts; rep from * 4 more times, join, ch 1. (80 sts)
Mosaic Rnd 8 (CC): *Sc BLO in next 5 sts, drop-down dc, sc BLO in next 1 st, drop-down dc, sc BLO in next 1 st, drop-down dc, sc BLO in next 6 sts; rep from * 4 more times, join, ch 1. (80 sts)
Mosaic Rnd 9 (MC): *Sc BLO in next 6 sts, drop-down dc, drop-down dc, drop-down dc, sc BLO in next 7 sts; rep from * 4 more times, join, ch 1. (80 sts)
Mosaic Rnd 10 (MC): *Sc BLO in next 5 sts, drop-down dc, drop-down dc, drop-down dc, drop-down dc, drop-down dc, sc BLO in next 6 sts; rep from * 4 more times, join, ch 1. (80 sts)
Mosaic Rnd 11 (CC): *Sc BLO in next 4 sts, drop-down dc, drop-down dc, sc BLO in next 1 st, drop-down dc, sc BLO in next 1 st, drop-down dc, drop-down dc, sc BLO in next 5 sts; rep from * 4 more times, join, ch 1. (80 sts)
Mosaic Rnd 12 (CC): *Sc BLO in next 5 sts, drop-down dc, drop-down dc, drop-down dc, drop-down dc, drop-down dc, sc BLO in next 6 sts; rep from * 4 more times, join, ch 1. (80 sts)
Mosaic Rnd 13 (MC): *Sc BLO in next 6 sts, drop-down dc, drop-down dc, drop-down dc, sc BLO in next 7 sts; rep from * 4 more times, join, ch 1. (80 sts)
Mosaic Rnd 14 (MC): *Sc BLO in next 2 sts, drop-down dc, sc BLO in next 5 sts, drop-down dc, sc BLO in next 4 sts, drop-down dc, sc BLO in next 2 sts; rep from * 4 more times, join, ch 1. (80 sts)
Mosaic Rnd 15 (CC): *Sc BLO in next 1 st, drop-down dc, drop-down dc, drop-down dc, sc BLO in next 7 sts, drop-down dc, drop-down dc, drop-down dc, sc BLO in next 2 sts; rep from * 4 more times, join, ch 1. (80 sts)
Mosaic Rnd 16 (CC): *Sc BLO in next 2 sts, drop-down dc, sc BLO in next 9 sts, drop-down dc, sc BLO in next 3 sts; rep from * 4 more times, join, ch 1. (80 sts)
Mosaic Rnds 17–18 (MC): Sc BLO in each st around, join, ch 1. (80 sts)
Mosaic band complete. Fasten off CC. Continue with MC only.
Even rounds (optional extra height): If you prefer a slouchier hat, work 2–4 additional rnds of sc BLO in MC. (80 sts each rnd)
Ribbed Band (Option)
Standard BLO Rib (recommended)
Change to smaller hook if desired for firmer rib.
Rib Rnd 1: Sc BLO in each st around, join, ch 1. (80 sts)
Rib Rnds 2–6 (or desired length ~1½" / 4 cm): Rep Rib Rnd 1.
Fasten off after final rnd, or work one rnd of sl st BLO for a polished edge.
Alternate Rib (post stitches, same hook):
Rib Rnd 1: *FPdc around next st, BPdc around next st; rep from * around, join. (80 sts)
Rib Rnds 2–5: Rep Rib Rnd 1. Fasten off.
Finishing
- Weave in all ends securely on WS, especially color-change tails.
- Block lightly if desired: dampen, shape over a bowl or balloon ~20" circumference, dry flat. Do not stretch mosaic motifs aggressively.
- Optional: Add a small pom-pom in MC or CC to crown.
- Optional: Embroider a tiny French-knot eye on each reindeer with scrap CC or black yarn for extra charm (after blocking).
Fit & Adjustment Notes
- Too loose: go down one hook size for body/ribbing or omit optional even rnds.
- Too tight: add one even sc rnd after crown or use larger hook for mosaic.
- Longer hat: add 2–4 sc BLO rnds in MC after mosaic before ribbing.
- Stitch count must remain a multiple of 16 for the reindeer repeat; do not alter final crown count without redesigning the chart.
Tech-edit confirmation: Crown 8 → 80 by +8 each rnd (10 rnds) ✓. Mosaic 16-st rep × 5 = 80 ✓. Gauge 16 sts = 4" → 80 sts = 20" ✓. All drop-down dc placements preserve 80 sts ✓.
Enjoy your Mosaic Reindeer Beanie!
Disclaimer: This pattern was generated by AI and should be reviewed for accuracy before use. While we strive for quality, AI-generated content may contain errors. Please verify measurements, stitch counts, charts, and instructions before beginning your project. Generated by purlJam.uk
Love this pattern?
Save this pattern to your free PurlJam libraryAccess your pattern anytime
Bookmark this page to access your pattern anytime