Type
Knitting
Difficulty
intermediate
Category
blanket
AI Thinking Process
Planning
Verification
Pattern
MUSKOKA Chunky Textured Throw Blanket
Skill level: Beginner Finished size: Approximately 127 cm × 152 cm (50" × 60")
Materials
- Yarn: Bulky (chunky) weight yarn in two colours:
- Colour A (Main): approx. 1,000 g (e.g. a soft heathered grey) — background
- Colour B (Contrast): approx. 200 g (e.g. cream or deep teal) — for the word MUSKOKA
- Needles: 8 mm (UK/metric) circular needle, 100 cm cable length (used flat to hold the wide row of stitches). A long straight needle will not comfortably hold the width.
- Notions: 6–8 yarn bobbins (for colourwork), stitch markers, tapestry/darning needle, scissors.
Tip: A circular needle is used purely to hold the large number of stitches — you still work back and forth in rows, not in the round.
Tension (Gauge)
10 sts and 14 rows = 10 cm (4") over stocking stitch on 8 mm needles.
Please knit a tension square. If you have more stitches than 10 per 10 cm, go up a needle size; if fewer, go down a needle size. Accurate tension keeps the finished measurements and lettering proportions correct.
Abbreviations (UK)
- k – knit
- p – purl
- st(s) – stitch(es)
- RS – right side
- WS – wrong side
- A – Colour A (main/background)
- B – Colour B (contrast lettering)
- st st – stocking stitch (k on RS, p on WS)
- seed st – seed stitch (*k1, p1; repeat, offsetting each row)
Construction Overview
This throw is worked flat, in one piece, from the bottom edge upward. A seed-stitch border frames a stocking-stitch centre panel. The word MUSKOKA is worked in Colour B across the centre panel using the separately attached stitch chart (see the Attached Stitch Chart section below). The colourwork changes yarn colour only — it never changes your stitch count, which stays at 127 sts throughout.
Stitch count map (127 sts total):
- 7 sts seed-stitch border (right edge)
- 113 sts stocking-stitch centre panel (carries the lettering)
- 7 sts seed-stitch border (left edge)
Check: 7 + 113 + 7 = 127 sts ✓
Instructions
1. Cast on
Using Colour A and 8 mm needles, cast on 127 sts.
(127 sts ÷ 10 sts per 10 cm = 127 cm width ✓ = 50")
2. Bottom border (seed stitch)
Row 1 (RS): *k1, p1; repeat from * to last st, k1. Row 2 (WS): work as they present — knit the purls, purl the knits (i.e. *k1, p1; rep, k1 — the offset seed pattern).
Because you have an odd number of stitches (127), simply repeat Row 1 every row and the seed pattern forms automatically.
Work seed stitch for 14 rows (approx. 10 cm).
3. Set up side borders + centre panel
From here, keep 7 sts in seed stitch at each edge and work the centre 113 sts as instructed.
Border-set row (RS): (k1, p1) 3 times, k1 — 7 seed border sts place marker, work 113 sts in st st (knit on RS), place marker, (k1, p1) 3 times, k1 — 7 seed border sts.
Border-set row (WS): (k1, p1) 3 times, k1 — 7 seed border sts, slip marker, purl 113 sts, slip marker, (k1, p1) 3 times, k1 — 7 seed border sts.
Repeat these two rows for the plain lower centre section until the centre panel measures approximately 40 cm (16") from the top of the bottom border — about 56 rows of st st centre.
4. Work the lettering — MUSKOKA (colourwork)
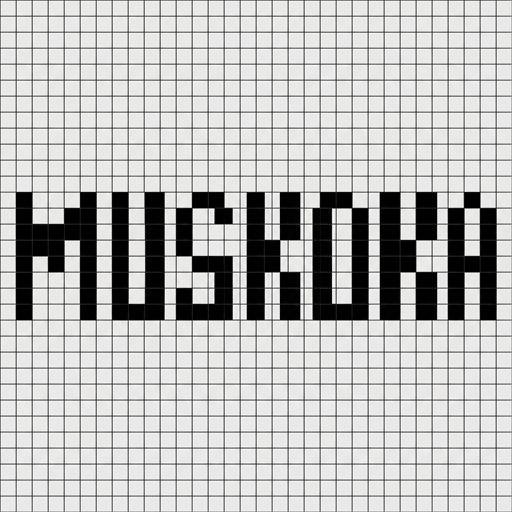
Continue the 7-st seed borders at each edge exactly as before. Across the centre 113 sts, follow the attached stitch chart to place the word MUSKOKA in Colour B on a Colour A background.
- Work the charted rows exactly as shown, keeping the seed borders on either side.
- The lettering block is approximately 70 rows tall (about 50 cm / 20"). Continue to slip the border markers each row.
- When the chart is complete, break Colour B and continue the centre in Colour A st st.
Colour count check: the chart occupies the centre 113 sts only; borders remain 7 + 7 = 14 sts in A. 113 + 14 = 127 sts ✓ — no stitches are added or removed by the colourwork.
5. Plain upper centre section
With Colour A only, continue in pattern (7 seed border sts each side, 113 st st centre) until the total centre panel (steps 3–5 combined) measures approximately 132 cm (52") from the top of the bottom border.
Total main body target: bottom border 10 cm + centre 132 cm + top border 10 cm = 152 cm (60") ✓
6. Top border (seed stitch)
Remove markers on the next row and work all 127 sts in seed stitch (as in step 2) for 14 rows (approx. 10 cm).
7. Cast off
Cast off all 127 sts loosely in seed-stitch pattern (knit the knits, purl the purls as you cast off) to keep the top edge from pulling in.
Attached Stitch Chart
Use the separate attached chart panel for the visual grid of the word MUSKOKA — it is not reproduced here as text on purpose, so that the grid stays crisp and easy to follow.
Where it sits in the pattern: The chart is used in Step 4 (Work the lettering). It maps only the centre 113 stitches of each charted row; the 7-stitch seed borders on each side are not shown on the chart and are always worked in Colour A as described above.
How to read the chart (knitting, worked flat):
- Each square = 1 stitch; each horizontal line of squares = 1 row.
- Read from the bottom of the chart upward.
- RS (odd) rows: read the chart from right to left.
- WS (even) rows: read the chart from left to right.
- Shaded/marked squares = Colour B (the lettering); plain squares = Colour A (background).
- On WS rows, work the same colour placement but in purl.
Colour / yarn management notes:
- Use a separate bobbin of Colour B for each letter block rather than carrying long floats — this keeps the fabric soft and prevents puckering, which is ideal for a chunky blanket.
- When changing colour, cross the old and new yarn on the wrong side (pick up the new colour from under the old) to twist them together and avoid a hole at the join.
- Keep the background Colour A running across the row; only introduce Colour B where the chart shows lettering.
- Weave in all bobbin ends neatly on the WS at the end.
Stitch-count integration math (do this before you begin the chart):
- Centre panel = 113 sts. Confirm the chart is charted for 113 sts wide (letter blocks + spacing).
- If your attached chart shows the lettering centred with A-coloured "filler" squares on each side, those filler squares are still Colour A and part of the 113 — simply work them as background.
- Full-row check on every charted row: 7 (border A) + 113 (chart) + 7 (border A) = 127 sts ✓.
Finishing
- Weave in all ends on the wrong side using the tapestry needle, especially at colour joins.
- Blocking: Gently wet-block or steam-block (following your yarn's care label) to even out the stitches and let the lettering lie flat. Pin to 127 cm × 152 cm and allow to dry fully.
- Trim any remaining ends.
Notes
- Beginner reassurance: The only "new" skill here is changing colour for the lettering. If you have never done colourwork, practise a single letter on a small swatch first using bobbins.
- Advanced options: Note: For intricate cabled or lace lettering, or motifs requiring full charted cables/lace, request an advanced difficulty blanket for comprehensive stitch pattern support with detailed charts and instructions.
Enjoy your cosy MUSKOKA throw! 🧶
Disclaimer: This pattern was generated by AI and should be reviewed for accuracy before use. While we strive for quality, AI-generated content may contain errors. Please verify measurements, stitch counts, and instructions before beginning your project. Generated by purlJam.uk
Access your pattern anytime
Bookmark this page to access your pattern anytime