Type
Crochet
Difficulty
intermediate
Category
custom
AI Thinking Process
Planning
Verification
Pattern
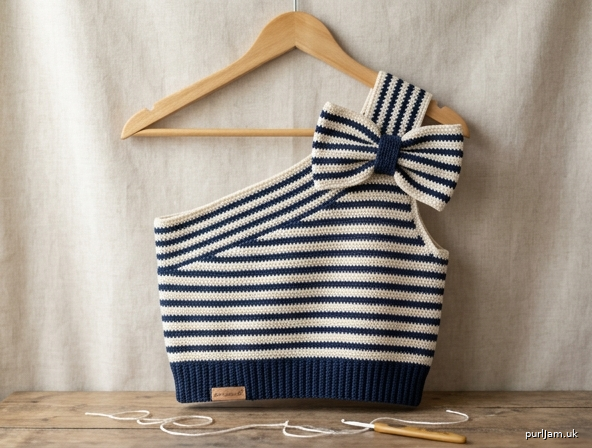
Nautical Knot — One-Shoulder Striped Crop Top
A fitted, cropped one-shoulder tank worked in easy single crochet horizontal rows. Cream and navy stripes give it classic nautical style, a snug back-loop ribbed hem hugs the waist, and an oversized striped bow makes a bold statement on the single shoulder strap. Beginner-friendly: if you can single crochet and change colors, you can make this top.
Skill Level
Beginner (basic single crochet, working in rows, simple color changes, straight seaming).
Finished Measurements
Designed with 2–4" of negative ease for a fitted look. Choose the size closest to your actual bust measurement minus ease.
| Size | Finished Bust | To Fit Bust |
|---|---|---|
| XS | 28" | 30–31" |
| S | 32" | 33–34" |
| M | 36" | 37–38" |
| L | 40" | 41–42" |
| XL | 44" | 45–46" |
| XXL | 48" | 49–50" |
Cropped body length (including hem): approximately 15" for all sizes.
Materials
- Yarn: Sport weight (#2 Fine), smooth cotton or cotton-blend recommended for stitch definition.
- Color A — Cream: approx. 250 / 300 / 350 / 400 / 450 / 500 yds (XS–XXL)
- Color B — Navy Blue: approx. 200 / 240 / 280 / 320 / 360 / 400 yds (XS–XXL)
- (Bow uses roughly 40–60 yds total, split between colors — included above.)
- Hook: US G/6 (4.0 mm) — or size needed to obtain gauge.
- Notions: Tapestry needle, stitch markers, scissors, sewing needle + matching thread (optional, for securing bow).
Gauge
20 sc × 24 rows = 4" (10 cm) in single crochet, worked flat.
Make a 5" × 5" swatch. Gauge is critical for fit — adjust hook size to match. Too many stitches per inch → go up a hook size; too few → go down.
Math check: 20 sc ÷ 4" = 5 sc per inch; 24 rows ÷ 4" = 6 rows per inch.
Abbreviations (US Terms)
- ch — chain
- sc — single crochet
- st(s) — stitch(es)
- sc2tog — single crochet 2 together (decrease)
- BLO — back loop only
- RS / WS — right side / wrong side
- rep — repeat
- sl st — slip stitch
- A — Cream, B — Navy
Special Stitches / Techniques
Single Crochet (sc): Insert hook into st, yarn over, pull up a loop (2 loops on hook), yarn over, pull through both loops.
sc2tog (decrease): [Insert hook in next st, yarn over, pull up loop] twice (3 loops on hook), yarn over, pull through all 3 loops. Reduces count by 1.
Color Change: Work the last stitch of the old color until 2 loops remain on the hook, then yarn over with the new color and complete the stitch. Carry the unused color loosely up the side; do not cut every row.
BLO Ribbing: Working sc in the back loop only creates a stretchy, ribbed texture used for the hem.
Stripe Pattern (Body)
Work a 2-row stripe sequence throughout the body:
- Rows in A (Cream) for 2 rows, then B (Navy) for 2 rows; repeat.
- Change color at the beginning of a new stripe on the turning stitch of the previous row (see Color Change above), so joins sit at the side seam.
The hem (ribbing) is worked entirely in B (Navy) for a solid contrast band.
Pattern Notes
- The top is worked in two flat panels (Front and Back), from the hem up.
- Turning chain: ch 1 at the beginning of each row does NOT count as a stitch. Work your first sc into the first stitch.
- Stitch counts are given in parentheses at the end of each row/set: (XS / S / M / L / XL / XXL).
- The Back is a simple striped rectangle. The Front adds one-shoulder shaping.
- Ribbed hem is added last, worked sideways in Navy and seamed to the lower edge, OR worked as the first rows in BLO — this pattern works it as a sideways attached band for the cleanest look.
BACK PANEL
The back is a plain striped rectangle.
Foundation: With A (Cream), ch 71 / 81 / 91 / 101 / 111 / 121.
Row 1 (RS): sc in 2nd ch from hook and in each ch across, turn. (70 / 80 / 90 / 100 / 110 / 120 sts)
Math check: chain count = stitch count + 1 for the turning chain. 71 − 1 = 70 ✓.
Row 2: ch 1, sc in each st across, turn. (70 / 80 / 90 / 100 / 110 / 120)
Rows 3–4: Change to B (Navy). ch 1, sc in each st across, turn. (same count)
Continue in stripe pattern (2 rows A, 2 rows B) working ch 1, sc in each st across every row, until panel measures 13" from foundation edge — approximately 78 rows total.
Math check: 78 rows ÷ 6 rows per inch = 13" ✓. Ending count unchanged: (70 / 80 / 90 / 100 / 110 / 120).
Fasten off. Set aside.
FRONT PANEL
Begin identically to the Back, then add one-shoulder shaping near the top.
Foundation: With A (Cream), ch 71 / 81 / 91 / 101 / 111 / 121.
Row 1 (RS): sc in 2nd ch from hook and in each ch across, turn. (70 / 80 / 90 / 100 / 110 / 120 sts)
Rows 2 onward: Work in stripe pattern (2 rows A, 2 rows B), ch 1, sc in each st across, until panel measures 9" from foundation — approximately 54 rows. (70 / 80 / 90 / 100 / 110 / 120)
Math check: 54 rows ÷ 6 = 9" ✓.
Armhole & Neckline Shaping (One-Shoulder)
You will now shape the right underarm/armhole and the scooped one-shoulder neckline, leaving a single strap on the left shoulder. Continue the stripe pattern throughout.
Read carefully — one side is bound off (the open armhole side) while the other narrows toward the strap.
Shaping Row 1 (RS): ch 1, sc across to the last 10 / 12 / 14 / 16 / 18 / 20 sts; leave those unworked (this creates the armhole edge). Turn. (60 / 68 / 76 / 84 / 92 / 100 sts)
Shaping Row 2 (WS): ch 1, sc2tog, sc across to end, turn. (59 / 67 / 75 / 83 / 91 / 99)
Shaping Row 3 (RS): ch 1, sc across to last 2 sts, sc2tog, turn. (58 / 66 / 74 / 82 / 90 / 98)
Continue decreasing 1 st at the neckline edge (the edge opposite the armhole — worked on every row at the same edge) until 15 sts remain.
- Sts to decrease from Shaping Row 3 count down to 15:
- XS: 58 → 15 = decrease 43 more times
- S: 66 → 15 = decrease 51 more times
- M: 74 → 15 = decrease 59 more times
- L: 82 → 15 = decrease 67 more times
- XL: 90 → 15 = decrease 75 more times
- XXL: 98 → 15 = decrease 83 more times
To keep the slope gentle and fitted, decrease 1 st at the neckline edge every row until 15 sts remain.
(15 / 15 / 15 / 15 / 15 / 15 sts) — this is the shoulder strap width for all sizes.
Math check: strap = 15 sts ÷ 5 sc per inch = 3" wide strap ✓ — a clean, supportive one-shoulder band.
Shoulder Strap
Continue on the remaining 15 sts in stripe pattern, working ch 1, sc in each st across every row, until the strap measures 5" from the last shaping row — approximately 30 rows.
Math check: 30 rows ÷ 6 = 5" ✓. This length reaches over the shoulder to seam to the back.
Fasten off, leaving an 18" tail for seaming the strap to the Back panel.
RIBBED HEM (make 1 long band)
Worked sideways in B (Navy) and later seamed around the lower edge of both joined panels.
Foundation: With B (Navy), ch 13.
Row 1: sc in 2nd ch from hook and in each ch across, turn. (12 sts)
Row 2: ch 1, sc in BLO of each st across, turn. (12)
Rep Row 2 until the band, when gently stretched, reaches around the entire lower body circumference:
- Lower circumference = Finished Bust: 28 / 32 / 36 / 40 / 44 / 48".
- Because BLO ribbing stretches, work the band to about 90% of that length relaxed: 25 / 29 / 32 / 36 / 40 / 43" relaxed, then stretch to fit.
- Approximate rows needed (at ~5 ribbed rows per inch): 125 / 145 / 160 / 180 / 200 / 215 rows.
Math check: hem depth = 12 sts ÷ ~6 rows/inch worked sideways ≈ 2" tall band ✓.
Fasten off, leaving a 12" tail for seaming the short ends together.
THE STATEMENT BOW
Worked as one striped rectangle, cinched in the center with a small band.
Bow Loop (make 1)
Foundation: With A (Cream), ch 41.
Row 1: sc in 2nd ch from hook and in each ch across, turn. (40 sts)
Rows 2–3: ch 1, sc in each st across. (40)
Rows 4–5: Change to B (Navy), ch 1, sc in each st across. (40)
Continue in 2-row A/B stripes until piece measures 6" tall — approximately 36 rows. Fasten off, leaving a 12" tail.
Finished bow loop: 8" wide × 6" tall (40 sts ÷ 5 = 8" ✓).
Center Band (make 1)
Foundation: With B (Navy), ch 9.
Row 1: sc in 2nd ch from hook and in each ch across, turn. (8 sts)
Rows 2–8: ch 1, sc in each st across, turn. (8)
Fasten off, leaving a 10" tail.
Assemble the bow: Bring the two short ends of the Bow Loop together to form a ring; overlap slightly and pinch the center vertically to make figure-eight bow folds. Wrap the Center Band snugly around the pinched middle, then sew the band's ends together at the back and tack to the bow. Weave in ends.
ASSEMBLY
-
Block all pieces to measurements. Lay flat, pin, mist with water, and let dry — this evens out stripes and edges.
-
Shoulder seam: With RS together, align the Front shoulder strap over the top edge of the Back panel at the left shoulder. Using the strap tail and a tapestry needle, whipstitch the strap end to the Back's top-left corner (about 3" of the back top edge). This creates the one-shoulder support.
-
Side seams: With RS together, align Front and Back at the sides. Whipstitch each side seam from the hem up to the underarm:
- Seam length = 9" (the straight body portion before shaping) on the shaped/armhole side; the opposite side seams the full length to where the shoulder strap begins.
- Leave the armhole opening (the unworked/bound-off armhole edge on the Front's right side and the corresponding upper Back edge) open for the arm.
-
Attach ribbed hem: Seam the two short ends of the ribbed band together to form a loop. With RS together, pin the long edge of the ribbed band evenly around the lower edge of the joined body, stretching the band slightly to fit. Whipstitch in place. Turn RS out.
-
Attach the bow: Position the finished bow on the front of the shoulder strap, near the shoulder seam. Sew securely through the center band to the strap using the yarn tail (reinforce with matching sewing thread if desired).
EDGING
Neaten all open edges with a single crochet border in B (Navy) for a crisp nautical finish.
Neckline & armhole edging: With RS facing, join Navy at any convenient point along the scooped neckline. ch 1, sc evenly around the neckline edge, around the open armhole, and along the upper back edge, spacing stitches so the fabric lies flat (roughly 1 sc per row-end, skipping occasionally on tight curves). Join with sl st to the first sc. Fasten off.
Tip: If edges pucker, you added too many stitches; if they ruffle/flute, too many as well — aim for the border to lie flat without stretching or gathering.
FINISHING
- Weave in all remaining ends securely on the WS.
- Give the finished top a final gentle steam or wet block.
- Try on: the ribbed hem should sit snugly at the waist, the single strap firm over the shoulder, and the bow front and center on the strap.
Quick Stitch-Count Reference
| Section | XS | S | M | L | XL | XXL |
|---|---|---|---|---|---|---|
| Panel foundation ch | 71 | 81 | 91 | 101 | 111 | 121 |
| Panel sts | 70 | 80 | 90 | 100 | 110 | 120 |
| After armhole bind-off | 60 | 68 | 76 | 84 | 92 | 100 |
| Final strap sts | 15 | 15 | 15 | 15 | 15 | 15 |
| Hem band sts (height) | 12 | 12 | 12 | 12 | 12 | 12 |
| Bow loop sts | 40 | 40 | 40 | 40 | 40 | 40 |
Enjoy your Nautical Knot crop top! ⚓
Disclaimer: This pattern was generated by AI and should be reviewed for accuracy before use. While we strive for quality, AI-generated content may contain errors. Please verify measurements, stitch counts, and instructions before beginning your project. Generated by purlJam.uk
Access your pattern anytime
Bookmark this page to access your pattern anytime