Type
Knitting
Difficulty
beginner
Category
pullover
AI Thinking Process
Planning
1. **Design Strategy**: A slightly cropped, short-sleeve boxy drop-shoulder tee in lace-weight yarn, featuring the BTS and ARMY logos worked as negative-space colourwork via an attached chart. The "negative space" is achieved with stranded colourwork (two colours) rather than dropping/picking up stitches — far more beginner-friendly while keeping all logo points crisp and the fabric intact.
2. **Construction Plan**: Worked flat in four pieces (Back, Front, two Sleeves), shoulders joined with 3-needle bind-off, sleeves picked up from straight armhole edges and worked down; logo chart placed centred on the Front.
3. **Quality Assurance**:
- Lace yarn + colourwork: keep floats loose to avoid puckering points.
- Centring the chart: must verify side-stitch counts each side of motif add up.
- Cropped length: confirm body length still clears the chart height plus rib.
4. **Final Calculations**: Tension 26 sts & 36 rows = 10 cm in st st (3.25 mm). Size M (example) bust 100 cm finished = 130 sts Back. Cropped body length 38 cm. Chart assumed 60 sts × 70 rows; centred on Front leaves 35 sts each side (130 − 60 = 70 ÷ 2 = 35 ✓).
Verification
[PRE-FLIGHT CHECKS]
1. **Completeness**: All template sections present — Back, Front (with chart), Shoulder join, Sleeves (added per user request), plus Attached Stitch Chart section. ✓
2. **Consistency**: 26 sts/10 cm → 2.6 sts/cm. 100 cm bust = 130 sts ✓. Front side panels: (130−60)/2 = 35 each ✓. Sleeve pick-up matches armhole depth.
3. **Constraints**: Short-sleeve ✓, slightly cropped ✓, lace weight ✓, negative-space BTS/ARMY logos via attached chart ✓, beginner-level (colourwork chosen over cast-off/pick-up trick, with note) ✓, UK terminology & metric-first ✓.
4. **Safety**: Stitch counts re-checked per size; chart width must be ≤ Front width minus rib edges. Note added to confirm chart size before casting on.
Pattern
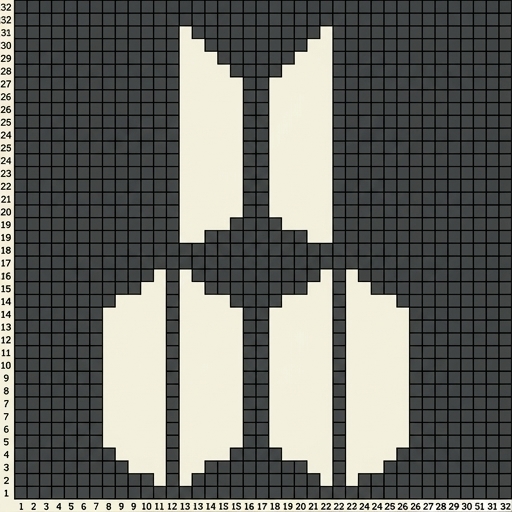
# Negative-Space ARMY / BTS Logo Tee
### A slightly cropped, short-sleeve boxy drop-shoulder top in lace-weight yarn

---

## A Note on Your "Negative Space" Idea

You mentioned casting off the top portion and picking it back up on the wrong side to keep the logo points. That technique (intarsia with cut floats, or partial cast-off) works, but for a **beginner** working in **lace weight**, it is fiddly and the delicate points tend to distort.

This pattern instead creates the negative-space logos using **two-colour stranded colourwork** following your **attached chart**. The background colour (Colour A) forms the "negative space," and the logo (Colour B) forms the shapes — or vice versa. This keeps every point sharp, keeps the fabric whole and stable, and is much more forgiving in fine yarn. If you later wish to try the cast-off/pick-up method, you can substitute it over the same charted area, but it is **not required** here.

---

## Sizes

| Size | S | M | L | XL | 2XL |
|------|---|---|---|----|-----|
| Finished bust (cm) | 90 | 100 | 110 | 122 | 134 |
| Finished bust (in) | 35½ | 39½ | 43¼ | 48 | 52¾ |
| Cropped body length (cm) | 36 | 38 | 40 | 42 | 44 |
| Sleeve length from pick-up (cm) | 12 | 12 | 14 | 14 | 16 |

Intended fit: **boxy with 8–12 cm (3–5 in) positive ease**. Choose the size closest to your actual bust **plus** that ease. Sample shown in size M.

---

## Tension (Gauge)

- **26 sts & 36 rows = 10 cm** over stocking stitch (st st) on 3.25 mm needles, blocked.
- **Colourwork tension:** work a swatch in stranded colourwork too — it often pulls in slightly. Aim to match 26 sts/10 cm with **loose, even floats**.

Please take time to block your tension swatch; lace weight grows when wet-blocked.

---

## Materials

- **Lace weight yarn (2-ply / fingering-lace, ~400 m per 50 g):**
  - Colour A (background): approx. 200 / 220 / 240 / 270 / 300 g
  - Colour B (logo): approx. 50 g (all sizes)
- **Needles:**
  - 3.25 mm (main) — straight or circular
  - 2.75 mm (ribbing)
- Stitch markers, tapestry needle, scrap yarn for holders.

UK/metric needle sizes are listed first. (3.25 mm ≈ US 3; 2.75 mm ≈ US 2.)

---

## Abbreviations

k = knit; p = purl; st(s) = stitch(es); st st = stocking stitch; RS = right side; WS = wrong side; CO = cast on; BO = cast/bind off; rep = repeat; A = Colour A; B = Colour B.

---

## Stitch Counts at a Glance

| | S | M | L | XL | 2XL |
|---|---|---|---|----|-----|
| Back CO sts | 117 | 130 | 143 | 159 | 174 |
| Front CO sts | 117 | 130 | 143 | 159 | 174 |
| Side sts each side of chart* | 28½ | 35 | 41½ | 49½ | 57 |

*Verification (M): (130 − 60 chart sts) ÷ 2 = **35 sts each side ✓**.
For sizes where the figure is not whole (S, L, XL), place the extra stitch on the **right side of the chart as worn** so totals match (e.g. S: 29 + 60 + 28 = 117 ✓).

> **Before you cast on:** Check your attached chart's actual stitch width. This pattern assumes the chart is **60 sts wide × 70 rows tall**. If your chart differs, recalculate side stitches as: **(Front sts − chart width) ÷ 2**.

---

## ATTACHED STITCH CHART

**Use the separate attached chart panel** for the visual grid — do not look for a grid printed in this text.

**Where it is placed:** The chart is worked on the **FRONT only**, **centred horizontally** and beginning after the cropped body has reached the height noted in the Front instructions (so the motif sits on the chest, ending a little below the shoulders).

**How to read it (knitting, worked flat):**
- Read **RS rows from RIGHT to LEFT**, and **WS rows from LEFT to RIGHT**.
- Each square = 1 stitch; each row of squares = 1 row.
- Two colours are used: one square symbol/shade = **Colour A (background / negative space)**, the other = **Colour B (logo)**. Follow the chart key supplied with the chart panel.
- Start at the bottom-right corner of the chart on a RS row.

**Colour / yarn management:**
- Carry both colours across each charted row (stranded colourwork). Keep floats **loose and even** — in lace weight, tight floats will pucker and blunt the logo points.
- Where a float would span more than 5 sts, gently **catch the unused colour** behind a stitch to avoid long loops.
- Keep Colour A always above/below Colour B consistently to keep colours from twisting.

**Stitch-count integration math:**
- Side panels + chart must equal the Front stitch count. Example (M): 35 + **60** + 35 = **130 ✓**.
- The chart does **not** change your stitch count — it is colour only. You end the charted section with exactly the same number of stitches you began with.

---

## BACK

With 2.75 mm needles and Colour A, CO **117 / 130 / 143 / 159 / 174** sts.

**Rib:** Work in k1, p1 rib for **5 cm**.
*Tip: For an even rib, an even CO count works neatly; the odd-count sizes simply begin and end with k1.*

Change to 3.25 mm needles.

Work in st st (k on RS, p on WS), starting with a RS row, until piece measures **36 / 38 / 40 / 42 / 44 cm** from cast-on (this is your cropped length).

**Mark armholes:** When the piece measures **armhole depth** below the top (16 / 17 / 18 / 19 / 20 cm from the top edge), place a marker at each side edge to note where the sleeve will be picked up.

BO all sts loosely.

---

## FRONT

Work exactly as for Back **until the body measures the chart placement height**:

- Continue from the rib until the Front measures: **total length − rib − chart height** worked in plain st st.
- Chart height = 70 rows ≈ **19.5 cm**.
- Example (M): 38 cm total − 5 cm rib − 19.5 cm chart ≈ work about **13.5 cm** of plain st st above the rib before starting the chart.

> If this leaves very little plain knitting (smaller/shorter sizes), simply begin the chart right after the rib and add any extra plain rows **above** the chart instead. The motif should sit centred on the chest.

**Begin chart (RS row):**
1. Work **side sts** in Colour A: k **35** (adjust per your size — see Stitch Counts).
2. Work the **60 chart sts** following the **Attached Stitch Chart**, joining Colour B as needed.
3. Work remaining **side sts** in Colour A: k to end (**35**).

Continue following the chart for all **70 rows**, keeping the side panels in plain st st (Colour A). Read RS rows right-to-left, WS rows left-to-right.

**Verification each row (M):** 35 + 60 + 35 = **130 sts ✓**.

After completing the chart, break Colour B and continue in **Colour A** st st until the Front measures the same as the Back: **36 / 38 / 40 / 42 / 44 cm**.

BO all sts loosely.

---

## JOIN SHOULDERS (Boatneck)

This is the easiest neckline for a drop-shoulder top — no neck shaping required.

1. Lay Front and Back with RS together.
2. **Shoulder width each side** = **38 / 43 / 47 / 53 / 58** sts.
3. Seam (or use 3-needle BO) across each shoulder for that many stitches at **each** outer edge.
4. **Leave the centre stitches unworked** for the neck opening:
   - Centre neck sts = total − (2 × shoulder) = e.g. M: 130 − (2 × 43) = **44 sts open ✓** (≈ 17 cm boatneck — a comfortable wide neck).
5. Repeat for the second shoulder.

---

## SLEEVES (short — added per your request)

The base template is often sleeveless/long; you asked for **short sleeves**, so here they are, worked **down from the armhole** with no sleeve cap (flat drop-shoulder style).

With RS facing, 3.25 mm needles and Colour A, **pick up and knit** stitches along the straight armhole edge between your side markers (the armhole depth above and below the shoulder seam):

- Pick up approx. **2 sts for every 3 rows**.
- Pick-up count: **84 / 90 / 94 / 100 / 104** sts.

Work in st st (in the round if using circulars and joining, or flat and seam later), starting with a WS/purl row if flat.

**Optional light shaping** (to avoid a flapping sleeve):
- Work 4 cm straight.
- Decrease row: k1, k2tog, k to last 3 sts, ssk, k1 (2 sts decreased).
- Rep decrease every 6th row, **2 times total** → **80 / 86 / 90 / 96 / 100** sts.

Work straight until sleeve measures **9 / 9 / 11 / 11 / 13 cm** from pick-up.

**Cuff:** Change to 2.75 mm needles, work k1, p1 rib for **3 cm**. BO loosely in rib.

Total sleeve length ≈ **12 / 12 / 14 / 14 / 16 cm**.

Repeat for second sleeve.

---

## FINISHING

1. If worked flat, seam sleeve and side seams using mattress stitch, matching the armhole markers.
2. Weave in all ends — on the colourwork section, weave Colour B ends **into same-colour areas** on the WS so they don't show through the fine fabric.
3. **Wet block:** soak in lukewarm water with wool wash, press out water (do not wring), lay flat to shape. Gently stretch the colourwork area so every **logo point** opens up crisply. Pin the points if needed and leave to dry fully.

---

## Quality / Troubleshooting Notes

- **Puckered logo / blunt points:** floats too tight — re-block, stretching the motif; next time use looser floats.
- **Logo off-centre:** recheck (Front sts − chart width) ÷ 2 before casting on.
- **Cropped feels too short/long:** adjust the **plain st st** worked above the rib and below the chart — keep the chart centred on the chest.
- **Show-through in lace weight:** carry floats neatly and trap long floats every 4–5 sts; a darker Colour B behind light Colour A may shadow slightly — block and assess.

Enjoy your ARMY/BTS negative-space tee! 💜
Disclaimer: This pattern was generated by AI and should be reviewed for accuracy before use. While we strive for quality, AI-generated content may contain errors. Please verify measurements, stitch counts, and instructions before beginning your project. Generated by purlJam.uk
Access your pattern anytime
Bookmark this page to access your pattern anytime