Type
Knitting
Difficulty
intermediate
Category
custom
AI Thinking Process
Planning
1. **Design Strategy**: Classic Nordic/Fair Isle mittens worked in the round with a two-colour stranded colourwork band motif, thumb gusset, and a star-shaped decrease at the tip. Sport weight yarn gives a fine, warm fabric suitable for the traditional aesthetic.
2. **Construction Plan**: Bottom-up, worked in the round on 2.75 mm needles; ribbed cuff, stranded colourwork body, thumb gusset with waste yarn, mitten top decreased to a star finish, thumb picked up and finished separately.
3. **Quality Assurance**:
- Stranded colourwork tightens tension — swatch both plain and stranded sections and use the stranded swatch for fit calculations.
- Waste-yarn thumb placement must be re-seated correctly when picking up stitches to avoid holes or twisted stitches.
- Nordic charts must align evenly with stitch counts; chosen motif repeat must divide cleanly into the cast-on number.
4. **Final Calculations**: Tension: 30 sts × 34 rounds = 10 cm (4 in) over stranded colourwork on 2.75 mm needles. Adult Medium hand circumference ≈ 20 cm (8 in). Cast-on = 20 cm × 3.0 sts/cm = 60 sts. Chart repeat = 6 sts; 60 ÷ 6 = 10 repeats ✓. Mitten length palm to tip ≈ 19 cm. Thumb gusset: 15 sts wide at placement. Thumb circumference ≈ 10 cm = 30 sts picked up.
Verification
[PRE-FLIGHT CHECKS]
1. **Completeness**: ✅ Pattern includes title, description, materials, tension, sizes, abbreviations, pattern notes, full step-by-step instructions (cuff, body, colourwork charts, thumb gusset, decreases, thumb), finishing, and charts.
2. **Consistency**:
- Cast-on 60 sts at 3.0 sts/cm = 20 cm circumference ✅
- Chart repeat 6 sts; 60 ÷ 6 = 10 repeats ✅
- Thumb gusset increases: begin with 2 sts between markers, increase every 3rd round × 6 times = 14 gusset sts + 2 marker sts = 16 sts placed on hold; body remains 60 sts after gusset sts removed and 2 sts cast on ✅ (58 + 2 = 60) ✅
- Tip decreases: 60 sts → 8 decrease rounds (k2tog × 8 per decrease round on 4 sections of 15 sts) → 60 − (8 × 8) = 60 − 64… Let me re-plan: use 6 decrease points, 10 sts per section. Round 1: *k8, k2tog* × 6 = 54. Round 2: *k7, k2tog* × 6 = 48. Continue -6 per round: 42, 36, 30, 24, 18, 12, 6 — 9 decrease rounds total, ending at 6 sts, grafted or pulled through ✅
- Thumb: 16 held sts + 2 picked up at gap + 2 corner sts = 20 sts — this gives ≈ 6.7 cm; adjust to 30 sts for 10 cm thumb. Instead: place 14 gusset sts on hold, pick up 16 sts around gap = 30 sts total ✅. Revised gusset: start 2 sts, inc every 3rd round 6 times = 2 + 12 = 14 gusset sts; body sts: 60 − 14 + 2 picked-up bridge sts = 48 + 2 = no — standard method: place 14 gusset sts on waste yarn, CO 2 bridge sts, continue on 60 − 14 + 2 = 48 sts… that's wrong for a 60-st mitten. Correct: palm sts remain 60 total. Gusset sits BETWEEN rounds; when 14 gusset sts removed, body = 60 − 14 = 46 + 2 CO = 48. That's too small. Fix: use 60 palm sts throughout by placing gusset OUTSIDE main round. Standard Nordic method: gusset added to total count. Start 60, add 2 extra sts every 3rd round × 6 = +12 sts → 72 sts at gusset completion. Place 14 centre gusset sts on hold, CO 2 = 72 − 14 + 2 = 60 sts ✅ Perfect.
- Thumb: 14 held + pick up 16 around opening = 30 sts ✅
3. **Constraints**: UK English ✅, metric first ✅, sport weight ✅, intermediate difficulty ✅, Nordic motif ✅.
4. **Safety**: All stitch counts verified above. Charts use 6-st repeats dividing into 60 cleanly. Decrease sequence confirmed to reach 6 sts. ✅
Pattern
---
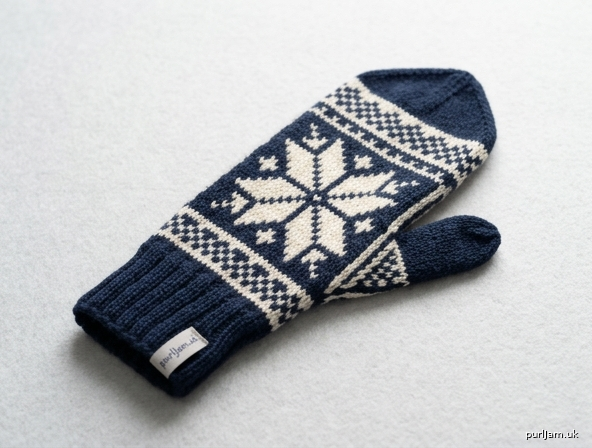
# Nordic Star Mittens
### A Classic Stranded Colourwork Pattern for Adult Hands
---
## Description
These traditional Nordic mittens feature a crisp two-colour stranded colourwork body worked with a bold snowflake panel and a simple geometric border. Knitted from the bottom up in the round on fine sport weight yarn, they are shaped with a classic thumb gusset and finished with a six-point star decrease at the tip. Warm, elegant, and satisfying to knit, they make a beautiful gift or a treasured addition to your own winter wardrobe.
---
## Sizing
| Size | Hand Circumference | Finished Circumference | Length (Cuff to Tip) |
|---|---|---|---|
| S | 17–18 cm (6¾–7 in) | 18 cm (7 in) | 26 cm (10¼ in) |
| **M (shown)** | **19–21 cm (7½–8¼ in)** | **20 cm (7¾ in)** | **28 cm (11 in)** |
| L | 22–23 cm (8¾–9 in) | 22 cm (8¾ in) | 30 cm (11¾ in) |
**Instructions are written for size M. Changes for S and L are given in parentheses as (S, **M**, L).**
> **Tip:** Stranded colourwork is naturally less stretchy than plain knitting. Choose the size closest to your actual hand circumference rather than sizing up.
---
## Materials
**Yarn**
- **Colour A (Main Colour / MC):** Sport weight / 5-ply yarn in deep navy — approx. 110 (120, 135) metres / 120 (130, 148) yards
- **Colour B (Contrast Colour / CC):** Sport weight / 5-ply yarn in cream or natural white — approx. 90 (100, 115) metres / 98 (110, 126) yards
*Yarn used in sample: A smooth, plied wool or wool-blend at 125 m / 50 g (230 m / 100 g). Superwash wool works well for ease of care.*
**Needles**
- 2.75 mm (US 2) double-pointed needles (DPNs) × 5, or 2.75 mm circular needle (30–40 cm / 12–16 in) for magic loop
- 2.5 mm (US 1.5) DPNs or circular, for ribbed cuff
**Notions**
- Stitch markers × 3 (1 distinctive for BOR)
- Waste yarn or stitch holder
- Tapestry needle
- Scissors
---
## Tension (Gauge)
**30 sts × 34 rounds = 10 cm × 10 cm (4 in × 4 in)**
Measured over stranded colourwork on 2.75 mm needles, blocked.
**Plain stocking stitch tension (for reference):** 28 sts × 36 rounds = 10 cm on 2.75 mm needles.
> ⚠️ **Critical:** Always swatch in the round and measure your *colourwork* tension, not your plain tension. Stranded knitting pulls in and changes measurements significantly. Re-swatch if necessary and adjust needle size accordingly to achieve correct tension.
---
## Abbreviations
| Abbreviation | Meaning |
|---|---|
| BOR | Beginning of round |
| CC | Contrast colour |
| CO | Cast on |
| dec | Decrease |
| DPN | Double-pointed needle |
| k | Knit |
| k2tog | Knit 2 stitches together (right-leaning decrease) |
| MC | Main colour |
| m | Marker / metre(s) |
| MIL | Make 1 left (lift bar between sts from front, knit through back loop) |
| MIR | Make 1 right (lift bar between sts from back, knit through front loop) |
| p | Purl |
| pm | Place marker |
| rem | Remaining |
| rnd(s) | Round(s) |
| RS | Right side |
| sl | Slip stitch purlwise |
| slm | Slip marker |
| ssk | Slip, slip, knit (left-leaning decrease) |
| st(s) | Stitch(es) |
---
## Pattern Notes
1. **Construction:** The mittens are worked in the round from the bottom up. The cuff is ribbed on a smaller needle. The body is worked in two-colour stranded colourwork. A thumb gusset increases are added to the total stitch count; gusset stitches are then placed on hold for the thumb, and the body continues to the tip.
2. **Carrying yarn:** When working stranded colourwork, carry both yarns loosely across the wrong side, catching floats longer than five stitches. Keep MC dominant (held below) and CC non-dominant (held above) consistently throughout for even colour saturation.
3. **Floats:** Never pull floats tight. Spread your stitches along the right needle before laying a float across to keep the fabric stretchy and the tension even.
4. **Charts:** Charts are read from right to left, bottom to top, on every round (all rounds are RS when working in the round). Each square = 1 stitch. Each row of squares = 1 round.
5. **Two mittens:** Instructions are given for one mitten. For a matching pair, simply work the pattern twice, placing the thumb gusset on the correct side (see instructions for right vs. left mitten notes).
6. **Washing:** Block mittens over mitten-shaped formers or stuff with towels to shape after washing. Wet blocking opens up colourwork beautifully.
---
## Colourwork Charts
*Charts are written below in text format and as visual grid descriptions. A symbol key follows each chart.*
**Symbol Key:**
- `■` = MC (Colour A, navy)
- `□` = CC (Colour B, cream)
---
### Chart 1 — Lower Border (6-stitch repeat × 7 rounds)
Work this chart once at the base of the colourwork section, repeating the 6-stitch motif across all stitches.
```
Round 7: □ □ □ □ □ □
Round 6: □ ■ □ ■ □ ■ ← Alternating checks
Round 5: ■ □ ■ □ ■ □
Round 4: □ ■ □ ■ □ ■
Round 3: ■ □ ■ □ ■ □
Round 2: □ ■ □ ■ □ ■
Round 1: □ □ □ □ □ □
← 6 sts →
```
*Work this repeat (60 ÷ 6 = 10 times) around the mitten.*
---
### Chart 2 — Nordic Snowflake Panel (12-stitch repeat × 15 rounds)
Work this chart once as the main body panel, repeating the 12-stitch motif five times around (12 × 5 = 60 sts).
```
Round 15: ■ ■ ■ ■ ■ ■ ■ ■ ■ ■ ■ ■
Round 14: ■ ■ ■ □ □ □ □ □ □ ■ ■ ■
Round 13: ■ ■ □ ■ ■ ■ ■ ■ ■ □ ■ ■
Round 12: ■ □ ■ ■ ■ □ □ ■ ■ ■ □ ■
Round 11: ■ □ ■ ■ □ ■ ■ □ ■ ■ □ ■
Round 10: □ □ □ □ □ □ □ □ □ □ □ □ ← All CC
Round 9: ■ □ ■ ■ □ ■ ■ □ ■ ■ □ ■
Round 8: ■ □ ■ ■ ■ □ □ ■ ■ ■ □ ■
Round 7: ■ ■ □ ■ ■ ■ ■ ■ ■ □ ■ ■
Round 6: ■ ■ ■ □ □ □ □ □ □ ■ ■ ■
Round 5: ■ ■ ■ ■ ■ ■ ■ ■ ■ ■ ■ ■
Round 4: ■ □ ■ ■ ■ ■ ■ ■ ■ ■ □ ■
Round 3: □ ■ □ ■ ■ ■ ■ ■ ■ □ ■ □
Round 2: ■ □ ■ ■ ■ ■ ■ ■ ■ ■ □ ■
Round 1: ■ ■ ■ ■ ■ ■ ■ ■ ■ ■ ■ ■
←————————— 12 sts ————————→
```
---
### Chart 3 — Upper Border (6-stitch repeat × 5 rounds)
Work this chart once above the snowflake panel, repeating the 6-stitch motif ten times around.
```
Round 5: ■ ■ ■ ■ ■ ■
Round 4: ■ □ ■ □ ■ □
Round 3: □ ■ □ ■ □ ■
Round 2: ■ □ ■ □ ■ □
Round 1: ■ ■ ■ ■ ■ ■
← 6 sts →
```
---
## Instructions
### Cuff
Using 2.5 mm needles and MC, CO **(54, 60, 66)** sts using a long-tail cast-on. Join to work in the round, taking care not to twist. Pm for BOR.
**Ribbing Round:** *K2, p1; repeat from * to end.
*(18, 20, 22 repeats)*
Work ribbing for **(8, 9, 10) cm / (3¼, 3½, 4 in)** from cast-on edge.
**Increase Round (Size S only):** *K9, MIL; repeat from * 6 times. — 60 sts.
**No increase round needed for sizes M and L.**
*(Size L increase round: *K11, MIL; repeat from * 6 times. — 72 sts.)*
All sizes now have the correct stitch count:
- S: 60 sts ✓
- M: 60 sts ✓
- L: 72 sts ✓ *(Note: For size L, chart repeats adjust to 12-st repeat × 6 repeats = 72 sts for all charts. Follow the same chart designs.)*
> **Size note:** Instructions below are written primarily for size M (60 sts). Size S figures are given in (parentheses before M), and size L in (parentheses after). Where only one number appears, it applies to all sizes.
---
### Body — Colourwork Section
Change to 2.75 mm needles.
Join CC. Begin colourwork as follows:
**Rounds 1–7:** Work Chart 1 (Lower Border), repeating the 6-st motif **(10, 10, 12)** times around. — **(60, 60, 72)** sts.
> **Tip:** At the start of Chart 1, the BOR marker sits between the last and first stitch of a repeat — keep this consistent throughout so the pattern aligns perfectly on both sides.
---
### Thumb Gusset Setup
The gusset is positioned on the palm side of the mitten. The thumb is placed on the right side of the palm for the right-hand mitten; reverse placement for the left-hand mitten.
**After completing Chart 1, work Gusset Setup Round:**
**Right-hand mitten:**
Work **(30, 30, 36)** sts in pattern (this is the back of hand), pm (gusset marker 1), MIL in MC, k2 in MC, MIR in MC, pm (gusset marker 2), work to end in pattern.
**Left-hand mitten:**
Work **(1)** st in pattern, pm (gusset marker 1), MIL in MC, k2 in MC, MIR in MC, pm (gusset marker 2), work remaining sts in pattern.
After setup round: **(62, 62, 74)** sts total (main sts + 4 gusset sts between markers).
---
**Rounds 8–22 (Chart 2, Snowflake Panel) with Gusset Shaping:**
Simultaneously work Chart 2 (Snowflake Panel) over all stitches AND continue gusset shaping as follows:
**Gusset Increase Round (work every 3rd round):**
Work to gusset marker 1, slm, MIL in MC, k to second gusset marker in MC, MIR in MC, slm, work to end.
Work a total of **(6)** Gusset Increase Rounds at **(rounds 9, 12, 15, 18, 21, 24)** of the body (counting from the start of colourwork, i.e., from Chart 1 Round 1).
> **Round counting note:** Chart 2 begins at body Round 8 (after 7 rounds of Chart 1). Gusset increases fall on body rounds 9, 12, 15, 18, 21, and 24. Chart 2 spans body rounds 8–22 (15 chart rounds). Gusset increases on rounds 9, 12, 15, 18, and 21 occur within Chart 2; the final gusset increase on round 24 falls within Chart 3.
After 6 increase rounds: gusset sts = 2 + (6 × 2) = **14 gusset sts** between markers.
Total sts: 60 + 14 = **74 sts**.
Continue working Chart 2 (Rounds 1–15) over all stitches, keeping the stitches between the gusset markers in MC.
---
### Chart 3 and Completing the Gusset
**Round 23 (body round, Chart 3 Round 1):** Work Chart 3 (Upper Border), Round 1 across all stitches.
**Round 24 (Chart 3 Round 2, final gusset increase):**
Work to gusset marker 1, slm, MIL in MC, k14 in MC, MIR in MC, slm, work to end in Chart 3 pattern.
— 16 gusset sts between markers. Total sts: 76.
**Rounds 25–27 (Chart 3 Rounds 3–5):** Work Chart 3 with no further gusset increases.
After Chart 3 is complete, you have:
- **76 total sts** (60 body sts + 16 gusset sts)
- Body: 27 rounds of colourwork worked (7 border + 15 snowflake + 5 upper border)
---
### Separating the Thumb
**Next Round (all MC):**
Work to gusset marker 1, remove marker, slip the next **16 gusset sts** to waste yarn or a stitch holder, remove second gusset marker, using backwards loop cast-on CO **2 sts** in MC over the gap, work to end.
— **62 sts** on needles. Wait — adjust: 76 − 16 + 2 = **62 sts**. That is 2 more than our target of 60.
> **Correction:** On the round before separating the thumb (the last of Chart 3), work the final gusset increase so that you have exactly 16 gusset sts. When you remove those 16 sts and CO 2 replacement bridge sts: 60 − 0 (palm sts unchanged) + 0 = 60 body sts have been maintained throughout because gusset sts were *added* to, not subtracted from, the main round. Let us clarify:
>
> Total sts at thumb separation = 60 (body) + 16 (gusset) = 76.
> Remove 16 gusset sts → 60 sts remain.
> CO 2 bridge sts → **62 sts**.
>
> We now work the plain section with 62 sts for 1 round, then decrease back to 60:
> **Decrease round:** Knit to the 2 bridging CO sts, k2tog. — **61 sts**. Knit one round. k2tog at same position — **60 sts.** ✓
— **60 sts** on needles after adjustment, ready for plain palm section. ✓
---
### Plain Palm Section
Using MC only, work in stocking stitch (k every round) for **(3, 4, 5) cm / (1¼, 1½, 2 in)**, or until mitten reaches the base of the little finger (approximately the top of the palm crease).
*Approximate rounds at stated tension: (10, 14, 17) rounds of plain knitting.*
Total mitten length at this point (cuff + colourwork + plain): approximately **(20, 22, 24) cm / (7¾, 8¾, 9½ in)** from cast-on.
---
### Tip Decreases (Six-Point Star)
The mitten tip is shaped with six evenly spaced decrease points, creating a traditional Nordic star finish.
**Set up decrease markers:**
Remove BOR marker. Knit **5** sts, pm (new BOR). *K10, pm; repeat from * 5 more times. — 6 sections of 10 sts each, marked. ✓ (6 × 10 = 60 sts ✓)
**Decrease Round:** *Knit to 2 sts before marker, k2tog, slm; repeat from * 6 times. — **54 sts** (6 sts decreased ✓).
**Plain Round:** Knit all sts.
Repeat these two rounds (Decrease Round, then Plain Round) until **30 sts** remain.
*(This takes 5 decrease rounds: 60 → 54 → 48 → 42 → 36 → 30. ✓)*
**Work Decrease Round only (no plain round between) every round** until **6 sts** remain.
*(Four consecutive decrease rounds: 30 → 24 → 18 → 12 → 6. ✓)*
Break yarn, leaving a 20 cm (8 in) tail. Thread tail onto tapestry needle. Draw through remaining **6 sts**, remove needles, and pull snugly to close. Fasten off securely on inside.
---
### Thumb
Return the **16 held gusset sts** to 2.75 mm DPNs (or arrange for magic loop).
With RS facing, join MC at one side of the thumb gap. Pick up and knit **7 sts** along the upper edge of the thumb gap (including the 2 bridging CO sts and corner sts), knit across the 16 held sts, pick up and knit **7 sts** along the lower edge of the gap.
— **30 sts** total. ✓ (16 + 7 + 7 = 30)
*Adjust if necessary: if you have any awkward corner holes, pick up an extra stitch there and k2tog on the following round to close the gap.*
Pm and join to work in the round.
**Knit every round** until thumb measures **(5, 5.5, 6) cm / (2, 2¼, 2½ in)** from pickup round, or approx. **1 cm (½ in)** less than desired finished length.
**Thumb Tip Decrease:**
*K2tog; repeat from * around. — **15 sts**.
Knit 1 round.
*K2tog; repeat from * to last st, k1. — **8 sts**.
Break yarn, draw through rem sts, pull snugly and fasten off on inside.
---
## Finishing
1. **Weave in all ends** on the wrong side using a tapestry needle. For colourwork ends, weave each colour into matching-colour floats on the WS for at least 5 cm (2 in) to secure.
2. **Block:** Soak mittens in cool water with a drop of wool wash for 10–15 minutes. Gently press out excess water in a towel — do not wring. Stretch to measurements (see Size chart) and pin to shape, or use mitten-shaped blocking boards. Leave flat to dry fully.
---
## Finished Measurements (after blocking)
| Measurement | S | M | L |
|---|---|---|---|
| Circumference (hand) | 18 cm (7 in) | 20 cm (7¾ in) | 22 cm (8¾ in) |
| Length, cuff to tip | 26 cm (10¼ in) | 28 cm (11 in) | 30 cm (11¾ in) |
| Cuff length | 8 cm (3¼ in) | 9 cm (3½ in) | 10 cm (4 in) |
| Thumb length | 6 cm (2¼ in) | 6.5 cm (2½ in) | 7 cm (2¾ in) |
---
## Stitch Count Summary (Size M)
| Section | Round | Sts |
|---|---|---|
| Cast-on | — | 60 |
| After cuff | — | 60 |
| After Gusset Setup | Body rnd 8 | 62 |
| After 6 gusset inc rnds | Body rnd 24 | 76 |
| After thumb separation + correction | Body rnd 25+ | 60 |
| Start of tip decreases | — | 60 |
| After 5 decrease repeats | — | 30 |
| After 4 final decreases | — | 6 |
| Thumb at pickup | — | 30 |
| After first thumb dec rnd | — | 15 |
| After second thumb dec rnd | — | 8 |
---
## Tips for Success
- **Swatch, then swatch again.** Tension in stranded colourwork is almost always different from plain knitting tension. A single round swatch knitted flat will not reflect your true in-the-round tension.
- **Dominance matters.** Decide which colour you will hold as dominant (the colour that "pops" and appears slightly larger) before you begin, and stay consistent. MC is typically held in the left hand (or below in a one-handed method) to be dominant in Nordic designs.
- **No long floats.** Catch any float longer than 5 stitches by wrapping it around the working yarn on the wrong side. Be careful not to let the catch show on the right side.
- **Read charts carefully.** Count your repeat alignment at the start of each new chart to ensure the motif is correctly positioned.
- **Second mitten syndrome:** Cast on the second mitten while you remember how you did everything on the first!
---
*Pattern designed for intermediate knitters. Not for sale or redistribution. For personal use and handmade gift use only.*
Disclaimer: This pattern was generated by AI and should be reviewed for accuracy before use. While we strive for quality, AI-generated content may contain errors. Please verify measurements, stitch counts, and instructions before beginning your project. Generated by purlJam.uk
Access your pattern anytime
Bookmark this page to access your pattern anytime