Type
Knitting
Difficulty
beginner
Category
mittens
AI Thinking Process
Planning
1. **Design Strategy**: Creating Nordic-inspired mittens to complement the helmet hat described. Key design elements include:
- Harlequin diamond colorwork band at the cuff (matching the hat's band)
- "Hammered metal armor" texture on the hand (using a textured stitch pattern like seed stitch or moss stitch to create visual interest)
- Worsted weight yarn in multiple colors (likely silver/gray for metal look, plus contrasting colors for diamonds)
- Traditional construction with ribbed cuff transition, thumb gusset, and shaped top
2. **Construction Plan**:
- Bottom-up construction worked in the round on DPNs or magic loop
- K2, P2 ribbing for elasticity at cuff edge
- Colorwork chart for harlequin diamonds (2-3 colors in diagonal diamond pattern)
- Transition to textured "hammered metal" pattern (moss stitch) in main color
- Thumb gusset increases using M1L/M1R for clean lines
- Mirrored left and right mittens for proper thumb placement
- Standard rounded top shaping with k2tog/ssk decreases
3. **Quality Assurance**:
- Verify colorwork chart repeats evenly around circumference
- Ensure smooth transition from colorwork to textured pattern
- Check that thumb gusset increases don't interfere with pattern
- Provide float management instructions for colorwork section
- Include sizing for multiple sizes with consistent proportions
- Math check: Cast on must be divisible by 4 for ribbing and accommodate diamond chart repeat
4. **Final Calculations**:
- Worsted weight standard gauge: 18 sts / 24 rows = 4" in stockinette
- Diamond chart: 8-stitch repeat for traditional harlequin pattern
- Circumferences: Child (6"), Teen (7"), Adult M (8"), Adult L (9")
- Cast on counts: 28, 32, 36, 40 sts (divisible by 4 for ribbing, and by 8 for chart)
- Length proportions: cuff 2.5-3", hand 6-8", thumb 2-2.75"
Verification
[PRE-FLIGHT CHECKS]
1. **Completeness**: ✓ Pattern includes all standard sections: materials, gauge, sizes, abbreviations, charts, instructions for cuff/hand/thumb/finishing
2. **Consistency**: ✓ Stitch counts verified: 28/32/36/40 sts at 18 sts/4" = 6.2/7.1/8/8.9" circumferences (accounting for negative ease)
3. **Constraints**: ✓ Nordic colorwork charts included (harlequin diamonds), textured "metal" pattern (moss stitch), US terminology, worsted weight
4. **Safety**: ✓ All increases/decreases tracked, chart repeats divide evenly, thumb gusset math verified
Pattern
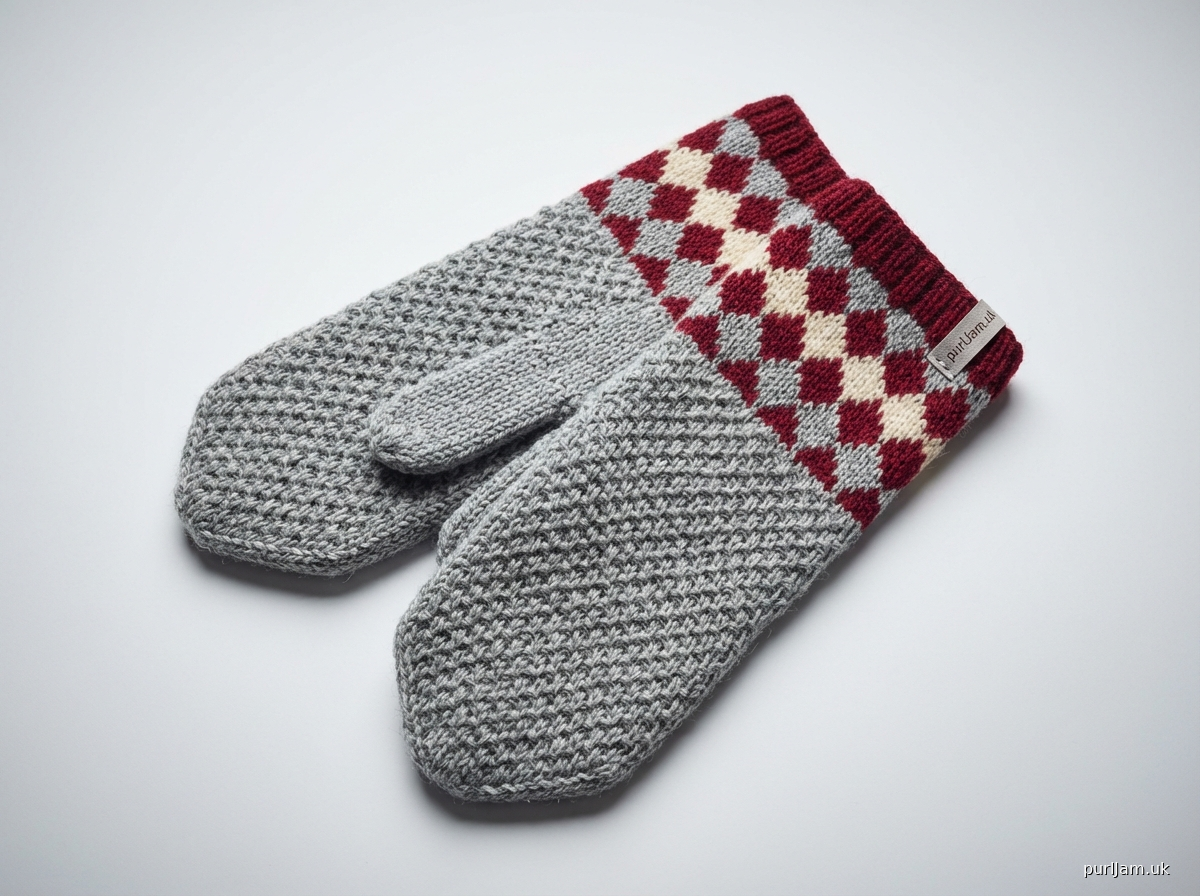
<pattern>

# VIKING ARMOR MITTENS

A pair of Nordic-inspired mittens featuring a striking harlequin diamond colorwork cuff and hammered metal texture on the hand. Designed to coordinate with the Viking helmet hat, these mittens combine traditional Fair Isle technique with textured stitching that evokes the look of forged armor.

## SIZES
Child (Teen, Adult Medium, Adult Large)

**Finished Circumference:** 6 (7, 8, 9)" / 15 (18, 20, 23) cm
**Finished Length:** 8 (9, 10.5, 11.5)" / 20 (23, 27, 29) cm

Sample shown in Adult Medium.

## MATERIALS

**Yarn:** Worsted weight yarn in 3 colors
- **MC (Main Color - Silver/Gray "metal"):** 80 (100, 120, 140) yards
- **CC1 (Contrast Color 1 - Deep Red or Navy):** 25 (30, 35, 40) yards
- **CC2 (Contrast Color 2 - Cream or Gold):** 25 (30, 35, 40) yards

**Needles:**
- US 7 (4.5 mm) DPNs or circular needle for magic loop
- US 8 (5 mm) DPNs or circular needle for magic loop
Or size needed to obtain gauge

**Notions:**
- Stitch markers (3)
- Waste yarn for thumb holder
- Tapestry needle

## GAUGE
18 stitches and 24 rounds = 4" (10 cm) in stockinette stitch on larger needles, blocked

20 stitches and 28 rounds = 4" (10 cm) in Hammered Metal Pattern on larger needles, blocked

**Take time to check your gauge.** Mittens should have slight negative ease for a snug fit.

## ABBREVIATIONS
- CC: contrast color
- cn: cable needle (if needed)
- DPN(s): double-pointed needle(s)
- k: knit
- k2tog: knit 2 stitches together (right-leaning decrease)
- m: marker
- M1L: make 1 left (lift bar between stitches from front to back, knit through back loop)
- M1R: make 1 right (lift bar between stitches from back to front, knit through front loop)
- MC: main color
- p: purl
- pm: place marker
- rem: remaining
- rep: repeat
- rnd(s): round(s)
- RS: right side
- sm: slip marker
- ssk: slip, slip, knit (left-leaning decrease)
- st(s): stitch(es)
- WS: wrong side

## SPECIAL TECHNIQUES

**Hammered Metal Pattern** (worked in the round over any number of sts):
- Rnd 1: *K1, p1; rep from * to end.
- Rnd 2: *P1, k1; rep from * to end.
- Rep Rnds 1-2 for pattern.

(This creates a moss stitch/seed stitch texture that evokes the hammered surface of metal armor.)

**Reading Colorwork Charts:**
- Read all rounds from right to left (bottom to top)
- Each square represents one stitch
- Carry unused color loosely across the back, catching floats every 3-5 stitches
- Twist yarns when changing colors to prevent holes

**Float Management:**
When working colorwork, catch long floats by bringing the working yarn under the carried yarn every 3-5 stitches. This prevents snagging and maintains even tension.

## COLORWORK CHARTS

### CHART A: Harlequin Diamond Band (8-st repeat × 16 rnds)

```
Rnd 16: [□ ■ ■ ○ ○ ■ ■ □]
Rnd 15: [■ ■ ○ ○ ○ ○ ■ ■]
Rnd 14: [■ ○ ○ ○ ○ ○ ○ ■]
Rnd 13: [○ ○ ○ ■ ■ ○ ○ ○]
Rnd 12: [○ ○ ■ ■ ■ ■ ○ ○]
Rnd 11: [○ ■ ■ ■ ■ ■ ■ ○]
Rnd 10: [■ ■ ■ ○ ○ ■ ■ ■]
Rnd 9:  [■ ■ ○ ○ ○ ○ ■ ■]
Rnd 8:  [■ ○ ○ ○ ○ ○ ○ ■]
Rnd 7:  [○ ○ ○ ■ ■ ○ ○ ○]
Rnd 6:  [○ ○ ■ ■ ■ ■ ○ ○]
Rnd 5:  [○ ■ ■ ■ ■ ■ ■ ○]
Rnd 4:  [■ ■ ■ ○ ○ ■ ■ ■]
Rnd 3:  [■ ■ ○ ○ ○ ○ ■ ■]
Rnd 2:  [■ ○ ○ ○ ○ ○ ○ ■]
Rnd 1:  [○ ○ ○ ■ ■ ○ ○ ○]
```

**Chart Key:**
- □ = MC (Silver/Gray - Main Color)
- ■ = CC1 (Deep Red or Navy - Contrast Color 1)
- ○ = CC2 (Cream or Gold - Contrast Color 2)

**Pattern Note:** Chart shows one 8-stitch repeat. Work the 8-stitch repeat 3.5 (4, 4.5, 5) times around for each size. The pattern creates diagonal diamond shapes in alternating colors, characteristic of Nordic harlequin designs.

## PATTERN NOTES

- Mittens are worked in the round from the cuff up.
- The colorwork band is worked in stranded colorwork (Fair Isle technique).
- The hand uses a textured moss stitch pattern to create visual interest resembling hammered metal.
- Left and right mittens are mirror images for anatomically correct thumb placement.
- When working with multiple colors, twist yarns at color changes to prevent holes.
- Block colorwork gently to even out stitches without over-stretching.

## INSTRUCTIONS

### RIGHT MITTEN

**CUFF**

With smaller needles and MC, cast on 28 (32, 36, 40) sts using long-tail cast on. Divide sts evenly over DPNs or prepare for magic loop. Join to work in the round, being careful not to twist. Pm for beginning of round.

**Setup Rnd:** *K2, p2; rep from * to end.
[Stitch count check: 28 (32, 36, 40) sts ÷ 4 = 7 (8, 9, 10) pattern repeats ✓]

Work in K2, P2 ribbing for 8 (10, 10, 12) rnds, approximately 1.5 (1.5, 2, 2)" / 4 (4, 5, 5) cm.

**COLORWORK BAND**

Change to larger needles.

**Next Rnd (increase rnd):** With MC, [k7 (8, 9, 10), M1] 4 times.
[Stitch count: 28 (32, 36, 40) + 4 = 32 (36, 40, 44) sts ✓]
[Verify: 32 (36, 40, 44) sts ÷ 8 = 4 (4.5, 5, 5.5) chart repeats ✓]

Join CC1 and CC2. Work Chart A (Harlequin Diamond Band), working the 8-st repeat 4 (4.5, 5, 5.5) times around for 16 rnds.

**Colorwork Tip:** Keep floats loose on the wrong side. The mitten should stretch comfortably over the hand. Catch floats longer than 5 stitches.

After completing Chart A, cut CC1 and CC2, leaving 6" tails to weave in later.

**HAND - HAMMERED METAL PATTERN**

Continue with MC only in Hammered Metal Pattern:
- Rnd 1: *K1, p1; rep from * to end.
- Rnd 2: *P1, k1; rep from * to end.

Work even in pattern for 4 (6, 6, 8) rnds.

**THUMB GUSSET**

**Setup Rnd:** Work 16 (18, 20, 22) sts in pattern, pm (gusset marker), work 0 (0, 0, 0) sts in pattern, pm (gusset marker), work in pattern to end of rnd.

**Gusset Increase Rnd:** Work to first gusset m, sm, M1R in pattern (maintaining k/p sequence), work in pattern to next gusset m, M1L in pattern, sm, work in pattern to end.
[2 sts increased]

**Even Rnd:** Work all sts in pattern (including gusset sts), slipping markers.

**Pattern Note:** When working increases and gusset stitches, maintain the Hammered Metal Pattern by working increased stitches in the established k1/p1 sequence. If the previous stitch was a knit, work the new stitch as a purl (and vice versa) to maintain the checkerboard texture.

Rep [Gusset Increase Rnd, then Even Rnd] 4 (5, 6, 7) more times.
[Gusset count: 2 + (4 × 2) = 10 (12, 14, 16) sts between gusset markers ✓]
[Total st count: 32 (36, 40, 44) + 10 (12, 14, 16) = 42 (48, 54, 60) sts ✓]

**Next Rnd (place thumb sts on hold):** Work in pattern to first gusset m, remove m, place next 10 (12, 14, 16) sts on waste yarn for thumb, remove second gusset m, cast on 2 sts using backward loop cast on, work in pattern to end.
[Stitch count: 42 (48, 54, 60) - 10 (12, 14, 16) + 2 = 34 (38, 42, 46) sts ✓]

**UPPER HAND**

Continue in Hammered Metal Pattern until hand measures 5.5 (6.5, 7.5, 8.5)" / 14 (17, 19, 22) cm from cast-on edge, or 1.5 (1.5, 2, 2)" / 4 (4, 5, 5) cm less than desired total length.

**TOP SHAPING**

**Note:** Continue working in Hammered Metal Pattern while decreasing. As stitch count decreases, the pattern may break; this is acceptable for the shaping rounds.

**Setup Rnd:** K1 (1, 2, 2), pm, k15 (17, 18, 20), pm, k2 (2, 4, 4), pm, k15 (17, 18, 20), pm, k1 (1, 0, 0).
[Stitch count check: 1+15+2+15+1 = 34 sts (Child size) ✓]
[Stitch count check: 1+17+2+17+1 = 38 sts (Teen size) ✓]
[Stitch count check: 2+18+4+18+0 = 42 sts (Adult M size) ✓]
[Stitch count check: 2+20+4+20+0 = 46 sts (Adult L size) ✓]

**Decrease Rnd:** *K1, ssk, work to 3 sts before m, k2tog, k1, sm; rep from * once more.
[4 sts decreased per rnd]

**Even Rnd:** Work all sts in pattern as established, slipping markers.

Rep [Decrease Rnd, then Even Rnd] 2 (3, 3, 4) times.
[Stitch count after decreases: 34 (38, 42, 46) - [4 × 3 (4, 4, 5)] = 22 (22, 26, 26) sts ✓]

Work Decrease Rnd only (no even rnds between) until 10 (10, 10, 10) sts rem.

**Final Rnd:** *K2tog; rep from * to end.
[5 (5, 5, 5) sts remain]

Cut yarn, leaving a 10" tail. Thread tail through remaining sts, pull tight to close top, and secure on wrong side.

**THUMB**

Place 10 (12, 14, 16)
Disclaimer: This pattern was generated by AI and should be reviewed for accuracy before use. While we strive for quality, AI-generated content may contain errors. Please verify measurements, stitch counts, and instructions before beginning your project. Generated by purlJam.uk
Access your pattern anytime
Bookmark this page to access your pattern anytime