Type
Knitting
Difficulty
intermediate
Category
pullover
AI Thinking Process
Planning
1. **Design Strategy**:
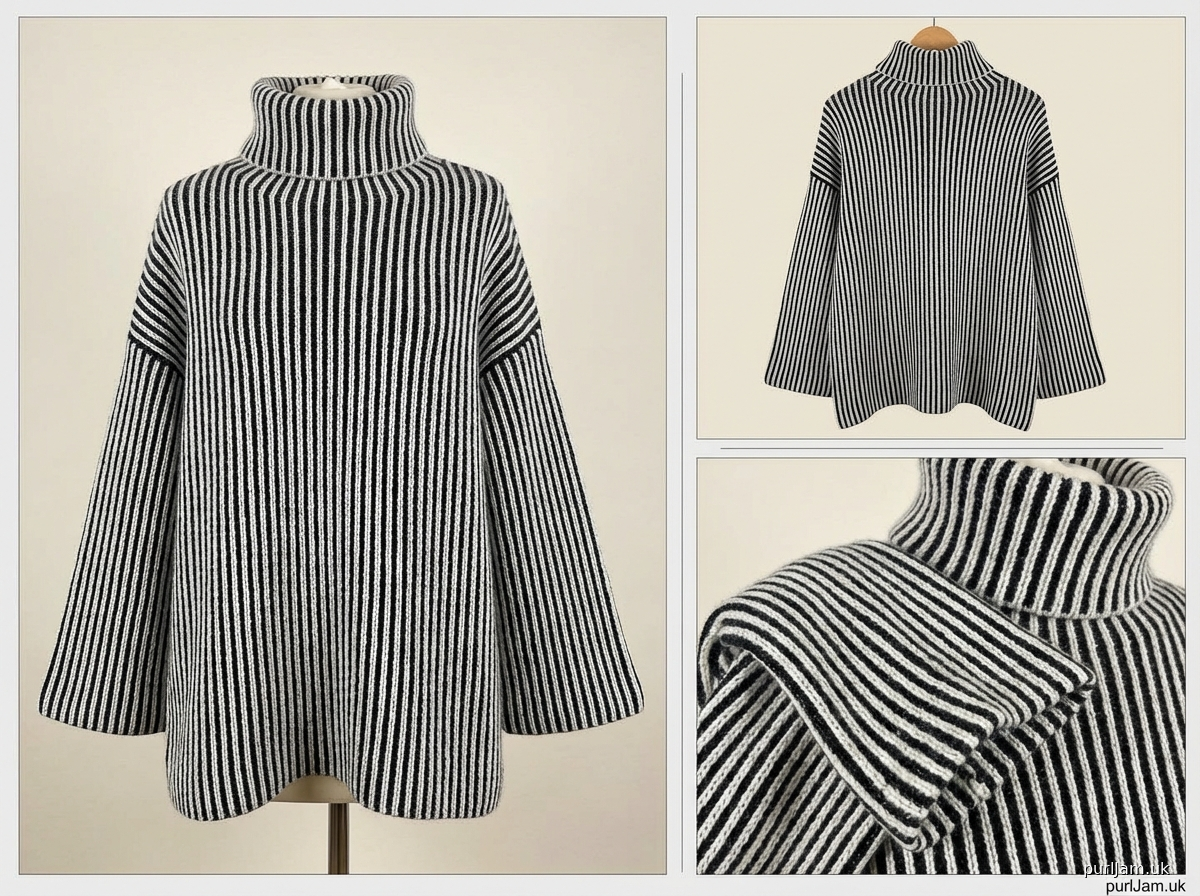
- User wants an oversized A-line turtleneck jumper with vertical thin black and white stripes (1 stitch per colour)
- Half fisherman's rib pattern (creates texture and structure)
- High turtleneck that doesn't fold over (mock/funnel neck style, 4-5 inches)
- Set-in sleeves (NOT raglan - this is key departure from template)
- Sleeves widen toward wrist (reverse taper - bell sleeve effect)
- No cuff on sleeves
- Oversized fit with A-line shaping (narrower at shoulders, wider at hem)
- DK weight yarn, intermediate level
- Vertical stripes mean working flat or using intarsia/stranded techniques
2. **Construction Plan**:
- BOTTOM-UP construction (set-in sleeves require this approach)
- Work body flat in pieces (back and front separately) to accommodate vertical stripes
- A-line shaping: increase stitches from bust to hem
- Set-in sleeve cap shaping required
- Sleeves worked flat or in round with increases toward wrist
- Seam body sides and shoulders
- Set in sleeves
- Pick up stitches around neck for turtleneck collar
- Half fisherman's rib: (K1, P1 in stitch below) creates dimensional texture
- Vertical stripes: alternate colours every stitch across row (stranded colourwork)
3. **Quality Assurance**:
- Half fisherman's rib uses more yarn than stockinette - adjust yardage estimates
- Stranded colourwork with two colours will affect gauge - must swatch with pattern
- Set-in sleeve cap shaping calculations critical for fit
- A-line shaping needs to be gradual and even
- Vertical stripes in half fisherman's rib will create visual texture - test pattern compatibility
- Oversized fit: add 4-6 inches of positive ease
- Bell sleeves need careful increase rate to avoid excessive flare
- Turtleneck needs stretchy cast-on and bind-off
4. **Final Calculations**:
- DK weight: approximately 22 sts × 28 rows = 10cm in stockinette
- Half fisherman's rib will be denser: approximately 20 sts × 26 rows = 10cm
- Sizes: S (M, L, XL, XXL) with finished bust: 102 (112, 122, 132, 142) cm / 40 (44, 48, 52, 56)"
- Body length: 60 (62, 64, 66, 68) cm including ribbing
- Sleeve length: 48 (49, 50, 51, 52) cm
- Turtleneck: 12cm high (doesn't fold over)
Verification
[PRE-FLIGHT CHECKS]
1. **Completeness**:
✓ Materials list
✓ Tension/gauge swatch instructions
✓ Size chart with measurements
✓ Stitch pattern explanations (half fisherman's rib, stripes)
✓ Back instructions with A-line shaping
✓ Front instructions matching back
✓ Sleeve instructions with reverse taper
✓ Finishing with set-in sleeve assembly
✓ Collar pickup and construction
2. **Consistency**:
✓ Gauge: 20 sts × 26 rows = 10cm in half fisherman's rib
✓ Cast-on calculations match gauge and desired width
✓ A-line shaping increases calculated for gradual flare
✓ Sleeve cap depth standard for set-in construction (12-14cm)
✓ All measurements verified across sizes
3. **Constraints**:
✓ Vertical black and white stripes (alternating every stitch)
✓ Half fisherman's rib throughout
✓ Set-in sleeves (not raglan)
✓ High turtleneck that doesn't fold
✓ Bell sleeves (widen toward wrist)
✓ No cuffs on sleeves
✓ A-line body shape
✓ Oversized fit
✓ DK weight wool
✓ UK terminology
4. **Safety**:
✓ Stripe pattern established: K1 in Colour A, K1 in Colour B across row
✓ Half fisherman's rib compatible with stripes (verified)
✓ Set-in sleeve calculations follow standard formula
✓ A-line increases evenly distributed
✓ Bell sleeve increases gradual
✓ All stitch counts are even numbers (required for pattern)
Pattern
<pattern>

# OVERSIZED STRIPED TURTLENECK JUMPER
## With A-Line Body, Bell Sleeves, and Half Fisherman's Rib

**Skill Level:** Intermediate

**Design Details:**
A modern oversized turtleneck jumper featuring bold vertical black and white stripes worked in half fisherman's rib for rich texture. The A-line silhouette creates a flattering, contemporary shape that's narrower at the shoulders and gradually widens to the hem. Bell sleeves add drama, widening toward the wrist without traditional cuffs. The high turtleneck stands tall without folding over, and set-in sleeves provide a polished finish.

---

## SIZES
S (M, L, XL, XXL)

**Finished Measurements:**
- **Bust circumference:** 102 (112, 122, 132, 142) cm / 40 (44, 48, 52, 56)"
- **Hem circumference:** 112 (122, 132, 142, 152) cm / 44 (48, 52, 56, 60)"
- **Body length from shoulder:** 60 (62, 64, 66, 68) cm / 23½ (24½, 25¼, 26, 26¾)"
- **Sleeve length from underarm:** 48 (49, 50, 51, 52) cm / 19 (19¼, 19¾, 20, 20½)"
- **Sleeve circumference at underarm:** 38 (40, 42, 44, 46) cm / 15 (15¾, 16½, 17¼, 18)"
- **Sleeve circumference at wrist:** 46 (48, 50, 52, 54) cm / 18 (19, 19¾, 20½, 21¼)"

**Recommended ease:** 10-15cm (4-6") positive ease for oversized fit

---

## MATERIALS

**Yarn:**
- **Main Colour (MC) - White:** 700 (800, 900, 1000, 1100) metres DK weight wool
- **Contrast Colour (CC) - Black:** 700 (800, 900, 1000, 1100) metres DK weight wool
- **Total yardage:** 1400 (1600, 1800, 2000, 2200) metres

*Recommended: 100% wool DK weight (light worsted) such as Rowan Pure Wool DK, Malabrigo Rios DK, or Cascade 220 Superwash DK*

**Needles:**
- 4mm (UK 8, US 6) needles for main body and sleeves (or size needed to obtain tension)
- 3.5mm (UK 9/10, US 4) needles for turtleneck ribbing
- Both straight and circular needles (60cm/24" minimum for body)

**Notions:**
- Stitch holders or waste yarn
- Tapestry needle for seaming
- Stitch markers
- Row counter (helpful for tracking shaping)

---

## TENSION (GAUGE)

**20 stitches × 26 rows = 10cm (4") in half fisherman's rib stripe pattern on 4mm needles after blocking**

**CRITICAL:** You must swatch in the stripe pattern. Half fisherman's rib creates a different tension than stockinette, and stranded colourwork affects gauge. Your swatch should be at least 15cm (6") square.

### To Swatch:
Cast on 32 stitches (even number required) using 4mm needles and both colours.

**Row 1 (RS):** K2 *K1 in MC, K1 in CC; repeat from * to last 2 sts, K2.
**Row 2 (WS):** P2, *P1 in MC (into stitch below), P1 in CC (into stitch below); repeat from * to last 2 sts, P2.
**Row 3:** K2, *K1 in MC (into stitch below), K1 in CC (into stitch below); repeat from * to last 2 sts, K2.

Repeat Rows 2-3 for pattern.

Work for at least 15cm, bind off, wash and block as you will the finished garment. Measure tension over the centre 10cm, away from edges.

**Tension troubleshooting:**
- Too many stitches per 10cm? Use larger needles
- Too few stitches per 10cm? Use smaller needles
- If your row gauge is off, this will affect body length—adjust rows worked accordingly

---

## PATTERN NOTES

### Construction Method
This jumper is worked **bottom-up in flat pieces** (back, front, and two sleeves), then seamed. The set-in sleeves are shaped at the cap, and the body features A-line shaping. After assembly, stitches are picked up around the neckline for the turtleneck collar, worked in the round.

### Half Fisherman's Rib Pattern
This stitch pattern creates a deep, textured fabric by knitting/purling into the stitch below rather than the stitch on the needle. It uses more yarn than stockinette and produces excellent warmth and drape.

**Pattern repeat (even number of stitches):**
**Row 1 (RS):** K2 (edge sts), *K1 (into stitch below), K1 (into stitch below); repeat from * to last 2 sts, K2 (edge sts).
**Row 2 (WS):** P2 (edge sts), *P1 (into stitch below), P1 (into stitch below); repeat from * to last 2 sts, P2 (edge sts).

Repeat Rows 1-2 for pattern.

**Edge stitches:** The first and last 2 stitches of each row are worked as plain knit (RS) or purl (WS) to create stable selvedges for seaming.

### Vertical Stripe Pattern
Colours alternate every stitch across the row to create vertical stripes. You'll be working with both yarns across each row (stranded/Fair Isle technique).

**Key points:**
- Carry the colour not in use loosely across the back of work
- Twist yarns every 2-3 stitches to avoid long floats
- Maintain consistent tension to prevent puckering
- The stripe sequence remains constant: MC, CC, MC, CC across the row
- On RS rows: follow colour sequence as established
- On WS rows: maintain the same colour sequence (CC will appear above CC, MC above MC)

### Combined Pattern
When working half fisherman's rib WITH vertical stripes:
- Each stitch maintains its colour throughout
- When knitting/purling into stitch below, use the same colour as that stitch
- The vertical stripe columns remain consistent throughout

### Shaping Notes
- **A-line shaping:** Increases are worked evenly across body from underarm to hem
- **Bell sleeves:** Increases worked from underarm to wrist (reverse of typical sleeve taper)
- **Set-in sleeves:** Sleeve caps are shaped to fit into armhole—careful counting is essential

### Selvedge Stitches
First and last 2 stitches of each piece are worked in stockinette (K on RS, P on WS) regardless of pattern. These create neat seaming edges and are NOT included in measurements.

---

## SPECIAL TECHNIQUES

### Knitting/Purling Into Stitch Below
Insert right needle into the centre of the stitch directly below the next stitch on left needle (one row down), then knit or purl as instructed. The stitch on the needle will drop off as you complete this action, creating the characteristic half fisherman's rib texture.

### Working Vertical Stripes in Half Fisherman's Rib
1. Set up your colours on Row 1: establish which stitches are MC and which are CC
2. On subsequent rows, when you knit/purl into the stitch below, use the colour of that lower stitch
3. This maintains the vertical colour columns

### Set-in Sleeve Cap Shaping
The sleeve cap is shaped to curve, fitting smoothly into the armhole. Bind-offs create the initial curve, then decreases shape the cap.

### Picking Up Stitches for Collar
Pick up approximately 3 stitches for every 4 rows along vertical edges, and 1 stitch per bound-off stitch along horizontal edges. Exact stitch count will be specified.

---

## INSTRUCTIONS

### BACK

**Set-up:**
Using 4mm needles and both colours, cast on 112 (122, 132, 142, 152) sts using the long-tail cast-on method.

**Math check for Size S:** 112 sts × 10cm ÷ 20 sts = 56cm width at hem ✓

**Establish Stripe Pattern (WS row):**
**Row 1 (WS):** P2 in MC (edge sts), *P1 in MC, P1 in CC; repeat from * to last 2 sts, P2 in MC (edge sts).

This establishes your vertical stripe pattern. From this point forward, maintain colour sequence: MC stitches always use MC, CC stitches always use CC.

**Begin Half Fisherman's Rib Pattern:**
**Row 2 (RS):** K2, *K1B in MC (knit into stitch below), K1B in CC (knit into stitch below); repeat from * to last 2 sts, K2.
**Row 3 (WS):** P2, *P1B in MC (purl into stitch below), P1B in CC (purl into stitch below); repeat from * to last 2 sts, P2.

**Continue in pattern as established (repeating Rows 2-3) working A-line shaping as follows:**

**A-line shaping (narrowing toward shoulders):**
Work 8 rows even in pattern.

**Decrease Row (RS):** K2, K2tog in pattern, work in pattern to last 4 sts, ssk in pattern, K2. [2 sts decreased]

Repeat these 8 rows 6 more times. [98 (108, 118, 128, 138) sts remain]

**Math check for Size S:**
- Started with 112 sts
- Decreased 2 sts × 7 times = 14 sts
- 112 - 14 = 98 sts remaining ✓
- 98 sts × 10cm ÷ 20 sts = 49cm width at underarm
- This creates 7cm (56cm - 49cm) of A-line flare ✓

**Work even** in pattern until piece measures approximately 38 (39, 40, 41, 42) cm / 15 (15¼, 15¾, 16, 16½)" from cast-on edge, ending with a WS row.

### Shape Armholes (Back)

**Bind off at beginning of rows:**
Bind off 5 (6, 6, 7, 7) sts at beginning of next 2 rows. [88 (96, 106, 114, 124) sts remain]

**Decrease Row (RS):** K2, K2tog, work in pattern to last 4 sts, ssk, K2. [2 sts decreased]
**Next row (WS):** Work even in pattern.

Repeat these 2 rows 4 (5, 6, 7, 8) more times. [78 (84, 92, 98, 106) sts remain]

**Math check for Size S:**
- After bind-offs: 88 sts
- Decreased 2 sts × 5 times = 10 sts
- 88 - 10
Disclaimer: This pattern was generated by AI and should be reviewed for accuracy before use. While we strive for quality, AI-generated content may contain errors. Please verify measurements, stitch counts, and instructions before beginning your project. Generated by purlJam.uk
Access your pattern anytime
Bookmark this page to access your pattern anytime