Type
Crochet
Difficulty
intermediate
Category
pullover
AI Thinking Process
Planning
Verification
Pattern
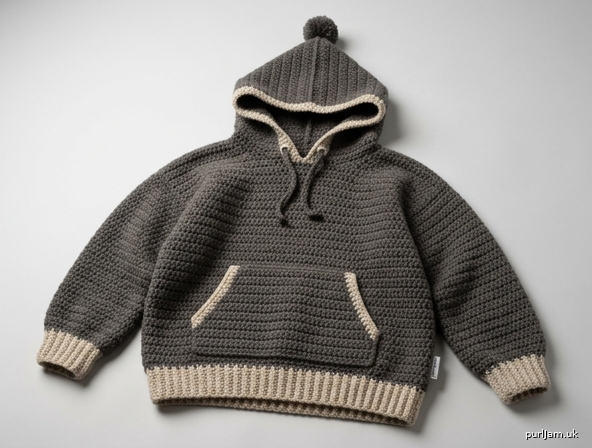
Oversized Teddy Bear Hoodie
Crochet pullover hoodie for a 25 cm (10 in) stuffed bear
A slouchy, pull-on hoodie worked flat in pieces from the hem up in double crochet, with single-crochet ribbing, set-in sleeves, a kangaroo pocket, and a hood picked up around the neckline. Designed with generous ease so it looks oversized on a typical 25 cm bear.
Skill level: Intermediate (shaping, even pickup, seaming)
Size
One size, to fit a stuffed bear approximately 25 cm (10 in) tall with chest circumference 8–10 in (20.5–25.5 cm).
Bears vary. If your bear is plump through the chest, work the body and sleeves as written (the ease is generous). If the head is very large, add 2 extra rows to the hood before seaming the crown.
Finished measurements
- Chest circumference: 12 in (30.5 cm)
- Back/front width: 6 in (15 cm)
- Length, shoulder to hem: 5¾ in (14.5 cm)
- Length to underarm (includes ribbing): 3¼ in (8.5 cm)
- Armhole depth: 2½ in (6.5 cm)
- Sleeve length, including cuff: 3¾ in (9.5 cm)
- Upper-sleeve circumference: 6¼ in (16 cm)
- Cuff circumference (unstretched): 4 in (10 cm)
- Hood height: 4 in (10 cm)
Materials
- Worsted weight yarn (CYC 4), approximately 110 yd (100 m) main color (MC). A washable acrylic or acrylic-blend is practical for toys.
- Optional contrast color (CC) for ribbing, pocket, and hood edging: 25 yd (23 m)
- Crochet hook US H/8 (5 mm), or size needed to obtain gauge
- Crochet hook US G/6 (4 mm) for ribbing (optional; using the same H/8 hook is fine)
- Yarn needle
- 4 stitch markers
- Scissors
- Optional: 1 small pom-pom for the hood
Safety note: If the bear will be used by a child under 3 years, omit the hood ties and pom-pom.
Gauge
14 dc and 8 rows = 4 in (10 cm) in double crochet with US H/8 (5 mm), blocked.
Ribbing: 16 sc-blo and 16 rows = 4 in (10 cm) with US G/6 (4 mm) or H/8 (5 mm).
Gauge swatch
With H/8 (5 mm), ch 18. Row 1: Dc in 4th ch from hook and in each ch across, turn. (16 dc) Rows 2–10: Ch 3 (counts as dc), dc in each dc across, turn. Measure the center 14 sts and 8 rows. They must equal 4 in (10 cm). Change hook size and reswatch until they do — at this scale, even a half-stitch off will change the fit.
Abbreviations (US)
- ch — chain
- st(s) — stitch(es)
- sc — single crochet
- dc — double crochet
- dc2tog — double crochet 2 together (see Special stitch)
- sl st — slip stitch
- blo — back loop only
- RS / WS — right side / wrong side
- rep — repeat
- rem — remaining
- pm — place marker
Special stitch
dc2tog: Yarn over, insert hook in next st, yarn over, pull up a loop, yarn over, draw through 2 loops; yarn over, insert hook in following st, yarn over, pull up a loop, yarn over, draw through 2 loops; yarn over, draw through all 3 loops on hook. (1 st decreased)
Pattern notes
- Ch 3 at the start of a dc row counts as the first dc.
- Ch 1 at the start of an sc row does not count as a stitch.
- Turn at the end of every row unless told otherwise.
- Stitch counts are given in parentheses at the end of a row. Use them.
- Ribbing is worked sideways (the chain is the ribbing height; the number of rows is the piece width), then body stitches are worked along the long edge.
- The hoodie is oversized on purpose. Do not size down unless you have confirmed a smaller gauge.
Back
Hem ribbing
With G/6 (4 mm) or H/8 (5 mm) and MC (or CC), ch 4.
Row 1: Sc in 2nd ch from hook and in each ch across, turn. (3 sc) Rows 2–24: Ch 1, sc blo in each sc across, turn. (3 sc; 24 rows = 6 in / 15 cm at 16 rows = 4 in ✓)
Fasten off if changing color. Do not fasten off if continuing in MC.
Body
Switch to H/8 (5 mm) and MC. Turn the ribbing so the long edge is on top (24 row-ends).
Row 1 (RS): Ch 3 (counts as dc here and throughout), work 20 more dc evenly across the long edge of the ribbing (skip 3 row-ends evenly: 24 − 3 = 21 ✓), turn. (21 dc = 6 in / 15 cm ✓)
Rows 2–5: Ch 3, dc in each dc across, turn. (21 dc) (5 dc rows = 2½ in / 6.5 cm; with ¾ in / 2 cm ribbing, length to underarm = 3¼ in / 8.5 cm ✓)
Armholes
Row 6: Sl st in first 2 dc, ch 3, dc in each dc across to last 2 dc, leave last 2 dc unworked, turn. (21 − 2 − 2 = 17 dc ✓)
Rows 7–10: Ch 3, dc in each dc across, turn. (17 dc) (5 armhole rows = 2½ in / 6.5 cm ✓)
Fasten off, leaving a 12 in (30.5 cm) tail for seaming.
The center 7 dc are the back neck; the 5 dc at each edge are the shoulders (5 + 7 + 5 = 17 ✓).
Front
Work Hem ribbing and Body Rows 1–5 exactly as for the Back. (21 dc)
Armholes
Row 6: Sl st in first 2 dc, ch 3, dc in each dc across to last 2 dc, leave last 2 dc unworked, turn. (17 dc)
Row 7: Ch 3, dc in each dc across, turn. (17 dc)
Shape left neck (as worn: left when looking at RS)
Row 8: Ch 3, dc in next 5 dc, turn, leaving rem sts unworked. (6 dc)
Row 9: Ch 3, dc2tog (neck edge), dc in each rem dc, turn. (5 dc)
Row 10: Ch 3, dc in each dc across. (5 dc)
Fasten off, leaving a 10 in (25.5 cm) tail.
Shape right neck
With RS facing, skip the center 5 dc of Row 7 (6 + 5 + 6 = 17 ✓). Join MC with sl st in the next dc.
Row 8: Ch 3 (counts as dc in same st as join), dc in rem 5 dc, turn. (6 dc)
Row 9: Ch 3, dc in next 2 dc, dc2tog (neck edge), turn. (5 dc)
Row 10: Ch 3, dc in each dc across. (5 dc)
Fasten off, leaving a 10 in (25.5 cm) tail.
Shoulders are 5 dc each, matching the Back (5 = 5 ✓). Front neck opening is the unworked 5 dc plus 1 decrease each side, aligning with the Back’s 7-st neck.
Sleeves (make 2)
Cuff ribbing
With G/6 (4 mm) or H/8 (5 mm) and MC (or CC), ch 4.
Row 1: Sc in 2nd ch from hook and in each ch across, turn. (3 sc) Rows 2–16: Ch 1, sc blo in each sc across, turn. (3 sc; 16 rows = 4 in / 10 cm ✓)
Sleeve body
Switch to H/8 (5 mm) and MC. Turn the ribbing so the long edge is on top.
Row 1 (RS): Ch 3, work 13 more dc evenly across the long edge (skip 2 row-ends evenly: 16 − 2 = 14 ✓), turn. (14 dc = 4 in / 10 cm ✓)
Row 2 (inc): Ch 3, 2 dc in next dc, dc in each dc to last 2 dc, 2 dc in next dc, dc in last dc (top of turning ch), turn. (14 + 2 = 16 dc ✓)
Row 3 (inc): Ch 3, 2 dc in next dc, dc across to last 2 dc, 2 dc in next dc, dc in last dc, turn. (16 + 2 = 18 dc ✓)
Row 4 (inc): Ch 3, 2 dc in next dc, dc across to last 2 dc, 2 dc in next dc, dc in last dc, turn. (18 + 2 = 20 dc ✓)
Row 5 (inc): Ch 3, 2 dc in next dc, dc across to last 2 dc, 2 dc in next dc, dc in last dc, turn. (20 + 2 = 22 dc ✓)
Row 6: Ch 3, dc in each dc across. (22 dc = 6¼ in / 16 cm circumference ✓)
(6 dc rows = 3 in / 7.5 cm; with ¾ in / 2 cm cuff, sleeve length = 3¾ in / 9.5 cm ✓)
Fasten off, leaving an 18 in (45.5 cm) tail.
Kangaroo pocket
With H/8 (5 mm) and MC (or CC), ch 15.
Row 1: Dc in 4th ch from hook and in each ch across, turn. (13 dc = 3¾ in / 9.5 cm ✓)
Rows 2–4: Ch 3, dc in each dc across, turn. (13 dc) (4 rows = 2 in / 5 cm ✓)
Edging: Ch 1, sc evenly around all 4 sides, working 3 sc in each corner, sl st to first sc. Fasten off, leaving a 16 in (40.5 cm) tail for sewing.
Finishing
Weave in any tails that will be trapped in seams; leave the long seaming tails attached.
1. Shoulder seams
With WS together (or RS together if you prefer an inside whip stitch), sew the 5-dc front shoulders to the 5-dc back shoulders using mattress stitch or whip stitch. (5 to 5 each side ✓) The center 7 back-neck dc and the shaped front neck remain open.
2. Hood
With RS facing and H/8 (5 mm), join MC at the right front neck inner corner (the corner beside the 5 unworked center-front dc). Do not work into those 5 center-front dc — they stay free for the throat.
Row 1 (pickup): Ch 3, pick up and dc 23 more sts evenly around the neckline: up the right neck edge (including the decrease row-ends), across the right shoulder seam, across the 7 back-neck dc, across the left shoulder seam, and down the left neck edge, ending at the left front inner corner, turn. (24 dc)
Space the 24 sts so the fabric does not flare or draw in. A workable distribution is 6 sts along each front neck edge (row-ends), 1 st in each shoulder seam, and 10 sts across the back neck (6 + 1 + 10 + 1 + 6 = 24 ✓).
Row 2 (inc): Ch 3, dc in next 4 dc, 2 dc in next dc; (dc in next 5 dc, 2 dc in next dc) 3 times, dc in rem dc, turn. (4 increases placed every 6th st: 24 + 4 = 28 dc ✓)
Rows 3–8: Ch 3, dc in each dc across, turn. (28 dc) (8 dc rows = 4 in / 10 cm hood height ✓)
Fasten off, leaving a 14 in (35.5 cm) tail.
Fold the last row in half (14 sts to 14 sts, 28 ÷ 2 = 14 ✓) with RS together and whip stitch the top of the hood closed. Turn right side out.
3. Face opening
With RS facing, join MC (or CC) at one side of the throat (end of the 5 center-front dc).
Rnd 1: Sc evenly around the entire face opening: across the 5 center-front dc, up one hood side (2 sc in each dc row-end = 16 sc per side), across the hood-top seam, and down the other hood side, sl st to first sc. Do not turn.
Rnd 2 (optional eyelets, omit if skipping ties): Ch 1, sc in first 2 sc, ch 1, skip 1 sc; *sc in next 2 sc, ch 1, skip 1 sc; rep from * around, sl st to first sc.
Rnd 3: Ch 1, sc in each sc and in each ch-1 space around, sl st to first sc. Fasten off.
4. Set in sleeves
With RS together, pin the sleeve cap (Row 6 of the sleeve, 22 dc) into the armhole. The armhole measures about 6¼ in (16 cm) around: 2½ in front + 2½ in back + 4 underarm sts (2 + 2) = 5 + 1¼ = 6¼ in, matching 22 dc ✓.
Sew the sleeve cap to the armhole with whip stitch or mattress stitch, easing the sleeve evenly. Repeat for the second sleeve.
5. Side and underarm seams
Starting at the hem (or at the cuff), sew each side seam continuously from hem ribbing, up the body, through the underarm, and down the sleeve to the cuff. Match ribbing rows so the hem and cuffs align.
6. Pocket
Center the pocket on the Front, with the lower edge about ½ in (1.5 cm) above the hem ribbing. Pin. With the long tail, sew the top and bottom edges and the lower two-thirds of each side to the Front, leaving the upper sides open as hand openings. Weave in the tail on the WS.
7. Optional ties
With G/6 (4 mm), ch 70. Fasten off. Weave the chain through the eyelet round of the face opening. Knot each end. Keep ties short; omit entirely for children under 3.
8. Optional pom-pom
Attach a small pom-pom to the tip of the hood seam.
Weave in all remaining ends. Lightly steam-block or wet-block, shaping the hood and avoiding flattening the ribbing.
Fit check
Pull the hoodie over the bear’s head (the 24-st neck plus ribbing stretch is the opening). The hem should sit at or just below the top of the legs; sleeves should reach the paws with a little slouch; the hood should sit back in a pile rather than fit like a cap. If the body is long, fold the hem up once — the blo ribbing will hold a short cuff.
Care
Follow the yarn label. For acrylic, machine wash gentle, tumble low or lay flat. For wool, hand wash cool and lay flat to dry. Remove ties before washing if they were added.
Disclaimer: This pattern was generated by AI and should be reviewed for accuracy before use. While we strive for quality, AI-generated content may contain errors. Please verify measurements, stitch counts, charts, and instructions before beginning your project. Generated by purlJam.uk
Love this pattern?
Save this pattern to your free PurlJam libraryAccess your pattern anytime
Bookmark this page to access your pattern anytime