Type
Crochet
Difficulty
intermediate
Category
basket
AI Thinking Process
Planning
Verification
Pattern
Pandy Paws–Inspired Trick-or-Treat Bucket
A structured panda pail in jumbo yarn (US crochet terms)
Fan-inspired original pattern for personal use. Not affiliated with Gabby’s Dollhouse or its owners.
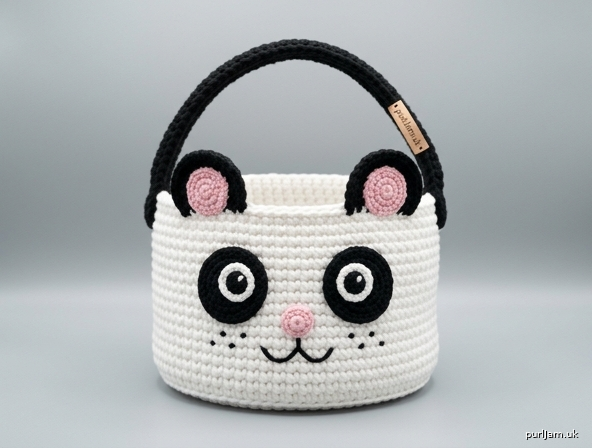
A round, stand-up candy bucket worked in continuous single crochet from the bottom up. The white bucket is Pandy’s head; black ears, black eye patches, pink inner ears, a pink nose, and an embroidered smile are sewn on after. A thick black handle spans the top like a classic trick-or-treat pail.
Skill level: Beginner
Finished size: About 9" (23 cm) diameter × 6" (15 cm) tall, not including ears or handle. Ears add about 2" (5 cm). One size.
Materials
Yarn: Size 6 jumbo (super bulky). Cotton-blend jumbo, t-shirt/tube yarn, or rope-like jumbo will stand the best. Chenille “blanket extra” jumbo works but is softer — use a smaller hook, optional cord, and stiffener (see Notes).
- MC White: 150 yd (137 m)
- CC1 Black: 60 yd (55 m)
- CC2 Pink: 20 yd (18 m)
Hook: 10 mm (US N-15) or 12 mm (US P-16) — go down 1–2 sizes from the yarn label so the fabric is dense, with no large gaps. If loops are a struggle, move up one size, but keep the fabric firm.
Notions:
- Locking stitch marker
- Large-eye yarn needle
- Scissors
- Optional: 3 yd (2.7 m) cotton clothesline or piping cord to crochet over
- Optional: fabric stiffener spray
- Optional: felt or cotton fabric for a lining (12" / 30 cm square is enough)
Do not use small plastic safety eyes or buttons on a child’s candy bucket. Embroider the pupils as written.
Gauge
6 sc and 6 rnds = 4" (10 cm) in single crochet, worked in the round with the suggested hook.
Swatch in the round (or a 4" / 10 cm flat square) and change hook until you match. A looser gauge makes a larger, floppier bucket; a tighter gauge makes a smaller, sturdier one.
Abbreviations (US)
- BLO — back loop only
- ch — chain
- CC — contrast color
- FO — fasten off
- inc — increase (2 sc in the same stitch)
- MC — main color
- MR — magic ring
- rnd(s) — round(s)
- sc — single crochet
- sk — skip
- sl st — slip stitch
- st(s) — stitch(es)
Notes
- Work the bucket in continuous spirals. Do not join and do not turn at the end of a round. Mark the first stitch of every round and move the marker up.
- Increase rate is fixed: 6 increases every base round. Fewer stitches cup; more stitches ruffle.
- Count stitches at the end of every round.
- Use sc only for the bucket (not dc). Sc keeps the walls rigid.
- Magic ring alternative: Ch 2, work the stated number of sc into the 2nd ch from the hook, then continue. Pull the starting tail tight.
- Rigidity: Aim for a fabric that stands when empty. For extra structure, crochet the base and sides over clothesline, spray with fabric stiffener when finished, and/or add a fabric lining. Block the damp base flat under a heavy book until dry.
- Keep RS facing you throughout the bucket (the outside).
Bucket
Base (worked flat, MC White)
Rnd 1: 6 sc in MR. (6 sts)
Rnd 2: Inc in each st around. (6 increases → 6 + 6 = 12 ✓)
Rnd 3: (Sc in next st, inc in next st) 6 times. (6 increases → 12 + 6 = 18 ✓)
Rnd 4: (Sc in next 2 sts, inc in next st) 6 times. (6 increases → 18 + 6 = 24 ✓)
Rnd 5: (Sc in next 3 sts, inc in next st) 6 times. (6 increases → 24 + 6 = 30 ✓)
Rnd 6: (Sc in next 4 sts, inc in next st) 6 times. (6 increases → 30 + 6 = 36 ✓)
Rnd 7: (Sc in next 5 sts, inc in next st) 6 times. (6 increases → 36 + 6 = 42 ✓)
Base should measure about 9" (23 cm) across. If it cups, you are stitching too tight or missing increases — steam-block flat before the sides. If it ruffles, you are stitching too loose or adding extra stitches.
Base-to-sides transition (do not skip)
Rnd 8: Sc BLO in each st around. (42 sts)
This BLO round is the sharp 90-degree corner between floor and wall.
Sides (worked even, both loops, MC White)
Rnds 9–16: Sc in each st around. (42 sts every rnd ✓)
Eight even rounds after the BLO round = 9 vertical rounds total (Rnd 8 through Rnd 16). At gauge, 9 rnds × 4"/6 = 6" (15 cm) tall ✓.
Side stitch count must stay 42. Do not increase or decrease.
Rnd 17 (optional polished rim): Reverse sc (crab stitch) in each st around. (42 sts)
Or: sl st loosely in each st around for a simple finished edge.
FO White. Weave in ends on the WS (inside of the bucket).
Handle (make 1, CC1 Black)
A single pail handle, worked in rows.
Ch 16.
Row 1: Sc in 2nd ch from hook and in each ch across. (15 sc)
15 sc at gauge ≈ 10" (25 cm) of strap.
Rows 2–3: Ch 1, turn, sc in each st across. (15 sc)
FO, leaving a 24" (61 cm) tail at each end (or one extra-long tail and use matching yarn for the second end).
Fold the strap in half lengthwise and whipstitch the long edges together. This doubles the thickness so the handle can take candy weight.
Ears (make 2)
Outer ear (CC1 Black) — make 2
Rnd 1: 6 sc in MR. (6 sts)
Rnd 2: Inc in each st around. (12 sts) (6 increases → 6 + 6 = 12 ✓)
Rnd 3: (Sc in next st, inc in next st) 6 times. (18 sts) (6 increases → 12 + 6 = 18 ✓)
Sl st in first st. FO, leaving a 18" (46 cm) tail for sewing.
Fold each circle in half to make a half-moon. The fold is the bottom of the ear.
Inner ear (CC2 Pink) — make 2
Rnd 1: 6 sc in MR. (6 sts)
Rnd 2: Inc in each st around. (12 sts)
Sl st in first st. FO, leaving a 12" (30 cm) tail.
Sew one pink circle onto the center of each folded black ear, pink facing forward. Stitch through all layers at the fold so the ear stays a half-moon.
Face pieces
Eye patches (make 2, CC1 Black)
Rnd 1: 6 sc in MR. (6 sts)
Rnd 2: Inc in each st around. (12 sts)
Sl st in first st. FO, leaving an 18" (46 cm) tail.
Eye highlights (make 2, MC White)
Rnd 1: 6 sc in MR. (6 sts)
Sl st in first st. FO, leaving a 12" (30 cm) tail.
Nose (make 1, CC2 Pink)
Rnd 1: 6 sc in MR. (6 sts)
Sl st in first st. FO, leaving a 12" (30 cm) tail. (The small circle reads as a cute round nose once sewn.)
Assembly
Use the photo-in-your-head layout: face on the front, handle ends at the left and right sides, ears on the top rim above the eyes.
-
Eyes. Pin the two black patches on the front wall, centered, about 1" (2.5 cm) down from the rim and about 1" (2.5 cm) apart at their inner edges. Sew around with black. Sew a white highlight onto the lower inner third of each black patch. With Black, embroider a small tight satin-stitch pupil (or 3 stacked French knots) on each white highlight. Weave all tails inside.
-
Nose. Sew the pink nose on the center line, just below and between the eye patches.
-
Smile. With Black and a yarn needle, embroider a shallow U (or a small cat-like W) under the nose, about 2" (5 cm) wide. Use surface chain stitch or backstitch, taking the needle through to the inside between stitches so the smile sits on the fabric. Optional: 3 tiny French-knot freckles on each cheek.
-
Ears. Sit the bucket upright. Place ears on the top rim, on the face half of the bucket, about 4–5 sts apart, folded edge against the rim, pink facing forward. They should look like they grow out of the top of the head, not the sides (leave the 3 o’clock and 9 o’clock positions free for the handle). Sew through the folded edge and into Rnds 16–17 so each ear is anchored to the rim and the round below. Stitch twice around.
-
Handle. Attach the handle ends to the inside of the bucket at opposite sides (3 o’clock and 9 o’clock), 1 rnd down from the rim, so the handle arcs over the top and does not cover the face. Lap about 1" (2.5 cm) of strap against the inner wall. Whipstitch around the buried end, then sew a second box of stitches through the strap and the side wall. Repeat for the other end. Tug hard — if anything shifts, add more stitches. Reinforce the outside with a few extra whipstitches in Black if needed.
-
Weave in every remaining tail on the inside. Knot tails once against the fabric before weaving — jumbo yarn can slip.
Finishing
- Block: Dampen the base, set the bucket on a table, and weight the floor with a book until dry so the bottom stays flat.
- Stiffener (optional): Spray the empty bucket inside and out; reshape; dry fully.
- Lining (optional, recommended for candy): Cut a 9" (23 cm) fabric circle for the floor and a 6" × 29" (15 × 74 cm) strip for the wall (29" = 9" × 3.14, plus a little ease ✓). Seam the strip into a tube, sew it to the circle, slip it in, and tack the top edge to Rnd 16 with running stitch. Lining hides ends, stops wrappers snagging, and adds body.
- Cord (optional): If you work over clothesline, keep the cord snug on the base and sides; cut and tape the cord end at the rim so it cannot poke out.
Sizing notes (if you want a different bucket)
The 6-increase rule does not change.
- Smaller (~7½" / 19 cm across): Stop the base after Rnd 6 (36 sts). BLO on Rnd 7, then work even on 36 sts to height.
- Larger (~10½" / 27 cm across): Add Rnd 7a: (Sc in next 6 sts, inc in next st) 6 times. (6 increases → 42 + 6 = 48 ✓), then BLO, then even on 48 sts. Add 2–3 extra even side rounds for height.
Handle length: keep the strap about 1" (2.5 cm) longer than the finished diameter so it arcs. Ears and face pieces stay the same.
Checklist before you fill it with candy
- Base lies flat (does not bowl or ruffle).
- Walls are 42 sts every round and stand on their own.
- BLO ridge is visible as a crisp corner.
- Ears, eyes, and nose are sewn through several stitches, not just the surface.
- Handle is doubled, boxed in on the inside, and does not pull the rim out of shape when lifted with weight.
Disclaimer: This pattern was generated by AI and should be reviewed for accuracy before use. While we strive for quality, AI-generated content may contain errors. Please verify measurements, stitch counts, charts, and instructions before beginning your project. Generated by purlJam.uk
Love this pattern?
Save this pattern to your free PurlJam libraryAccess your pattern anytime
Bookmark this page to access your pattern anytime