Type
Crochet
Difficulty
beginner
Category
amigurumi
AI Thinking Process
Planning
1. **Design Strategy**: Creating a beginner-friendly Easter egg basket that combines simple amigurumi shapes. The basket will use a basic cylinder/bowl shape with a handle. This is perfect for holding small Easter eggs or treats. Using worsted weight yarn in pastel spring colors (or traditional basket tan) will create an approximately 4-5" wide basket suitable for display or gifting.
2. **Construction Plan**:
- Base: Flat circle foundation (standard amigurumi increases)
- Sides: Worked in continuous rounds to create bowl shape
- Handle: Separate strip worked flat and attached to sides
- Optional: Simple decorative elements like a bow or flower
- Construction is bottom-up, seamless for the main basket body
- Single-piece construction minimizes assembly for beginner success
3. **Quality Assurance**:
- Potential issue: Handle attachment - will provide clear placement instructions with stitch counting
- Potential issue: Basket sides may flare - will include even rounds without increases after base
- Potential issue: Floppy basket - will recommend tight tension and optional stiffening methods
- Edge case: Size adjustment instructions for those wanting smaller/larger baskets
- Clarity: Will include stitch counts in brackets for every round
4. **Final Calculations**:
- Worsted weight with 3.5mm hook = approximately 16-18 sc per 4 inches
- Base circle to 36 sts (6 increase rounds) = approximately 4" diameter
- 8-10 rounds of sides = approximately 3" height
- Handle strip: approximately 20-24 rows = 8-10" length for proper arc
- Final basket size: approximately 4-5" wide x 3-4" tall (perfect for holding plastic Easter eggs)
Verification
[PRE-FLIGHT CHECKS]
1. **Completeness**: ✓ Will include all template sections: Materials, Abbreviations, Gauge, Notes, Pattern (Base, Sides, Handle), Assembly, Finishing, Optional embellishments
2. **Consistency**: ✓ Stitch counts verified: 6→12→18→24→30→36 for base increases (standard hexagonal increase pattern); sides remain at 36 sts
3. **Constraints**: ✓ Beginner level maintained (only sc, inc, dec stitches used); worsted weight specified; simple construction with minimal assembly
4. **Safety**: ✓ Math verified for increase rounds (each round adds 6 sts); handle dimensions proportional to basket size; all stitch counts in brackets for verification
Pattern
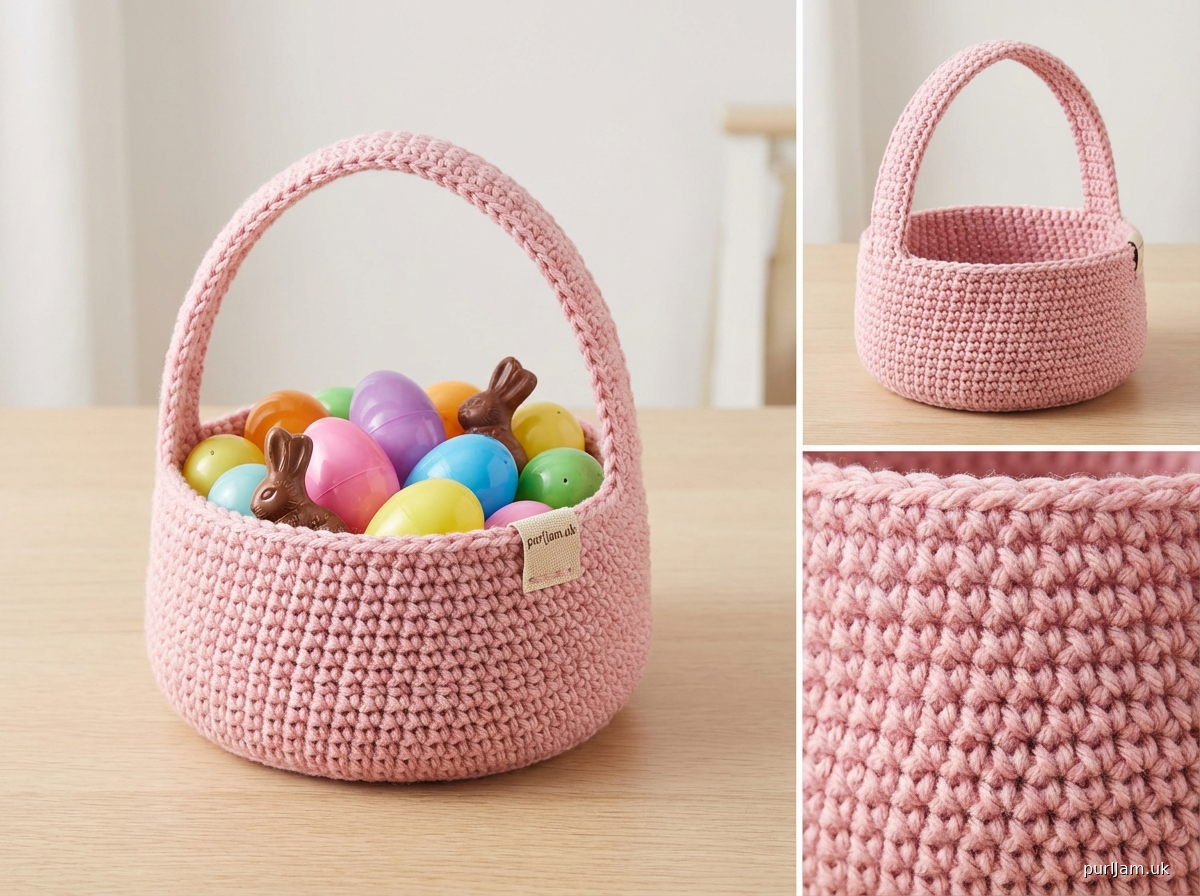
# Easter Egg Basket

A charming beginner-friendly basket perfect for Easter egg hunts, spring décor, or small gift giving! This simple project uses only basic single crochet stitches to create a sturdy little basket with a handle.

**Difficulty Level:** Beginner

---

## MATERIALS

**Yarn:**
- Worsted weight (4) yarn in main color, approximately 100-120 yards
- Suggested colors: Pastel pink, lavender, mint green, yellow, or natural tan
- Recommended: Lion Brand Vanna's Choice, Red Heart Super Saver, or similar

**Hook:**
- US E-4 (3.5mm) crochet hook
- Note: Using a smaller hook than yarn label recommends creates tighter fabric

**Other Supplies:**
- Yarn needle for weaving in ends and attaching handle
- Stitch marker
- Scissors
- Optional: Fabric stiffener spray for firmer basket
- Optional: Ribbon or small crocheted flowers for decoration

---

## ABBREVIATIONS

- ch = chain
- sc = single crochet
- inc = increase (2 sc in same stitch)
- dec = invisible decrease
- st(s) = stitch(es)
- rnd(s) = round(s)
- [ ] = total stitch count at end of round
- ( ) = repeat instructions within parentheses

---

## GAUGE

16 sc x 18 rows = 4 inches (10 cm) in single crochet

Gauge is not critical for this project, but using tight, even stitches will create a sturdier basket.

---

## FINISHED MEASUREMENTS

- Base diameter: approximately 4 inches (10 cm)
- Height: approximately 3.5 inches (9 cm)
- Total height with handle: approximately 8 inches (20 cm)
- Opening diameter: approximately 4.5 inches (11.5 cm)

---

## PATTERN NOTES

- Basket is worked in continuous rounds (spiral) from the bottom up. Do not join rounds unless specified.
- Use a stitch marker to track the beginning of each round; move marker up as you work.
- Work with tight, even tension for a sturdy basket that holds its shape.
- The invisible decrease method keeps the surface smooth: insert hook in front loops of next 2 sts, yarn over, pull through both front loops, yarn over, pull through 2 loops on hook.
- Stitch counts are provided in brackets [#] at the end of each round for verification.

---

## PATTERN INSTRUCTIONS

### BASKET BASE

**Rnd 1:** 6 sc in magic ring (or ch 2, 6 sc in 2nd ch from hook) [6]

**Rnd 2:** inc in each st around [12]
- *Math check: 6 inc = 12 sts*

**Rnd 3:** (sc, inc) around [18]
- *Math check: 6 repeats × 2 sts = 18 sts*

**Rnd 4:** (2 sc, inc) around [24]
- *Math check: 6 repeats × 3 sts = 24 sts*

**Rnd 5:** (3 sc, inc) around [30]
- *Math check: 6 repeats × 4 sts = 30 sts*

**Rnd 6:** (4 sc, inc) around [36]
- *Math check: 6 repeats × 5 sts = 36 sts*

**Rnd 7:** Working in back loops only (BLO), sc in each st around [36]
- *Note: Working in BLO creates a ridge that defines the edge between base and sides*

### BASKET SIDES

**Rnds 8-15:** Sc in each st around [36]
- *Work 8 rounds even to create approximately 3 inch tall sides*
- *These rounds create the bowl shape*

**Rnd 16 (Optional Decorative Edge):** (ch 1, skip 1 st, sc in next st) around
- *This creates small loops around the rim*
- *OR simply fasten off after Rnd 15 for plain edge*

**If you worked Rnd 16:** Fasten off, weave in end.

**If you ended at Rnd 15:** Fasten off, weave in end.

---

### HANDLE

The handle is worked flat in rows, then attached to opposite sides of the basket.

**Row 1:** Ch 5, sc in 2nd ch from hook and in each ch across [4]

**Rows 2-26:** Ch 1, turn, sc in each st across [4]
- *Math check: 4 sc × 26 rows = approximately 10-11 inches long*

Fasten off, leaving a long tail (approximately 12 inches) for sewing.

---

## ASSEMBLY

### Attaching the Handle

1. **Find handle placement:** Count 9 sts from any point on basket rim. Mark with stitch marker. Count 18 sts from first marker (halfway around basket) and mark second position.
   - *Math check: 36 sts ÷ 2 = 18 sts apart for opposite sides*

2. **Position first end:** Place one end of handle strip inside basket at first marker, with short edge aligned along 3 rim stitches.

3. **Sew first end:** Using yarn needle and long tail, whipstitch handle end to basket through rim stitches. Sew through all layers, working across the width of the handle (4 stitches wide). Reinforce by going through stitches twice.

4. **Attach second end:** Curve handle over and position second end at opposite marker. Ensure handle is not twisted. Sew second end same as first.

5. **Weave in ends** securely on inside of basket.

---

## FINISHING

1. **Weave in all remaining yarn ends** using yarn needle.

2. **Block basket (optional):** Lightly mist with water and shape, allowing to dry completely. You can stuff basket loosely with plastic bags or towels while drying to maintain round shape.

3. **Stiffen basket (optional):** For a firmer basket that holds shape better:
   - Spray with fabric stiffener following product directions, OR
   - Mix 1 part white glue with 1 part water, brush onto basket, shape and let dry completely

4. **Shape handle:** Bend handle into gentle arc and allow to set.

---

## OPTIONAL EMBELLISHMENTS

### Simple Bow
Cut 24 inches of ribbon. Tie into bow and stitch or glue to base of handle.

### Crocheted Flower
**Rnd 1:** 6 sc in magic ring
**Rnd 2:** (ch 3, sl st in next st) 6 times for 6 petals
Fasten off, sew to side of basket.

### French Knot Dots
Using contrasting color yarn, embroider small French knots randomly on basket sides for playful polka dot effect.

---

## SIZE VARIATIONS

### Smaller Basket (3 inches wide)
- Stop base increases at Rnd 5 [30 sts]
- Work only 6 rounds for sides
- Handle: Work 20 rows instead of 26

### Larger Basket (5.5 inches wide)
- Add Rnd 7: (5 sc, inc) around [42]
- Add Rnd 8: (6 sc, inc) around [48]
- Work sides for 10-12 rounds [48]
- Handle: Work 30 rows instead of 26

---

## TIPS FOR SUCCESS

1. **Tight tension is key:** Crochet tightly to prevent gaps and create sturdy fabric. If your basket feels floppy, try going down one hook size.

2. **Track your rounds:** Use a stitch marker or safety pin in the first stitch of each round. This prevents losing your place.

3. **Count frequently:** Verify stitch count at end of each round against the number in brackets. Easier to fix mistakes immediately!

4. **Handle attachment:** Pin handle in place before sewing to check length and placement. Adjust position if needed.

5. **Use the basket:** Fill with plastic Easter eggs, wrapped candies, small toys, or use as a decorative planter for a small potted plant.

---

## TROUBLESHOOTING

**Basket edges curl or flare:**
- Curling inward: You may be crocheting too tightly on sides. Try relaxing tension slightly.
- Flaring outward: You may have added accidental increases. Count stitches to verify [36] on each round.

**Handle is too long/short:**
- Too long: Unravel a few rows before attaching
- Too short: Add more rows before attaching
- Handle should arc gracefully about 3-4 inches above basket rim

**Base isn't lying flat:**
- Common in early increase rounds
- Block by pinning flat circle shape while damp
- Usually resolves once sides are added and basket has structure

**Holes visible in fabric:**
- Increase hook tension (crochet tighter)
- Try smaller hook size (3.0mm or 3.25mm)

---

## CARE INSTRUCTIONS

- Hand wash in cool water with mild soap
- Gently squeeze out excess water (do not wring)
- Reshape and lay flat to dry
- Re-stiffen if desired after washing

---

## YARN ALTERNATIVES

This pattern works with any worsted weight yarn:
- **Cotton:** Creates sturdy, structured basket (recommended: Lily Sugar'n Cream)
- **Acrylic:** Lightweight, easy care (recommended: Red Heart Super Saver)
- **Cotton/Acrylic blend:** Best of both worlds (recommended: Lion Brand Vanna's Choice)

---

## DESIGNED BY

Pattern Designer & Technical Editor
Beginner-Friendly Crochet Patterns

---

**Happy Crocheting! Enjoy your adorable Easter basket! 🐰🌷🥚**
Disclaimer: This pattern was generated by AI and should be reviewed for accuracy before use. While we strive for quality, AI-generated content may contain errors. Please verify measurements, stitch counts, and instructions before beginning your project. Generated by purlJam.uk
Access your pattern anytime
Bookmark this page to access your pattern anytime