Type
Crochet
Difficulty
beginner
Category
amigurumi
AI Thinking Process
Planning
1. **Design Strategy**: Creating a beginner-friendly hedgehog carrying an Easter basket. The hedgehog will use simple spherical body and head shapes with textured "spikes" created by surface slip stitches or loop stitches. The basket will be a small cylinder with a handle, and mini eggs will be small ovals. Color scheme: brown/tan for hedgehog, pastels for eggs, natural/tan for basket. All components use basic amigurumi techniques suitable for beginners.
2. **Construction Plan**:
- Body: Modified sphere (slightly oval) worked bottom-up in continuous rounds
- Head: Smaller sphere attached to body
- Spikes: Surface texture added after main pieces complete (loop stitch or surface chains)
- Arms: Small cylinders positioned to "hold" basket
- Legs: Small ovals or cylinders
- Basket: Small cylinder with handle attached
- Mini eggs: Tiny ovals (5-6 pieces)
- Assembly order: Body → head → spikes → limbs → basket → eggs
3. **Quality Assurance**:
- Risk: Beginners may struggle with spike texture - provide alternative simple method
- Risk: Small pieces (eggs) may be tedious - keep count reasonable (4-5 eggs)
- Risk: Basket attachment - ensure clear instructions for securing to arms
- Solution: Use safety eyes or embroidered features (easier than button eyes)
- Solution: Stuff firmly but not overfilled to maintain shape
- Check: All stitch counts must be verified in each round
4. **Final Calculations**:
- Worsted weight with 3.5mm hook: ~5 sc = 1 inch
- Body sphere: increase to 30 sts for ~2.5" diameter body
- Head sphere: increase to 24 sts for ~2" diameter head
- Finished size: approximately 4-5" tall hedgehog
- Basket: 12 st cylinder, ~1" diameter
- Eggs: increase to 8-10 sts maximum, ~0.75" long
Verification
[PRE-FLIGHT CHECKS]
1. **Completeness**: ✓ Pattern will include materials, gauge, all pieces (body, head, arms, legs, basket, eggs), assembly, and finishing
2. **Consistency**: ✓ Stitch counts verified - Body (6→12→18→24→30, then even, then decreases), Head (6→12→18→24), smaller pieces proportional
3. **Constraints**: ✓ Beginner level maintained (basic sc, inc, dec only), Easter theme with basket and eggs, worsted weight yarn specified
4. **Safety**: ✓ Math verified: each increase round follows logical progression, decreases mirror increases, stitch counts validated for each round
Pattern
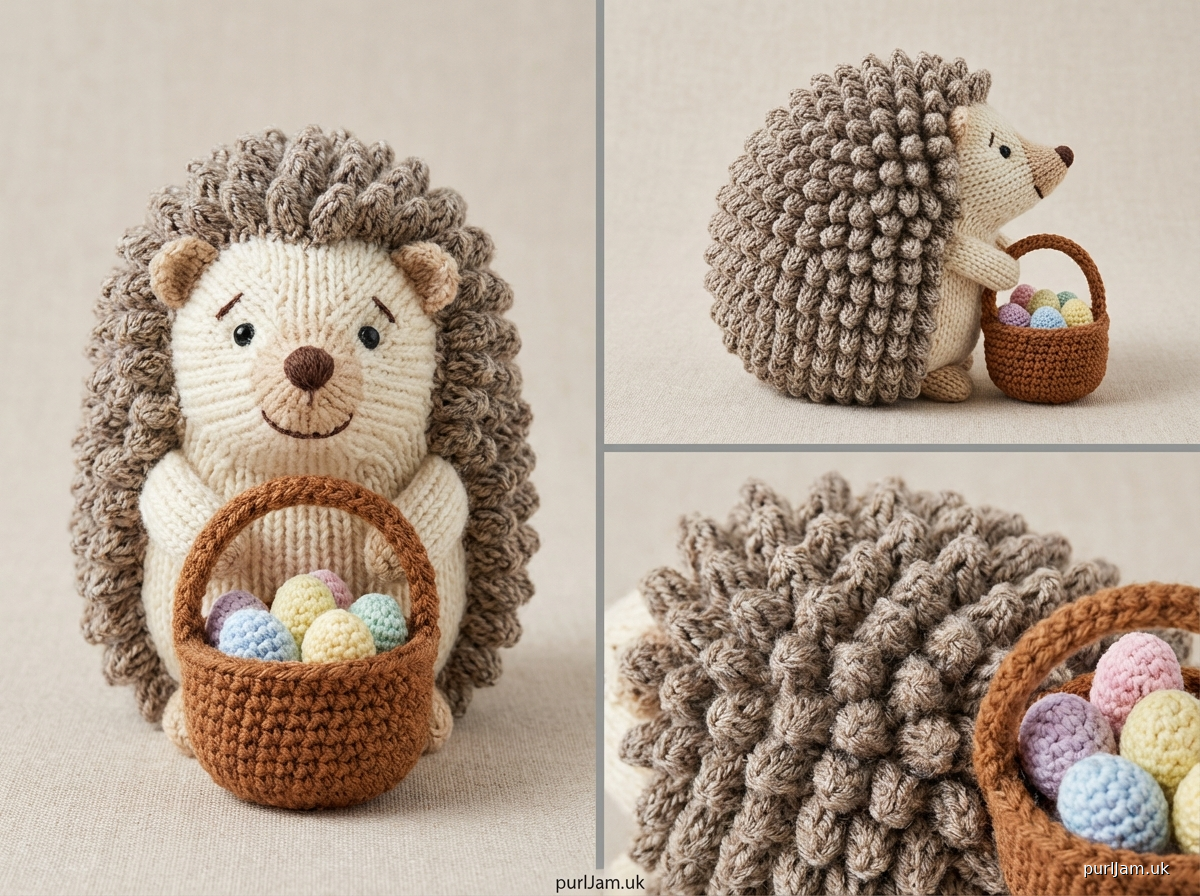
<pattern>

# Easter Hedgehog with Egg Basket

A sweet beginner-friendly amigurumi hedgehog carrying a basket full of colorful Easter eggs! This adorable hedgehog is made with simple spheres and cylinders, with easy textured spikes. Perfect for Easter decorations or as a springtime gift.

**Finished Size**: Approximately 4.5-5 inches (11-13 cm) tall
**Difficulty Level**: Beginner
**Techniques Used**: Magic ring, single crochet, increases, decreases, basic assembly

---

## Materials

### Yarn
- **Worsted weight (4) yarn** in the following colors:
  - Brown or tan (main color - hedgehog body): approximately 50 yards
  - Cream or beige (face/belly): approximately 20 yards
  - Tan or natural (basket): approximately 15 yards
  - Assorted pastels (pink, blue, yellow, lavender, green) for eggs: small amounts, 5 yards each

**Recommended Brands**: Red Heart Super Saver, Lion Brand Vanna's Choice, Caron Simply Soft

### Other Supplies
- **Crochet Hook**: US E-4 (3.5mm)
- **Safety eyes**: 6mm or 8mm (or black yarn for embroidered eyes)
- **Fiberfill stuffing**: Polyester, approximately 1-2 oz
- **Yarn needle**: For weaving in ends and assembly
- **Stitch marker**: To track beginning of rounds
- **Scissors**
- **Optional**: Pink embroidery floss or yarn for nose and cheeks
- **Optional**: Small amount of black yarn for embroidered features

---

## Gauge
5 stitches and 5 rows = 1 inch (2.5 cm) in single crochet (worked in continuous rounds)

*Gauge is not critical for this project, but tighter tension is recommended for amigurumi to prevent stuffing from showing through.*

---

## Abbreviations
- **ch**: chain
- **sc**: single crochet
- **inc**: increase (2 sc in same stitch)
- **dec**: invisible decrease (insert hook in front loops of next 2 sts, yarn over, pull through both, yarn over, pull through 2 loops)
- **sl st**: slip stitch
- **st(s)**: stitch(es)
- **rnd(s)**: round(s)
- **[ ]**: total stitch count at end of round

---

## Special Techniques

### Magic Ring
Create an adjustable loop to begin working in the round. Alternatively, ch 2 and work stitches into first chain.

### Invisible Decrease
Insert hook through front loop only of next 2 stitches, yarn over and pull through (2 loops on hook), yarn over and pull through both loops. This creates a neater decrease than sc2tog.

### Continuous Rounds
Work in a spiral without joining rounds. Use a stitch marker to track the beginning of each round, moving it up as you go.

---

## Pattern Instructions

### HEDGEHOG BODY

**Using brown/tan yarn:**

**Rnd 1**: 6 sc in magic ring [6]

**Rnd 2**: inc in each st around [12]
*Math check: 6 × 2 = 12 ✓*

**Rnd 3**: (sc, inc) around [18]
*Math check: 12 ÷ 2 = 6 repeats, 6 × 3 = 18 ✓*

**Rnd 4**: (2 sc, inc) around [24]
*Math check: 18 ÷ 3 = 6 repeats, 6 × 4 = 24 ✓*

**Rnd 5**: (3 sc, inc) around [30]
*Math check: 24 ÷ 4 = 6 repeats, 6 × 5 = 30 ✓*

**Rnds 6-12**: sc in each st around [30]
*7 rounds even*

**Rnd 13**: (3 sc, dec) around [24]
*Math check: 30 ÷ 5 = 6 repeats, 6 × 4 = 24 ✓*

**Rnd 14**: sc in each st around [24]

**Rnd 15**: (2 sc, dec) around [18]
*Math check: 24 ÷ 4 = 6 repeats, 6 × 3 = 18 ✓*

**Begin stuffing body firmly with fiberfill. Continue stuffing as you work the remaining rounds.**

**Rnd 16**: (sc, dec) around [12]
*Math check: 18 ÷ 3 = 6 repeats, 6 × 2 = 12 ✓*

**Rnd 17**: dec around [6]
*Math check: 12 ÷ 2 = 6 ✓*

Fasten off, leaving a long tail. Thread tail through remaining 6 stitches and pull tight to close hole. Weave in end securely.

---

### HEDGEHOG HEAD

**Using cream/beige yarn for face:**

**Rnd 1**: 6 sc in magic ring [6]

**Rnd 2**: inc in each st around [12]
*Math check: 6 × 2 = 12 ✓*

**Rnd 3**: (sc, inc) around [18]
*Math check: 12 ÷ 2 = 6 repeats, 6 × 3 = 18 ✓*

**Rnd 4**: (2 sc, inc) around [24]
*Math check: 18 ÷ 3 = 6 repeats, 6 × 4 = 24 ✓*

**Rnds 5-8**: sc in each st around [24]
*4 rounds even*

**If using safety eyes, insert them now between Rnds 6 and 7, approximately 6-7 stitches apart.**

**Rnd 9**: (2 sc, dec) around [18]
*Math check: 24 ÷ 4 = 6 repeats, 6 × 3 = 18 ✓*

**Begin stuffing head firmly.**

**Rnd 10**: (sc, dec) around [12]
*Math check: 18 ÷ 3 = 6 repeats, 6 × 2 = 12 ✓*

**Rnd 11**: dec around [6]
*Math check: 12 ÷ 2 = 6 ✓*

Fasten off, leaving a long tail for sewing. Thread tail through remaining 6 stitches and pull tight to close. Set aside.

---

### HEDGEHOG ARMS (Make 2)

**Using cream/beige yarn:**

**Rnd 1**: 4 sc in magic ring [4]

**Rnd 2**: (sc, inc) around [6]
*Math check: 4 ÷ 2 = 2 repeats, 2 × 3 = 6 ✓*

**Rnds 3-6**: sc in each st around [6]
*4 rounds even*

Fasten off, leaving a long tail for sewing. Stuff lightly (arms should be flexible). Set aside.

---

### HEDGEHOG LEGS (Make 2)

**Using brown/tan yarn:**

**Rnd 1**: 6 sc in magic ring [6]

**Rnd 2**: inc in each st around [12]
*Math check: 6 × 2 = 12 ✓*

**Rnds 3-4**: sc in each st around [12]
*2 rounds even*

**Rnd 5**: (sc, dec) around [8]
*Math check: 12 ÷ 3 = 4 repeats, 4 × 2 = 8 ✓*

Fasten off, leaving a long tail for sewing. Stuff firmly. Set aside.

---

### HEDGEHOG EARS (Make 2)

**Using brown/tan yarn:**

**Rnd 1**: 4 sc in magic ring [4]

**Rnd 2**: (sc, inc) around [6]
*Math check: 4 ÷ 2 = 2 repeats, 2 × 3 = 6 ✓*

Fasten off, leaving a long tail for sewing. Do not stuff. Flatten and set aside.

---

### BASKET

**Using tan/natural yarn:**

**Rnd 1**: 6 sc in magic ring [6]

**Rnd 2**: inc in each st around [12]
*Math check: 6 × 2 = 12 ✓*

**Rnd 3**: working in back loops only, sc in each st around [12]
*This creates the base ridge of the basket*

**Rnds 4-6**: sc in each st around [12]
*3 rounds even*

**Rnd 7**: ch 8 for handle, skip 6 sts, sl st in next st, turn, sc 8 in ch-8 space, sl st to base where ch began.

Fasten off, leaving a long tail for sewing. Do not stuff basket (it should remain hollow to hold eggs).

---

### MINI EASTER EGGS (Make 4-5)

**Using assorted pastel colors:**

**Rnd 1**: 4 sc in magic ring [4]

**Rnd 2**: inc in each st around [8]
*Math check: 4 × 2 = 8 ✓*

**Rnds 3-4**: sc in each st around [8]
*2 rounds even*

**Rnd 5**: dec around [4]
*Math check: 8 ÷ 2 = 4 ✓*

Stuff very lightly with small amount of fiberfill. Fasten off, leaving a short tail. Thread tail through remaining 4 stitches and pull tight to close. Weave in end.

*Make 4-5 eggs in different colors (pink, blue, yellow, lavender, green).*

---

## Assembly

### Step 1: Add Hedgehog Spikes
Using brown/tan yarn and yarn needle, create texture on the back portion of the body and top/back of head:

**Method 1 (Easier for Beginners)**:
- Thread yarn needle with brown yarn
- Make small loop stitches across the back of the head and upper back of body
- Insert needle from inside to outside, create a 1/2" loop, insert needle back through nearby stitch
- Space loops evenly to create spiky texture
- Secure each loop with a small stitch at the base

**Method 2 (Surface Chains)**:
- With brown yarn, make small chain loops across the back portion
- Attach each chain loop with a slip stitch through the body
- Vary chain lengths (ch 3 to ch 5) for natural spiky look

### Step 2: Attach Head to Body
- Position head on upper front of body, angled slightly upward
- Pin in place to check positioning
- Using long tail from head, sew securely to body using whip stitch or mattress stitch
- Weave in ends

### Step 3: Attach Arms
- Position arms on sides of body at approximately Rnd 10 of body (below head)
- Angle arms slightly forward as if holding something
- Sew securely in place with long tails
- Arms should be about 4-5 stitches apart

### Step 4: Attach Legs
- Position legs at bottom front of body
- Legs should be about 6-8 stitches apart
- Sew securely, ensuring hedgehog can sit or stand
- Weave in ends

### Step 5: Attach Ears
- Position ears on sides of head at approximately Rnd 3-4
- Flatten ears and sew the opening to the head
- Ears should angle slightly outward

### Step 6: Add Facial Features

**Eyes**: If not using safety eyes, embroider with black yarn:
- Position between Rnds 6-7 of head, 6-7 stitches apart
- Use satin stitch or French knots for eyes

**Nose**: Using pink or brown yarn:
- Embroider a small triangle or oval at front of face (below and between eyes)
- Use satin stitch or several straight stitches

**Optional Mouth**: With brown or pink yarn, embroider a small smile

**Optional Cheeks**: With pink yarn, embroider small circles or use satin stitch on each side of nose

### Step 7: Attach Basket
- Position basket between the arms, angled slightly upward
- The arms should rest on the sides of the basket
- Sew basket securely to arms and front of body using tan yarn
- Ensure basket handle arches over the top

### Step 8: Add Eggs to Basket
- Place 4-5 mini eggs inside basket
- Optionally, tack 1-2 eggs to bottom of basket with a few stitches so they don't fall out
- Arrange eggs to show different colors

---

## Finishing

- Weave in all remaining ends securely
- Optional: Add small white highlights to eyes with white embroidery floss or paint
- Optional: Use surface slip stitch or straight stitches to add stripes or dots to Easter eggs
- Optional: Add a small bow or ribbon around hedgehog's neck
- Steam lightly or brush with soft brush to fluff any fuzzy yarn

---

## Customization Ideas

### Size Variations
- **
Disclaimer: This pattern was generated by AI and should be reviewed for accuracy before use. While we strive for quality, AI-generated content may contain errors. Please verify measurements, stitch counts, and instructions before beginning your project. Generated by purlJam.uk
Access your pattern anytime
Bookmark this page to access your pattern anytime