Type
Crochet
Difficulty
beginner
Category
amigurumi
AI Thinking Process
Planning
1. **Design Strategy**: Creating a beginner-friendly "peek-a-boo Easter egg" plush with amigurumi techniques. The design features two main components: a cracked egg shell and a baby bunny emerging from it. Using pastel yarn colors (likely light pink or yellow for egg, white or cream for bunny), embroidered facial features for a kawaii expression, and round chubby proportions. The egg will be split into two halves with jagged edges to simulate cracking, and the bunny will be a simplified head-and-ears design that can be inserted/removed for the "peek-a-boo" effect.
2. **Construction Plan**:
- Egg bottom half: Modified sphere pattern, worked from bottom up, left open at top with zigzag edge
- Egg top half: Half-sphere with jagged opening edge, worked separately
- Baby bunny: Small sphere for head with two small oval ears attached
- All pieces worked in continuous rounds with stitch marker
- Assembly: Bunny head stuffed and closed, positioned inside egg bottom, top half can rest on or be sewn partially
3. **Quality Assurance**:
- Ensure stitch counts are consistent for matching egg halves
- Verify jagged edges have same number of points for alignment if desired
- Check that bunny head is proportionally sized to fit inside egg opening
- Confirm stuffing instructions are clear for maintaining shape
- Add clear embroidery guidance for kawaii face details
- Include positioning tips for bunny placement
4. **Final Calculations**:
- Worsted weight yarn with 3.5mm hook
- Egg: Increase to 30 sts for ~3.5" diameter egg
- Bunny head: Increase to 18 sts for ~2" head (proportional to egg)
- Ears: Small ovals ~1.5" long
- Total height assembled: ~4-5 inches
Verification
[PRE-FLIGHT CHECKS]
1. **Completeness**: Pattern will include Materials, Gauge, Abbreviations, Notes, Instructions (Egg Bottom, Egg Top, Bunny Head, Ears, Face Details), Assembly, and Finishing sections ✓
2. **Consistency**:
- Egg bottom: 6→12→18→24→30 sts (5 increase rounds) ✓
- Egg top: Same increases for matching diameter ✓
- Bunny head: 6→12→18 sts (3 increase rounds for smaller proportions) ✓
3. **Constraints**: Beginner level (basic stitches only), worsted yarn, pastel colors, embroidered eyes, kawaii style, peek-a-boo interactive element ✓
4. **Safety**: All increase/decrease math verified, stitch counts clearly marked, stuffing reminders included ✓
Pattern
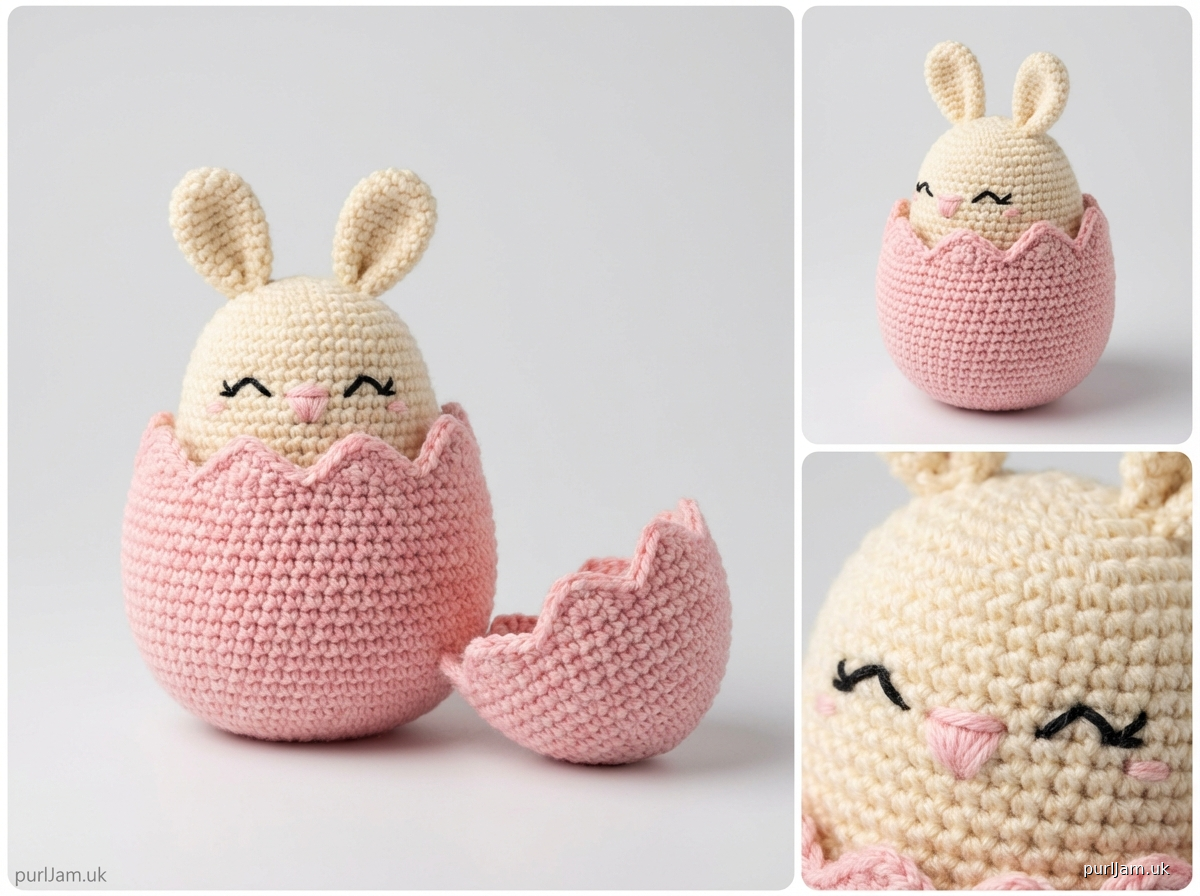
<pattern>

# Peek-a-Boo Easter Egg with Baby Bunny

A sweet amigurumi plush featuring a cracked pastel egg with an adorable baby bunny peeking out! Perfect for Easter baskets or springtime décor. The bunny can be tucked inside or displayed peeking out for interactive play.

**Difficulty Level**: Beginner
**Finished Size**: Approximately 4-5 inches tall
**Design Style**: Kawaii amigurumi

---

## MATERIALS

**Yarn:**
- Worsted weight (4) acrylic yarn in the following colors:
  - Pastel pink, yellow, or blue (egg) – approximately 50 yards
  - White or cream (bunny) – approximately 25 yards
  - Pink (inner ears, optional) – small amount
  - Black or dark brown (embroidery) – small amount

**Recommended Yarn:** Any worsted weight acrylic (Red Heart Super Saver, Caron Simply Soft, Bernat Super Value)

**Hook & Notions:**
- US E-4 (3.5mm) crochet hook
- Yarn needle
- Stitch marker
- Fiberfill stuffing (polyester)
- Embroidery needle (for facial features)
- Pins (for positioning during assembly)

---

## GAUGE

Gauge is flexible for amigurumi, but standard gauge for this pattern:
- 18 sts × 20 rows = 4 inches in single crochet

**Note:** Work tightly to prevent stuffing from showing through. If your fabric looks loose, go down a hook size to 3.25mm.

---

## ABBREVIATIONS

- ch = chain
- sc = single crochet
- inc = increase (2 sc in same stitch)
- dec = invisible decrease (insert hook in front loops of next 2 sts, yarn over, pull through both, yarn over, pull through 2 loops)
- sl st = slip stitch
- st(s) = stitch(es)
- rnd(s) = round(s)
- [ ] = stitch count at end of round
- ( ) = repeat instructions within parentheses

---

## PATTERN NOTES

- All pieces are worked in continuous spiral rounds unless otherwise stated. Use a stitch marker to track the beginning of each round.
- Do not join or turn at the end of rounds unless instructed.
- Stuff pieces firmly as you work, especially before decreasing.
- The invisible decrease technique creates the smoothest finish for amigurumi.
- The egg halves have intentionally uneven "cracked" edges – don't worry about them being perfectly symmetrical!

---

## INSTRUCTIONS

### EGG BOTTOM HALF (Pastel color)

This forms the base of the egg where the bunny sits.

**Rnd 1:** 6 sc in magic ring [6]

**Rnd 2:** inc in each st around [12]
*Math check: 6 × 2 = 12 ✓*

**Rnd 3:** (sc, inc) around [18]
*Math check: 12 ÷ 2 = 6 repeats, 6 × 3 = 18 ✓*

**Rnd 4:** (2 sc, inc) around [24]
*Math check: 18 ÷ 3 = 6 repeats, 6 × 4 = 24 ✓*

**Rnd 5:** (3 sc, inc) around [30]
*Math check: 24 ÷ 4 = 6 repeats, 6 × 5 = 30 ✓*

**Rnds 6-11:** sc in each st around [30]
*6 even rounds for egg body*

**Rnd 12:** (3 sc, dec) around [24]
*Math check: 30 ÷ 5 = 6 repeats, 6 × 4 = 24 ✓*

**Begin stuffing firmly now and continue stuffing as you work.**

**Rnd 13:** (2 sc, dec) around [18]
*Math check: 24 ÷ 4 = 6 repeats, 6 × 3 = 18 ✓*

**Rnd 14 (Jagged Edge):** *(sc, ch 2, sl st in 2nd ch from hook, sc) in next st, sc in next 2 sts; repeat from * around [18 sts with 6 points]

Fasten off, leaving a long tail for assembly. The opening should be approximately 2 inches across.

---

### EGG TOP HALF (Same pastel color)

This creates the cracked upper portion of the shell.

**Rnd 1:** 6 sc in magic ring [6]

**Rnd 2:** inc in each st around [12]
*Math check: 6 × 2 = 12 ✓*

**Rnd 3:** (sc, inc) around [18]
*Math check: 12 ÷ 2 = 6 repeats, 6 × 3 = 18 ✓*

**Rnd 4:** (2 sc, inc) around [24]
*Math check: 18 ÷ 3 = 6 repeats, 6 × 4 = 24 ✓*

**Rnd 5:** (3 sc, inc) around [30]
*Math check: 24 ÷ 4 = 6 repeats, 6 × 5 = 30 ✓*

**Rnds 6-9:** sc in each st around [30]
*4 even rounds for top shell*

**Stuff lightly** (this piece should be less firmly stuffed than the bottom)

**Rnd 10 (Jagged Edge):** *(sc, ch 2, sl st in 2nd ch from hook, sc) in next st, sc in next 2 sts; repeat from * around [30 sts with 10 points]

Fasten off, leaving a long tail. Leave opening as is (do not close).

---

### BABY BUNNY HEAD (White or cream)

**Rnd 1:** 6 sc in magic ring [6]

**Rnd 2:** inc in each st around [12]
*Math check: 6 × 2 = 12 ✓*

**Rnd 3:** (sc, inc) around [18]
*Math check: 12 ÷ 2 = 6 repeats, 6 × 3 = 18 ✓*

**Rnds 4-7:** sc in each st around [18]
*4 even rounds for chubby head shape*

**Begin stuffing firmly.**

**Rnd 8:** (sc, dec) around [12]
*Math check: 18 ÷ 3 = 6 repeats, 6 × 2 = 12 ✓*

**Rnd 9:** dec around [6]
*Math check: 12 ÷ 2 = 6 ✓*

Fasten off, leaving a long tail. Use yarn needle to weave through remaining 6 sts and pull tight to close. Weave in end securely.

---

### BUNNY EARS (Make 2 in white or cream)

**Rnd 1:** 4 sc in magic ring [4]

**Rnd 2:** (sc, inc) around [6]
*Math check: 4 ÷ 2 = 2 repeats, 2 × 3 = 6 ✓*

**Rnds 3-6:** sc in each st around [6]
*4 even rounds for ear length*

**Do not stuff ears.** Flatten opening and sl st across to close (working through both layers). Fasten off, leaving a long tail for sewing.

**Optional Inner Ear Detail:** Using pink yarn, embroider a small oval in the center of each ear with straight stitches or chain stitch.

---

### FACE DETAILS (Embroidery)

**Eyes:** Using black or dark brown yarn and embroidery needle:
- Position eyes on bunny head between Rnds 4-5, approximately 4-5 sts apart
- For kawaii style: Embroider small vertical lines (2-3 stitches long) for closed/happy eyes, OR small French knots, OR tiny circles with satin stitch

**Nose:** Using pink yarn:
- Position nose centered below eyes on Rnd 6
- Embroider a small triangle or upside-down Y shape

**Cheeks (optional):** Using pink yarn:
- Add two small circles (satin stitch or French knots) on either side of nose

**Expression tip:** For maximum kawaii effect, place eyes close together and keep features small and centered on the face.

---

## ASSEMBLY

**Step 1: Attach Ears to Bunny Head**
- Position ears on top of head, angled slightly outward in a V-shape
- Place ears approximately at Rnd 1-2 of the head
- Pin in place, then sew securely using the long tails and whip stitch
- Weave in ends

**Step 2: Position Bunny in Egg**
- Place bunny head inside egg bottom half so it peeks out at the desired height
- The bunny can rest freely inside (removable for interactive play) OR be sewn in place
- **For removable bunny:** Simply place bunny inside egg bottom. Add a small "nest" of fiberfill around base of bunny head to hold it upright if desired
- **For permanent placement:** Sew bunny head to inside edge of egg bottom with a few secure stitches

**Step 3: Egg Top Half**
- The egg top can be:
  - **Option A:** Left completely separate (placed on as a "hat" or displayed beside egg)
  - **Option B:** Sewn partially to egg bottom at back edge only (2-3 inches of seam), creating a hinged "lid" effect
  - **Option C:** Positioned and sewn to one side for a permanently open display

**Recommended:** Option A or B work best for the peek-a-boo interactive element!

---

## FINISHING

- Weave in all remaining ends securely
- Use yarn needle to tighten any loose stitches around faces or seams
- Gently shape egg halves and bunny head with your hands to perfect the round proportions
- Optional: Lightly brush bunny with a clean pet brush or suede brush for a fuzzy texture

---

## CUSTOMIZATION IDEAS

**Color Variations:**
- Try pastel blue, lavender, mint green, or peach for the egg
- Make a brown or gray bunny instead of white
- Create a whole family with different colored eggs!

**Size Adjustments:**
- **Smaller keychain version:** Use sport weight yarn and 2.75mm hook, reduce increase rounds by one (stop at 24 sts for egg)
- **Larger display version:** Use bulky yarn and 5.5mm hook, add 1-2 more increase rounds (up to 36 sts for egg)

**Embellishments:**
- Add a small fabric bow between bunny ears
- Embroider tiny flowers or dots on egg shell
- Sew small felt decorations to egg surface
- Add safety eyes instead of embroidered eyes (9mm size, inserted after Rnd 6 before stuffing)

**Other Animals:**
- Use the same pattern but swap bunny ears for chick features (yellow head, small orange triangle beak, no ears)
- Make a duckling (yellow, small flat orange oval for beak)

---

## CARE INSTRUCTIONS

- Spot clean only with damp cloth
- Do not machine wash (stuffing may clump)
- Air dry completely if cleaned
- Not suitable for children under 3 if using embroidered features (choking hazard if pulled loose)

---

## TROUBLESHOOTING

**Problem:** Egg halves don't match in size
**Solution:** Count stitches carefully in each round. Both halves should have 30 sts at widest point.

**Problem:** Bunny head wobbles or tips over inside egg
**Solution:** Add more stuffing around the base inside the egg bottom, or sew bunny in place with a few tack stitches.

**Problem:** Fabric looks loose and stuffing shows through
**Solution:** Use a smaller hook (try 3.25mm) and work stitches more tightly.

**Problem:** Jagged edges look messy
**Solution:** This is normal! Real cracked eggs have uneven edges. Embrace the organic look, or skip the jagged edge and work a plain round instead.

**Problem:** Can't close magic ring tightly
**Solution:** After completing Rnd 1, pull the tail firmly before working Rnd 2. You can also start with ch 2, 6 sc in 2nd ch from hook as an alternative.

---

## SKILL BUILDING

This pattern teaches:
- ✓ Magic ring technique
- ✓ Working in continuous rounds
- ✓ Increasing evenly to create spheres
- ✓ Decreasing to shape and close
- ✓ Creating decorative edges (jagged effect)
- ✓ Embroidering facial features
- ✓ Basic amigurumi assembly

---

## ABOUT THIS PATTERN

Designed as a beginner-friendly introduction to amigurumi techniques using simple sphere and oval shapes. The peek-a-boo element adds interactive charm, making this perfect for Easter gifts, spring décor, or as a sweet handmade present for someone special.

**Estimated Time:** 3-4 hours for confident beginners

**Perfect for:** Easter baskets, nursery décor, spring photography props, gifts for bunny lovers

---

*Pattern tested with Red Heart Super Saver in Soft Pink and White using 3.
Disclaimer: This pattern was generated by AI and should be reviewed for accuracy before use. While we strive for quality, AI-generated content may contain errors. Please verify measurements, stitch counts, and instructions before beginning your project. Generated by purlJam.uk
Access your pattern anytime
Bookmark this page to access your pattern anytime