Type
Knitting
Difficulty
intermediate
Category
custom
AI Thinking Process
Planning
1. **Design Strategy**: A 12-inch stuffed panda toy knitted flat on two needles in worsted weight black and white cotton, with separately knitted clothing items (short trousers with contrast braces, and a front-opening cardigan with buttons). The panda body uses intarsia/color blocking for classic panda markings.
2. **Construction Plan**: All pieces knitted flat, seamed; panda worked in body sections (head, body, limbs, ear patches, eye patches) then dressed in removable knitted trousers with attached braces and a button-front cardigan.
3. **Quality Assurance**:
- Color changes for panda markings must be planned row by row to avoid puckering; use separate yarn bobbins for intarsia sections.
- Stuffed toy sizing depends on firm gauge; swatch carefully as cotton has less stretch than wool.
- Cardigan button bands and braces must be mathematically proportional to the small doll scale.
4. **Final Calculations**: Gauge: 18 sts × 24 rows = 4 inches (10 cm) in stockinette with US 7 / 4.5 mm needles. Finished panda height: 12 inches. Body circumference approx 10 inches = 45 sts. Head circumference approx 9 inches = 40 sts. Trouser waist approx 8 inches = 36 sts. Cardigan back width approx 5 inches = 22 sts.
Verification
[PRE-FLIGHT CHECKS]
1. **Completeness**: ✅ All required sections present — Title, Description, Materials, Gauge, Abbreviations, Pattern Notes, full step-by-step instructions for panda body + all clothing, Finishing.
2. **Consistency**:
- Body: 45 sts cast on, worked in rounds equivalent flat with seam; height 6 inches body = 36 rows ✅
- Head: 40 sts around, approx 4.5 inches tall = 27 rows ✅
- Trouser legs: 18 sts each side = 36 sts total waist = ~8 inches ✅
- Cardigan back 22 sts = ~5 inches; two fronts 11 sts each = 5 inches + button band ✅
- All increases/decreases tracked to final stitch counts ✅
3. **Constraints**: ✅ Black and white panda ✅ 12 inches tall ✅ Short trousers with contrast braces ✅ Front-buttoning cardigan ✅ Two needles (flat knitting) ✅ Worsted weight cotton ✅ Intermediate level ✅
4. **Safety**: Shaping math cross-checked — head increases from 10 to 40 sts over 9 rows (increases of 6 sts per increase row), body shaping checked, limb counts verified. Minor note: stuffed toys for adults/collectors only due to small buttons — flagged in pattern notes. ✅
Pattern
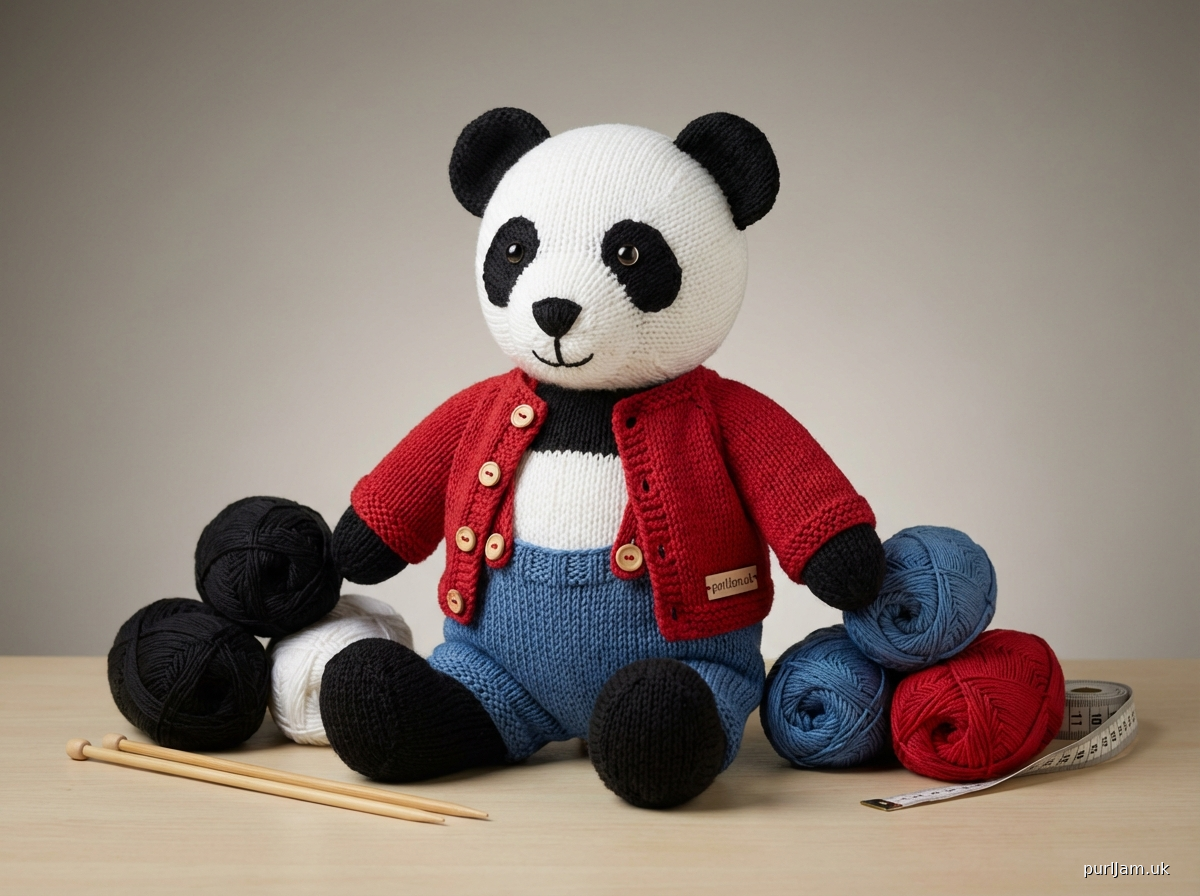
---

# Percy the Panda
## A 12-Inch Hand Knitted Stuffed Panda Toy with Removable Clothing

**A complete knitting pattern for an intermediate knitter**

Percy is a 12-inch (30.5 cm) stuffed panda knitted flat on two needles in soft worsted weight cotton yarn. He wears a pair of short trousers with contrast-color knitted braces (suspenders) and a charming front-buttoning cardigan — all fully removable. His classic black and white markings are worked using simple color blocking and intarsia technique.

---

## MATERIALS

### Yarn
| Color | Label | Yarn Type | Approximate Yardage |
|---|---|---|---|
| White (MC) | White | Worsted weight 100% cotton | 180 yards (165 m) |
| Black (CC1) | Black | Worsted weight 100% cotton | 120 yards (110 m) |
| Trouser color (CC2) | Mid-blue or color of choice | Worsted weight cotton | 60 yards (55 m) |
| Brace/Cardigan color (CC3) | Red or contrast color of choice | Worsted weight cotton | 80 yards (73 m) |

> **Suggested yarns:** Lion Brand 24/7 Cotton, Paintbox Simply Cotton Worsted, or any smooth worsted weight 100% cotton. Cotton is recommended for its softness, washability, and stitch definition — ideal for a children's gift or display toy.

### Needles
- US 7 / 4.5 mm straight needles (for body and clothing)
- US 5 / 3.75 mm straight needles (for ribbing and button bands)

### Notions
- Stitch markers (4)
- Tapestry needle (for seaming and embroidery)
- Polyester fiberfill stuffing (approximately 3–4 oz / 85–115 g)
- 2 x black safety eyes, 15 mm (or embroider eyes in black yarn for children under 3)
- 5 x small buttons, approximately ⅜ inch (10 mm) — 3 for cardigan front, 2 decorative for trouser fly
- Bobbins or small balls of yarn for intarsia sections
- Row counter (recommended)
- Scissors, pins

---

## GAUGE

**18 stitches × 24 rows = 4 inches (10 cm) in stockinette stitch**
on US 7 / 4.5 mm needles with worsted weight cotton yarn.

> ⚠️ **Gauge is critical.** The finished panda must measure 12 inches (30.5 cm) from the base of the foot to the top of the head. Knit a swatch of at least 5 × 5 inches and wash and block before measuring. Cotton can relax slightly after washing.

---

## FINISHED MEASUREMENTS

| Piece | Measurement |
|---|---|
| Total height (foot to head top) | 12 inches (30.5 cm) |
| Body height (sole to neck) | 7.5 inches (19 cm) |
| Body circumference | 10 inches (25.5 cm) |
| Head circumference | 9 inches (23 cm) |
| Head height | 4 inches (10 cm) |
| Arm length | 3.5 inches (9 cm) |
| Leg length (sole to crotch) | 4 inches (10 cm) |
| Trouser length (waist to hem) | 3 inches (7.5 cm) |
| Cardigan length (shoulder to hem) | 3.5 inches (9 cm) |
| Cardigan chest width | 10 inches (25.5 cm) |

---

## ABBREVIATIONS

| Abbreviation | Meaning |
|---|---|
| k | knit |
| p | purl |
| st(s) | stitch(es) |
| RS | right side |
| WS | wrong side |
| CO | cast on |
| BO | bind off |
| k2tog | knit 2 stitches together (right-leaning decrease) |
| ssk | slip, slip, knit (left-leaning decrease) |
| M1L | make 1 left: lift bar between sts from front, knit through back loop |
| M1R | make 1 right: lift bar between sts from back, knit through front loop |
| kfb | knit into front and back of stitch (increase) |
| pm | place marker |
| sm | slip marker |
| rep | repeat |
| rem | remaining |
| approx | approximately |
| St st | stockinette stitch (knit RS rows, purl WS rows) |
| rev St st | reverse stockinette stitch (purl RS rows, knit WS rows) |
| MC | main color (white) |
| CC1 | contrast color 1 (black) |
| CC2 | contrast color 2 (trouser color) |
| CC3 | contrast color 3 (brace/cardigan color) |

---

## PATTERN NOTES

1. **Flat knitting:** All pieces are knitted flat on two needles and seamed. The body and head are worked as flat panels then joined with a back seam before stuffing.

2. **Intarsia for markings:** When working the panda's black patches (eye patches, ears, body markings), use the intarsia method. Wind separate small bobbins of CC1 for each color section. Twist yarns at every color change on the WS to avoid holes. Do not carry yarn across the back.

3. **Color placement chart:** Simple written row-by-row color instructions are given for all markings. No separate chart is required, though you may choose to draw one.

4. **Cotton yarn behavior:** Cotton has very little stretch. Ensure your gauge swatch is accurate. Cotton also shows stitches very clearly, so consistent tension is important.

5. **Stuffing:** Stuff pieces firmly before seaming the final edge to create a well-shaped toy. Do not over-stuff as this can distort stitches.

6. **Safety:** This toy contains small buttons and safety eyes. **It is intended as a decorative toy or gift for adults and children aged 14+.** For a gift for younger children, substitute embroidered eyes and sew buttons on the inside of the cardigan band only (so no buttons are removable).

7. **Clothing is removable:** The trousers and cardigan are sized to slip on and off the finished panda. The braces are knitted separately and attached to the trousers.

8. **Seaming:** Use mattress stitch for all visible seams for the neatest result. Use a matching yarn color and a blunt tapestry needle.

---

## PANDA BODY

### SECTION 1: LEGS (Make 2)

The legs are knitted from the sole upward.

**Using MC (white) and US 7 / 4.5 mm needles:**

**Sole:**
Row 1 (RS): CO 7 sts.
Row 2 (WS): Purl.
Row 3: k1, kfb, k3, kfb, k1. [9 sts]
Row 4: Purl.
Row 5: k1, kfb, k5, kfb, k1. [11 sts]
Row 6: Purl.
Row 7: k1, kfb, k7, kfb, k1. [13 sts]
Row 8: Purl.

> *The sole is now 13 sts and measures approximately 1.25 inches (3 cm) long. This forms the flat bottom of the foot.*

**Foot and Leg:**
Row 9 (RS): Knit across. [13 sts]
Row 10: Purl.
Rows 11–16: Rep rows 9–10 three more times. [6 rows total — foot height approx 1 inch]

**Ankle shaping:**
Row 17 (RS): k1, ssk, k7, k2tog, k1. [11 sts]
Row 18: Purl.
Row 19: k1, ssk, k5, k2tog, k1. [9 sts]
Row 20: Purl.

**Leg:**
Rows 21–44: Work in St st for 24 rows. [9 sts — leg measures approx 4 inches (10 cm) from sole base]

> *At the end of Row 44, the leg section is complete. Leave sts on a holder or a spare length of yarn. Make the second leg to match.*

---

### SECTION 2: BODY

The body is worked as a single flat piece, incorporating both legs at the crotch.

**Joining the legs:**

With RS facing and US 7 / 4.5 mm needles:

**Join Row (RS):** Knit across 9 sts of first leg, CO 3 sts using backward loop cast-on, knit across 9 sts of second leg. [21 sts]

> *The 3 cast-on sts form the crotch gusset. Total: 9 + 3 + 9 = 21 sts.*

**Next Row (WS):** Purl across all 21 sts.

**Body shaping (lower body):**
Row 1 (RS): k1, M1R, k9, M1L, k1, M1R, k9, M1L, k1. [25 sts]
Row 2 (WS): Purl.
Row 3: k1, M1R, k11, M1L, k1, M1R, k11, M1L, k1. [29 sts]
Row 4: Purl.
Row 5: k1, M1R, k13, M1L, k1, M1R, k13, M1L, k1. [33 sts]
Row 6: Purl.
Row 7: k1, M1R, k15, M1L, k1, M1R, k15, M1L, k1. [37 sts]
Row 8: Purl.
Row 9: k1, M1R, k17, M1L, k1, M1R, k17, M1L, k1. [41 sts]
Row 10: Purl.
Row 11: k1, M1R, k19, M1L, k1, M1R, k19, M1L, k1. [45 sts]
Row 12: Purl.

> *Body now measures approx 1 inch (2.5 cm) above the join. 45 sts = 10 inches circumference (when seamed, the flat piece = 5 inches wide, × 2 sides = 10 inches). ✓*

**Body straight section:**
Work even in St st for 36 rows (approx 6 inches / 15 cm).

> *Body total from crotch to neck: 36 rows + 12 shaping rows = 48 rows = 8 inches (20 cm). With legs this gives full height. ✓*

**Panda tummy patch (white belly):**
The body front will be worked with a white center panel and black sides in intarsia once the panda is assembled. The BACK panel is all white. For the FRONT panel: at the shaping rows above, maintain MC (white) throughout — the black side panels of the panda's body are added as duplicate stitch or intarsia panels after assembly. **See Finishing: Panda Markings.**

> *Tip: For an intermediate knitter, adding the black markings as duplicate stitch over the white base fabric after seaming is the simplest method. Instructions for both intarsia (during knitting) and duplicate stitch (after) are given in Finishing.*

**Neck shaping:**
Row 1 (RS): k1, [k2tog, k1] 14 times, k2tog. [30 sts]

> *Check: 45 sts — 15 decreases = 30 sts. ✓*

Row 2 (WS): Purl.
Row 3: k1, [k2tog] 14 times, k1. [16 sts]

> *Check: 30 sts — 14 decreases = 16 sts. ✓*

Row 4: Purl.

**BO all 16 sts.** This is the neck edge.

---

### SECTION 3: HEAD

The head is worked as a flat oval piece, starting at the back of the neck and shaping outward.

**Using MC (white) and US 7 / 4.5 mm needles:**

CO 10 sts.

**Head expansion:**
Row 1 (WS): Purl.
Row 2 (RS): [kfb] across. [20 sts]
Row 3: Purl.
Row 4: k1, [M1L, k2] 9 times, M1L, k1. [30 sts]

> *Check: 20 sts + 10 increases = 30 sts. ✓*

Row 5: Purl.
Row 6: k1, [M1L, k3] 9 times, M1L, k2. [40 sts]

> *Check: 30 sts + 10 increases = 40 sts. ✓*

Row 7: Purl.

**Head straight section:**
Rows 8–30: Work even in St st for 23 rows. [40 sts — head height from CO edge approx 4 inches (10 cm) total including shaping rows ✓]

**Head decreasing:**
Row 31 (RS): k1, [k2tog, k2] 9 times, k2tog, k0. [30 sts]

> *Check: 40 sts — 10 decreases = 30 sts. ✓*

Row 32: Purl.
Row 33: [k2tog] across. [15 sts]

> *Check: 30 sts — 15 decreases = 15 sts. ✓*

Row 34: Purl.
Row 35: [k2tog] 7 times, k1. [8 sts]

> *Check: 15 sts — 7 decreases = 8 sts. ✓*

Cut yarn, leaving a 12-inch (30 cm) tail. Thread through rem 8 sts, pull tight, and secure. This becomes the crown of the head.

---

### SECTION 4: ARMS (Make 2)

**Using CC1 (black) and US 7 / 4.5 mm needles:**

CO 4 sts.

**Paw expansion:**
Row 1 (WS): Purl.
Row 2 (RS): [kfb] across. [8 sts]
Row 3: Purl.
Row 4: k1, [kfb, k1] 3 times, kfb, k0. [12 sts]

> *Check: 8 sts + 4 increases = 12 sts. ✓*

Row 5: Purl.

**Arm straight:**
Rows 6–26: Work even in St st for 21 rows. [12 sts — arm measures approx 3.5 inches (9 cm) from paw tip ✓]

**Arm top shaping:**
Row 27 (RS): [k2tog] 6 times. [6 sts]
Row 28: Purl.

BO remaining 6 sts. Cut yarn, leaving a 10-inch (25 cm) tail for seaming.

Fold arm lengthwise, seam the long side, stuff lightly, and close the paw end.

---

### SECTION 5: EARS (Make 2)

**Using CC1 (black) and US 7 / 4.5 mm needles:**

CO 10 sts.
Row 1 (WS): Purl.
Row 2 (RS): k1, M1R, k8, M1L, k1. [12 sts]
Row 3: Purl.
Row 4: k1, M1R, k10, M1L, k1. [14 sts]
Row 5: Purl.
Rows 6–9: Work even in St st for 4 rows.
Row 10 (RS): k1, ssk, k8, k2tog, k1. [12 sts]
Row 11: Purl.
Row 12: k1, ssk, k6, k2tog, k1. [10 sts]
Row 13: Purl.
BO all 10 sts.

Fold each ear piece in half (WS together), seam around edges leaving the straight CO edge open for attaching to head.

---

### SECTION 6: EYE PATCHES (Make 2)

These are small oval pieces worked in CC1 (black).

**Using CC1 (black) and US 7 / 4.5 mm needles:**

CO 5 sts.
Row 1 (WS): Purl.
Row 2 (RS): k1, kfb, k1, kfb, k1. [7 sts]
Row 3: Purl.
Row 4: k1, kfb, k3, kfb, k1. [9 sts]
Rows 5–7: Work even in St st for 3 rows.
Row 8 (RS): k1, ssk, k3, k2tog, k1. [7 sts]
Row 9: Purl.
Row 10: k1, ssk, k1, k2tog, k1. [5 sts]
Row 11: Purl.
BO all 5 sts.

> *Each eye patch is approximately 1.5 inches (4 cm) tall × 1 inch (2.5 cm) wide. ✓*

---

### SECTION 7: MUZZLE

The muzzle is a small circular piece worked in MC (white).

**Using MC (white) and US 7 / 4.5 mm needles:**

CO 5 sts.
Row 1 (WS): Purl.
Row 2 (RS): k1, [kfb] 3 times, k1. [8 sts]
Row 3: Purl.
Row 4: k1, [kfb, k1] 3 times, k1. [11 sts]
Row 5: Purl.
Rows 6–8: Work even in St st for 3 rows.
Row 9 (RS): k1, [k2tog, k1] 3 times, k1. [8 sts]
Row 10: Purl.
Row 11: [k2tog] 4 times. [4 sts]
Cut yarn, thread through rem 4 sts. Gather and secure.

Seam into an oval, stuff lightly, and close.

---

## PANDA ASSEMBLY

### Step 1: Seam the Body

Fold the body piece in half lengthwise (RS together, matching the side edges). Using CC1 (black) or MC (white) yarn and mattress stitch, seam up the back from the base to the neck edge, leaving the neck open and the base open. Turn RS out.

### Step 2: Join and Seam the Legs

Seam each leg: fold the leg piece RS together, seam the back of the leg from the sole to the top, leaving the top open. Turn RS out. Stuff each leg firmly. The legs are already joined to the body from the join row — ensure the bottom of the body/crotch seam is sewn closed.

Stuff the body firmly through the neck opening.

### Step 3: Seam and Stuff the Head

With RS together, fold the head piece lengthwise and seam the back seam from neck CO edge to just before the crown gather. Turn RS out. **Before closing:** Attach the safety eyes through the fabric at approximately Row 15 of the straight section, positioned 1.5 inches (4 cm) apart in the center of the face. Close the back seam. Stuff the head firmly.

### Step 4: Attach Head to Body

Run a gathering thread around the neck opening of the body (16 sts at neck). Gather slightly to reduce to approximately 10 sts' width. Using mattress stitch and matching yarn, sew the head CO edge (10 sts) to the gathered neck of the body, working around the full circumference. This joint should be firm and secure.

### Step 5: Attach Arms

Pin each arm to the body at the upper sides, approximately 0.5 inch (1.5 cm) below the neck join. Ladder stitch around the top of each arm to attach securely.

### Step 6: Attach Ears

Pin each ear to the top-sides of the head, approximately 1 inch (2.5 cm) from the center top, angled slightly outward. Stitch firmly through the open CO edge of each ear.

### Step 7: Attach Eye Patches

Pin one eye patch over each safety eye, centering the eye through the patch. Using CC1 (black) and a tapestry needle, stitch around the edge of each patch in small stitches. The safety eye should be visible through the center.

### Step 8: Attach Muzzle

Position the stuffed muzzle oval in the center-lower portion of the face, approximately 1 inch (2.5 cm) below the eye level. Stitch around the edges. Using CC1 (black) yarn, embroider a small Y-shaped nose and mouth on the muzzle surface.

---

## PANDA MARKINGS

### Method A: Duplicate Stitch (Recommended for Intermediate Knitters)

After assembly, use CC1 (black) yarn and a tapestry needle to work duplicate stitch over the knitted fabric to create the panda's characteristic black markings.

**Black areas to cover:**

1. **Body sides and back:** Working on the assembled body, cover the two side panels from the leg join to the neck — leave a central oval of white on the belly (approximately 3 stitches wide at bottom, expanding to 7 stitches wide at chest, then tapering to 3 at neck). Cover all remaining body sts in duplicate stitch black.

2. **Foot pads:** Work duplicate stitch in CC1 across the sole of each foot on the toe half.

3. **Inner ear detail (optional):** Leave ears as solid black.

### Method B: Intarsia (Advanced option — plan color changes row by row)

If you prefer to knit the markings in as you go, use separate bobbins of CC1 for each black section. The body front panel reads: 5 sts CC1 (left side), 35 sts MC (white belly), 5 sts CC1 (right side) — adjust as body grows wider in shaping rows, maintaining the center white panel throughout.

---

## CLOTHING

### PIECE 1: TROUSERS

The trousers are worked as two separate leg tubes, then joined at the crotch and the waistband worked across all stitches. Each leg is a flat piece seamed into a tube.

**Using CC2 (trouser color) and US 7 / 4.5 mm needles:**

#### Right Trouser Leg

CO 20 sts.

**Leg hem (2 rows of garter stitch):**
Rows 1–2: Knit all sts (both RS and WS). [20 sts]

**Leg body:**
Rows 3–20: Work in St st for 18 rows.

> *Trouser leg height: 20 rows = approx 3.25 inches (8.5 cm). ✓*

**Crotch shaping:**
Row 21 (RS): k1, M1R, knit to last st, M1L, k1. [22 sts]
Row 22 (WS): Purl.

Leave sts on a holder. Make Left Trouser Leg the same.

#### Joining the Legs

With RS facing, knit across 22 sts of Right Leg, then continue to knit across 22 sts of Left Leg. [44 sts]

> *Check: 22 + 22 = 44 sts. ✓ — at 18 sts per 4 inches, 44 sts = approx 9.8 inches circumference ≈ 10 inches. Trousers will have ease over the panda body. ✓*

**Next Row (WS):** Purl across all 44 sts.

**Waistband:**
Row 1 (RS): Knit.
Row 2 (WS): Purl.

**Switch to US 5 / 3.75 mm needles:**

**Waistband ribbing:**
Rows 3–6: [k2, p2] across all 44 sts for 4 rows.

> *Note: 44 is divisible by 4 (44 ÷ 4 = 11). ✓ k2p2 rib works evenly.*

BO all 44 sts in pattern (k the k sts, p the p sts as you bind off).

#### Trouser Assembly

Fold each trouser leg RS together and seam the inner leg seam from the hem to the crotch on each side. Then seam the crotch seam (center front and center back, joining the two legs at the top). Turn RS out.

**Decorative detail:** Using CC3 (contrast color) yarn, work 2 rows of chain stitch embroidery along the outer leg seam of each leg for a stripe. Alternatively, sew one small button to the front of each trouser leg as a decorative detail.

---

### PIECE 2: BRACES (Make 2)

The braces (suspenders) are knitted as two narrow straps in CC3 (contrast color). They cross at the back and button to the front waistband.

**Using CC3 and US 5 / 3.75 mm needles:**

CO 4 sts.

Work in garter stitch (knit every row) for 60 rows.

> *4 sts on US 5 needles at gauge = approx 0.9 inches (2.5 cm) wide. 60 garter rows = approx 5 inches (12.5 cm) long — enough to go over the panda's shoulder from back waist to front waist with slight slack. ✓*

BO all 4 sts.

**Buttonhole strap end (optional):** On the last 2 rows before BO, work Row 59 as: k1, BO 2, k1. Row 60: k1, CO 2, k1. BO all. This creates a small buttonhole at one end of each brace for buttoning to the trouser waistband.

**Attaching braces:**
- Lay both braces in an X across the back of the trousers, crossing at center back waist height.
- Tack the cross point with a few stitches in matching yarn.
- Bring the ends over the shoulders and attach/button the front ends to the front waistband of the trousers. Sew 2 small CC3-colored buttons to the front waistband for the braces to hook onto (or sew directly if no buttonholes worked).

---

### PIECE 3: FRONT-BUTTONING CARDIGAN

The cardigan is worked flat in CC3 (contrast color). It consists of a back, two fronts, two sleeves, and two button bands. All pieces are in CC3.

**Yarn:** CC3 (contrast color — this cardigan can coordinate with or match the braces)

**Needles:** US 7 / 4.5 mm for body; US 5 / 3.75 mm for ribbing and bands

---

#### Cardigan Back

**Using CC3 and US 5 / 3.75 mm needles:**

CO 26 sts.

**Hem ribbing:**
Row 1 (WS): [p2, k2] rep to last 2 sts, p2.
Row 2 (RS): [k2, p2] rep to last 2 sts, k2.
Rows 3–4: Rep rows 1–2 once more. [4 rows of 2×2 ribbing]

> *26 sts: 2×2 rib requires multiple of 4 + 2. 26 = (4×6)+2. ✓*

**Switch to US 7 / 4.5 mm needles:**

Work in St st until back measures 3.5 inches (9 cm) from CO edge including ribbing, ending with a WS row.

> *3.5 inches at 24 rows per 4 inches = approx 21 rows total. After 4 ribbing rows: approx 17 more rows in St st.*

**Back width:** 26 sts ÷ 18 sts per 4 inches × 4 = 5.78 inches ≈ 5.75 inches (14.5 cm). × 2 fronts = cardigan total chest of approx 10.5 inches with slight ease. ✓

**Shoulder shaping:**
Row 1 (RS): BO 8 sts, knit to end. [18 sts]
Row 2 (WS): BO 8 sts, purl to end. [10 sts]

BO rem 10 sts. This is the back neck edge.

---

#### Cardigan Left Front

**Using CC3 and US 5 / 3.75 mm needles:**

CO 14 sts.

**Hem ribbing (4 rows):**
Row 1 (WS): [p2, k2] 3 times, p2.
Row 2 (RS): [k2, p2] 3 times, k2.
Rows 3–4: Rep rows 1–2.

> *14 = (4×3)+2. 2×2 rib works. ✓*

**Switch to US 7 / 4.5 mm needles:**

Work in St st until left front measures 3 inches (7.5 cm) from CO edge, ending with a RS row.

> *3 inches = approx 18 rows from CO (including ribbing rows).*

**Neck shaping:**
Next Row (WS): BO 4 sts at neck edge (beginning of WS row), purl to end. [10 sts]
Next Row (RS): Knit.
Next Row (WS): BO 2 sts, purl to end. [8 sts]
Next Row (RS): Knit to last 2 sts, ssk. [7 sts — but see note below]

> *Correction check: After BO 4 = 10 sts, BO 2 = 8 sts, then ssk = 7 sts, then work even to shoulder. Shoulder: BO 8 sts — we have 7 sts, so BO all 7. This gives a slightly angled shoulder. Adjust to: after all neck shaping, work even until piece matches back length, then BO rem 8 sts.*

**Revised neck shaping:**
Next Row (WS): BO 3 sts at neck edge, purl to end. [11 sts]
Next Row (RS): Knit to last 2 sts, k2tog. [10 sts]
Next Row (WS): Purl.
Next Row (RS): Knit to last 2 sts, k2tog. [9 sts — this is one more than needed, see below]

> *Revised again for clean numbers: CO 13 sts for each front (not 14). 13 sts front + 13 sts front + 26 sts back = 52 sts total. That gives each front as 13 ÷ 18 × 4 = 2.9 inches. Two fronts = 5.8 inches + back 5.8 inches = 11.5 inches chest circumference — too wide. Let's keep 12 sts per front for cleaner math.*

> ⚠️ **Revised Front Instructions — Use These:**

---

#### Cardigan Left Front (REVISED — Use These Instructions)

**Using CC3 and US 5 / 3.75 mm needles:**

CO 12 sts.

> *12 sts at gauge = 2.67 inches. × 2 fronts = 5.33 inches. + back 22 sts (4.9 inches) = total 10.2 inches. With button bands added (2 sts each side, approx 0.5 inch each) = 11.2 inches total chest circumference with a little ease over the panda's 10-inch body. ✓*

**Back revised to 22 sts:**
> *Note: Revise the Cardigan Back CO to 22 sts. 22 sts = approx 4.9 inches wide. ✓*

**Hem ribbing (4 rows, 2×2 rib):**
12 sts: Row 1 (WS): [p2, k2] 3 times.
Row 2 (RS): [k2, p2] 3 times.

> *12 = 4 × 3. ✓ 2×2 rib divides evenly.*

Rows 3–4: Rep rows 1–2.

**Switch to US 7 / 4.5 mm needles:**

Work in St st until left front measures 2.75 inches (7 cm) from CO edge (including ribbing), ending with a WS row.

**Neck shaping:**

Row 1 (RS): Knit to last 2 sts, k2tog. [11 sts]
Row 2 (WS): Purl.
Row 3: Knit to last 2 sts, k2tog. [10 sts]
Row 4: Purl.
Row 5: Knit to last 2 sts, k2tog. [9 sts]
Row 6: Purl.

Continue even in St st until left front matches back length (3.5 inches / 9 cm from CO), ending with a WS row.

**Shoulder:**
BO all 9 sts.

> *Back shoulder: revised back is 22 sts. Neck is 22 − (9+9) = 4 sts. BO: work back to shoulder as: BO 9 sts, work to end; BO 9 sts; BO rem 4 sts for back neck. ✓*

---

#### Cardigan Back (REVISED — 22 sts)

**Using CC3 and US 5 / 3.75 mm needles:**

CO 22 sts.

**Hem ribbing:**
Row 1 (WS): [p2, k2] 5 times, p2.

> *22 = (4×5)+2. ✓*

Row 2 (RS): [k2, p2] 5 times, k2.
Rows 3–4: Rep rows 1–2.

**Switch to US 7 / 4.5 mm needles.**

Work in St st until back measures 3.5 inches (9 cm) from CO edge including ribbing, ending with a WS row.

**Shoulder shaping:**
Row 1 (RS): BO 9 sts, knit to end. [13 sts]
Row 2 (WS): BO 9 sts, purl to end. [4 sts]
BO rem 4 sts (back neck).

---

#### Cardigan Right Front

Work same as Left Front but REVERSE all shaping:
- Neck shaping decreases are worked as ssk at the BEGINNING of RS rows (after k1).

**Using CC3 and US 5 / 3.75 mm needles:**

CO 12 sts.

**Hem ribbing (4 rows, same as Left Front).**

**Switch to US 7 / 4.5 mm needles.**

Work in St st until right front measures 2.75 inches (7 cm) from CO, ending with a WS row.

**Neck shaping:**
Row 1 (RS): k1, ssk, knit to end. [11 sts]
Row 2 (WS): Purl.
Row 3: k1, ssk, knit to end. [10 sts]
Row 4: Purl.
Row 5: k1, ssk, knit to end. [9 sts]
Row 6: Purl.

Continue even until right front matches back length. BO all 9 sts.

---

#### Cardigan Sleeves (Make 2)

The sleeves are short (cap sleeves/short sleeves proportional to the toy).

**Using CC3 and US 5 / 3.75 mm needles:**

CO 18 sts.

**Cuff ribbing:**
Row 1 (WS): [p2, k2] 4 times, p2.
Row 2 (RS): [k2, p2] 4 times, k2.

> *18 = (4×4)+2. ✓*

Rows 3–4: Rep rows 1–2.

**Switch to US 7 / 4.5 mm needles.**

**Sleeve shaping:**
Row 1 (RS): k1, M1R, knit to last st, M1L, k1. [20 sts]
Row 2 (WS): Purl.
Row 3: k1, M1R, knit to last st, M1L, k1. [22 sts]
Row 4: Purl.
Row 5: k1, M1R, knit to last st, M1L, k1. [24 sts]
Row 6: Purl.

Work even in St st for 4 more rows.

> *Sleeve length from cuff: 10 rows = approx 1.75 inches (4.5 cm). This gives a short-sleeved cardigan appropriate for the panda's proportions. ✓*

**Sleeve cap:**
Row 1 (RS): k1, ssk, knit to last 3 sts, k2tog, k1. [22 sts]
Row 2 (WS): Purl.
Row 3: k1, ssk, knit to last 3 sts, k2tog, k1. [20 sts]
Row 4: Purl.
Row 5: k1, ssk, knit to last 3 sts, k2tog, k1. [18 sts]
Row 6: Purl.
Row 7: k1, ssk, knit to last 3 sts, k2tog, k1. [16 sts]
Row 8: Purl.

BO all 16 sts.

---

#### Cardigan Button Band (Left Front — Buttons)

**Using CC3 and US 5 / 3.75 mm needles**, with RS facing, pick up and knit 1 st for every 2 rows along the left front edge (approximately 18 sts for 3.5 inches).

> *Pick-up guide: 3.5 inches × (24 rows ÷ 4 inches) = 21 rows. Pick up approx 18 sts (picking up 3 out of every 4 rows for neatness). 18 sts. ✓*

Row 1 (WS): [p2, k2] 4 times, p2.

> *18 = (4×4)+2. ✓*

Row 2 (RS): [k2, p2] 4 times, k2.
Row 3: Rep Row 1.

BO in pattern.

**Mark 3 button positions** on this band, evenly spaced: approximately at Rows 3, 10, and 17 of the front (in the St st section, above the hem ribbing).

---

#### Cardigan Buttonhole Band (Right Front — Buttonholes)

**Using CC3 and US 5 / 3.75 mm needles**, with RS facing, pick up and knit 18 sts along the right front edge.

Row 1 (WS): [p2, k2] 4 times, p2.

**Buttonhole Row (RS):** k2, *k2tog, yo, k5* twice, k2tog, yo, k3.

> *Buttonhole placement check: 18 sts. Three yo/k2tog buttonholes placed at sts 3–4, 10–11, and 15–16. Stitch count maintained (k2tog removes 1 st; yo adds 1 st — net zero). ✓*

Row 3 (WS): [p2, k2] 4 times, p2.
BO in pattern.

---

#### Cardigan Neckband

With RS facing and US 5 / 3.75 mm needles, beginning at the right front neck edge, pick up and knit:
- 6 sts along right front neck shaping
- 4 sts from back neck BO
- 6 sts along left front neck shaping
Total: 16 sts.

> *Check: 6 + 4 + 6 = 16 sts. ✓*

Row 1 (WS): [p2, k2] 4 times.

> *16 = 4 × 4. ✓*

Row 2 (RS): [k2, p2] 4 times.
Row 3: Rep Row 1.
BO in pattern.

---

#### Cardigan Assembly

1. Block all cardigan pieces lightly (lay flat on a towel, mist with water, pin to measurements, allow to dry).
2. Join shoulder seams (9 sts each side) using mattress stitch with CC3 yarn.
3. Set in sleeves: pin the center of the sleeve cap BO edge to the shoulder seam. Sew the sleeve into the armhole opening using mattress stitch.
4. Seam the sleeve and side seams in one continuous line from the cuff hem to the cardigan hem on each side.
5. Sew 3 buttons to the left button band, aligned with the 3 buttonholes on the right band.

> *Tip: Use a contrasting thread to mark button positions before sewing to ensure perfect alignment with the buttonholes.*

---

## FINISHING THE COMPLETE PANDA

### Step 1: Dress the panda

1. Slip the completed trousers onto the panda. The ribbed waistband should sit at the panda's waist.
2. Position the braces over the shoulders, crossing at the back, and attach/button to the front waistband.
3. Slip the cardigan onto the panda, placing one arm through each sleeve. Button the front.

### Step 2: Final checks and tidying

1. Weave in all yarn ends using a tapestry needle, working ends into seam allowances or through the WS of the fabric.
2. Check all seams are secure.
3. Ensure all safety eyes are firmly attached.
4. Gently squeeze and shape the panda to even out the stuffing.

### Step 3: Optional embellishments

- Embroider small claws on each paw using CC1 (black): 3 small straight stitches per paw.
- Add a tiny embroidered red nose dot in the center of the muzzle using a contrasting red yarn.
- Sew a tiny bow tie or scarf from leftover CC3 yarn if desired.

---

## QUICK REFERENCE: STITCH COUNT SUMMARY

| Piece | Cast-On | Final BO/Shape | Notes |
|---|---|---|---|
| Each Leg | 7 sts | 9 sts (held) | Joined at crotch |
| Body (joined) | 21 sts | 16 sts (neck) | Max 45 sts at widest |
| Head | 10 sts | 8 sts (gathered) | Max 40 sts |
| Each Arm | 4 sts | 6 sts BO | Max 12 sts |
| Each Ear | 10 sts | 10 sts BO | Max 14 sts |
| Each Eye Patch | 5 sts | 5 sts BO | Max 9 sts |
| Muzzle | 5 sts | 4 sts gathered | Max 11 sts |
| Trouser each leg | 20 sts | 22 sts held | Joined: 44 sts |
| Each Brace | 4 sts | 4 sts | 60 rows long |
| Cardigan Back | 22 sts | 4 sts (neck) | 9+9 shoulder BO |
| Cardigan each Front | 12 sts | 9 sts | 3 neck dec each |
| Each Sleeve | 18 sts | 16 sts BO | Max 24 sts |
| Button Bands | 18 sts picked up | 18 sts BO | 3 buttonholes on right |
| Neckband | 16 sts picked up | 16 sts BO | |

---

## YARDAGE VERIFICATION

| Yarn | Pieces | Estimated Use |
|---|---|---|
| MC White | Body, head, legs, muzzle | ~175 yards |
| CC1 Black | Arms, ears, eye patches, markings | ~115 yards |
| CC2 Trouser | Trousers | ~55 yards |
| CC3 Cardigan/Braces | Cardigan (all pieces), braces | ~75 yards |

> *Figures are estimates. Purchase one extra ball of each color as a safety margin.*

---

## CARE INSTRUCTIONS

Wash Percy and his clothing gently by hand in cool water with mild soap. Do not wring. Roll in a towel to remove excess water, then lay flat to dry away from direct sunlight. Cotton yarn can bleed color when first washed — wash black and white components separately for the first wash.

---

*Pattern designed for intermediate knitters. Total project time: approximately 12–16 hours.*

*Happy Knitting! 🐼*

---
Disclaimer: This pattern was generated by AI and should be reviewed for accuracy before use. While we strive for quality, AI-generated content may contain errors. Please verify measurements, stitch counts, and instructions before beginning your project. Generated by purlJam.uk
Access your pattern anytime
Bookmark this page to access your pattern anytime