Type
Knitting
Difficulty
beginner
Category
cardigan
AI Thinking Process
Planning
Verification
Pattern
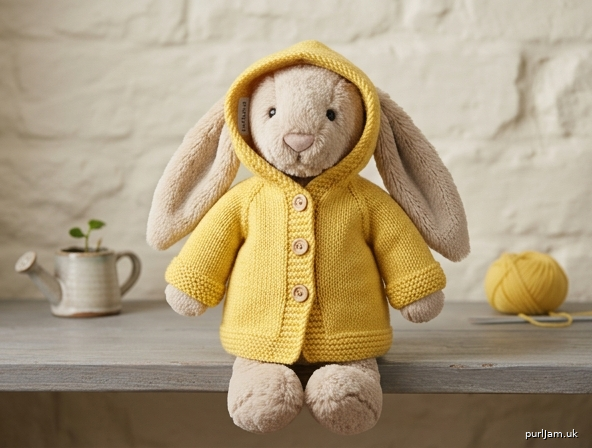
Puddle-Jumper Raincoat for a Jellycat Bunny
A sweet little hooded raincoat sized for a medium Jellycat Bashful Bunny (approximately 12" / 31 cm tall). Worked flat in easy stockinette with garter-stitch trim, an open buttoned front, set-in sleeves, and a cozy hood — everything a bunny needs for a rainy day. This is a great confident-beginner project.
MATERIALS
- Yarn: Worsted weight (Medium / #4), approximately 90–120 yards (82–110 m). (A toy garment uses far less than a human cardigan; one skein is plenty.) A smooth, brightly colored yellow or red yarn gives the classic raincoat look.
- Needles:
- US 7 / 4.5 mm straight or circular needles (main fabric)
- US 5 / 3.75 mm straight or circular needles (ribbing and trim)
- Notions:
- Tapestry needle
- 3 small buttons (approx. ½" / 12 mm)
- Stitch markers (2–3)
- Stitch holder or waste yarn
- Scissors
GAUGE
- 20 stitches and 26 rows = 4" (10 cm) in stockinette stitch on US 7 / 4.5 mm needles, after blocking.
- This equals 5 stitches per inch and 6.5 rows per inch.
- Gauge is not critical for a toy garment, but staying close keeps the fit correct.
SIZES
This pattern is written in one size to fit a medium Jellycat Bashful Bunny (approx. 12" / 31 cm tall).
Finished measurements:
- Chest (buttoned): approximately 13" (33 cm)
- Length (hem to shoulder): approximately 5" (12.5 cm)
- Sleeve length: approximately 3" (7.5 cm)
To fit a larger or smaller bunny, add or subtract stitches in multiples of 5 (= 1"). All shaping instructions remain the same.
ABBREVIATIONS
- k – knit
- p – purl
- st(s) – stitch(es)
- RS – right side
- WS – wrong side
- k2tog – knit 2 stitches together (right-leaning decrease)
- ssk – slip, slip, knit (left-leaning decrease)
- BO – bind off
- CO – cast on
- St st – stockinette stitch (knit RS rows, purl WS rows)
- beg – beginning
- rem – remaining
- rep – repeat
- pm – place marker
NOTES
- The raincoat is worked flat in five pieces (Back, two Fronts, two Sleeves), then seamed. The Hood is picked up around the neckline and worked upward, and the button bands are worked last.
- All pieces begin with a few rows of garter stitch (knit every row) at the hem for a clean, non-curling edge.
- Slip the first stitch of every row purlwise if you'd like tidier seams (optional).
- Because this is a toy garment, the pieces are small — read one full section before starting.
- Yellow or red yarn is traditional for a raincoat, but any color works!
BACK
With US 5 / 3.75 mm needles, CO 32 sts.
- Rows 1–4: Knit every row (garter hem).
Change to US 7 / 4.5 mm needles and work in St st:
- Row 5 (RS): Knit.
- Row 6 (WS): Purl.
Continue in St st until piece measures 3" (7.5 cm) from cast-on, ending after a WS row.
Armhole shaping
- Next 2 rows: BO 3 sts at beg of each row. (32 − 6 = 26 sts ✓)
- Next RS row: k1, ssk, knit to last 3 sts, k2tog, k1. (26 − 2 = 24 sts)
- Purl 1 WS row.
- Next RS row: k1, ssk, knit to last 3 sts, k2tog, k1. (24 − 2 = 22 sts ✓)
Work even in St st until armhole measures 2" (5 cm), ending after a WS row.
Shoulders and back neck
- BO 7 sts at beg of next 2 rows for shoulders. (22 − 14 = 8 sts)
- BO rem 8 sts for back neck. (8 − 8 = 0 ✓)
FRONTS
(Make 2: one Left Front and one Right Front. Work them identically, then reverse the neck-shaping edge as noted — mirror the shaping so necklines face each other.)
With US 5 / 3.75 mm needles, CO 18 sts.
- Rows 1–4: Knit every row (garter hem).
Change to US 7 / 4.5 mm needles:
- Row 5 (RS): Knit.
- Row 6 (WS): Purl.
- Keep the 2 sts at the front (center) edge in garter stitch (knit every row) throughout to form a stable button-band foundation.
Continue until piece measures 3" (7.5 cm) from cast-on, ending after a WS row.
Armhole shaping
(Shape the armhole edge only — this is the side seam edge, opposite the front/center edge.)
- At the armhole edge, BO 3 sts once. (18 − 3 = 15 sts ✓)
- On the next RS row (armhole edge): decrease 1 st (use ssk or k2tog as appropriate to the edge). (15 − 1 = 14 sts)
- Work 1 WS row.
- Decrease 1 st at armhole edge once more. (14 − 1 = 13 sts ✓)
Work even until armhole measures 1" (2.5 cm), ending ready to shape the neck at the front/center edge.
Neck shaping
(Shape the front/center edge.)
- BO 4 sts at the front/center edge once. (13 − 4 = 9 sts)
- Decrease 1 st at the neck edge on the next RS row. (9 − 1 = 8 sts)
- Work 1 WS row.
- Decrease 1 st at the neck edge once more. (8 − 1 = 7 sts ✓)
Work even until armhole matches the Back (2" / 5 cm total), ending at the armhole edge.
Shoulder
- BO rem 7 sts. (7 − 7 = 0 ✓)
Check: 2 Fronts × 7 shoulder sts = 14 sts, matching Back shoulders (7 + 7 = 14) ✓.
SLEEVES
(Make 2.)
With US 5 / 3.75 mm needles, CO 22 sts.
- Rows 1–4: Knit every row (garter cuff).
Change to US 7 / 4.5 mm needles and work in St st until sleeve measures 3" (7.5 cm) from cast-on, ending after a WS row.
Sleeve cap shaping
- Next 2 rows: BO 3 sts at beg of each row. (22 − 6 = 16 sts ✓)
- RS row: k1, ssk, knit to last 3 sts, k2tog, k1. (16 − 2 = 14 sts)
- Purl 1 WS row.
- RS row: k1, ssk, knit to last 3 sts, k2tog, k1. (14 − 2 = 12 sts)
- Purl 1 WS row.
- RS row: k1, ssk, knit to last 3 sts, k2tog, k1. (12 − 2 = 10 sts ✓)
- BO rem 10 sts.
HOOD
(A raincoat needs a hood! This is picked up after the shoulders are seamed — see Finishing Step 1 first, then return here.)
With shoulders seamed and RS facing, using US 7 / 4.5 mm needles, pick up and knit stitches around the neckline as follows:
-
7 sts across right front neck, 18 sts across back neck, 7 sts across left front neck = 32 sts total (7 + 18 + 7 = 32 ✓).
-
Row 1 (WS): Purl.
-
Row 2 (RS): Knit.
Work in St st until hood measures 4" (10 cm) from pick-up row, ending after a WS row.
Shape top of hood
- RS row: k15, k2tog, ssk, k13. (32 − 2 = 30 sts)
- Purl 1 WS row.
- RS row: k14, k2tog, ssk, k12. (30 − 2 = 28 sts)
- Purl 1 WS row.
- RS row: k13, k2tog, ssk, k11. (28 − 2 = 26 sts ✓)
Divide remaining 26 sts onto two needles (13 sts each) and join the top of the hood using three-needle bind-off, or BO all sts and seam the top with mattress stitch.
BUTTON BANDS
(The 2 garter sts kept at each front edge already form a neat foundation. Add a simple pick-up band for buttons and buttonholes.)
Button band (left front, for girl-style; place on either side you prefer)
With US 5 / 3.75 mm needles and RS facing, pick up and knit 1 st for every row along the front edge from hem to top of neck — approximately 24 sts for the ~5" edge (5" × ~5 rows/in edge ≈ 24 sts).
- Knit 3 rows (garter).
- BO all sts.
Buttonhole band (right front)
Work as for the button band, picking up 24 sts.
- Row 1: Knit.
- Row 2 (buttonhole row): k3, [yo, k2tog, k7] twice, yo, k2tog, k1. (3 buttonholes, evenly spaced — 3 + 9 + 9 + 3 = 24 ✓)
- Row 3: Knit, working each yo as a stitch.
- BO all sts.
Sew 3 buttons on the button band opposite the buttonholes.
FINISHING
- Seam shoulders: With RS together, seam the 7-st shoulders of each Front to the Back (7 sts each side). (Do this before knitting the Hood.)
- Knit the Hood (see HOOD section) now that the shoulders are joined.
- Set in sleeves: Center each sleeve cap in its armhole, easing gently, and seam in place.
- Side and sleeve seams: Seam each side of the body and the underside of each sleeve in one continuous line using mattress stitch.
- Button bands: Work the button and buttonhole bands (see BUTTON BANDS section) along the front edges.
- Attach buttons opposite the buttonholes.
- Weave in all ends with the tapestry needle.
- Block gently: Lightly steam or wet-block and let dry flat to smooth the stockinette and set the shape.
Your Jellycat bunny is now ready for any rainy-day adventure! 🐰☔
Final consistency check
- Back: CO 32 → armhole 22 → shoulders 7 + 7 + back neck 8 = 22 ✓
- Each Front: CO 18 → armhole 13 → neck 7 shoulder ✓
- Fronts shoulders (7 + 7 = 14) = Back shoulders (7 + 7 = 14) ✓
- Sleeve: CO 22 → cap BO to 10 ✓
- Hood pick-up: 7 + 18 + 7 = 32 ✓
- Chest: Back 6.4" + Fronts (32 effective sts ÷ 5 = 6.4") ≈ 12.8" (≈13") ✓
Disclaimer: This pattern was generated by AI and should be reviewed for accuracy before use. While we strive for quality, AI-generated content may contain errors. Please verify measurements, stitch counts, and instructions before beginning your project. Generated by purlJam.uk
Love this pattern?
Save this pattern to your free PurlJam libraryAccess your pattern anytime
Bookmark this page to access your pattern anytime