Type
Machine Knitting
Difficulty
intermediate
Category
custom
AI Thinking Process
Planning
Verification
Pattern
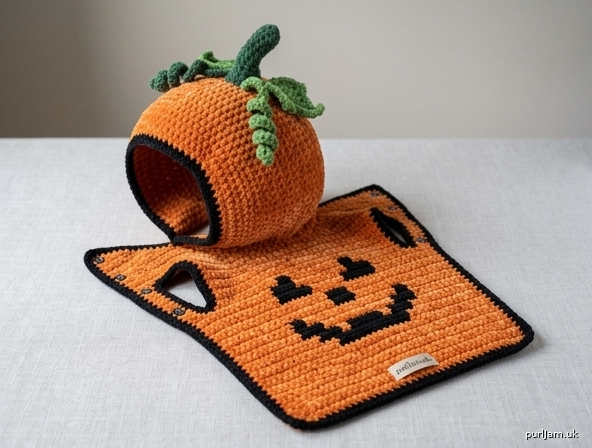
Pumpkin Hood & Belly-Wrap Dog Costume
Hand-crochet pattern — US terms
Two-piece Halloween costume: a snug pumpkin hood with a 3-D stem and curled leaves, joined to an open-belly body wrap with an intarsia jack-o’-lantern on the back. Not a pullover.
Skill: Confident beginner. Intarsia (Section 5) is the one intermediate step; a sewn-on crochet-appliqué option is given there.
Materials
Yarn: #4 worsted / Aran velvet or chenille acrylic (plush pile, teddy hand-feel). Smooth cotton or standard acrylic will not match gauge or drape.
| Color | Use | XS | S | M | L |
|---|---|---|---|---|---|
| MC Pumpkin orange | Hood + body | 160 yd / 146 m (150 g) | 220 yd / 201 m (200 g) | 310 yd / 283 m (280 g) | 420 yd / 384 m (380 g) |
| CC1 Black | All trims + face | 40 yd / 37 m | 50 yd / 46 m | 65 yd / 59 m | 80 yd / 73 m |
| CC2 Dark green | Stem | 10 yd / 9 m | 10 yd / 9 m | 15 yd / 14 m | 15 yd / 14 m |
| CC3 Medium green | Leaves + vine | 15 yd / 14 m | 15 yd / 14 m | 20 yd / 18 m | 20 yd / 18 m |
Yardages are for the listed gauge; velvet varies by brand — buy an extra ball of MC.
Hook: 5.5 mm (US I-9), or 5.0 mm (US H-8) if your swatch is looser than gauge. Size up, not down: this fabric must stay soft.
Notions: 4 stitch markers; yarn needle; small amount of polyester fiberfill; 3 heavy-duty metal sew-on snap sets, ½–⅝" (12–15 mm); sharp sewing needle; doubled sewing thread to match CC1; pencil or ⅜" (10 mm) dowel; scissors.
Gauge
12 sc × 14 rows = 4" (10 cm) in sc with plush worsted on 5.5 mm hook, unstretched, pile lightly patted down (do not crush).
If you have more than 12 sc in 4" (10 cm), go up a hook size. If you have fewer, go down one size only; a stiff fabric will not sit well on a dog.
Sizes
Instructions are written XS (S, M, L). Choose by the dog’s actual neck, chest, and nape-to-tail, not by breed.
| Neck | Chest | Back length | |
|---|---|---|---|
| XS | 10–11" (25–28 cm) | 13–15" (33–38 cm) | 8" (20 cm) |
| S | 11–13" (28–33 cm) | 15–17¾" (38–45 cm) | 10" (25 cm) |
| M | 13–15" (33–38 cm) | 17¾–21¾" (45–55 cm) | 12" (30 cm) |
| L | 15–17¾" (38–45 cm) | 21¾–25½" (55–65 cm) | 14¼" (36 cm) |
Finished body wrap (unstretched): chest width 14 (16¾, 20, 24)" / 35.5 (42.5, 50.5, 61) cm; back length 8 (10, 12, 14¼)" / 20 (25, 30, 36) cm.
Abbreviations (US)
| BLO | back loop only |
| ch | chain |
| CC1 / CC2 / CC3 | contrast colors (black / dark green / medium green) |
| dec / sc2tog | single crochet 2 together |
| FO | fasten off |
| hdc | half double crochet |
| inc | 2 sc in the same stitch |
| MC | main color (pumpkin orange) |
| MR | magic ring |
| pm | place marker |
| rnd / rnds | round / rounds |
| RS / WS | right side / wrong side |
| sc | single crochet |
| sl st | slip stitch |
| st(s) | stitch(es) |
Pattern Notes
- 100% hand crochet with a hook. No knitting needles, looms, or machines.
- Hood is worked in continuous spirals. Do not join, do not turn, unless a row is specified. Move the start-of-rnd marker up every rnd.
- Body is worked flat in turned rows of sc. Ch 1 at the start of every row does not count as a stitch.
- Velvet hides stitch Vs. Count at the end of every rnd/row. Use markers on every increase and at each color change.
- Do not iron chenille. If blocking is needed, hover a steam iron 2–3" (5–8 cm) above the WS; never rest the iron on the pile.
- Pet safety: Supervise wear. The face U must leave eyes, muzzle, and ears free. Snaps sit on the underside only. Sew the stem through both layers so it cannot be pulled off and swallowed. Remove the costume before crating.
Section 1 — Hood (Pumpkin Cap)
MC. Continuous rnds from the crown, then turned rows to open the face.
Crown (all sizes start together)
Rnd 1: 6 sc in MR. Pm in first st. (6) Rnd 2: inc in each st. (6 inc → 6 + 6 = 12 ✓) Rnd 3: *sc 1, inc; rep from * around. (18) Rnd 4: *sc 2, inc; rep from * around. (24) Rnd 5: *sc 3, inc; rep from * around. (30) Rnd 6: *sc 4, inc; rep from * around. (36)
XS only: stop increasing. Skip to Even Rnds with 36 sts. S, M, L: Rnd 7: *sc 5, inc; rep from * around. (42)
S only: stop increasing. Skip to Even Rnds with 42 sts. M, L: Rnd 8: *sc 6, inc; rep from * around. (48)
M only: stop increasing. Skip to Even Rnds with 48 sts. L only: Rnd 9: *sc 7, inc; rep from * around. (54)
Crown circumference: 36 (42, 48, 54) sc = 12 (14, 16, 18)" / 30 (35, 40, 45) cm. That is a snug dome, not a floppy cap.
Even rnds (upper skull)
Work 3 (4, 5, 6) rnds even in sc on 36 (42, 48, 54) sts.
Face opening (turned rows)
The opening is a wide U so ears, eyes, and muzzle stay clear. It is not a 1-stitch slit.
On the last even rnd, pm on each side of a block of 16 (18, 20, 22) consecutive sts — these are the forehead and stay unworked.
Row 1 (RS): Starting at the left marker, sc2tog, sc in each st to 2 sts before the right marker, sc2tog; turn, leaving the 16 (18, 20, 22) marked sts unworked. 20 (24, 28, 32) − 2 = 18 (22, 26, 30) sts.
Rows 2–6 (8, 10, 12): Ch 1, sc in each st across, turn. 18 (22, 26, 30) sts.
FO MC, leaving a 12" (30 cm) tail for the nape seam.
Lower edge of the hood (nape join) = 18 (22, 26, 30) sc = 6 (7¼, 8¾, 10)" / 15 (18.5, 22, 25) cm. This sews to the center of the body neckline only.
Face-opening trim (CC1)
Join CC1 with sl st at one nape corner of the U.
Work 1 rnd of sc evenly around the entire face opening: 1 sc in each of the 16 (18, 20, 22) unworked forehead sts, 1 sc in each row-end down one side 6 (8, 10, 12), 1 sc in each row-end up the other side 6 (8, 10, 12), plus 2 extra sc at each of the two top corners so the trim does not cup.
Approx. trim count: 32 (38, 46, 54) sc. (16+6+6+4 extras = 32 ✓; 18+8+8+4 = 38 ✓; 20+10+10+6 = 46 ✓; 22+12+12+8 = 54 ✓)
Join with sl st to first sc. FO. Weave in.
Do not trim the nape edge in black; that edge is seamed to the body in MC.
Section 2 — Stem (3-D, top of hood)
CC2. Continuous rnds. Stuff lightly after Rnd 4 so the stem stands up. Twist comes from BLO, not from extra shaping.
XS and S (6 rnds; base 6 sc, tip 4 sc)
Rnd 1: 6 sc in MR. (6) Rnds 2–4: sc BLO in each st. (6) Rnd 5: sc2tog, sc 4. (5) Rnd 6: sc2tog, sc 3. (4) FO, leaving a 10" (25 cm) tail. Close the tip with the tail, then thread the tail to the base for sewing.
M and L (8 rnds; base 8 sc, tip 4 sc)
Rnd 1: 8 sc in MR. (8) Rnds 2–4: sc BLO in each st. (8) Rnd 5: *sc2tog, sc 2; rep from * once. (6) Rnd 6: sc BLO in each st. (6) Rnd 7: *sc2tog, sc 1; rep from * once. (4) Rnd 8: sc BLO in each st. (4) FO as above.
Base of the stem is slightly flattened when sewn so it sits on the crown, not on a point.
Section 3 — Curled Leaves & Vine
Worked flat in rows, CC3. Make 3 leaves (2 if you prefer a cleaner crown). Do not aim for a mirrored botanical leaf.
Leaf A (make 1)
Ch 9. Row 1: Working in the back bumps of the chain: sl st in 2nd ch from hook, sc, hdc, dc, hdc, sc, hdc, sc. FO, 8" (20 cm) tail. (8 sts on 8 bumps ✓)
Leaf B (make 1)
Ch 7. Row 1: Back bumps: sc in 2nd ch, sc, hdc, dc, hdc, sl st. FO, 8" (20 cm) tail. (6 sts ✓)
Leaf C (make 1)
Ch 11. Row 1: Back bumps: sl st in 2nd ch, sc, sc, hdc, dc, dc, hdc, sc, hdc, sl st. FO, 8" (20 cm) tail. (10 sts ✓)
Curl method (BLO / back-bump cup — use this, not a second pass of sc)
- The back-bump pass already cups the long edge.
- Wrap that long edge around a pencil, RS out, for 3–4 turns.
- Hold for 30 seconds. If the acrylic has memory, hover-steam the coil 2–3" (5–8 cm) away for 5 seconds; let it cool on the pencil.
- Tack the coil with 2–3 tiny stitches in CC3 at the stem end only, so the tip can spring.
Do not overwork the other edge into a perfect leaf outline.
Vine tendril (optional)
Ch 12. Sl st in 2nd ch from hook and in each ch to the end. FO, 8" (20 cm) tail. Coil around the pencil, hover-steam as above, tack at one end.
Attachment (do this after the stem is built, before the stem is sewn to the hood)
With matching tails, tack all leaf bases and the vine end to the base ring of the stem, stacked asymmetrically (two leaves to one side, one leaf + vine to the other). Stitch through the stem wall, not just through stuffing.
Section 4 — Body / Shirt Panel
Construction (used for the whole pattern): one panel worked flat in turned sc rows, neckline toward hem. The two long selvedges are the center-belly opening; they meet under the dog and are not seamed shut. No separate belly panel, no center-back seam (a back seam would cut the jack-o’-lantern in half).
MC.
Neckline
Ch 33 (39, 45, 53). Row 1 (RS): Sc in 2nd ch from hook and in each ch. 32 (38, 44, 52) sc. Row 2: Ch 1, turn, sc in each st. 32 (38, 44, 52)
Neckline width = 10¾ (12¾, 14¾, 17¼)" / 26.5 (31.5, 36.5, 43.5) cm, matching mid-range neck. The hood nape sews to the center 18 (22, 26, 30) of these sts; the leftover 7 (8, 9, 11) sts on each side are throat tabs and stay free until they are bound with black trim.
Increase to chest
Inc 1 st at each end of every row (work 2 sc in the first st and 2 sc in the last st):
Rows 3–7 (3–8, 3–10, 3–12): Ch 1, turn, inc, sc to last st, inc.
Stitch counts after these rows:
- XS: 5 inc-rows × 2 sts = +10 → 32 + 10 = 42 ✓
- S: 6 × 2 = +12 → 38 + 12 = 50 ✓
- M: 8 × 2 = +16 → 44 + 16 = 60 ✓
- L: 10 × 2 = +20 → 52 + 20 = 72 ✓
Next row: Ch 1, turn, sc even on 42 (50, 60, 72).
Chest width = 14 (16¾, 20, 24)" / 35.5 (42.5, 50.5, 61) cm.
Front-leg openings
Divide the 42 (50, 60, 72) sts as:
| Left belly | Left hole | Back (face panel) | Right hole | Right belly | Total | |
|---|---|---|---|---|---|---|
| XS | 5 | 8 | 16 | 8 | 5 | 42 ✓ |
| S | 6 | 9 | 20 | 9 | 6 | 50 ✓ |
| M | 7 | 11 | 24 | 11 | 7 | 60 ✓ |
| L | 8 | 13 | 30 | 13 | 8 | 72 ✓ |
Left belly flap: With RS facing, sc across the 5 (6, 7, 8) left-belly sts only. Work 7 (9, 11, 13) more rows even on these sts (8 (10, 12, 14) rows total for the hole depth). FO.
Back panel: Skip the next 8 (9, 11, 13) sts (top of left leg hole). Join MC in the next st. Sc across 16 (20, 24, 30) back sts. Work 7 (9, 11, 13) more rows even. FO.
Right belly flap: Skip the next 8 (9, 11, 13) sts (top of right leg hole). Join MC in the next st. Sc across remaining 5 (6, 7, 8) sts. Work 7 (9, 11, 13) more rows even. FO.
Hole depth = 8 (10, 12, 14) rows = 2¼ (2¾, 3½, 4)" / 5.5 (7, 8.5, 10) cm.
Rejoin row: RS facing, join MC at the start of the left belly flap. Sc across 5 (6, 7, 8) belly sts, ch 8 (9, 11, 13) over the left gap, sc across 16 (20, 24, 30) back sts, ch 8 (9, 11, 13) over the right gap, sc across 5 (6, 7, 8) belly sts. 42 (50, 60, 72) sts including chains.
Next row: Ch 1, turn, sc in each sc and in each ch. 42 (50, 60, 72)
Back length to hem
Work even in sc on 42 (50, 60, 72) sts until the panel measures 8 (10, 12, 14¼)" / 20 (25, 30, 36) cm from the neckline edge, ending with a WS row so the next RS row is available for the last inches of the face motif if needed.
Row budget (already used, for checking, not extra work): neck 2 + inc 5 (6, 8, 10) + 1 even + leg 8 (10, 12, 14) + rejoin 2 = 18 (21, 25, 29) rows. Remaining even rows: 10 (14, 17, 21) → 18+10=28, 21+14=35, 25+17=42, 29+21=50 ✓ at 14 rows/4".
FO MC after the intarsia in Section 5 is complete.
Leg-opening trim (CC1)
Join CC1 at the underarm of one hole. Work 1 rnd of sc evenly around the hole (1 sc per row-end on each vertical, 1 sc in each leftover st at the top, 1 sc in each ch at the bottom). Join, FO. Repeat for the second hole.
Approx. per hole: 28 (34, 42, 50) sc.
Do not leave raw row-ends.
Section 5 — Jack-o’-Lantern Face (intarsia)
Worked in the fabric, block by block, in CC1 on MC. Not duplicate stitch, not embroidery.
Skill note (the advanced step): Intarsia in rows. Wind 4 small bobbins of CC1 (left eye, right eye, nose, mouth) plus the MC ball. At every color change, drop the old yarn, pick up the new, and twist the two yarns once on the WS so a hole does not form. Do not carry CC1 behind long stretches of MC; that puckers velvet. Carry MC only across 1–2 sts if needed, and keep the float loose.
Beginner option: Crochet the four black shapes separately with the same stitch counts below and whip-stitch them on. Do not use felt (chew hazard) and do not use duplicate stitch.
Placement: RS of the body, centered on the 16 (20, 24, 30) back sts. Begin on the 3rd (3rd, 4th, 5th) row after the rejoin row so the face sits on the ribcage, not in the armpits. All stitches outside the motif stay MC.
Read every motif row from the same direction you are crocheting (RS rows right-to-left across the dog’s back if you work right-handed, etc.). Center each shape on the back-st block.
Eyes (two triangles, points toward the hem)
Leave 3 (4, 5, 7) back-section sts in MC before the left eye, and the same after the right eye. Leave 2 (3, 4, 5) MC sts between the two eye bases.
Work both eyes on the same rows.
XS — each eye, 3 rows: 3 CC1, then 2 CC1 centered, then 1 CC1 centered. S — each eye, 4 rows: 4 / 3 / 2 / 1 CC1, each row centered on the row above. M — each eye, 5 rows: 5 / 4 / 3 / 2 / 1 CC1, centered. L — each eye, 6 rows: 6 / 5 / 4 / 3 / 2 / 1 CC1, centered.
Spacer
Work 1 (1, 2, 2) full MC row(s) across the whole panel.
Nose (one triangle, centered, point toward the hem)
XS: 2 CC1, then 1 CC1 centered. (2 rows) S: 3 / 2 / 1 CC1. (3 rows) M: 4 / 3 / 2 / 1 CC1. (4 rows) L: 5 / 4 / 3 / 2 / 1 CC1. (5 rows)
Spacer
Work 1 (1, 1, 2) full MC row(s).
Mouth (jagged, centered on the back-st block)
Width 10 (12, 16, 20) sts.
XS (3 rows, 10 sts):
- Row A: 10 CC1.
- Row B: 2 CC1, 1 MC, 2 CC1, 1 MC, 2 CC1, 1 MC, 1 CC1.
- Row C: 1 MC, 2 CC1, 1 MC, 3 CC1, 1 MC, 2 CC1, 1 MC.
S (3 rows, 12 sts):
- Row A: 12 CC1.
- Row B: 2 CC1, 1 MC, 3 CC1, 1 MC, 3 CC1, 1 MC, 1 CC1.
- Row C: 1 MC, 3 CC1, 1 MC, 2 CC1, 1 MC, 3 CC1, 1 MC.
M (4 rows, 16 sts):
- Row A: 16 CC1.
- Row B: 3 CC1, 1 MC, 3 CC1, 1 MC, 4 CC1, 1 MC, 3 CC1.
- Row C: 1 MC, 3 CC1, 1 MC, 2 CC1, 1 MC, 3 CC1, 1 MC, 3 CC1, 1 MC.
- Row D: 2 CC1, 1 MC, 4 CC1, 1 MC, 4 CC1, 1 MC, 3 CC1.
L (4 rows, 20 sts):
- Row A: 20 CC1.
- Row B: 4 CC1, 1 MC, 4 CC1, 1 MC, 5 CC1, 1 MC, 4 CC1.
- Row C: 1 MC, 4 CC1, 1 MC, 3 CC1, 1 MC, 4 CC1, 1 MC, 4 CC1, 1 MC.
- Row D: 3 CC1, 1 MC, 5 CC1, 1 MC, 5 CC1, 1 MC, 4 CC1.
After the mouth, finish any remaining MC rows to the hem length in Section 4, then FO MC.
Section 6 — Trim Consistency
CC1 black sc appears at every opening. Work each trim as 1 row/rnd of sc, even, without skipping or crowding.
| Location | When | How | Approx. count |
|---|---|---|---|
| 1. Hood face opening | After hood is complete | 1 rnd sc around the U | 32 (38, 46, 54) |
| 2. Left leg opening | After body panel is complete | 1 rnd sc around the hole | 28 (34, 42, 50) |
| 3. Right leg opening | After body panel is complete | 1 rnd sc around the hole | 28 (34, 42, 50) |
| 4. Hem | With item 5, as one U | 1 row sc across 42 (50, 60, 72) hem sts | 42 (50, 60, 72) |
| 5. Center-belly opening, both long edges | With item 4, as one U | 1 sc in each row-end of each selvedge, plus the free throat-tab sts at the neckline | 28 (35, 42, 50) sc per long edge, plus 7 (8, 9, 11) throat sts each side |
Belly + hem U (work as one pass): Join CC1 at the left throat corner of the neckline. Sc across the 7 (8, 9, 11) free left throat sts, sc down the left belly row-ends to the hem, 3 sc in the corner, sc across the hem, 3 sc in the corner, sc up the right belly row-ends, sc across the 7 (8, 9, 11) free right throat sts. FO. The center nape (where the hood will sit) stays un-trimmed in black.
Section 7 — Closure / Snap Placement
Full center-belly opening from chest to hem. Not a pullover.
Hardware: Heavy-duty metal sew-on snap sets (two discs per set). Do not use sew-through buttons — they snag fur and sit proud.
Placement: 3 sets, on the CC1 trim line, underside of the dog.
| Size | Opening length | Snap 1 (near chest) | Snap 2 (center) | Snap 3 (near hem) |
|---|---|---|---|---|
| XS | 8" (20 cm) | 1¼" (3 cm) from neck | 4" (10 cm) | 6¾" (17 cm) |
| S | 10" (25 cm) | 1½" (4 cm) | 5" (12.5 cm) | 8¼" (21 cm) |
| M | 12" (30 cm) | 2" (5 cm) | 6" (15 cm) | 10" (25 cm) |
| L | 14¼" (36 cm) | 2¼" (6 cm) | 7" (18 cm) | 11¾" (30 cm) |
Socket on one belly edge, stud on the other, aligned so the wrap lies flat. Function: the closure is fully hidden under the ribcage, the jack-o’-lantern on the back stays unbroken, and the snaps sit clear of the leg openings.
Sewing: With doubled sewing thread (or a split ply of CC1), stitch each disc through both the black trim and the MC fabric behind it. 8–10 stitches around each disc. Fasten off on the WS. Snap and unsnap 5 times before you call it done; restitch if a disc tilts.
Section 8 — Assembly Order
| Step | Piece | Attached to | Join method | Notes |
|---|---|---|---|---|
| 1 | Hood | — | Crochet | Crown rnds, even rnds, face rows, CC1 face trim |
| 2 | Stem | — | Crochet | Stuff lightly before closing the base |
| 3 | Leaves + vine | — | Crochet | Back-bump row, curl on pencil |
| 4 | Leaves + vine | Stem base | Tack with CC3 tails | Asymmetric cluster |
| 5 | Stem + leaves | Hood crown center | Whipstitch with CC2 tail | Flatten the base; sew through hood fabric, not just the MR hole |
| 6 | Body panel | — | Crochet | Neck, increases, leg split, intarsia, even to hem |
| 7 | Trims | All raw edges | CC1 sc | Legs, then belly+hem U (Section 6 table) |
| 8 | Hood | Body neckline | MC sc seam or whipstitch, WS together | Center the 18 (22, 26, 30) nape sts on the 32 (38, 44, 52) neckline; throat tabs stay free |
| 9 | Snaps | Belly trim | Hand-sew | 3 metal sets, underside only |
| 10 | Finish | Whole garment | Weave in; hover-steam WS only if needed | Do not crush the pile |
Hood-to-body seam: Pin the hood nape to the center back of the body neckline, RS of hood to RS of body if you prefer a visible ridge, or WS together for a flat join. Work 1 row of sc through both layers in MC, 18 (22, 26, 30) sts. FO. The face U points forward (toward the dog’s muzzle); the stem points up.
Section 9 — Size Scaling
| To change size by | Hook | Extra rnds/rows | Where to add length |
|---|---|---|---|
| Between listed sizes (small step) | Keep 5.5 mm | Hood: ±1 even rnd before the face split. Body: ±3–4 rows after the leg rejoin, before the hem | Body back, after the face motif |
| One full size up without rewriting | Stay on 5.5 mm and work the next size’s counts | Do not mix a larger hood with a smaller body — chest and nape will not match | Recast the whole piece in the next size |
| Longer back only (long dogs) | No hook change | Body only: add 4 rows (≈1⅛" / 3 cm) after the mouth, before hem trim | Never add those rows at the neck; leg holes will shift |
| Deeper hood only | No hook change | +2 even rnds on the crown before the face split | Upper skull, not the nape rows |
| Wider face U (very large ears) | No hook change | Leave 2 extra sts unworked at the forehead; work 2 fewer sts on Row 1 of the hood | Face opening only; re-count the nape before seaming |
| Tighter fabric / smaller dog than XS | 5.0 mm, same XS counts | None | Recheck gauge; finished chest will drop about ½–1" (1–2.5 cm) |
| Looser / drapier | 6.0 mm, same counts | None | Recheck that the hood is still snug; velvet grows when worn |
Finishing
- Weave in every tail on the WS. On velvet, take 4–5 short stitches in different directions; long weaves show as tracks in the pile.
- Confirm the stem is sewn through the hood fabric and cannot be twisted off.
- Hover-steam the body panel WS only if the intarsia puckers. Keep the iron off the pile.
- Fit on the dog: face U clears eyes, muzzle, and ears; snaps lie under the belly; front legs pass freely through the bound holes; the jack-o’-lantern sits on the back, unbroken.
- Supervise wear. Remove before the dog is left alone.
End of pattern.
Disclaimer: This pattern was generated by AI and should be reviewed for accuracy before use. While we strive for quality, AI-generated content may contain errors. Please verify measurements, stitch counts, charts, and instructions before beginning your project. Generated by purlJam.uk
Love this pattern?
Save this pattern to your free PurlJam libraryAccess your pattern anytime
Bookmark this page to access your pattern anytime