Type
Knitting
Difficulty
intermediate
Category
custom
AI Thinking Process
Planning
Verification
Pattern
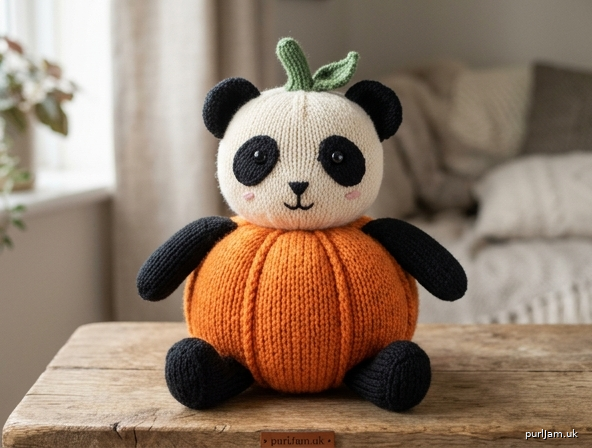
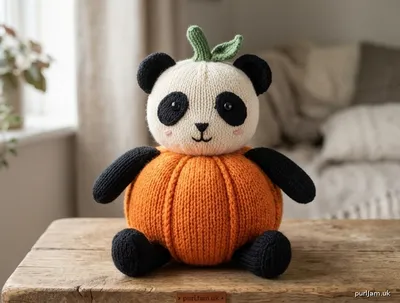
Pumpkin Panda
A Cute Stuffed Toy Knitting Pattern (Beginner)
A huggable little panda whose round body is a cheerful autumn pumpkin. Perfect for fall decorating or gifting. Worked mostly in the round in simple stockinette with basic increases and decreases.
Finished Size
Approximately 7–8 inches (18–20 cm) tall after stuffing.
Difficulty
Beginner – knit/purl, knit front & back (kfb), k2tog, simple seaming, basic embroidery.
Materials
Yarn (Worsted weight / category 4; approx. yardage)
- MC (Pumpkin Orange): 60 yd (55 m)
- CC1 (Panda White/Cream): 40 yd (37 m)
- CC2 (Panda Black or Dark Gray): 30 yd (27 m)
- CC3 (Stem Green): 10 yd (9 m)
- Tiny scrap of pink (optional cheek embroidery)
Needles
- US 6 (4 mm) double-pointed needles (DPNs), or long circular for magic loop
- (Optional) US 5 (3.75 mm) for denser fabric if you stuff firmly
Notions
- Stitch marker
- Yarn needle
- Polyester fiberfill stuffing
- 2 small black safety eyes (9–12 mm) or black yarn for embroidered eyes
- Small amount of black embroidery floss or yarn for nose/mouth
- Scissors
- (Optional) pipe cleaner or floral wire for poseable stem
Gauge
20 stitches and 28 rounds = 4" (10 cm) in stockinette stitch in the round.
Gauge is not critical for a toy, but tighter fabric is better so stuffing does not show. Adjust needle size if needed.
Abbreviations (US)
- CO: cast on
- k: knit
- p: purl
- st(s): stitch(es)
- rnd(s): round(s)
- kfb: knit into front and back of stitch (1 st increased)
- k2tog: knit 2 stitches together (1 st decreased)
- ssk: slip, slip, knit (optional left-leaning decrease; k2tog is fine for beginners)
- BO: bind off
- rep: repeat
- RS / WS: right side / wrong side
- MC, CC1, CC2, CC3: main and contrasting colors as listed
Pattern Notes
- Body and head are worked in the round. Arms, legs, ears, stem, and leaf may be worked flat or as small tubes.
- Use a marker to indicate beginning of round.
- Stuff firmly as you go, especially the pumpkin body, so the shape holds.
- Pumpkin “ribs” are created after knitting by wrapping yarn tightly in 5–6 vertical sections.
- Safety eyes are recommended only for ages 3+; embroider eyes for babies/toddlers.
- All stitch counts are confirmed inline.
Pattern Instructions
Pumpkin Body (MC – Orange)
CO 12 sts using MC. Join to work in the round, being careful not to twist. Place marker.
Rnd 1: Knit. (12 sts)
Rnd 2: *kfb; rep from * around. (24 sts) — 12 increases → 12 + 12 = 24 ✓
Rnd 3: Knit.
Rnd 4: *k1, kfb; rep from * around. (36 sts) — 12 increases → 24 + 12 = 36 ✓
Rnd 5: Knit.
Rnd 6: *k2, kfb; rep from * around. (48 sts) — 12 increases → 36 + 12 = 48 ✓
Rnds 7–20: Knit (14 plain rounds). Piece measures roughly 3–3½" tall from CO.
Begin decreases:
Rnd 21: *k2, k2tog; rep from * around. (36 sts) — 12 decreases → 48 – 12 = 36 ✓
Rnd 22: Knit.
Rnd 23: *k1, k2tog; rep from * around. (24 sts) — 12 decreases → 36 – 12 = 24 ✓
Rnd 24: Knit.
Stuff the body firmly now, shaping it into a plump pumpkin.
Rnd 25: *k2tog; rep from * around. (12 sts) — 12 decreases → 24 – 12 = 12 ✓
Rnd 26: Knit.
Add a little more stuffing if needed.
Cut yarn, thread tail through remaining 12 sts, pull tight, and secure. Leave a long tail if you want to use it later for rib definition; otherwise weave in.
Panda Head (CC1 – White)
CO 12 sts using CC1. Join to work in the round. Place marker.
Rnd 1: Knit. (12 sts)
Rnd 2: *kfb; rep from * around. (24 sts) ✓
Rnd 3: Knit.
Rnd 4: *k1, kfb; rep from * around. (36 sts) ✓
Rnds 5–14: Knit (10 plain rounds).
Insert safety eyes now (if using) between Rnds 10–11, about 6–7 sts apart, centered on the face. Stuff head firmly as you continue.
Rnd 15: *k1, k2tog; rep from * around. (24 sts) ✓
Rnd 16: Knit.
Rnd 17: *k2tog; rep from * around. (12 sts) ✓
Rnd 18: Knit.
Finish stuffing. Cut yarn, thread through remaining 12 sts, pull tight, and fasten off. Leave a long tail for sewing head to body.
Ears (make 2 – CC2 Black)
Worked flat.
CO 6 sts using CC2.
Row 1 (RS): Knit.
Row 2 (WS): Purl.
Row 3: kfb, k4, kfb. (8 sts) ✓
Row 4: Purl.
Row 5: Knit.
Row 6: Purl.
Row 7: k2tog, k4, k2tog. (6 sts) ✓
Row 8: Purl.
Row 9: k2tog, k2, k2tog. (4 sts) ✓
BO remaining sts. Cut yarn, leaving a tail for sewing.
(Optionally fold ear slightly and tack the lower corners together for a cupped look.)
Eye Patches (make 2 – CC2 Black)
CO 8 sts using CC2.
Row 1: Knit.
Row 2: Purl.
Row 3: k2tog, k4, k2tog. (6 sts) ✓
Row 4: Purl.
Row 5: k2tog, k2, k2tog. (4 sts) ✓
BO. Leave long tail for sewing.
(These are small ovals; stretch gently into almond/oval shape when attaching.)
Arms (make 2 – CC2 Black)
CO 8 sts using CC2. Join to work in the round (or work flat and seam later).
Rnds 1–10: Knit. (8 sts)
Stuff lightly.
Rnd 11: *k2tog; rep from * around. (4 sts) ✓
Cut yarn, thread through remaining sts, pull tight, fasten off. Leave tail for sewing.
Legs (make 2 – CC2 Black)
CO 10 sts using CC2. Join to work in the round.
Rnds 1–8: Knit. (10 sts)
Stuff lightly.
Rnd 9: *k2tog; rep from * around. (5 sts)
Cut yarn, thread through remaining sts, pull tight, fasten off. Leave tail for sewing.
Pumpkin Stem (CC3 Green)
CO 8 sts using CC3. Join to work in the round.
Rnds 1–6: Knit.
Rnd 7: *k2tog; rep from * around. (4 sts) ✓
Rnds 8–10: Knit on these 4 sts (I-cord style or carefully on 2 DPNs).
BO or thread tail through sts and pull snug.
(Optional: insert a short piece of pipe cleaner before closing for a curved stem.)
Leaf (CC3 Green, optional)
CO 5 sts.
Row 1: Kfb, k3, kfb. (7 sts)
Row 2: Purl.
Row 3: Knit.
Row 4: Purl.
Row 5: k2tog, k3, k2tog. (5 sts)
Row 6: Purl.
Row 7: k2tog, k1, k2tog. (3 sts)
Row 8: Slip 1, k2tog, psso (or bind off all 3).
Fasten off, leave tail for sewing. Embroider a simple center vein if desired.
Finishing
-
Attach Head to Body
Pin white head centered on the top (closed end) of the orange pumpkin body. Sew securely all around with the white tail, adding a tiny bit more stuffing at the neck join if needed for a smooth transition. -
Pumpkin Ribs
With a long length of MC (orange), thread yarn needle. Starting at the bottom center, take the yarn up and over the outside of the pumpkin to the top center (under the head), pull snug to create a groove, then return inside or take another vertical wrap. Repeat 5 or 6 times evenly spaced around the body, pulling each wrap firmly so the pumpkin looks segmented. Secure ends inside. -
Face
- Sew black eye patches onto the head, slightly overlapping or framing the safety eyes (or embroider eyes on top of the patches with black yarn in satin or French-knot style).
- Embroider a small inverted triangle or Y-shaped nose in black centered below the eyes. Add a simple curved smile.
- Optional: tiny pink stitches for cheeks.
-
Ears
Sew ears to top sides of head, spaced evenly, curving them slightly forward. -
Arms & Legs
- Sew arms to the sides of the body just below the head/neck join, angled slightly forward.
- Sew legs to the bottom front of the pumpkin so the panda can sit stably.
-
Stem & Leaf
Attach stem to the very top of the head (or at the head/body join if you prefer a more “pumpkin-with-panda-face” look). Sew leaf at the base of the stem. -
Weave in all ends securely on the inside.
-
Final shaping: Roll and squeeze the pumpkin body to round it; adjust stuffing if any lumps remain.
Your Pumpkin Panda is ready!
Tips for Success
- Stuff the pumpkin more firmly than the head for good rib definition.
- If working on DPNs feels fiddly at the start, begin with a longer circular needle and magic-loop, or knit the first few increase rounds flat then join.
- For a no-safety-eye version, embroider simple ovals or use French knots after the patches are sewn on.
- Make a whole pumpkin patch family by varying orange shades or adding a tiny scarf.
Enjoy your cute fall friend!
(Pattern mathematically verified: all increase/decrease rounds produce the stated stitch counts; construction suitable for beginner worsted toy knitting.)
Disclaimer: This pattern was generated by AI and should be reviewed for accuracy before use. While we strive for quality, AI-generated content may contain errors. Please verify measurements, stitch counts, charts, and instructions before beginning your project. Generated by purlJam.uk
Love this pattern?
Save this pattern to your free PurlJam libraryAccess your pattern anytime
Bookmark this page to access your pattern anytime