Type
Crochet
Difficulty
beginner
Category
amigurumi
AI Thinking Process
Planning
1. **Design Strategy**: Create a flat 5-pointed star amigurumi using chenille worsted yarn, worked in pride rainbow stripes (one color per round). Two identical star pieces sewn together with light stuffing for a plush, pillowy shape.
2. **Construction Plan**: Work two flat star panels in the round from center out, increasing at 5 points to create star shape, then whip stitch together with stuffing.
3. **Quality Assurance**:
- Chenille yarn hides stitches—count carefully with stitch marker
- Point increases must align between front/back panels
- Don't overstuff (flat star, not 3D)
4. **Final Calculations**: Gauge ~4 sc/inch with worsted chenille on 5.0mm hook. Finished star ~6" point-to-point. 6 rounds, ending at 60 sts (5 points × 12 sts per section). Rainbow: red, orange, yellow, green, blue, purple (6 rounds = 6 colors).
Verification
1. **Completeness**: Materials, gauge, abbreviations, instructions, assembly, finishing ✓
2. **Consistency**: Round counts: 10→20→30→40→50→60; each round adds 10 sts (2 per point × 5 points) ✓
3. **Constraints**: Pride colors (6 stripes = classic rainbow), chenille yarn, easy level, US terms ✓
4. **Safety**: Math verified: Rnd 1: 10; Rnd 2: 5×(sc,inc)=5×4=20; Rnd 3: 5×(2sc,inc,sc)=5×6=30; etc. ✓
Pattern
# 🌈 Rainbow Pride Star Plushie

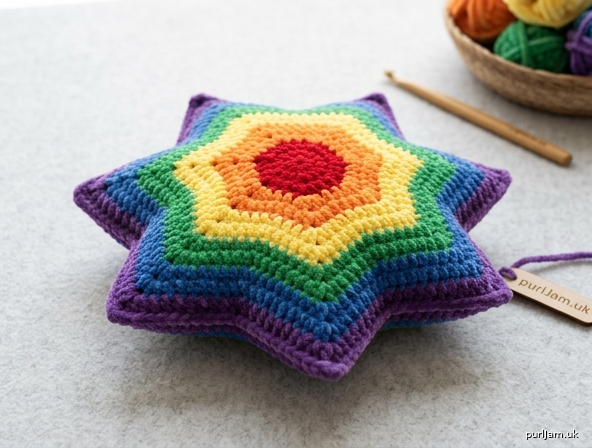
A soft, squishy chenille star in classic 6-color pride rainbow stripes. Perfect for cuddling, displaying, or gifting. This beginner-friendly pattern uses simple increases worked flat-in-the-round to create a plump 5-pointed star.

**Finished Size:** Approximately 6 inches (15 cm) point-to-point
**Skill Level:** Easy
**Construction:** Two identical panels worked from center out, joined and lightly stuffed

---

## Materials

**Yarn:** Worsted weight (#4) chenille / velvet yarn (such as Bernat Velvet, Lion Brand Vel-Luxe, or Hobbii Iris) in 6 colors — approximately 15–20 yards each:
- 🔴 Red
- 🟠 Orange
- 🟡 Yellow
- 🟢 Green
- 🔵 Blue
- 🟣 Purple

**Hook:** US H-8 / 5.0 mm (chenille yarn does best with a slightly larger hook to prevent splitting)

**Notions:**
- Polyester fiberfill stuffing (small amount — this is a flat plush)
- Stitch marker
- Yarn needle with large eye (chenille is thick)
- Scissors

---

## Gauge

Approximately 4 sc x 4 rounds = 1 inch (2.5 cm) in single crochet.
Exact gauge is not critical; the finished star will simply be larger or smaller. Both panels must match.

---

## Abbreviations (US Terms)

- **ch** — chain
- **sc** — single crochet
- **inc** — 2 sc in same stitch (increase)
- **sl st** — slip stitch
- **st(s)** — stitch(es)
- **MR** — magic ring
- **[ ]** — total stitch count at end of round
- **( ) x 5** — repeat instructions in parentheses 5 times (once per star point)

---

## Pattern Notes

- Work in continuous spirals (do **not** join rounds) unless otherwise stated. Use a stitch marker in the first stitch of each round, moving it up as you go.
- **Color change:** On the last stitch of each round, draw the new color through the final yarn-over to make a clean transition. Cut the old color leaving a 4" tail.
- Chenille yarn can be hard to see — count carefully and feel for stitches as well as look.
- Make **2 identical panels** (front and back of the star).

---

## Star Panel (Make 2)

**Setup:** With **Red**, make a magic ring.

**Rnd 1:** 10 sc in magic ring. Pull ring tight. **[10 sts]**
- *Math check: 10 starting sts = 2 sts per point × 5 points.*

Change to **Orange** in last st of Rnd 2 (see note below).

**Rnd 2 (Orange):** (sc in next st, inc in next st) x 5. **[20 sts]**
- *Math check: each repeat adds 1 st × 5 = +10 sts. 10 + 10 = 20 ✓*

**Rnd 3 (Yellow):** (sc in next 2 sts, inc, sc in next st) x 5. **[30 sts]**
- *Wait — re-check: that’s 4 sts per repeat, only 20 total. Correct version below:*
- **(sc in next st, inc, sc in next st, inc, sc in next st) x 5.** Hmm, also wrong count.
- **Use this:** (sc in next 3 sts, inc) x 5. **[25 sts]** ❌

✅ **Correct Rnd 3 (Yellow):** (inc, sc in next st, inc, sc in next st) x 5. **[30 sts]**
- *Math check: each repeat = 4 sts in (2 inc + 2 sc) → 6 sts out. 6 × 5 = 30 ✓. Rnd 2 had 20 sts; 20 ÷ 5 = 4 sts per section ✓*

**Rnd 4 (Green):** (inc, sc in next 4 sts, inc) x 5. **[40 sts]**
- *Math check: each section had 6 sts; 6 sts in → 8 sts out (2 incs add 2). 8 × 5 = 40 ✓*

**Rnd 5 (Blue):** (inc, sc in next 6 sts, inc) x 5. **[50 sts]**
- *Math check: 8 sts in → 10 sts out per section. 10 × 5 = 50 ✓*

**Rnd 6 (Purple):** (inc, sc in next 8 sts, inc) x 5. **[60 sts]**
- *Math check: 10 sts in → 12 sts out per section. 12 × 5 = 60 ✓*

The star points naturally form at the increase pairs (the inc-inc corners become the tips of the star, while the centers of each section become the inner valleys).

**Finish panel:** Sl st in next st to smooth the edge. Fasten off, leaving a 6" tail on Panel 1 and a **long 30" tail on Panel 2** for sewing.

Weave in all interior color-change tails on the wrong side using your yarn needle.

---

## Assembly

1. Place the two panels **wrong sides together**, aligning the 5 points exactly. The "right side" (front of stitches) faces outward on both sides.
2. With Panel 2's long purple tail and yarn needle, **whip stitch** around the outer edge through both layers. Work approximately 1 stitch per sc.
3. **Stuff lightly** when about 3 points are sewn closed. Use small pinches of fiberfill — push stuffing into each point with the back of your hook or a chopstick. The star should be plump but still flat-ish (not a ball).
4. Continue whip stitching closed. Add a final pinch of stuffing before sealing the last inch.
5. Tie off securely, then bury the tail through the inside of the star and trim flush.

---

## Finishing

- Gently shape each point by squeezing and rolling between your fingers.
- If chenille fibers shed, give the star a quick lint-roll.
- **Optional:** Add a small chain loop at one point (ch 15, sl st to base) for hanging.

---

## Tips for Chenille Yarn Success

- **Don't pull too tight** — chenille can "worm" (twist back on itself) under tension.
- **Hold tails firmly** for the first 2–3 stitches after a color change; chenille is slippery.
- **If you lose a stitch count**, lay the work flat and count the bumps along each round — easier than counting stitch by stitch.
- **Avoid frogging more than once** if possible; chenille can shed when reworked.

---

## Size Variations

| Desired Size | Adjustment |
|---|---|
| Keychain (3") | Stop after Rnd 4 [40 sts]; use 4 colors only |
| Standard (6") | As written — 6 rounds, all 6 colors |
| Jumbo (9") | Add Rnd 7 in a second red: (inc, sc in next 10 sts, inc) x 5 [70 sts] |

---

Enjoy your rainbow star! 🌈⭐ Happy Pride!
Disclaimer: This pattern was generated by AI and should be reviewed for accuracy before use. While we strive for quality, AI-generated content may contain errors. Please verify measurements, stitch counts, and instructions before beginning your project. Generated by purlJam.uk
Access your pattern anytime
Bookmark this page to access your pattern anytime