Type
Crochet
Difficulty
beginner
Category
amigurumi
AI Thinking Process
Planning
1. **Design Strategy**:
- User requests a 3D butterfly with chunky yarn for finger knitting
- However, the template is for CROCHET patterns, not finger knitting
- I need to clarify: Will create a crochet butterfly pattern suitable for chunky yarn that creates a 3D sculptural effect
- Butterfly components: body (cylinder), wings (flat worked pieces that can be shaped), antennae (small chains or tubes)
- Beginner-friendly: basic stitches only (chain, sc, maybe hdc for wings)
- Chunky yarn will create a quick, satisfying project (approximately 5-7" wingspan)
2. **Construction Plan**:
- Body: Work as a small cylinder/tube (similar to template's basic cylinder shape)
- Wings: Four flat pieces worked separately in rows or a continuous flat oval shape
- Antennae: Simple chains with bobbles at ends
- Assembly: Sew wings to body sides, add antennae to top
- 3D effect achieved by: stuffing body, shaping wings with wire (optional), or working wings in dimensional shapes
3. **Quality Assurance**:
- Chunky yarn with appropriate hook size (K-10.5 to M-13 / 6.5-9mm) - going down from yarn label recommendation
- Stitch counts must be simple and easy to follow for beginners
- Wing attachment points clearly explained
- Optional wire stiffening for wings mentioned (not required)
- Clear stuffing instructions for body only (wings stay flat)
4. **Final Calculations**:
- Chunky yarn gauge: approximately 10-12 sc = 4" (but will vary with tension)
- Body: Start with 6 sc magic ring, increase to 12 sts, work 8-10 rounds for 3-4" body
- Wings: Each wing approximately 3-4" wide for proportional look
- Total project size: 5-7" wingspan, 3-4" body length
Verification
[PRE-FLIGHT CHECKS]
1. **Completeness**:
✓ Will include: Materials, Gauge, Finished Size, Notes, Pattern Instructions (Body, Wings, Antennae, Assembly), Finishing
✓ Template sections adapted for butterfly toy structure
2. **Consistency**:
✓ Chunky yarn with K-10.5 or L-11 hook (6.5-8mm) for tight amigurumi fabric
✓ Body stitch counts: 6→12 sts, worked for ~10 rounds = 3-4" cylinder
✓ Wings worked flat with increases for shape
✓ Proportions checked: wings larger than body for realistic butterfly look
3. **Constraints**:
✓ Beginner level - only sc, hdc, chain stitches used
✓ Chunky yarn specified
✓ 3D construction through stuffed body + dimensional assembly
✓ Note about finger knitting vs crochet clarified in introduction
4. **Safety**:
✓ All stitch counts verified for each round
✓ Increase/decrease math checked (6→12 = 6 increases)
✓ Wing shaping progression logical
✓ Assembly order makes structural sense
Pattern
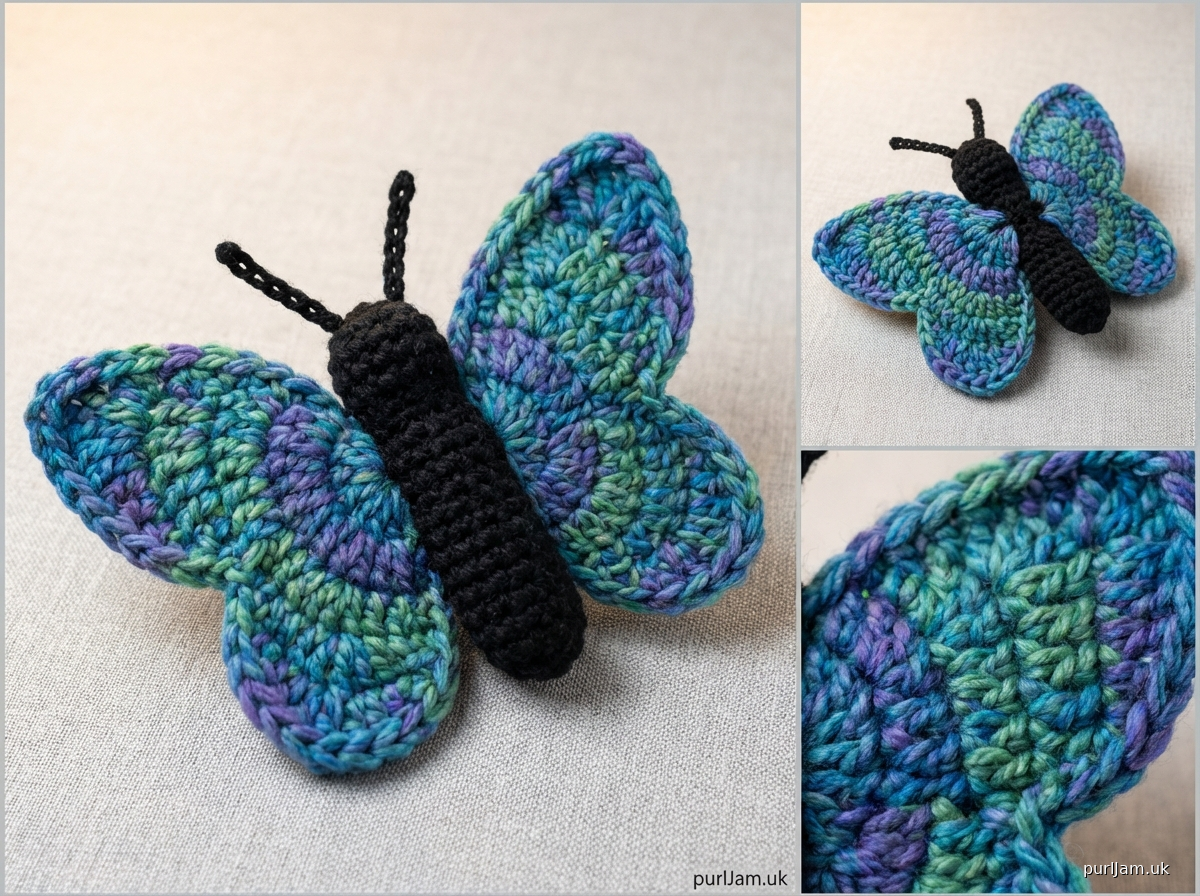
# 3D Butterfly

**A beginner-friendly crochet pattern for a dimensional butterfly decoration**

*Note: This pattern is designed for crochet (not finger knitting). If you're looking to finger knit, this butterfly can be adapted by finger knitting i-cord tubes for the body and simple flat strips for wings.*

---

## MATERIALS

**Yarn:**
- Chunky weight yarn (5) - approximately 50-75 yards total
  - Color A (body): 20-30 yards (black, brown, or your choice)
  - Color B (wings): 30-45 yards (any color - try bright colors or variegated yarn!)

**Hook:**
- US K-10.5 (6.5mm) or L-11 (8mm) - use a hook 1-2 sizes smaller than yarn label recommends for tight amigurumi fabric

**Other supplies:**
- Fiberfill stuffing (small amount for body only)
- Yarn needle for weaving in ends and assembly
- Stitch marker
- Optional: Pipe cleaners or floral wire (for poseable antennae and/or wing support)
- Optional: Small black beads for eyes (or embroider with scrap yarn)

---

## GAUGE

Gauge is not critical for this project, but tighter is better for stuffed toys.

Approximate gauge with chunky yarn and K hook: 10 sc = 4" (10cm)

**Important:** Work tightly so stuffing doesn't show through. If your fabric looks loose, go down a hook size.

---

## FINISHED SIZE

Approximately 5-7" (12.5-18cm) wingspan and 3-4" (7.5-10cm) body length with chunky yarn.

Size will vary based on yarn weight, hook size, and personal tension.

---

## ABBREVIATIONS

- ch = chain
- sc = single crochet
- hdc = half double crochet
- inc = increase (2 sc in same stitch)
- dec = invisible decrease (insert hook in front loops of next 2 sts, yarn over, pull through both, yarn over, pull through 2 loops on hook)
- st(s) = stitch(es)
- rnd = round
- [ ] = stitch count at end of round/row

---

## PATTERN NOTES

- Body is worked in continuous rounds (spiral). Use stitch marker to track beginning of round.
- Wings are worked flat in rows, turned at the end of each row.
- Stuff body firmly as you work; wings remain flat and unstuffed.
- All pieces are worked separately, then assembled.
- For a more dimensional look, you can insert pipe cleaner or wire into wings before attaching (optional).

---

## INSTRUCTIONS

### BODY

Using Color A (body color):

**Rnd 1:** 6 sc in magic ring [6]

**Rnd 2:** inc in each st around [12]
- *Check: You should have 12 sts (6 increases made)*

**Rnds 3-10:** sc in each st around [12]
- *Work 8 rounds even for a 3-4" body*
- *Stuff body with fiberfill after Round 8, before closing*

**Rnd 11:** dec around (6 times) [6]
- *Check: 12 sts ÷ 2 = 6 sts*

**Add more stuffing if needed.** Push stuffing down firmly with the back of your hook.

**Rnd 12:** dec around (3 times) [3]

Fasten off with long tail (12-15"). Thread tail through remaining stitches and pull tight to close hole. Weave in this end securely on inside.

---

### UPPER WINGS (Make 2)

Using Color B (wing color):

Wings are worked in rows and turned.

**Row 1:** Ch 8, sc in 2nd ch from hook and across (7 sc), ch 1, turn [7]

**Row 2:** 2 sc in first st, sc 5, 2 sc in last st, ch 1, turn [9]
- *Check: 7 + 2 increases = 9 sts*

**Row 3:** 2 sc in first st, sc 7, 2 sc in last st, ch 1, turn [11]
- *Check: 9 + 2 increases = 11 sts*

**Row 4:** sc across, ch 1, turn [11]

**Row 5:** sc across, ch 1, turn [11]

**Row 6:** dec, sc 7, dec, ch 1, turn [9]
- *Check: 11 - 2 decreases = 9 sts*

**Row 7:** dec, sc 5, dec, ch 1, turn [7]
- *Check: 9 - 2 decreases = 7 sts*

**Row 8:** dec, sc 3, dec [5]
- *Check: 7 - 2 decreases = 5 sts*

Fasten off with long tail (12") for sewing.

---

### LOWER WINGS (Make 2)

Using Color B (wing color):

**Row 1:** Ch 6, sc in 2nd ch from hook and across (5 sc), ch 1, turn [5]

**Row 2:** 2 sc in first st, sc 3, 2 sc in last st, ch 1, turn [7]
- *Check: 5 + 2 increases = 7 sts*

**Row 3:** 2 sc in first st, sc 5, 2 sc in last st, ch 1, turn [9]
- *Check: 7 + 2 increases = 9 sts*

**Row 4:** sc across, ch 1, turn [9]

**Row 5:** dec, sc 5, dec, ch 1, turn [7]
- *Check: 9 - 2 decreases = 7 sts*

**Row 6:** dec, sc 3, dec [5]
- *Check: 7 - 2 decreases = 5 sts*

Fasten off with long tail (12") for sewing.

---

### ANTENNAE (Make 2)

Using Color A (body color):

**Option 1 - Simple Chain:**

Ch 10, fasten off with 6" tail for sewing.

For a bobble at the end: Before fastening off, work 3 hdc in 2nd ch from hook, sl st back down chain, fasten off.

**Option 2 - Wire Antennae (more advanced):**

Cut two 4" pieces of pipe cleaner or floral wire. Wrap yarn around each wire tightly, securing ends with dabs of glue. Leave 1" of wire exposed at base for inserting into body.

---

## ASSEMBLY

**Step 1 - Attach Upper Wings:**

Position upper wings on sides of body, approximately 1/4" (6mm) down from top. Wings should angle slightly upward. Pin in place.

Using yarn tails from wings and yarn needle, whip stitch the narrow end (Row 1 edge) of each upper wing to the side of body. Sew through several stitches on body for security. Weave in ends.

**Step 2 - Attach Lower Wings:**

Position lower wings directly below upper wings, slightly overlapping at the base. The lower wings should angle slightly downward. Pin in place.

Using yarn tails, whip stitch the narrow end of each lower wing to body, just below where upper wings attach. Weave in ends.

**Step 3 - Attach Antennae:**

**For chain antennae:** Sew the end of each chain to the top of the head (closed end of body), spacing them about 1/2" (12mm) apart. Secure with several stitches. Weave in ends.

**For wire antennae:** Use yarn needle to poke a hole at top of head. Insert wire base of antenna and secure with a few stitches around the base. Repeat for second antenna.

**Step 4 - Add Face (Optional):**

- Embroider two small dots for eyes using black yarn and French knots, or sew on small black beads
- Position eyes on rounds 3-4 of body, spaced about 3 stitches apart
- Add a tiny smile with backstitch if desired

---

## FINISHING

**Shaping the Wings:**

For flat, natural drape: No additional work needed. The wings will have a gentle curve.

For more dimension:
- Before attaching wings, you can insert a pipe cleaner or thin floral wire along the outer edge of each wing. Thread it through the edge stitches carefully, then trim and bend wire to hide ends. This allows you to pose the wings.
- Alternatively, starch the wings lightly or use fabric stiffener spray

**Blocking (Optional):**

Pin wings to a blocking mat or towel in desired shape. Lightly mist with water (or use spray starch for stiffer wings). Allow to dry completely before removing pins.

Weave in any remaining ends.

---

## DISPLAY IDEAS

- Attach to a hair clip or headband
- Sew to a string or ribbon for a hanging decoration
- Attach pin back for a brooch
- Create multiple butterflies in different colors for a mobile
- Use as a package topper or gift decoration
- Attach magnet to back for refrigerator display

---

## CUSTOMIZATION IDEAS

**Color Variations:**
- Monarch butterfly: Orange wings with black body
- Blue Morpho: Bright blue wings with brown/black body
- Rainbow: Use variegated or striped yarn for wings
- Pastel spring butterflies: Soft pinks, yellows, and lavenders

**Size Adjustments:**
- Smaller butterfly: Use worsted weight yarn with G-6 (4mm) hook
- Larger butterfly: Add 2-3 more rounds to body (Rnds 11-13: sc around before decreasing), and add 1-2 extra rows to each wing at widest point

**Texture:**
- Add spots to wings: Embroider French knots or sew on small felt circles
- Wing veins: After assembly, use a contrasting yarn color to surface crochet or backstitch lines radiating from body across wings
- Fuzzy body: Use eyelash yarn or brush out body yarn with pet brush for fuzzy texture

---

## TROUBLESHOOTING

**Wings are curling:** This is normal with crochet. Block the wings or add wire support to keep them flat.

**Stuffing shows through body:** Your stitches are too loose. Go down a hook size and work more tightly. You can also add a fabric lining inside before stuffing.

**Wings won't stay attached:** Make sure you're sewing through multiple stitches on both the wing and body. Use doubled thread for extra strength. Add a few extra stitches if needed.

**Body is too short/long:** Adjust the number of even rounds (Rounds 3-10). Add or subtract 1-2 rounds to change body length by approximately 1/2" per round.

**Butterfly won't stand up:** This is a soft toy meant for display hanging or laying flat. For a standing butterfly, create a wire armature by inserting pipe cleaner through the body before closing, or attach to a wire stand.

---

## CARE INSTRUCTIONS

Hand wash gently in cool water with mild soap. Squeeze (don't wring) to remove excess water. Roll in towel to absorb moisture. Reshape and lay flat to dry. Do not machine wash or dry.

If wings become misshaped, re-block by pinning and misting with water.

---

**Pattern designed for beginner crocheters using chunky yarn. Finished in 2-3 hours.**

**#ChunkyYarn #CrochetButterfly #BeginnerCrochet #3DAmigurumi #QuickProject**

---

*Happy Crocheting! 🦋*
Disclaimer: This pattern was generated by AI and should be reviewed for accuracy before use. While we strive for quality, AI-generated content may contain errors. Please verify measurements, stitch counts, and instructions before beginning your project. Generated by purlJam.uk
Access your pattern anytime
Bookmark this page to access your pattern anytime