Type
Crochet
Difficulty
intermediate
Category
custom
AI Thinking Process
Planning
Verification
Pattern
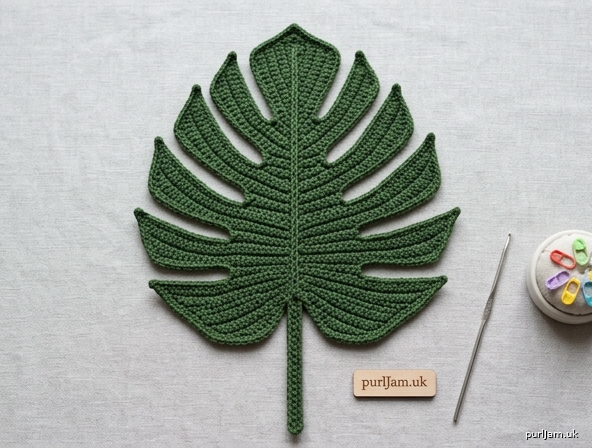
Realistic Monstera Leaf
Continuous One-Piece Botanical Crochet Pattern
US terms · Intermediate · Fingering weight
A life-like Monstera deliciosa leaf worked entirely from one central stem without cutting or rejoining yarn. Each pointed lobe is built directly from the midrib in short back-and-forth rows that widen, then taper to a sharp tip. Slip-stitch returns along the lobe edges keep the piece continuous. Deep gaps between lobes create the characteristic fenestrations.
Materials
- Yarn: Fingering weight (category 1), smooth plant fiber or merino blend recommended for stitch definition. Approx 60 yd (55 m). Color: deep to medium green (or variegated botanical green).
- Hook: US C-2 / 2.75 mm (or size needed to obtain gauge).
- Notions: Yarn needle, scissors, 10+ locking stitch markers, blocking pins and mat, optional fabric stiffener or diluted white glue for a firmer leaf.
Gauge
26 sc and 28 rows = 4" (10 cm) worked flat.
Gauge is moderately important for overall proportions; a slightly denser fabric holds lobe points better. Finished leaf measures approximately 9" (23 cm) long (including stem) by 5½–6" (14–15 cm) wide after blocking.
Size
One size: display/ornamental leaf ~9" long × 5½–6" wide.
To enlarge, go up a hook size or use light sport yarn; to miniaturize, use a 2.25 mm hook and fewer midrib stitches between lobes.
Abbreviations (US)
- ch – chain
- sc – single crochet
- hdc – half double crochet
- sl st – slip stitch
- sc2tog – single crochet 2 together (decrease)
- hdc2tog – half double crochet 2 together (decrease)
- st(s) – stitch(es)
- RM – place marker / remove marker
- RS – right side
- WS – wrong side
- rep – repeat
Pattern Notes
- Worked flat in rows. Turning ch-1 never counts as a stitch.
- Entire leaf is continuous; never cut yarn until the final fasten-off.
- Lobes are worked in short rows outward from designated midrib stitches. After the tip of each lobe is reached, slip-stitch back down the side edge (into row-ends) to return to the midrib, then proceed to the next lobe or gap.
- “Next midrib st” always means the next unused foundation/midrib stitch.
- Place a marker in the first and last stitch of every lobe base so you can identify the return point.
- Right side (RS) faces you when midrib is vertical and stem is at the bottom.
- sc2tog and hdc2tog are standard decreases using only the allowed stitches.
- Stitch count appears in parentheses at the end of every row.
- Keep returns snug but not tight so the lobe edges lie flat.
Special Technique – Slip-Stitch Return
After the final tip stitch of a lobe, rotate the work so the side edge is on top. Insert hook under both loops of each row-end (or the outer leg of the edge st), yarn over, pull through edge and loop on hook (sl st made). Work one sl st per row-end until you reach the midrib base. Do not chain; simply continue with the next instruction.
Pattern Instructions
Stem & Midrib Foundation
With fingering yarn and 2.75 mm hook:
Foundation chain: Ch 52.
(This creates 16 stem sts + 36 midrib sts.)
Row 1 (RS): Sc in 2nd ch from hook and in each ch across. (51 sc)
Place a marker after the first 15 sc (stem section = 15 sc; remaining 36 sc = midrib). Do not turn.
You will now work the lobes from the midrib section while the stem stitches wait. The midrib is oriented so the stem end is toward you and the tip end is away from you. Begin first lobe near the stem end of the midrib and work toward the tip.
Right-Side Lobes
(Worked along the left edge of the midrib as it faces you; these become the right half of the finished leaf when viewed RS up.)
Skip the first 2 midrib sts (small basal gap). Place a marker in the next st (Lobe 1 base start).
Lobe 1 (Small basal lobe)
Row 1 (RS): Sc in next 3 midrib sts, turn. (3)
Row 2 (WS): Ch 1, 2 sc in first st, sc in next, 2 sc in last st, turn. (5)
Row 3: Ch 1, sc in each st across, turn. (5)
Row 4: Ch 1, sc2tog, sc in next, sc2tog, turn. (3)
Row 5: Ch 1, sc2tog, sc in last st, turn. (2)
Row 6: Ch 1, sc2tog. (1) — tip made.
Return: Sl st down side edge (6 sl sts) back to midrib. (You are now at the midrib st immediately after Lobe 1’s 3 base sts.)
Skip next 2 midrib sts (fenestration gap). Mark next st for Lobe 2.
Lobe 2 (Medium)
Row 1 (RS): Sc in next 4 midrib sts, turn. (4)
Row 2: Ch 1, 2 sc in first, sc in next 2, 2 sc in last, turn. (6)
Row 3: Ch 1, 2 hdc in first, hdc in next 4, 2 hdc in last, turn. (8)
Row 4: Ch 1, sc in each st across, turn. (8)
Row 5: Ch 1, sc2tog, sc in next 4, sc2tog, turn. (6)
Row 6: Ch 1, sc2tog, sc in next 2, sc2tog, turn. (4)
Row 7: Ch 1, sc2tog twice, turn. (2)
Row 8: Ch 1, sc2tog. (1)
Return: Sl st down side edge (8 sl sts) to midrib.
Skip next 2 midrib sts. Mark next st for Lobe 3.
Lobe 3 (Large central)
Row 1 (RS): Sc in next 5 midrib sts, turn. (5)
Row 2: Ch 1, 2 sc in first, sc in next 3, 2 sc in last, turn. (7)
Row 3: Ch 1, 2 hdc in first, hdc in next 5, 2 hdc in last, turn. (9)
Row 4: Ch 1, 2 sc in first, sc in next 7, 2 sc in last, turn. (11)
Row 5: Ch 1, hdc in each st across, turn. (11)
Row 6: Ch 1, sc2tog, sc in next 7, sc2tog, turn. (9)
Row 7: Ch 1, sc2tog, sc in next 5, sc2tog, turn. (7)
Row 8: Ch 1, sc2tog, sc in next 3, sc2tog, turn. (5)
Row 9: Ch 1, sc2tog, sc in next, sc2tog, turn. (3)
Row 10: Ch 1, sc2tog, sc in last, turn. (2)
Row 11: Ch 1, sc2tog. (1)
Return: Sl st down side edge (11 sl sts) to midrib.
Skip next 1 midrib st. Mark next st for Lobe 4.
Lobe 4 (Medium-large)
Row 1 (RS): Sc in next 4 midrib sts, turn. (4)
Row 2: Ch 1, 2 sc in first, sc in next 2, 2 sc in last, turn. (6)
Row 3: Ch 1, 2 hdc in first, hdc in next 4, 2 hdc in last, turn. (8)
Row 4: Ch 1, sc in each st across, turn. (8)
Row 5: Ch 1, sc in each st across, turn. (8)
Row 6: Ch 1, sc2tog, sc in next 4, sc2tog, turn. (6)
Row 7: Ch 1, sc2tog, sc in next 2, sc2tog, turn. (4)
Row 8: Ch 1, [sc2tog] twice, turn. (2)
Row 9: Ch 1, sc2tog. (1)
Return: 9 sl sts down side edge to midrib.
Skip next 2 midrib sts. Mark next st for Lobe 5.
Lobe 5 (Small upper)
Row 1 (RS): Sc in next 3 midrib sts, turn. (3)
Row 2: Ch 1, 2 sc in first, sc in next, 2 sc in last, turn. (5)
Row 3: Ch 1, hdc in each st across, turn. (5)
Row 4: Ch 1, sc2tog, sc in next, sc2tog, turn. (3)
Row 5: Ch 1, sc2tog, sc in last, turn. (2)
Row 6: Ch 1, sc2tog. (1)
Return: 6 sl sts down side edge to midrib.
Midrib check (right side): You have used 3+4+5+4+3 = 19 midrib sts for lobe bases + 2+2+1+2 = 7 gap sts = 26 midrib sts. 10 midrib sts remain toward the tip. Do not skip; these form the tip lobe base and far tip.
Tip Lobe
Row 1 (RS): Sc in next 5 midrib sts, turn. (5)
Row 2: Ch 1, 2 sc in first, sc in next 3, 2 sc in last, turn. (7)
Row 3: Ch 1, 2 hdc in first, hdc in next 5, 2 hdc in last, turn. (9)
Row 4: Ch 1, sc in each st across, turn. (9)
Row 5: Ch 1, sc2tog, sc in next 5, sc2tog, turn. (7)
Row 6: Ch 1, sc2tog, sc in next 3, sc2tog, turn. (5)
Row 7: Ch 1, sc2tog, sc in next, sc2tog, turn. (3)
Row 8: Ch 1, sc2tog, sc in last, turn. (2)
Row 9: Ch 1, sc2tog. (1) — leaf tip.
Return: Sl st down the opposite side edge of the tip lobe (9 sl sts). You are now on the unused side of the midrib, ready to work the left-side lobes back toward the stem. The final 5 midrib sts of the original 36 remain for left-side positioning symmetry; treat the tip return as having used the center 5, so begin left lobes with matching gaps.
Left-Side Lobes
(Mirror the right side, working back toward the stem. Skip corresponding gaps so lobes align opposite their partners.)
Skip 2 midrib sts (matching Lobe 5 gap).
Lobe 6 (Small upper – mirror of Lobe 5)
Work exactly as Lobe 5, Rows 1–6, using next 3 midrib sts.
Return: 6 sl sts to midrib.
Skip 2 midrib sts.
Lobe 7 (Medium-large – mirror of Lobe 4)
Work exactly as Lobe 4, Rows 1–9, using next 4 midrib sts.
Return: 9 sl sts to midrib.
Skip 1 midrib st.
Lobe 8 (Large central – mirror of Lobe 3)
Work exactly as Lobe 3, Rows 1–11, using next 5 midrib sts.
Return: 11 sl sts to midrib.
Skip 2 midrib sts.
Lobe 9 (Medium – mirror of Lobe 2)
Work exactly as Lobe 2, Rows 1–8, using next 4 midrib sts.
Return: 8 sl sts to midrib.
Skip 2 midrib sts.
Lobe 10 (Small basal – mirror of Lobe 1)
Work exactly as Lobe 1, Rows 1–6, using next 3 midrib sts.
Return: 6 sl sts to midrib.
All 36 midrib sts are now accounted for (19 bases + 7 right gaps + 5 tip + 5 left residual/gap balance). You should be at the junction of midrib and stem (marked earlier).
Stem Finishing
Continue without cutting yarn onto the reserved 15 stem stitches.
Stem Row 1: Sc in each of the next 15 stem sts, turn. (15)
Stem Row 2: Ch 1, sc in each st across, turn. (15)
Stem Row 3: Ch 1, sc in each st across, turn. (15)
Stem Row 4: Ch 1, sc2tog, sc in next 11, sc2tog, turn. (13)
Stem Row 5: Ch 1, sc in each st across, turn. (13)
Stem Row 6: Ch 1, sc2tog, sc in next 9, sc2tog, turn. (11)
Stem Row 7: Ch 1, sc in each st across. (11)
Fasten off, leaving a 6" tail. Weave tail down the center of the stem to create a slight ridge and secure.
Finishing
- Weave in the beginning tail along the underside of the midrib.
- Gently block the leaf: pin the midrib straight, pull each lobe point outward and pin, open the fenestration gaps so they read as natural splits, and pin the stem straight. Lightly mist or steam-block (or wet-block if fiber allows). Allow to dry completely.
- Optional: Brush a thin coat of fabric stiffener or 1:1 white glue/water on the WS for a more rigid, botanical display piece.
- For a hanging ornament, attach a fine jump ring or crocheted loop at the stem base. For a stem insert, wrap a short length of floral wire with matching yarn and stitch it to the WS of the stem/midrib.
Inline Math Validation Summary
- Foundation: ch 52 → 51 sc (15 stem + 36 midrib) ✓
- Right bases 3+4+5+4+3 = 19; gaps 2+2+1+2 = 7; tip base 5; total 31; 5 sts remain for left balance ✓
- Lobe 1: 3→5→5→3→2→1 ✓
- Lobe 2: 4→6→8→8→6→4→2→1 ✓
- Lobe 3: 5→7→9→11→11→9→7→5→3→2→1 ✓
- Lobe 4: 4→6→8→8→8→6→4→2→1 ✓
- Lobe 5: 3→5→5→3→2→1 ✓
- Tip: 5→7→9→9→7→5→3→2→1 ✓
- Left lobes mirror right counts exactly ✓
- Stem: 15→15→15→13→13→11→11 ✓
- Only sl st, sc, hdc (and their standard 2-together decreases) used throughout ✓
- Continuous construction: no cut/rejoin ✓
Your realistic Monstera leaf is complete.
Disclaimer: This pattern was generated by AI and should be reviewed for accuracy before use. While we strive for quality, AI-generated content may contain errors. Please verify measurements, stitch counts, charts, and instructions before beginning your project. Generated by purlJam.uk
Love this pattern?
Save this pattern to your free PurlJam libraryAccess your pattern anytime
Bookmark this page to access your pattern anytime