Type
Crochet
Difficulty
beginner
Category
amigurumi
AI Thinking Process
Planning
Verification
Pattern
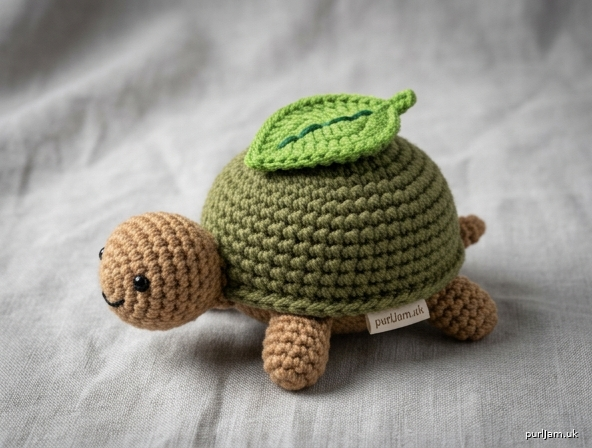
Mini Turtle with Leaf (Simple Shapes Amigurumi)
Difficulty: Easy
Finished Size: Approx 4.5 inches (11.5 cm) long × 3 inches (7.5 cm) wide × 2.5 inches (6.5 cm) tall
A beginner-friendly mini turtle worked entirely from basic spheres, cylinders, and a flat leaf shape. Perfect first amigurumi project.
Materials
- Bulky weight yarn (category 5), approx 50 yd (46 m) main color (MC) for body/shell (green, olive, or teal recommended)
- Small amounts bulky weight yarn in:
- Contrast A (CA): lighter green or brown for head/legs/tail
- Contrast B (CB): bright green for leaf
- Black or dark brown scrap for embroidery (eyes/mouth) — worsted weight fine
- US I-9 / 5.5 mm crochet hook
- Fiberfill stuffing
- Yarn needle
- Stitch marker
- Scissors
- Optional: 6 mm safety eyes (insert before closing head)
Gauge
12 sc × 14 rnds = 4 inches (10 cm) in sc worked in the round.
Exact gauge is not critical; work tightly so stuffing does not show. Adjust hook ±0.5 mm if needed for dense fabric.
Abbreviations (US Terms)
- ch: chain
- sc: single crochet
- inc: 2 sc in same stitch
- dec: invisible decrease (sc2tog through front loops)
- st(s): stitch(es)
- rnd(s): round(s)
- MR: magic ring
- FO: fasten off
- [ ]: stitch count at end of round
- ( ): work instructions in parentheses as a set
Pattern Notes
- Work in continuous spiral rounds unless noted. Do not join or turn. Mark first st of each rnd with stitch marker and move up.
- Stuff firmly as directed; use small bits of fiberfill for limbs.
- Invisible decrease keeps surface smooth.
- All pieces start with MR unless noted.
- Weave in ends securely as you go where possible.
Turtle Pieces
Shell / Body (MC)
Rnd 1: 6 sc in MR. [6]
Rnd 2: inc in each st around. [12] (6 inc → 6 + 6 = 12 ✓)
Rnd 3: (sc, inc) around. [18] (6 inc → 12 + 6 = 18 ✓)
Rnd 4: (2 sc, inc) around. [24] (6 inc → 18 + 6 = 24 ✓)
Rnds 5–9: sc in each st around. [24] (5 rnds even)
Rnd 10: (2 sc, dec) around. [18] (6 dec → 24 – 6 = 18 ✓)
Stuff firmly, shaping into a slightly flattened dome (shell top).
Rnd 11: (sc, dec) around. [12] (6 dec → 18 – 6 = 12 ✓)
Rnd 12: dec around. [6] (6 dec → 12 – 6 = 6 ✓)
FO, leaving 8-inch tail. Thread tail through front loops of remaining 6 sts and pull tight to close. Weave in end. Shell measures approx 2.75 inches (7 cm) diameter.
Head (CA)
Rnd 1: 6 sc in MR. [6]
Rnd 2: inc in each st around. [12]
Rnds 3–5: sc in each st around. [12]
Stuff lightly.
Rnd 6: dec around. [6]
FO, leaving long tail for sewing. Close hole as for shell. Head measures approx 1.25 inches (3 cm).
Legs (make 4, CA)
Rnd 1: 6 sc in MR. [6]
Rnds 2–4: sc in each st around. [6]
Lightly stuff. FO, leaving long tail for sewing. Do not close; leave open end for attaching. Each leg approx 1 inch (2.5 cm) long.
Tail (CA)
Rnd 1: 4 sc in MR. [4]
Rnd 2: sc in each st around. [4]
FO, leaving long tail for sewing. No stuffing needed. Tiny pointed tip.
Leaf (CB)
Worked flat in rows.
Ch 7.
Row 1: sc in 2nd ch from hook, sc in next 4 ch, 3 sc in last ch; rotate to work along opposite side of foundation ch, sc in next 4 ch, 2 sc in last ch (same as first st). [14]
Row 2: ch 1, turn; sc in next 5 sts, (sc, ch 2, sc) in next st (tip), sc in next 5 sts, sl st in last st. FO, leaving long tail for sewing.
Leaf is a simple pointed oval approx 1.75 inches (4.5 cm) long. Optionally embroider a center vein with a straight stitch in darker green.
Assembly
- Position limbs on shell underside (flat-ish base): Pin 4 legs evenly spaced around the lower half of the shell (two front, two back), open ends against shell. Sew securely with yarn tails, stitching through both leg edge and shell fabric several times. Weave ends inside.
- Head: Sew head to front of shell at slight upward angle, centered between front legs. Attach firmly so it does not wobble.
- Tail: Sew tail to back of shell, opposite head, centered between back legs.
- Leaf: Pin leaf on top center of shell, slightly toward rear for balance. Sew around outer edge with matching CB yarn using small whip stitches. Secure center if desired.
- Face: With black scrap yarn and yarn needle, embroider two small French-knot or satin-stitch eyes on head (or insert safety eyes between Rnds 3–4 before final stuffing/closing). Add a tiny curved smile with 2–3 straight stitches.
Finishing
- Weave in all remaining ends inside the body.
- Gently reshape shell dome and limbs with fingers.
- Optional: Add a small keychain ring or loop of yarn at top of shell if desired for charm use.
Your mini turtle is complete! The simple sphere + cylinder construction keeps every step beginner-accessible while the leaf adds a sweet nature detail. Enjoy your new little friend.
Disclaimer: This pattern was generated by AI and should be reviewed for accuracy before use. While we strive for quality, AI-generated content may contain errors. Please verify measurements, stitch counts, charts, and instructions before beginning your project. Generated by purlJam.uk
Love this pattern?
Save this pattern to your free PurlJam libraryAccess your pattern anytime
Bookmark this page to access your pattern anytime