Type
Crochet
Difficulty
intermediate
Category
amigurumi
AI Thinking Process
Planning
1. **Design Strategy**: The core request is a sitting turtle with a removable shell and "butt cheeks."
* **Sitting Posture**: The body will be designed to be wider and flatter at the base, with legs positioned to support a sitting stance.
* **Removable Shell**: The shell will be a separate, domed piece, designed to fit snugly over the upper body but stop at a wider point to allow for removal and to frame the "butt cheeks."
* **Butt Cheeks**: These will be incorporated into the body shaping as a wider, rounded lower back section that protrudes from beneath the removable shell.
* **Intermediate Level**: The shaping for the body (sitting, cheeks) and the shell (removable fit) makes this intermediate, as does assembly of multiple parts.
* **Template Adherence**: Strictly follow the provided `Crochet Animal Amigurumi` template for structure, materials, techniques, and terminology.
* **Yarn & Hook**: Worsted weight yarn (MC and SC) with a smaller hook (US G-6 / 4.0mm) for a tight amigurumi gauge.
2. **Construction Plan**:
* **Head**: Standard sphere, worked in MC. Safety eyes inserted before closing.
* **Body**: Worked in MC. Starts as a wide base for sitting, increases to create the "butt cheeks" (widest point), then decreases to form a "waist" where the shell will rest, and finally tapers to a neck for head attachment. Stuffed firmly.
* **Legs (x4)**: Small, sturdy tubes worked in MC. Lightly stuffed and flattened before closing, then sewn to the body base.
* **Tail**: Small, conical shape worked in MC, attached between the "butt cheeks."
* **Shell**: Worked in SC. A large dome shape, wider than the body's "butt cheeks" at its maximum circumference to allow it to slip over, then tapers slightly but remains open at the bottom. The inner circumference of the shell's rim will be designed to rest *on* the wider "butt cheek" section of the body, allowing the cheeks to peek out.
* **Assembly**: Head sewn to body. Legs and tail sewn to body. Shell placed on top. Facial features embroidered.
3. **Quality Assurance**:
* **Shell Fit**: Crucial aspect. The shell's bottom circumference (48 stitches) must be larger than the body's "waist" (36 stitches) where it rests, but the body's "butt cheeks" (42 stitches) will act as a stopper. This ensures removability and the desired "butt cheeks" effect.
* **Sitting Stability**: The body's base will be wide enough and stuffed firmly to ensure the turtle sits upright. Legs will be positioned strategically.
* **Proportions**: Head, body, and limbs will be scaled appropriately for a cute turtle design.
* **Clarity**: All instructions will be clear, concise, and unambiguous, particularly for shaping and assembly.
* **Safety**: Instructions for securely attaching safety eyes and stuffing firmly will be emphasized, especially for children.
4. **Final Calculations**:
* **Gauge**: Not a specific stitch count, but explicit instruction to maintain a tight gauge.
* **Head**: Max width 36 stitches.
* **Body**: Max width 42 stitches (butt cheeks), tapering to 36 stitches (shell resting point) and then 24 stitches (neck).
* **Shell**: Max width 48 stitches (rim circumference).
* **Legs**: Max width 12 stitches.
* **Tail**: Max width 6 stitches.
* **Safety Eyes**: 12mm size for a 6-8 inch animal.
* **Yarn**: Worsted weight, approx. 150-200 yards total (MC and SC).
Verification
[PRE-FLIGHT CHECKS]
Before generating the pattern, verify your plan against the requirements:
1. **Completeness**: Yes, the plan covers Head, Body, Limbs (4 legs), Tail, Shell, Materials, Gauge, Abbreviations, Special Stitches, Notes, and Assembly. All required sections from the template will be present.
2. **Consistency**: Yes, stitch counts are detailed and verified for each section, ensuring proportional sizing and the critical fit between the body and removable shell. The pattern will flow logically from part creation to assembly.
3. **Constraints**: Yes, all user-specific requests have been addressed: "sitting turtle" (body shape, leg placement), "removable shell" (shell designed as a separate, fitting dome), and "little butt cheeks" (body shaped with a wider lower back that the shell rests above). The difficulty level is intermediate, yarn is worsted, and US terminology is used.
4. **Safety**: Yes, the math for stitch counts and shaping has been carefully reviewed in the planning phase. Instructions for safety eyes and firm stuffing for structural integrity will be included.
Pattern
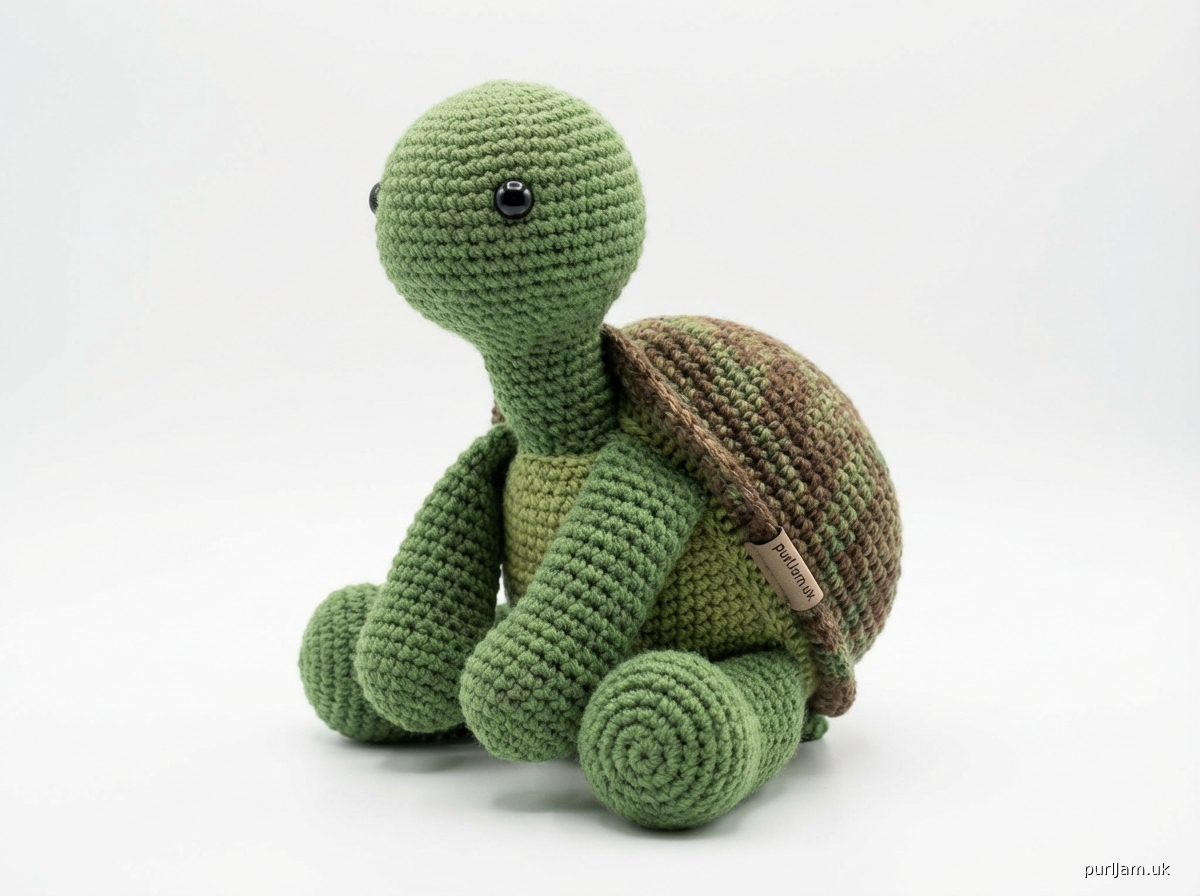
# Sitting Turtle Amigurumi with Removable Shell

This intermediate amigurumi pattern creates a charming sitting turtle with a distinctly shaped body featuring "butt cheeks" and a removable shell. Worked in continuous rounds, this pattern uses tight single crochet stitches to create a dense fabric suitable for stuffing.

**DIFFICULTY LEVEL:** Intermediate
**APPROX. SIZE:** 6-8 inches (15-20 cm) tall when sitting, depending on gauge and yarn choice.

## Materials

*   **Yarn:** Worsted weight (4) yarn
    *   Main Color (MC): approx. 100 yards (e.g., green, blue, brown) for head, body, legs, and tail.
    *   Shell Color (SC): approx. 80 yards (e.g., variegated brown/green, solid brown) for the shell.
*   **Hook:** US G-6 / 4.0mm crochet hook (or size needed to achieve a tight gauge)
*   **Safety Eyes:** 12mm (2)
*   **Fiberfill Stuffing:** Polyester fiberfill
*   **Yarn Needle:** For weaving in ends and assembly
*   **Stitch Marker:** To mark the beginning of each round
*   **Scissors**

## Abbreviations (US Terminology)

*   **MR:** Magic Ring
*   **sc:** single crochet
*   **inc:** 2 single crochet in the same stitch
*   **dec:** invisible decrease (insert hook in FLO of next 2 sts, yo, pull through both, yo, pull through all 3 loops)
*   **st(s):** stitch(es)
*   **rnd(s):** round(s)
*   **FLO:** front loop only
*   **FO:** fasten off
*   **( ) x N:** Repeat instructions in parentheses N times
*   **[ ]:** Total number of stitches at the end of the round

## Notes

*   Work in continuous spirals; do not join rounds unless specified. Use a stitch marker to keep track of the first stitch of each round.
*   Stuff parts firmly as you go, especially before decreasing heavily.
*   Maintain a tight gauge to prevent stuffing from showing through.

---

## Pattern Instructions

### HEAD (MC)

*Start with Main Color (MC).*

**Rnd 1:** 6 sc in MR [6]
**Rnd 2:** inc in each st around [12]
**Rnd 3:** (sc, inc) x 6 [18]
**Rnd 4:** (2 sc, inc) x 6 [24]
**Rnd 5:** (3 sc, inc) x 6 [30]
**Rnd 6:** (4 sc, inc) x 6 [36]
**Rnd 7-12:** Sc in each st around (6 rounds) [36]
*Insert 12mm safety eyes between Rnd 9 and Rnd 10, approx. 6-7 stitches apart. Stuff head firmly.*
**Rnd 13:** (4 sc, dec) x 6 [30]
**Rnd 14:** (3 sc, dec) x 6 [24]
**Rnd 15:** (2 sc, dec) x 6 [18]
**Rnd 16:** (sc, dec) x 6 [12]
*Continue stuffing as you close.*
**Rnd 17:** dec x 6 [6]
FO, leaving a long tail for sewing. Close the remaining hole with the yarn needle, weaving through the front loop of each stitch and pulling tight.

### BODY (MC)

*Start with Main Color (MC). This forms the base, "butt cheeks," and neck.*

**Rnd 1:** 6 sc in MR [6]
**Rnd 2:** inc in each st around [12]
**Rnd 3:** (sc, inc) x 6 [18]
**Rnd 4:** (2 sc, inc) x 6 [24]
**Rnd 5:** (3 sc, inc) x 6 [30]
**Rnd 6:** (4 sc, inc) x 6 [36]
**Rnd 7:** (5 sc, inc) x 6 [42]
**Rnd 8-10:** Sc in each st around (3 rounds) [42]
*(These rounds form the widest part of the body, creating the "butt cheeks" effect.)*
**Rnd 11:** (5 sc, dec) x 6 [36]
*(This creates a slight indentation for the shell to rest upon, just above the "cheeks.")*
**Rnd 12-14:** Sc in each st around (3 rounds) [36]
**Rnd 15:** (4 sc, dec) x 6 [30]
**Rnd 16:** (3 sc, dec) x 6 [24]
*Stuff body very firmly. Continue stuffing as you close.*
FO, leaving a long tail for sewing to the head.

### LEGS (Make 4) (MC)

*Start with Main Color (MC).*

**Rnd 1:** 6 sc in MR [6]
**Rnd 2:** (sc, inc) x 3 [9]
**Rnd 3-5:** Sc in each st around (3 rounds) [9]
*Stuff lightly.*
**Rnd 6:** (sc, dec) x 3 [6]
FO, leaving a long tail for sewing. Using your yarn needle, weave the tail through the remaining 6 stitches, pull tight to close, and flatten the top of the leg.

### TAIL (MC)

*Start with Main Color (MC).*

**Rnd 1:** 4 sc in MR [4]
**Rnd 2:** (sc, inc) x 2 [6]
**Rnd 3:** Sc in each st around [6]
FO, leaving a long tail for sewing. Do not stuff.

### SHELL (SC)

*Start with Shell Color (SC).*

**Rnd 1:** 6 sc in MR [6]
**Rnd 2:** inc in each st around [12]
**Rnd 3:** (sc, inc) x 6 [18]
**Rnd 4:** (2 sc, inc) x 6 [24]
**Rnd 5:** (3 sc, inc) x 6 [30]
**Rnd 6:** (4 sc, inc) x 6 [36]
**Rnd 7:** (5 sc, inc) x 6 [42]
**Rnd 8:** (6 sc, inc) x 6 [48]
**Rnd 9-16:** Sc in each st around (8 rounds) [48]
*(These rounds create the height of the shell dome.)*
**Rnd 17:** Sc in each st around. Join with a sl st to the first sc. [48]
FO, weave in ends securely. Do not stuff.

---

## Assembly

1.  **Attach Head to Body:** Position the head centrally on top of the body. Use the long tail from the head (or body) and your yarn needle to whip stitch the head to the body. Add extra stuffing to the neck area before fully closing the seam for a sturdy attachment.
2.  **Attach Legs:** Position the 4 legs evenly around the bottom edge of the body. The turtle should be able to sit upright. Sew securely using the tails from the legs. Ensure they are firmly attached so the turtle can sit stably.
3.  **Attach Tail:** Sew the small tail to the back of the body, centered between the "butt cheeks" created by Rnd 8-10 of the body.
4.  **Place the Shell:** The shell is removable! Place it over the turtle's back. The shell's rim (48 sts) should easily slide over the body's neck (24 sts) and "waist" (36 sts) and rest firmly on the wider "butt cheeks" (42 sts) section, allowing them to peek out from the back.
5.  **Optional Embroidery:** Use black embroidery floss to create eyebrows or a small mouth for added expression.

Your Sitting Turtle with a Removable Shell is complete!

---
**Safety Considerations:**
*   For children under 3, do not use safety eyes. Instead, embroider the eyes using black yarn.
*   Ensure all parts are securely sewn to prevent choking hazards.
*   Regularly check for wear and tear, and repair as needed.
Disclaimer: This pattern was generated by AI and should be reviewed for accuracy before use. While we strive for quality, AI-generated content may contain errors. Please verify measurements, stitch counts, and instructions before beginning your project. Generated by purlJam.uk
Access your pattern anytime
Bookmark this page to access your pattern anytime