Type
Crochet
Difficulty
beginner
Category
blanket
AI Thinking Process
Planning
Verification
Pattern
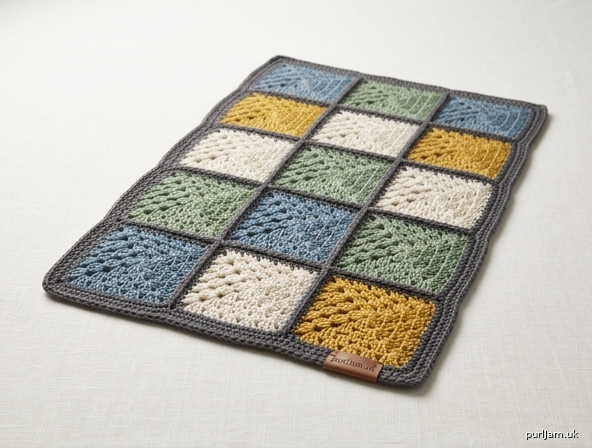
Rectangular Granny Square Table Mat
Skill Level: Beginner
Finished Size: Approximately 16" wide × 26" long (40.5 cm × 66 cm) after border and light blocking
Yarn: Worsted weight (category 4) yarn, approx. 450–500 yd (410–455 m) total. Sample uses one main color (MC) for squares and a contrasting color (CC) for join/border, but scrap-friendly—use as many colors as desired.
Hook: US H/8 (5 mm) or size needed to obtain gauge
Notions: Yarn needle, scissors, blocking mats/pins (optional but recommended)
Gauge: One 4-round granny square = 5" × 5" (12.5 cm × 12.5 cm) after light blocking.
Adjust hook size if your square differs by more than ¼".
Abbreviations (US Terms)
- ch = chain
- sl st = slip stitch
- sc = single crochet
- dc = double crochet
- sp = space
- st(s) = stitch(es)
- rnd(s) = round(s)
- MC = main color
- CC = contrasting color
- FO = fasten off
Pattern Notes
- Magic ring may be substituted for ch-4 ring if preferred.
- Each granny square is worked in joined rounds, right side always facing.
- Beginning ch-3 counts as first dc throughout.
- Table mat is intentionally rectangular (3 squares wide × 5 squares long).
- Weave in ends as you go for neater finishing.
- Block squares before joining for best flat results.
Granny Square (make 15)
With MC (or color of choice), ch 4, join with sl st in first ch to form ring.
Rnd 1: Ch 3 (counts as dc), 2 dc in ring, ch 2, [3 dc in ring, ch 2] 3 times, join with sl st in top of beg ch-3. (4 groups of 3 dc, 4 corner ch-2 sps)
Rnd 2: Sl st in next 2 dc and into first ch-2 sp, ch 3, (2 dc, ch 2, 3 dc) in same sp (first corner), ch 1, *(3 dc, ch 2, 3 dc) in next ch-2 sp, ch 1; rep from * around, join with sl st in top of beg ch-3. (8 groups of 3 dc)
Rnd 3: Sp st in next 2 dc and into first ch-2 sp, ch 3, (2 dc, ch 2, 3 dc) in same sp, ch 1, 3 dc in next ch-1 sp, ch 1, *(3 dc, ch 2, 3 dc) in next ch-2 sp, ch 1, 3 dc in next ch-1 sp, ch 1; rep from * around, join with sl st in top of beg ch-3. (12 groups of 3 dc)
Rnd 4: Sl st in next 2 dc and into first ch-2 sp, ch 3, (2 dc, ch 2, 3 dc) in same sp, ch 1, [3 dc in next ch-1 sp, ch 1] twice, *(3 dc, ch 2, 3 dc) in next ch-2 sp, ch 1, [3 dc in next ch-1 sp, ch 1] twice; rep from * around, join with sl st in top of beg ch-3. (16 groups of 3 dc)
FO, leaving a 12" tail if using whip-stitch join later. Weave in center tail.
(Inline check: Rnd 1 = 4 dc-groups → Rnd 2 adds 4 = 8 → Rnd 3 adds 4 = 12 → Rnd 4 adds 4 = 16 groups ✓. Square measures 5" × 5".)
Arrangement
Lay squares right side up in a rectangle:
- 3 squares across (width)
- 5 squares down (length)
Total 15 squares. Alternate colors if using multiple for a classic look, or keep uniform.
Joining Method 1: Whip Stitch (recommended for beginners)
- Hold two squares with right sides together, matching stitches and corners.
- Thread yarn needle with matching yarn or CC.
- Whip stitch through both loops of corresponding stitches along one edge, working from corner ch-2 to corner ch-2. Keep stitches snug but not tight so the mat lies flat.
- Join all squares into 5 strips of 3 squares each first (horizontal joins).
- Then join the 5 strips together along the long edges (vertical joins).
- Weave in all tails securely on wrong side.
(Inline check: 3 × 5 grid requires 10 horizontal seams inside strips + 4 long vertical seams between strips ✓.)
Joining Method 2: Join-As-You-Go (JAYG) – optional
Work Rnds 1–3 of each square as normal. On Rnd 4, when working a side that needs to join to a previous square:
- Instead of ch-1 between 3-dc groups, work: 3 dc in ch-sp, drop loop, insert hook from front into corresponding ch-1 sp of adjacent square, pick up dropped loop and pull through, ch 1 to secure.
- At corners: work (3 dc, ch 1, drop loop, join to adjacent corner ch-2, ch 1, 3 dc).
Join on two sides maximum per square as you build the grid row by row. FO and weave ends.
Border (optional but recommended)
With right side facing and CC (or MC), join yarn with sl st in any outer corner ch-2 sp.
Border Rnd 1: Ch 1, *(sc, ch 2, sc) in corner ch-2 sp, sc in each dc and ch-1 sp across to next corner; rep from * around entire mat, working 1 sc in each join seam for smoothness, join with sl st in first sc.
Border Rnd 2 (optional thicker edge): Ch 1, sc in each sc around, working (sc, ch 2, sc) in each corner ch-2 sp, join with sl st in first sc.
FO. Weave in ends.
(Inline check: Starting size 15" × 25"; two sc rnds add approx. ½" per side → +1" width and length = 16" × 26" ✓.)
Finishing
- Weave in any remaining ends.
- Block gently: pin mat to finished measurements on blocking boards, spritz with water, and allow to dry completely. This evens stitches and flattens joins.
- Your rectangular granny square table mat is ready for the table!
Customizing Size:
- For narrower runner: 2 × 6 squares (approx. 11" × 31" before border).
- For larger mat: 4 × 6 squares (approx. 21" × 31" before border).
Recalculate yarn accordingly (~30 yd per square).
Enjoy your handmade table mat!
Disclaimer: This pattern was generated by AI and should be reviewed for accuracy before use. While we strive for quality, AI-generated content may contain errors. Please verify measurements, stitch counts, and instructions before beginning your project. Generated by purlJam.uk
Love this pattern?
Save this pattern to your free PurlJam libraryAccess your pattern anytime
Bookmark this page to access your pattern anytime