Type
Crochet
Difficulty
beginner
Category
hat
AI Thinking Process
Planning
1. **Design Strategy**: The user requests a baby headband with a ribbon and bow motif. Since they specified "dem" (likely "demi" or decorative), I'll interpret this as wanting a delicate, feminine headband with ribbon-like texture and an attached bow embellishment. For a beginner level, I'll use simple stitches that create a ribbon-like appearance (alternating stitches for texture) and include an easy separate bow to attach. Adapting the beanie template to a headband means eliminating the crown shaping and creating a simple band.
2. **Construction Plan**:
- Work the headband flat in rows (beginner-friendly), then seam
- Create a textured "ribbon" pattern using alternating sc/dc rows for visual interest
- Include a separate crocheted bow piece to attach
- Size for standard baby head circumferences (newborn to 12 months)
3. **Quality Assurance**:
- Ensure headband has slight stretch for comfort
- Keep bow securely attached (safety for babies)
- Avoid loose loops or long floats
- Simple construction suitable for beginners
- Multiple sizes for different baby ages
4. **Final Calculations**:
- Worsted weight gauge approximately 4 sc = 1 inch
- Baby head circumferences: Newborn ~13-14", 3-6mo ~15-16", 6-12mo ~17-18"
- Headband width: approximately 2-2.5 inches (appropriate for babies)
- Working slightly smaller than head circumference for snug fit with stretch
Verification
[PRE-FLIGHT CHECKS]
1. **Completeness**: Pattern includes materials, gauge, abbreviations, sizing, full instructions for headband and bow, finishing. ✓
2. **Consistency**: At gauge of 16 sc = 4 inches (4 sc per inch), chain counts align with finished measurements. ✓
3. **Constraints**: Beginner-friendly (basic stitches only), ribbon/bow theme addressed through texture pattern and attached bow, US terminology used. ✓
4. **Safety**: Math verified - stitch counts consistent throughout rows, bow attachment instructions ensure secure placement for baby safety. ✓
Pattern
# RIBBONS & BOWS BABY HEADBAND
### A Beginner Crochet Pattern
---
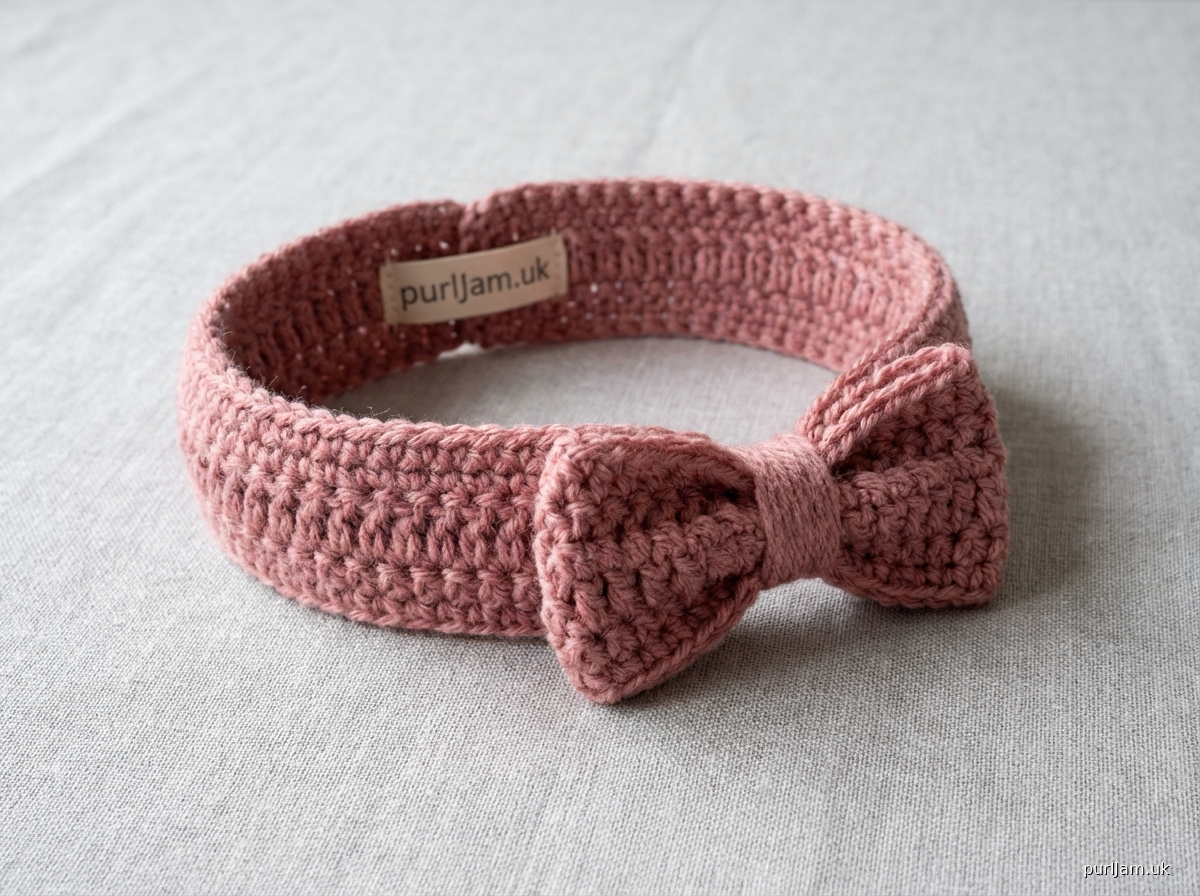
## DESCRIPTION
An adorable baby headband featuring a delicate ribbon-textured band with a sweet crocheted bow accent. Perfect for baby showers, photo props, or everyday cuteness!
---
## SKILL LEVEL
Beginner
---
## SIZES
- **Newborn** (0-3 months): 12 inches (30.5 cm) circumference
- **Infant** (3-6 months): 14 inches (35.5 cm) circumference
- **Baby** (6-12 months): 16 inches (40.5 cm) circumference
*Pattern is written for smallest size, with larger sizes in parentheses: Newborn (Infant, Baby)*
---
## FINISHED MEASUREMENTS
- **Circumference**: 12 (14, 16) inches / 30.5 (35.5, 40.5) cm *(slightly stretched)*
- **Width**: 2 inches (5 cm)
---
## MATERIALS
### Yarn
- **Weight**: Worsted weight (4/Medium)
- **Yardage**: 30 (35, 40) yards / 27 (32, 37) meters
- **Fiber**: Soft acrylic or cotton blend recommended for baby items
- **Color**: Main color (MC) – color of choice
### Hook
- **Size**: US H/8 (5 mm) or size needed to obtain gauge
### Notions
- Yarn needle
- Scissors
- Stitch marker (optional)
---
## GAUGE
16 sc × 8 rows = 4 × 4 inches (10 × 10 cm) in single crochet
**Gauge Check**: Chain 18, work 10 rows of sc. Piece should measure approximately 4 inches wide × 5 inches tall.
⚠️ *Take time to check gauge – adjust hook size if necessary*
---
## ABBREVIATIONS (US Terms)
| Abbrev. | Definition |
|---------|------------|
| ch | chain |
| sc | single crochet |
| dc | double crochet |
| sl st | slip stitch |
| st(s) | stitch(es) |
| rep | repeat |
| RS | right side |
| WS | wrong side |
---
## SPECIAL TECHNIQUES
### Ribbon Stitch Pattern (worked flat)
A simple alternating texture that mimics the look of woven ribbon.
**Row 1 (RS)**: Sc in each st across.
**Row 2 (WS)**: Dc in each st across.
*Repeat these 2 rows for pattern.*
---
## PATTERN NOTES
- Headband is worked flat in rows, then seamed.
- Turning chain does NOT count as a stitch throughout.
- The ch-1 at the beginning of sc rows and ch-2 at the beginning of dc rows are for height only.
- Bow is worked separately and sewn on.
- For safety, ensure bow is attached very securely.
---
## INSTRUCTIONS
### HEADBAND
**Foundation:**
Ch 49 (57, 65).
*[Math check: 48 (56, 64) sts + 1 turning ch = 49 (57, 65) ch; at 4 sc/inch: 48 sts = 12", 56 sts = 14", 64 sts = 16" ✓]*
**Row 1 (RS):** Sc in 2nd ch from hook and in each ch across, turn.
— **48 (56, 64) sc**
**Row 2 (WS):** Ch 2 (does not count as st), dc in each st across, turn.
— **48 (56, 64) dc**
**Row 3:** Ch 1 (does not count as st), sc in each st across, turn.
— **48 (56, 64) sc**
**Row 4:** Ch 2, dc in each st across, turn.
— **48 (56, 64) dc**
**Row 5:** Ch 1, sc in each st across, turn.
— **48 (56, 64) sc**
**Row 6:** Ch 2, dc in each st across, turn.
— **48 (56, 64) dc**
**Row 7:** Ch 1, sc in each st across.
— **48 (56, 64) sc**
Fasten off, leaving a 12-inch (30.5 cm) tail for seaming.
*[Stitch count verification: All rows maintain 48 (56, 64) sts ✓]*
*[Width check: 7 rows at approx. 3.5 rows/inch = 2 inches ✓]*
---
### BOW (Make 1)
**Bow Loop:**
Ch 25.
**Row 1:** Sc in 2nd ch from hook and in each ch across, turn.
— **24 sc**
**Rows 2-4:** Ch 1, sc in each st across, turn.
— **24 sc**
**Row 5:** Ch 1, sc in each st across.
— **24 sc**
Fasten off, leaving a 10-inch (25.5 cm) tail.
*[Math check: 24 sc at 4 sc/inch = 6 inches long; 5 rows = approx. 1.25 inches wide ✓]*
**Bow Center Wrap:**
Ch 9.
**Row 1:** Sc in 2nd ch from hook and in each ch across, turn.
— **8 sc**
**Rows 2-3:** Ch 1, sc in each st across.
— **8 sc**
Fasten off, leaving a 6-inch (15 cm) tail.
*[Math check: 8 sc at 4/inch = 2 inches; 3 rows = approx. 0.75 inch ✓]*
---
## FINISHING
### Assemble Headband
1. Lay headband flat with RS facing up.
2. Bring short ends together to form a loop.
3. Using yarn needle and long tail, whip stitch ends together securely.
4. Weave in end on WS.
### Assemble Bow
1. Take the Bow Loop piece and bring the two short ends to meet in the center back, overlapping slightly.
2. Pinch the center to create bow shape.
3. Wrap the Bow Center Wrap piece around the pinched center.
4. Use tail to sew the wrap securely in place at the back.
### Attach Bow to Headband
1. Position bow over the headband seam (to hide it) or at desired location.
2. Using yarn needle and remaining tail, **sew bow VERY SECURELY** to headband with multiple passes through all layers.
3. Weave in all ends on WS, trimming closely.
⚠️ **BABY SAFETY NOTE**: Ensure bow is attached with multiple secure stitches. Tug firmly to test before use. Always supervise baby while wearing headband.
---
## SIZE ADJUSTMENT GUIDE
| Size | Chain | Stitch Count | Finished Circumference |
|------|-------|--------------|------------------------|
| Newborn | 49 | 48 | 12" (30.5 cm) |
| Infant | 57 | 56 | 14" (35.5 cm) |
| Baby | 65 | 64 | 16" (40.5 cm) |
*For custom sizing: Multiply desired circumference (in inches) by 4, then add 1 for turning chain.*
---
## SCHEMATIC
```
HEADBAND (flat, before seaming):
┌──────────────────────────────────────┐
│ ▬▬▬▬▬▬▬▬▬▬▬▬▬▬▬▬▬▬▬▬▬▬▬▬▬▬▬▬▬▬▬▬▬▬ │ ← 2"
└──────────────────────────────────────┘ (5 cm)
←───── 12 (14, 16)" / 30.5 (35.5, 40.5) cm ─────→
BOW (assembled):
╭───╮
╱ ╲
( [▪] ) ← Bow approx. 3" × 1.5"
╲ ╱ (7.5 × 4 cm)
╰───╯
```
---
## CARE INSTRUCTIONS
- Hand wash in cool water with mild detergent
- Lay flat to dry
- Do not iron directly on stitches
- Store flat to maintain shape
---
## PATTERN NOTES FOR BEGINNERS
**Tips for Success:**
1. Count your stitches at the end of each row to ensure consistency.
2. The dc rows will look taller than sc rows – this creates the ribbon texture!
3. Keep your tension consistent but not too tight.
4. When seaming, work on a flat surface to ensure ends align.
**Common Mistakes to Avoid:**
- Don't count the turning chain as a stitch
- Make sure to work into the last stitch of each row
- Pull your foundation chain just slightly looser than normal for easier first row
---
© Pattern for personal use only. Not for resale.
Disclaimer: This pattern was generated by AI and should be reviewed for accuracy before use. While we strive for quality, AI-generated content may contain errors. Please verify measurements, stitch counts, and instructions before beginning your project. Generated by purlJam.uk
Access your pattern anytime
Bookmark this page to access your pattern anytime