Type
Crochet
Difficulty
intermediate
Category
tank
AI Thinking Process
Planning
Verification
Pattern
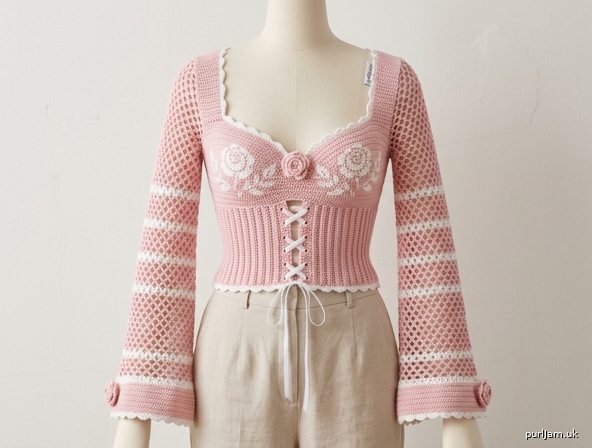
Rosaline Sweetheart Crop Top
Fitted corset-inspired crop with floral tapestry cups and lattice bell sleeves
US crochet terminology · Imperial measurements (metric in parentheses) · Lace weight · Advanced
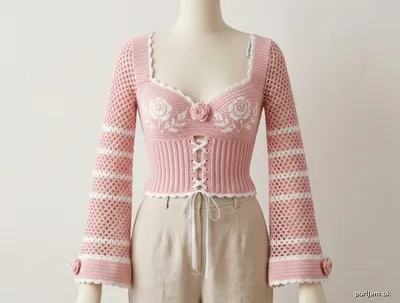
A close-fitting, underbust-cropped bodice in soft baby pink, with white floral colorwork, a scalloped sweetheart neckline, a wide vertically ribbed corset band, and long, slightly flared bell sleeves in open lattice, striped in alternating pink and white. Three-dimensional rose motifs finish the center front and cuffs.
Construction
Route C (modular cups joined to a bust band, body worked downward), with added set-in bell sleeves.
Cups are worked flat from the wide underbust edge up to the sweetheart. A matching back panel is worked flat. Cups are joined with a short center bridge, shoulders are seamed to the back, then stitches are picked up around the entire lower edge and the corset band is worked downward in the round. Sleeves are picked up around each armhole and worked downward in open lattice, increasing to a bell. Neckline, band hem, and cuffs are scalloped.
Difficulty
Advanced. Shaped cups, tapestry colorwork, lace-weight gauge control, vertical rib in the round, open-lattice shaping, and fine seaming. Not a first garment.
Sizes
XS (S, M, L, XL, XXL)
To fit bust: 32 (36, 40, 44, 48, 52)" / 81.5 (91.5, 101.5, 112, 122, 132) cm
Finished bust (at cup line): 30 (34, 38, 42, 46, 50)" / 76 (86.5, 96.5, 106.5, 117, 127) cm
Intended ease: −2" / −5 cm (close-fitting, corset)
Shown in size S. Choose the size closest to your full bust; the optional front lacing lets you cinch the band.
Finished Measurements
| XS | S | M | L | XL | XXL | |
|---|---|---|---|---|---|---|
| Bust at cups | 30" | 34" | 38" | 42" | 46" | 50" |
| Band (underbust/high waist) | 24" | 28" | 32" | 36" | 40" | 44" |
| Each cup width | 7" | 8" | 9" | 10" | 11" | 12" |
| Cup height | 5½" | 6" | 6½" | 7" | 7½" | 8" |
| Band height | 4" | 4" | 4¼" | 4½" | 4¾" | 5" |
| Total length, shoulder to hem | 11½" | 12½" | 13½" | 14½" | 15½" | 16½" |
| Strap / shoulder width | 2" | 2¼" | 2½" | 2¾" | 3" | 3¼" |
| Armhole depth | 7½" | 7¾" | 8¼" | 8¾" | 9¼" | 9¾" |
| Sleeve length from armhole | 22" | 22½" | 23" | 23" | 23½" | 24" |
| Upper sleeve | 10" | 11" | 12" | 13" | 14½" | 16" |
| Bell hem | 18" | 20" | 22" | 24" | 26" | 28" |
Materials
Yarn: Lace weight (0), merino/silk or cotton/silk blend, approx. 880 yd / 805 m per 100 g. Soft drape, clear stitch definition.
- MC — Soft Baby Pink: 980 (1100, 1250, 1420, 1620, 1850) yd / 896 (1006, 1143, 1298, 1481, 1692) m
- CC — Crisp White: 490 (550, 630, 720, 820, 940) yd / 448 (503, 576, 658, 750, 860) m
Hook: US B-1 / 2.25 mm, or size to obtain sc gauge.
Optional: US C-2 / 2.75 mm for the lattice sleeves only, for a softer drape (re-check lattice gauge).
Notions:
- Stitch markers (including 8+ removable)
- Tapestry needle
- Scissors
- Blocking wires and T-pins
- 1½ yd / 1.4 m of ¼" satin ribbon (optional corset lacing)
- Optional lining: flesh-tone or matching stretch mesh for cups and/or body
Gauge
Blocked, measured flat.
- Main fabric (sc): 32 sts and 36 rows = 4" / 10 cm with US B-1 / 2.25 mm.
(8 sts = 1" / 9 rows = 1") - Corset rib (fpdc/bpdc): 32 sts and 28 rnds = 4" / 10 cm.
- Open lattice [(dc, ch 2, sk 2) repeat]: 24 sts (8 repeats) and 16 rnds = 4" / 10 cm.
(6 sts = 1" / 4 rnds = 1")
Swatch both fabrics. If sc gauge is tight, the bodice will be too small; if lattice gauge is tight, the sleeves will not drape.
Stitch Guide (US)
- ch — chain
- sl st — slip stitch
- sc — single crochet
- hdc — half double crochet
- dc — double crochet
- tr — treble crochet
- sc BLO — single crochet in back loop only
- hdc BLO — half double crochet in back loop only
- sc2tog — single crochet 2 together
- dc2tog — double crochet 2 together
- fpdc — front-post double crochet
- bpdc — back-post double crochet
- fpdc2tog — front-post dc 2 together
- ch-sp — chain space
- shell — 5 dc in indicated st or sp
- picot — ch 3, sl st in first ch
Open Lattice (in the round):
Rnd 1: Ch 5 (counts as dc + ch 2), sk 2 sts, *dc in next st, ch 2, sk 2 sts; rep from * to end, sl st in 3rd ch of beg ch-5.
Following rnds: Sl st into first ch-2 sp, ch 5, *dc in next ch-2 sp, ch 2; rep from *, sl st in 3rd ch of beg ch-5.
Lattice increase: In one ch-2 sp work (dc, ch 2, dc, ch 2) instead of (dc, ch 2). Adds 1 repeat (3 sts).
Tapestry sc: Work sc as usual, carrying the unused color along the WS and encasing it under the working sts. Catch the float at least every 3 sts. Keep carried yarn loose enough that the fabric does not pucker.
Pattern Notes
- Worked in US terms throughout. Do not mix UK names.
- Parentheses give sizes XS (S, M, L, XL, XXL). When one number is given, it applies to all sizes.
- Turning ch-1 at the start of a sc row does not count as a stitch. Ch-3 at the start of a dc rnd does count as dc.
- The lattice fabric and any open lace are see-through. Wear over a matching bandeau, sew in a lining, or treat the top as a layering piece. Tapestry cups are denser but still fine.
- Block every piece before seaming. Lace will not show its true size until blocked.
- On open fabric, weave ends along a solid column, never across a ch-sp.
- Colorwork is tapestry crochet (crochet analogue of stranded/Fair Isle work), not cut intarsia, unless you prefer to manage bobbins on Chart A.
Colorwork Charts
How to read the charts
Charts are worked in tapestry sc, 1 chart square = 1 sc.
Rows are numbered from bottom to top.
RS (odd-numbered) rows: read right to left.
WS (even-numbered) rows: read left to right.
Always carry CC on WS. Twist MC and CC at color changes to prevent holes.
Color key
- □ = MC (Soft Baby Pink)
- ■ = CC (Crisp White)
Where the charts are used
- Chart A — centered on each cup during the even-width section (see Cups).
- Chart B — optional second blossom, stacked above Chart A on larger cups, or used on the back panel.
- Chart C — leaf sprig flanking Chart A (one on the inner side, one on the outer side of each cup).
CHART A: Rose Motif (15 sts × 17 rows)
Repeat width: 15 sts. Worked once, centered.
17: □□□□□□□□□□□□□□□
16: □□□□□■■■■■□□□□□
15: □□□□■■■■■■■□□□□
14: □□□■■□□■□□■■□□□
13: □□■■□□□□□□□■■□□
12: □■■□□□■■■□□□■■□
11: □■□□□■■■■■□□□■□
10: □■□□■■■■■■■□□■□
 9: □■■□□■■■■■□□■■□
 8: □□■■□□■■■□□■■□□
 7: □□□■■□□■□□■■□□□
 6: □□□□■■■■■■■□□□□
 5: □□□□□■■■■■□□□□□
 4: □□□□□□□■□□□□□□□
 3: □□□■■□□■□□■■□□□
 2: □□□□■■■■■■■□□□□
 1: □□□□□□□□□□□□□□□
Key: □ = MC (Baby Pink), ■ = CC (White)
CHART B: Small Blossom (9 sts × 9 rows)
Repeat width: 9 sts.
 9: □□□□□□□□□
 8: □□□■■■□□□
 7: □□■■■■■□□
 6: □■■□■□■■□
 5: □■■■■■■■□
 4: □■■□■□■■□
 3: □□■■■■■□□
 2: □□□■■■□□□
 1: □□□□□□□□□
Key: □ = MC, ■ = CC
CHART C: Leaf Sprig (11 sts × 7 rows)
Repeat width: 11 sts. Work twice per cup (mirror the second by reading RS rows left to right and WS rows right to left).
 7: □□□□■□□□□□□
 6: □□□■■■□□□□□
 5: □□■■■□□□□□□
 4: □■■■□□□■□□□
 3: □□□□□□■■■□□
 2: □□□□□□□■■□□
 1: □□□□□□□□□□□
Key: □ = MC, ■ = CC
Color management
- Wind a small CC bobbin for each cup (and one for the back if using Chart B).
- Do not carry CC across more than 5 sts without catching it.
- After Chart A is complete, cut CC on that cup, leaving a 6" tail, and weave along a sc column.
- Stripe the sleeves by cutting and rejoining at each 8-rnd color change, or carry up the WS of the join if the jog is acceptable. Weave stripe tails down a dc post.
- Block colorwork with pins so motifs lie square; do not overstretch white stitches relative to pink.
Special Stitch Patterns
Horizontal ridge (back panel):
Row 1 (RS): Sc across.
Row 2 (WS): Sc BLO across.
Rep Rows 1–2 for lightly ribbed texture.
Corset rib (band, in the round):
*Fpdc around next st, bpdc around next st; rep from * around.
On subsequent rnds, fpdc around each fpdc and bpdc around each bpdc so ribs stack vertically.
CUPS (make 2)
With MC and US B-1 / 2.25 mm, ch 57 (65, 73, 81, 89, 97).
Row 1 (RS): Sc in 2nd ch from hook and in each ch across, turn.
56 (64, 72, 80, 88, 96) sc.
Rows 2–7: Ch 1, sc in each st across, turn.
56 (64, 72, 80, 88, 96) sc.
Optional short-row bust dart (recommended for a fuller bust):
After Row 7, work 6 short rows over the center 28 (32, 36, 40, 44, 48) sts only, turning with ch 1 and leaving 14 (16, 18, 20, 22, 24) sts unworked at each end on Row 1 of the dart, then 4 fewer unworked sts each short row, then work 1 full row across all sts to close the dart. These 6 rows add projection without changing the full-row stitch count.
Place charts (even-width section):
Rows 8–24: Ch 1, sc across, working Chart A in tapestry sc over the center 15 sts, and (optional) Chart C in the remaining fabric — one sprig to the right of Chart A, one mirrored sprig to the left, with at least 2 MC sts between motifs.
Chart A placement (sts before chart, 15 chart sts, sts after chart):
20 (24, 28, 32, 36, 40) MC, 15 chart, 21 (25, 29, 33, 37, 41) MC.
(20 + 15 + 21 = 56 ✓; 24 + 15 + 25 = 64 ✓; 28 + 15 + 29 = 72 ✓; 32 + 15 + 33 = 80 ✓; 36 + 15 + 37 = 88 ✓; 40 + 15 + 41 = 96 ✓)
On size M and larger, after Chart A, you may work Chart B once, centered, on Rows 26–34.
Rows 25–38 (41, 45, 48, 51, 55): With MC only, ch 1, sc in each st across, turn.
56 (64, 72, 80, 88, 96) sc.
Mark the inner (center-front) edge and the outer (armhole/strap) edge. For the two cups, inner edges face each other — make a left cup and a right cup by reversing which edge you decrease.
Upper sweetheart shaping
Decrease 1 st at the inner edge every row as follows.
Row 1 of shaping (RS): Ch 1, sc2tog at inner edge, sc to end, turn.
55 (63, 71, 79, 87, 95) sc.
Row 2: Ch 1, sc to last 2 sts, sc2tog, turn.
54 (62, 70, 78, 86, 94) sc.
Continue in this manner, decreasing 1 st at the inner edge every row, 12 (13, 14, 15, 16, 17) shaping rows total.
Sts remaining: 44 (51, 58, 65, 72, 79).
(56 − 12 = 44 ✓; 64 − 13 = 51 ✓; 72 − 14 = 58 ✓; 80 − 15 = 65 ✓; 88 − 16 = 72 ✓; 96 − 17 = 79 ✓)
Next row (divide for strap):
Starting at the outer edge, ch 1, sc 16 (18, 20, 22, 24, 26), leave remaining 28 (33, 38, 43, 48, 53) sts unworked (neckline). Turn.
(44 − 16 = 28 ✓; 51 − 18 = 33 ✓; 58 − 20 = 38 ✓; 65 − 22 = 43 ✓; 72 − 24 = 48 ✓; 79 − 26 = 53 ✓)
Strap
Working on the 16 (18, 20, 22, 24, 26) strap sts only:
Strap rows: Ch 1, sc in each st across, turn.
Work 18 (20, 22, 24, 26, 28) rows, or until strap measures 2 (2¼, 2½, 2¾, 3, 3¼)" / 5 (5.5, 6.5, 7, 7.5, 8.5) cm from the divide. Fasten off, leaving a 12" tail for seaming.
Total cup + strap rows: 56 (61, 67, 72, 77, 83) full-height rows at the outer edge ≈ 6¼ (6¾, 7½, 8, 8½, 9¼)" of front armhole, plus the strap. Combined with the back, this yields the listed armhole depth.
Make the second cup as a mirror, decreasing at the opposite edge.
BACK PANEL
With MC, ch 121 (137, 153, 169, 185, 201).
Row 1 (RS): Sc in 2nd ch from hook and in each ch across, turn.
120 (136, 152, 168, 184, 200) sc.
(15 × 8 = 120 ✓; 17 × 8 = 136 ✓; 19 × 8 = 152 ✓; 21 × 8 = 168 ✓; 23 × 8 = 184 ✓; 25 × 8 = 200 ✓)
Rows 2–8 (8, 8, 10, 10, 10): Work in Horizontal Ridge pattern (sc on RS, sc BLO on WS).
120 (136, 152, 168, 184, 200) sts.
Optional: center Chart B once on Rows 4–12 of the back, using the same tapestry method.
Armhole shaping
Next row (RS): Sl st across first 6 (7, 8, 9, 10, 12) sts, ch 1, sc to last 6 (7, 8, 9, 10, 12) sts, leave those sts unworked, turn.
108 (122, 136, 150, 164, 176) sc.
(120 − 12 = 108 ✓; 136 − 14 = 122 ✓; 152 − 16 = 136 ✓; 168 − 18 = 150 ✓; 184 − 20 = 164 ✓; 200 − 24 = 176 ✓)
Dec row: Ch 1, sc2tog, sc to last 2 sts, sc2tog, turn.
Rep Dec row every row 7 (8, 9, 10, 11, 12) more times (8 (9, 10, 11, 12, 13) dec rows total).
Sts remaining: 92 (104, 116, 128, 140, 150).
(108 − 16 = 92 ✓; 122 − 18 = 104 ✓; 136 − 20 = 116 ✓; 150 − 22 = 128 ✓; 164 − 24 = 140 ✓; 176 − 26 = 150 ✓)
Work even in Horizontal Ridge until Back measures 5½ (6, 6½, 7, 7½, 8)" / 14 (15, 16.5, 18, 19, 20.5) cm from the foundation, ending on a WS row. (This matches cup height.)
Continue even until total Back height from foundation = 7½ (7¾, 8¼, 8¾, 9¼, 9¾)" / 19 (19.5, 21, 22, 23.5, 25) cm, ending on a WS row.
Back neck and shoulders
Shoulder width each side: 16 (18, 20, 22, 24, 26) sts.
Center back neck: 60 (68, 76, 84, 92, 98) sts.
(16 + 60 + 16 = 92 ✓; 18 + 68 + 18 = 104 ✓; 20 + 76 + 20 = 116 ✓; 22 + 84 + 22 = 128 ✓; 24 + 92 + 24 = 140 ✓; 26 + 98 + 26 = 150 ✓)
Next row (RS): Ch 1, sc 16 (18, 20, 22, 24, 26), fasten off this shoulder (or place sts on a holder). Skip center 60 (68, 76, 84, 92, 98) sts, join MC in next st, sc 16 (18, 20, 22, 24, 26). Fasten off, leaving a 12" tail.
Work 0 (0, 0, 2, 2, 2) extra rows on each shoulder if needed so the back shoulder matches the front strap length. Block Back.
CENTER BRIDGE
With MC, RS facing, join yarn to the inner-bottom corner of the Right Cup (as worn).
Row 1: Ch 1, work 8 sc evenly along a 1" / 2.5 cm span of the inner edge, beginning at the foundation and working up ½" / 1.5 cm, then down the matching inner edge of the Left Cup so the cups are joined at the underbust only. Turn.
8 sc.
Rows 2–4: Ch 1, sc in each sc, turn. Fasten off.
The sweetheart dip above the bridge remains open.
BLOCK AND JOIN BODICE
Block Cups and Back to the finished widths and cup heights.
Shoulders: With RS together (or WS together for a decorative ridge), mattress-stitch each front strap to the matching back shoulder, 16 (18, 20, 22, 24, 26) sts.
Underarms: Mattress-stitch the bottom ¾–1" / 2–2.5 cm of each cup’s outer corner to the matching unworked armhole bind-off of the Back, so the armhole is a closed ring.
CORSET WAISTBAND
Worked downward from the bust line.
With MC, RS facing, join at the left side (as worn).
Pick-up rnd: Ch 1, sc evenly around the entire lower edge: 56 sc along Left Cup foundation, 8 sc along Bridge, 56 sc along Right Cup foundation, 120 sc along Back foundation. Join with sl st to first sc, do not turn.
240 sc.
(56 + 8 + 56 + 120 = 240 ✓)
All sizes pick-up: 240 (272, 304, 336, 368, 400) sc.
(S: 64 + 8 + 64 + 136 = 272 ✓; M: 72 + 8 + 72 + 152 = 304 ✓; L: 80 + 8 + 80 + 168 = 336 ✓; XL: 88 + 8 + 88 + 184 = 368 ✓; XXL: 96 + 8 + 96 + 200 = 400 ✓)
Place markers at both side “seams,” at center front, and at center back.
Rnd 1: Ch 3 (counts as dc), dc in each sc around, sl st in top of ch-3.
240 (272, 304, 336, 368, 400) dc.
Rnd 2 (establish ribs): Ch 2 (does not count as a st), *fpdc around next st, bpdc around next st; rep from * around, sl st in first fpdc.
Count remains even. 240 (272, 304, 336, 368, 400) sts.
Cinch shaping
Decrease 6 sts every rnd for 8 rnds (48 sts decreased), keeping rib alignment. Work each decrease as fpdc2tog (or bpdc2tog) over a pair, spacing the 6 decreases at: left front, left side, left back, right back, right side, right front.
Rnds 3–10: Work corset rib, decreasing 6 sts evenly as above.
Rnd 3: 234 (266, 298, 330, 362, 394)
Rnd 4: 228 (260, 292, 324, 356, 388)
Rnd 5: 222 (254, 286, 318, 350, 382)
Rnd 6: 216 (248, 280, 312, 344, 376)
Rnd 7: 210 (242, 274, 306, 338, 370)
Rnd 8: 204 (236, 268, 300, 332, 364)
Rnd 9: 198 (230, 262, 294, 326, 358)
Rnd 10: 192 (224, 256, 288, 320, 352)
(240 − 48 = 192 ✓; 272 − 48 = 224 ✓; 304 − 48 = 256 ✓; 336 − 48 = 288 ✓; 368 − 48 = 320 ✓; 400 − 48 = 352 ✓)
Next rnds: Work even in corset rib until band measures 4 (4, 4¼, 4½, 4¾, 5)" / 10 (10, 11, 11.5, 12, 12.5) cm from the pick-up, including decrease rnds.
Optional lacing window: On the last 6 rnds, stop 4 sts before center front, ch 3, skip 8 center-front sts, continue rib. On following rnds, work 3 sc in each ch-3 sp (or ch 3 again) to form stacked eyelets. Thread ribbon through eyelets at finishing.
Do not fasten off if you will work the hem scallop now; or fasten off MC and join CC for the hem.
Band hem scallop (CC)
Scallop rnd: Ch 1, sc in first st, sk 1, 5 dc in next st, sk 1, *sc in next st, sk 1, 5 dc in next st, sk 1; rep from * around, sl st in first sc. Adjust by skipping 0–2 sts at the join so the last shell sits cleanly. Fasten off.
SLEEVES (make 2)
Long, slightly flared bell sleeves in Open Lattice, striped in 8-rnd blocks of MC and CC.
With MC and RS facing, join at the underarm.
Pick-up rnd: Ch 1, sc evenly around the armhole — along cup outer edge, strap/shoulder, back armhole, and underarm join — 104 (116, 128, 140, 156, 172) sc. Join, pm for beg of rnd.
Dec rnds: Working in sc in the round, decrease evenly with sc2tog until 60 (66, 72, 78, 87, 96) sc remain. Distribute decreases over 8 rnds (about 5–7 sc2tog per rnd).
(60 ÷ 3 = 20 repeats ✓; 66 ÷ 3 = 22 ✓; 72 ÷ 3 = 24 ✓; 78 ÷ 3 = 26 ✓; 87 ÷ 3 = 29 ✓; 96 ÷ 3 = 32 ✓)
Next rnd: Sc around. 60 (66, 72, 78, 87, 96) sc.
Begin Open Lattice
Change to optional 2.75 mm hook if using it for drape.
Lattice Rnd 1: Work Open Lattice around — 20 (22, 24, 26, 29, 32) ch-2 sps.
Stripe sequence (throughout sleeve):
*8 rnds MC, 8 rnds CC; rep from * to cuff, ending with CC (or MC if you prefer a pink cuff). Change color at the sl-st join. Do not carry unused color more than 2 rnds; cut and weave.
Work 24 (24, 28, 28, 32, 32) even lattice rnds after Lattice Rnd 1 for the upper arm
(6 (6, 7, 7, 8, 8)" / 15 (15, 18, 18, 20.5, 20.5) cm).
Bell flare
Increase as (dc, ch 2, dc, ch 2) in the same ch-2 sp, spacing increases evenly.
Work 4 (3, 4, 4, 4, 4) increase rounds, with 8 even lattice rnds between them, adding repeats as follows:
- XS: 4 incs per inc rnd × 4 inc rnds = 16 repeats added → 20 + 16 = 36 repeats = 108 sts (108 ÷ 6 sts/in = 18" ✓)
- S: 6 incs per inc rnd × 3 inc rnds = 18 repeats added → 22 + 18 = 40 repeats = 120 sts (20" ✓)
- M: 5 incs per inc rnd × 4 inc rnds = 20 repeats added → 24 + 20 = 44 repeats = 132 sts (22" ✓)
- L: 6 incs × 3 rnds, then 4 incs × 1 rnd = 22 repeats added → 26 + 22 = 48 repeats = 144 sts (24" ✓)
- XL: 6 incs × 3 rnds, then 5 incs × 1 rnd = 23 repeats added → 29 + 23 = 52 repeats = 156 sts (26" ✓)
- XXL: 6 incs per inc rnd × 4 inc rnds = 24 repeats added → 32 + 24 = 56 repeats = 168 sts (28" ✓)
After the last increase rnd, work even in lattice until sleeve measures 21 (21½, 22, 22, 22½, 23)" / 53.5 (54.5, 56, 56, 57, 58.5) cm from pick-up, ending with a complete stripe if possible.
Cuff scallop (CC)
Setup: Ch 1, 3 sc in each ch-2 sp around. Join.
108 (120, 132, 144, 156, 168) sc? Wait — 3 sc × 36 (40, 44, 48, 52, 56) sps = 108 (120, 132, 144, 156, 168) sc ✓
Scallop rnd: *Sc in next sc, sk 1, 5 dc in next, sk 1; rep from * around, sl st in first sc.
(108 ÷ 4 = 27 shells ✓; 120 ÷ 4 = 30 ✓; 132 ÷ 4 = 33 ✓; 144 ÷ 4 = 36 ✓; 156 ÷ 4 = 39 ✓; 168 ÷ 4 = 42 ✓)
Fasten off.
NECKLINE EDGING
With CC, RS facing, join at the left back neck.
Work 1 rnd of sc evenly around the entire neckline: back neck, left strap inner edge, left sweetheart curve, center bridge top, right sweetheart curve, right strap inner edge, back to join. Aim for a multiple of 4 sts. Do not turn.
Scallop rnd: *Sc in next sc, sk 1, 5 dc in next sc, sk 1; rep from * around, sl st in first sc.
On the deepest point of each sweetheart curve, work a shell into the same st if needed so the edge lies flat (do not add extra skipped sts). Fasten off.
If the back neck feels wide, you may work the sc rnd with 4–8 sc2tog evenly across the back neck only, then scallop.
ARMHOLE / SLEEVE JOIN TIDY (if needed)
If the pick-up looks gappy, work 1 rnd of sc in MC around the sleeve-to-bodice join on the WS, catching any loose pick-up bars. Weave that tail along a solid column.
THREE-DIMENSIONAL ROSE MOTIFS
Make 3 (3, 4, 4, 5, 5) roses in CC and 2 (2, 2, 3, 3, 3) in MC. Sew CC roses at the center-front bridge, at each strap base, and one at each cuff; scatter MC roses as accents.
Irish-style rose (US terms, CC or MC):
Rnd 1: Magic ring, 6 sc in ring, sl st in first sc. (6 sc)
Rnd 2 (small petals): *(Sc, hdc, 2 dc, hdc, sc) in next sc; rep from * around, sl st in first sc. (6 petals)
Rnd 3 (petal bases): Working behind Rnd 2 into Rnd 1 sts, *ch 3, sl st in next Rnd-1 sc; rep from * around. (6 ch-3 sps)
Rnd 4 (medium petals): *(Sc, hdc, 3 dc, hdc, sc) in next ch-3 sp; rep from * around, sl st in first sc.
Rnd 5: Working behind Rnd 4, *ch 4, sl st between next two petals; rep from * around. (6 ch-4 sps)
Rnd 6 (large petals): *(Sc, hdc, dc, 3 tr, dc, hdc, sc) in next ch-4 sp; rep from * around, sl st in first sc. Fasten off, leaving an 8" tail.
Steam-block each rose face-down so petals cup forward. Tack through Rnd 1 only so petals stay free.
FINISHING
- Weave in all ends. On lattice, run tails down dc posts, never across ch-2 sps.
- Sew roses in place with the yarn tail, using small stitches through the magic ring only.
- If using ribbon lacing, thread through center-front eyelets and tie a bow.
- Block the finished garment: Soak in lukewarm water, press out water in a towel, pin to schematic measurements. Use blocking wires through the scallops and along the sleeve lattice so bells drape evenly. Let dry fully.
- Lining (recommended): Cut two cup linings and a band lining from stretch mesh, ¼" inside the finished edges. Whipstitch to WS, leaving lattice sleeves unlined for drape.
- Steam the shoulder seams and underarms lightly; do not crush the rib or roses.
Schematic (key points)
- A Bust at cups: 30 (34, 38, 42, 46, 50)"
- B Band circumference: 24 (28, 32, 36, 40, 44)"
- C Cup height: 5½ (6, 6½, 7, 7½, 8)"
- D Band height: 4 (4, 4¼, 4½, 4¾, 5)"
- E Shoulder/strap width: 2 (2¼, 2½, 2¾, 3, 3¼)"
- F Armhole depth: 7½ (7¾, 8¼, 8¾, 9¼, 9¾)"
- G Sleeve length: 22 (22½, 23, 23, 23½, 24)"
- H Bell hem: 18 (20, 22, 24, 26, 28)"
- I Total length: 11½ (12½, 13½, 14½, 15½, 16½)"
Wear with high-waisted bottoms. The silhouette is cropped at the high waist, fitted through the ribcage, and romantic through the sleeves.
Fit notes
- If cups gap at the center, take a deeper sweetheart decrease (1 extra inner-edge sc2tog per cup) or tighten the bridge.
- If the band rides up, add ½–1" of even corset rib before the hem scallop.
- If sleeves cling, re-block more aggressively or remake them on the 2.75 mm hook.
- For more coverage, work the cups and back in sc as written and line them; do not fill the lattice — the airiness is the design.
Rosaline — a heirloom lace-weight crop. Block with care, wear with a slip if you like, and let the lattice move.
Disclaimer: This pattern was generated by AI and should be reviewed for accuracy before use. While we strive for quality, AI-generated content may contain errors. Please verify measurements, stitch counts, charts, and instructions before beginning your project. Generated by purlJam.uk
Love this pattern?
Save this pattern to your free PurlJam libraryAccess your pattern anytime
Bookmark this page to access your pattern anytime