Type
Crochet
Difficulty
intermediate
Category
custom
AI Thinking Process
Planning
Verification
Pattern
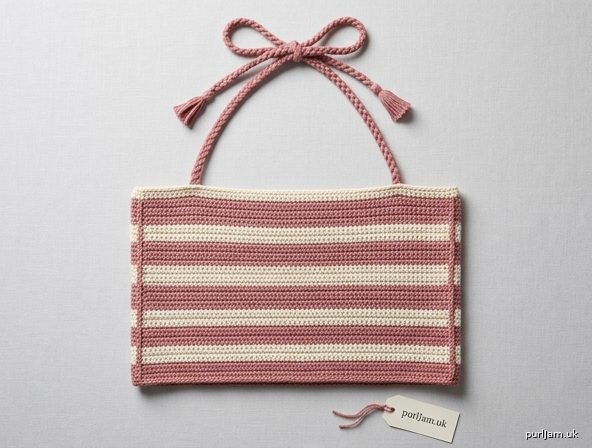
Rosewater Stripe Halter Crop Tank
A snug, cropped halter tank worked in dense single crochet for a smooth, stretch-resistant fabric. Cheerful horizontal stripes in dusty rose and cream, a clean bandeau (straight) neckline, and slim braided straps that tie behind the neck. Worked flat in two panels and seamed — perfect for confident beginners.
Skill Level
Easy (Advanced Beginner) — uses only chain, single crochet, and simple increases/decreases plus color changes.
Finished Measurements
Designed with ~2" (5 cm) negative ease for a fitted look. Choose the size closest to your actual bust measurement minus 1–2".
| Size | Finished Bust (relaxed) | To Fit Bust |
|---|---|---|
| XS | 26" (66 cm) | 28–30" |
| S | 30" (76 cm) | 32–34" |
| M | 34" (86 cm) | 36–38" |
| L | 38" (96.5 cm) | 40–42" |
| XL | 42" (106.5 cm) | 44–46" |
| 2XL | 46" (117 cm) | 48–50" |
| 3XL | 50" (127 cm) | 52–54" |
| 4XL | 54" (137 cm) | 56–58" |
| 5XL | 58" (147 cm) | 60–62" |
Cropped length (bottom hem to top bandeau edge): approx. 11½" (29 cm) all sizes. Adjust by adding/removing rows in even numbers.
Materials
- Yarn: Sport weight (US #2 Fine), smooth cotton or cotton-blend recommended for stitch definition and minimal stretch.
- Color A – Dusty Rose
- Color B – Cream
- Hook: US E/4 (3.5 mm)
- Notions: Tapestry needle, stitch markers (4–6), scissors, rust-proof pins for blocking, measuring tape.
Yarn Yardage Estimate (total; split roughly evenly A/B)
| Size | Total Yardage | Color A | Color B |
|---|---|---|---|
| XS | 480 yd (439 m) | 240 yd | 240 yd |
| S | 540 yd (494 m) | 270 yd | 270 yd |
| M | 610 yd (558 m) | 305 yd | 305 yd |
| L | 690 yd (631 m) | 345 yd | 345 yd |
| XL | 770 yd (704 m) | 385 yd | 385 yd |
| 2XL | 850 yd (777 m) | 425 yd | 425 yd |
| 3XL | 930 yd (850 m) | 465 yd | 465 yd |
| 4XL | 1010 yd (924 m) | 505 yd | 505 yd |
| 5XL | 1090 yd (997 m) | 545 yd | 545 yd |
Buy one extra ball per color for straps/blocking safety.
Gauge
22 sc × 24 rows = 4" (10 cm) in single crochet, worked in both loops, after blocking. → 5.5 sc per inch and 6 rows per inch.
Gauge is critical for fit. Make a 5" × 5" swatch, block it, and measure. If you have too many stitches per inch, size up your hook; too few, size down.
Abbreviations (US Terminology)
- ch — chain
- sc — single crochet
- sc2tog — single crochet 2 together (decrease)
- st(s) — stitch(es)
- RS / WS — right side / wrong side
- rep — repeat
- sl st — slip stitch
- A — Dusty Rose
- B — Cream
Pattern Notes
- The top is worked in two flat panels (Front and Back — worked identically) from the bottom hem up, then seamed at the sides. Straps are added at the top corners of the Front panel and tie behind the neck.
- Turning chain: ch 1 at the start of each row does NOT count as a stitch. Work your first sc into the first stitch.
- Work in both loops unless otherwise noted.
- Stripe pattern: Alternate 4 rows of Color A and 4 rows of Color B throughout. (2 rows each also works for thinner stripes — see Note below.)
- Stitch counts are given in parentheses at the end of each row/section.
- Slight waist shaping narrows the panel at the natural waist, then widens back to full width at the bust for a snug, curvy fit.
Special Techniques
Color Change (clean stripes): On the last stitch before a color change, work the sc until 2 loops remain on the hook, then yarn over with the new color and pull through both loops. Turn and continue with the new color. Carry the unused color loosely up the side, or cut and weave in — your choice.
sc2tog: Insert hook in next st, yarn over, pull up a loop (2 loops on hook); insert hook in following st, yarn over, pull up a loop (3 loops on hook); yarn over, pull through all 3 loops.
Braided Strap: Made from three lengths of yarn braided together (instructions below).
Stitch Counts by Size (per panel)
The Front and Back panels are identical. Each panel is half the finished bust.
| Size | Panel width | Cast-on / Row 1 sts |
|---|---|---|
| XS | 13" | 72 |
| S | 15" | 83 |
| M | 17" | 94 |
| L | 19" | 105 |
| XL | 21" | 116 |
| 2XL | 23" | 127 |
| 3XL | 25" | 138 |
| 4XL | 27" | 149 |
| 5XL | 29" | 160 |
Math check (XS): 13" × 5.5 sc/in = 71.5 → 72 sts. Two panels = 144 sts ÷ 5.5 = 26.2" ≈ 26" finished bust. ✓
Throughout the instructions the starting stitch count is written as [CO] — substitute your size's number from the table above.
FRONT PANEL
Foundation
With Color A, ch [CO] + 1. Row 1 (RS): Sc in 2nd ch from hook and in each ch across. Turn. — [CO] sts
(Example XS: ch 73; Row 1 = 72 sc.)
Hip Section (straight)
Rows 2–8: Ch 1, sc in each st across. Turn. — [CO] sts Maintain 4-row stripe pattern: Rows 1–4 in A, change to B on last st of Row 4; work Rows 5–8 in B. Continue alternating every 4 rows for the whole panel.
Waist Shaping — Decrease (snug at waist)
Work these 4 decrease rows to draw in the waist. Decreases are worked 1 stitch in from each edge for a clean seam.
Row 9 (dec): Ch 1, sc in first st, sc2tog, sc across to last 3 sts, sc2tog, sc in last st. Turn. — [CO − 2] sts Rows 10–12: Ch 1, sc in each st across. Turn. — [CO − 2] sts Row 13 (dec): Ch 1, sc in first st, sc2tog, sc across to last 3 sts, sc2tog, sc in last st. Turn. — [CO − 4] sts Rows 14–18: Ch 1, sc in each st across. Turn. — [CO − 4] sts
This is the narrowest point (natural waist). Example XS: 72 → 68 sts.
Waist Shaping — Increase (widen to bust)
Restore width for the bust with matching increases, worked 1 st in from each edge.
Increase method: Ch 1, sc in first st, 2 sc in next st, sc across to last 2 sts, 2 sc in next st, sc in last st. Turn. (+2 sts)
Row 19 (inc): Work increase row. — [CO − 2] sts Rows 20–23: Ch 1, sc in each st across. Turn. — [CO − 2] sts Row 24 (inc): Work increase row. — [CO] sts (back to full width) Rows 25–30: Ch 1, sc in each st across. Turn. — [CO] sts
Example XS: back to 72 sts. Symmetry check: −2 −2 then +2 +2 = 0 net. ✓
Bust Section (straight to bandeau top)
Rows 31–68: Ch 1, sc in each st across, continuing the 4-row stripe pattern. Turn. — [CO] sts
Length check: Total 68 rows ÷ 6 rows/in = 11.3" ≈ 11½". ✓ To lengthen or shorten, add/remove rows here in multiples of 4 to keep stripes even.
Fasten off after Row 68, leaving the top edge as your straight bandeau neckline.
BACK PANEL
Work exactly the same as the Front Panel (Foundation through Row 68). Fasten off.
ASSEMBLY
- Block both panels (see Blocking below) before seaming — this evens the stitches and sets the width.
- With RS together, align Front and Back at the side edges.
- Seam the sides: Using Color A (or matching stripe) and a tapestry needle, whipstitch or mattress-stitch each side seam from the bottom hem up to the top edge. Leave both seams fully closed (there are no armhole openings — this is a straight-sided bandeau tube with halter straps).
Tip: If you prefer a little armhole scoop, stop each side seam 1½" (4 cm) below the top edge and leave the upper side edges open.
HALTER STRAPS (Braided)
Two braided straps rise from the top front corners and tie behind the neck.
Cut lengths
For each strap, cut 6 strands of Color A (or mix A + B for a two-tone braid), each 60" (152 cm) long. (Long ends allow tying; trim later.)
Attach & braid
- Fold the 6 strands in half to find the center; you now have effectively 12 working ends, grouped into 3 bundles of 4 strands.
- Using a crochet hook, pull the folded center through the top corner stitch of the Front panel (about ½" in from the side seam) to form a lark's head knot, anchoring the strap.
- Divide the strands into 3 even bundles and braid tightly and evenly down the full length.
- Tie a secure overhand knot at the end of the braid, leaving a small tassel.
- Repeat for the second strap at the opposite top-front corner.
Wear
Bring both braids up and tie behind the neck in a bow or double knot. Adjust braid length before knotting the ends if you prefer shorter ties.
Tip: For extra security, tack the braid start to the panel with a few whipstitches in matching yarn.
NECKLINE & HEM EDGING (Optional but recommended)
For a crisp bandeau edge and clean hem:
Top edge (bandeau): With Color matching the top stripe, join at a side seam and work 1 row of sc evenly across the entire top edge (Front and Back), working about 1 sc per row-end/stitch. Sl st to join if worked around; fasten off. This firms the straight neckline and helps it lie flat.
Bottom hem: Optional — work 1 row of sc across the bottom edge to match, or leave the foundation edge as-is.
FINISHING
- Weave in all ends securely on the WS with a tapestry needle. Because this is a fitted garment, weave ends along stripe color-change points where they blend in.
- Trim strap tassels evenly.
- Try on and adjust strap knot for fit.
BLOCKING
- Soak the finished panels (or completed top) in cool water with a little wool wash for 15 minutes.
- Gently squeeze out water — do not wring.
- Lay flat on a blocking mat. Pin to the finished measurements for your size (panel width = half the finished bust; length 11½").
- Ensure stripes are straight and side edges are even. Let dry completely before wearing.
Cotton relaxes with wear — blocking to size ensures the snug fit stays true.
Quick Reference — Row Map (all sizes)
| Rows | Section | Action |
|---|---|---|
| 1–8 | Hip | Straight, full width |
| 9 | Waist | Dec (−2) |
| 10–12 | Waist | Straight |
| 13 | Waist | Dec (−2) |
| 14–18 | Waist | Straight (narrowest) |
| 19 | Bust | Inc (+2) |
| 20–23 | Bust | Straight |
| 24 | Bust | Inc (+2) → full width |
| 25–68 | Bust | Straight to bandeau top |
Net shaping = 0 (full width restored). Both panels identical. ✓
Enjoy your Rosewater Stripe Halter Crop Tank!
Disclaimer: This pattern was generated by AI and should be reviewed for accuracy before use. While we strive for quality, AI-generated content may contain errors. Please verify measurements, stitch counts, and instructions before beginning your project. Generated by purlJam.uk
Access your pattern anytime
Bookmark this page to access your pattern anytime