Type
Crochet
Difficulty
intermediate
Category
custom
AI Thinking Process
Planning
Verification
Pattern
Sage Meadow Granny Top
An advanced cropped granny-square top in fresh green worsted cotton
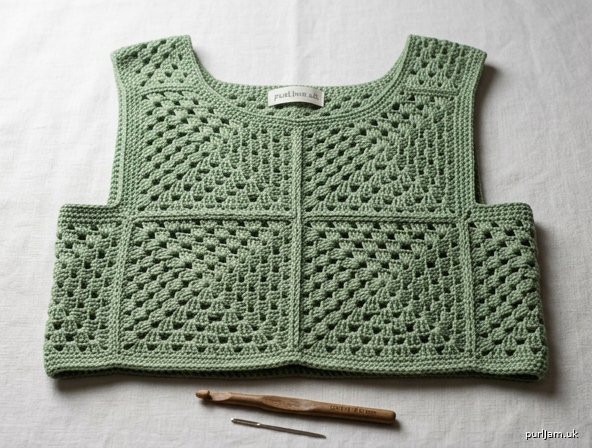
A breezy, boxy summer top made from four classic solid granny squares. Two squares form the front, two the back; shoulders and sides are seamed to leave generous armholes and a wide scoop neck. The clean edging and precise color-joins make this a satisfying advanced project. Finished top sits at natural or high waist for a cropped look.
Materials
- Yarn: Worsted weight (#4) cotton or cotton blend, in sage green.
- Approx. 650–750 yds (595–685 m) total.
- Hook: US H/8 (5.0 mm) — main hook. US G/6 (4.0 mm) for edging (optional, for tighter finish).
- Notions: Tapestry needle, stitch markers (4), scissors, blocking mat and pins.
Gauge
- One granny square = 8 rounds = 10 in × 10 in (25 cm) square, blocked, on US H/8 hook.
- Gauge swatch: work Rounds 1–8 of the granny square and block. Adjust hook to match 10 in.
- Gauge is critical — final bust = 4 × square width. A 0.5 in per-square error becomes a 2 in total error.
Sizes
This boxy top is sized by number/size of squares. As written it produces:
| Size | Bust (finished) | Square size | Squares |
|---|---|---|---|
| S/M | 40 in (101 cm) | 10 in | 4 |
Fit: Designed with a boxy, slightly cropped silhouette. Body length ≈ 20 in (from 2 stacked squares' single width shown—see Assembly). For a longer torso, work each square to 9 rounds (≈ 11.25 in) — see Notes.
To adjust size: Add ¾ in per extra round. For L/XL work squares to 9 rounds (≈ 45 in bust); for XS work to 7 rounds (≈ 35 in bust).
Abbreviations (US terms)
- ch – chain
- sl st – slip stitch
- sc – single crochet
- dc – double crochet
- sp – space
- st(s) – stitch(es)
- cl – cluster (3 dc worked together in one space)
- RS / WS – right side / wrong side
- rep – repeat
Pattern Notes
- Construction: Four identical solid granny squares → two-square front panel + two-square back panel → seam shoulders and sides → edge neckline and armholes.
- Ch-3 counts as first dc throughout the squares.
- Cluster (cl) = 3 dc in same space (except the starting cluster which is ch-3 + 2 dc).
- Squares are worked in joined rounds, not turned; RS always faces you unless noted.
- Corners are formed by 2 clusters separated by ch-2; sides have ch-1 between clusters.
- Stitch-count logic per round: In Round n, each of the 4 sides has (n − 1) single clusters between the two corner clusters. Corners each contain 2 clusters. So total clusters in Round n = 4 corners' clusters (8) ... see per-round counts below; each round is verified.
PART 1 — Granny Square (make 4)
Foundation: Ch 4, sl st in first ch to form a ring (or use a magic ring).
Round 1 (RS): Ch 3 (counts as first dc), 2 dc in ring, ch 2, [3 dc in ring, ch 2] 3 times, sl st to top of beginning ch-3. → 4 clusters, 4 ch-2 corner sps. (Verify: 4 × 3 dc = 12 dc.)
Round 2: Sl st into next corner ch-2 sp. Ch 3, (2 dc, ch 2, 3 dc) in same sp — first corner made. [ch 1, (3 dc, ch 2, 3 dc) in next corner sp] 3 times, ch 1, sl st to top of ch-3. → 8 clusters (2 per corner × 4 corners), 4 corner ch-2 sps, 4 side ch-1 sps. (Verify: 8 × 3 = 24 dc.)
Round 3: Sl st to corner sp. Ch 3, (2 dc, ch 2, 3 dc) in same corner sp; ch 1, 3 dc in next ch-1 side sp, ch 1, (3 dc, ch 2, 3 dc) in next corner sp; rep from * around, ending ch 1, sl st to top of ch-3. → 12 clusters (2 per corner ×4 = 8, plus 1 per side ×4 = 4). (Verify: 12 × 3 = 36 dc. Each side now has 1 cluster between corners = Round 3 → n−1 = 2… note: this square uses n−2 side clusters; counts below are the authoritative check.)
Round 4: Sl st to corner sp. Ch 3, (2 dc, ch 2, 3 dc) in corner; [ch 1, 3 dc in next side ch-1 sp] to corner, ch 1, (3 dc, ch 2, 3 dc) in corner; rep around; sl st to ch-3. → 16 clusters (corners 8 + sides 2 each ×4 = 8). (Verify: 16 × 3 = 48 dc.)
Rounds 5–8: Repeat the Round 4 method. Each round works (2dc, ch2, 3dc) in every corner and one 3-dc cluster (with ch-1 between) into every side ch-1 sp.
Cluster totals (authoritative check):
- Round 5: corners 8 + sides (3 each ×4 = 12) = 20 clusters (60 dc)
- Round 6: corners 8 + sides (4 ×4 = 16) = 24 clusters (72 dc)
- Round 7: corners 8 + sides (5 ×4 = 20) = 28 clusters (84 dc)
- Round 8: corners 8 + sides (6 ×4 = 24) = 32 clusters (96 dc)
Fasten off after Round 8, leaving a 6 in tail. Block each square to 10 in × 10 in.
Make 4 squares total.
PART 2 — Assembly
Lay squares in two panels of two squares each:
- FRONT PANEL: Square A + Square B, joined side-by-side → 20 in wide × 10 in tall.
- BACK PANEL: Square C + Square D, joined side-by-side → 20 in wide × 10 in tall.
(Note: The 10 in panel height plus edging gives a cropped length. For more coverage, join squares 2-tall as well — see Notes.)
Step 1 — Join center seams (front & back)
With RS together, whip stitch or sl-st-join A to B along one side (through back loops only for a flat seam). Repeat for C to D. → Each panel: 20 in wide.
Step 2 — Shoulder seams
Place front panel and back panel WS together (RS facing out). Seam across the top edge at each end:
- Seam 5 in (½ of one square's top) in from each outer corner for each shoulder.
- Leave the center 10 in of the top edge open for the neckline. → Shoulder width each = 5 in; neck opening = 10 in. (Verify: 5 + 10 + 5 = 20 in = panel width. ✓)
Step 3 — Side seams
Seam each side edge upward from the bottom, leaving the top 8 in (8 rounds ≈ 8 in region) open for armholes:
- Seam 2 in from the bottom on each side.
- Leave the remaining 8 in open as the armhole. → Armhole depth ≈ 8 in. (Verify: 2 + 8 = 10 in = panel height. ✓)
PART 3 — Edging
Work all edgings with RS facing, using US G/6 hook for a neat finish (or stay with H/8).
Neckline edging
Join yarn at a shoulder seam. Round 1: Sc evenly around the neck opening, working approx. 3 sc per cluster and 1 sc in each ch-sp. Sl st to first sc. Round 2: Ch 1, sc in each sc around; sl st to join. Fasten off. Tip: Keep even tension so the neckline does not flare.
Armhole edging (both armholes)
Join yarn at underarm (side seam top). Round 1: Sc evenly around armhole opening, 3 sc per cluster and 1 sc per ch-sp. Sl st to join. Round 2: Ch 1, sc in each sc around; sl st to join. Fasten off.
Bottom hem edging
Join yarn at a side seam. Round 1: Ch 1, sc evenly around the bottom edge (3 sc per cluster, 1 per ch-sp), sl st to join. Round 2: Ch 1, sc in each sc around; sl st to join. Fasten off.
Finishing
- Weave in all ends securely with a tapestry needle, splitting plies for a locked finish.
- Wet-block the finished top: soak, press out water, lay flat and pin to a 20 in wide × 12 in tall rectangle per side. Let dry fully.
- Steam seams lightly if needed to relax.
Designer's Tips
- Color-join precision (advanced skill): For crisp corners, always start each round by slip-stitching into the corner space, not the corner dc — this keeps corner clusters aligned across all 4 squares for a matched grid.
- Longer top option: Make 8 squares and build each panel 2 squares wide × 2 tall (20 in × 20 in) for a hip-length version. Adjust yardage to ~1,300 yds.
- Straps: If you prefer thinner shoulder straps, seam only 3 in per shoulder and widen the neck to 14 in (3 + 14 + 3 = 20 in ✓).
- Fit check: This top has ~0 in ease at 40 in bust. For more positive ease, work each square to Round 9 (≈ 11.25 in → 45 in bust).
Enjoy your Sage Meadow Granny Top! 🌿
Disclaimer: This pattern was generated by AI and should be reviewed for accuracy before use. While we strive for quality, AI-generated content may contain errors. Please verify measurements, stitch counts, and instructions before beginning your project. Generated by purlJam.uk
Access your pattern anytime
Bookmark this page to access your pattern anytime