Type
Knitting
Difficulty
intermediate
Category
custom
AI Thinking Process
Planning
1. **Design Strategy**: Beginner-friendly garter stitch cushion worked sideways in three equal vertical colour blocks using chunky yarn. Simple flat rectangle construction with button closure for easy insert access.
2. **Construction Plan**: Cast on for the 30cm height, knit a flat rectangle 60cm wide (front + back), fold and seam sides with a button band closure at the centre back.
3. **Quality Assurance**:
- Carry yarn loosely up side or cut and weave ends to avoid puckering at colour changes.
- Garter stitch row gauge must be accurate — count ridges, not rows.
- Buttonholes must align with button placement.
4. **Final Calculations**:
- Tension: 12 sts × 20 rows (10 garter ridges) = 10cm in garter st on 6.5mm needles.
- Cast-on: 36 sts (= 30cm height).
- Total length worked: ~70cm (30cm front + 30cm back + 10cm button overlap flap) = 140 rows total.
- Each front stripe: 10cm wide = 20 rows; back single colour or simple.
Verification
1. **Completeness**: All sections included — materials, tension, abbreviations, notes, instructions, finishing. ✓
2. **Consistency**: 36 sts ÷ 12 sts/10cm × 10 = 30cm height ✓. 20 rows ÷ 20 rows/10cm × 10 = 10cm stripe width ✓. Three stripes × 20 rows = 60 rows = 30cm front ✓.
3. **Constraints**: Sideways construction ✓, three equal vertical stripes (Burnt Orange, Cream, Sage Green) ✓, chunky yarn ✓, button closure included ✓, UK terminology and metric ✓.
4. **Safety**: Math verified — 36 sts cast-on produces 30cm; 20 rows produces 10cm stripe; total 30cm × 30cm cover achieved.
Pattern
# Sideways Stripes Garter Cushion Cover

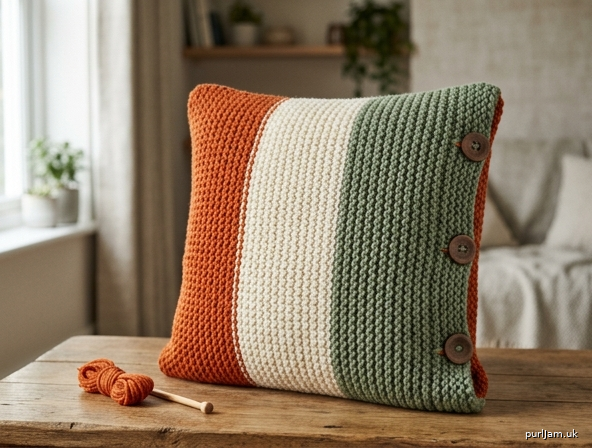
A cosy, chunky-knit cushion cover featuring three bold vertical colour blocks in burnt orange, cream and sage green. Worked sideways in simple garter stitch, this beginner-friendly project introduces tidy colour changes and a button-band closure — perfect for a 30cm × 30cm cushion insert.

**Finished Size:** 30cm × 30cm (approx. 12" × 12") to fit a 30cm cushion pad.

---

## Materials

**Yarn:** Chunky / Bulky weight (approx. 14–15 sts per 10cm on 6.5mm needles)
- **Colour A — Burnt Orange:** 1 × 100g ball (approx. 80m / 87 yds used)
- **Colour B — Cream / Off-White:** 1 × 100g ball (approx. 80m / 87 yds used)
- **Colour C — Sage Green:** 1 × 100g ball (approx. 80m / 87 yds used)

*Total yardage required: approx. 240m / 260 yds chunky yarn.*

**Needles:** 6.5mm (UK 3 / US 10½) straight needles, or size needed to obtain tension.

**Notions:**
- Tapestry/yarn needle for seaming and weaving in ends
- 3 buttons, approx. 25–30mm diameter
- Stitch markers (optional)
- Scissors
- 30cm × 30cm cushion insert

---

## Tension (Gauge)

**12 sts × 20 rows (10 garter ridges) = 10cm × 10cm** in garter stitch on 6.5mm needles, after light blocking.

*Always work a tension swatch before starting. Adjust needle size as needed — getting tension right ensures the cover fits the insert snugly.*

---

## Abbreviations (UK)

- **k** — knit
- **st(s)** — stitch(es)
- **CO** — cast on
- **BO** — bind/cast off
- **RS / WS** — right side / wrong side
- **yo** — yarn over (for buttonhole)
- **k2tog** — knit two stitches together
- **A** — Burnt Orange
- **B** — Cream/Off-White
- **C** — Sage Green

---

## Pattern Notes

- The cover is worked **sideways** as one long flat rectangle. The cast-on edge becomes the **height** of the cushion (30cm), and the rows worked become the **width**.
- The piece is worked in three sections:
  1. **Front:** three vertical stripes (A, B, C), each 10cm wide.
  2. **Back overlap (button band):** worked in Colour C continuing from the front.
  3. **Back underlap (buttonhole band):** worked in Colour A.
- When changing colours, **cut the old yarn** leaving a 15cm tail and join the new colour at the start of a RS row. This gives the cleanest vertical stripe edge.
- Garter stitch is reversible — both sides look the same, which is helpful for the overlap closure.

---

## Pattern Instructions

### Cast On

With **Colour A (Burnt Orange)** and 6.5mm needles, **cast on 36 sts**.

*Maths check: 36 sts ÷ 12 sts per 10cm × 10 = 30cm ✓*

---

### Section 1 — Front Stripe 1 (Burnt Orange)

Working in garter stitch (knit every row):
- Knit 20 rows in Colour A.

*This produces 10 garter ridges = 10cm width. ✓*

Cut Colour A, leaving a 15cm tail.

---

### Section 2 — Front Stripe 2 (Cream)

Join **Colour B (Cream)**.
- Knit 20 rows in Colour B.

Cut Colour B, leaving a 15cm tail.

---

### Section 3 — Front Stripe 3 (Sage Green)

Join **Colour C (Sage Green)**.
- Knit 20 rows in Colour C.

*Maths check: 3 × 20 rows = 60 rows = 30cm front panel width ✓*

**Do not cut Colour C** — continue directly into the back panel.

---

### Section 4 — Back Overlap (Sage Green)

Continue in Colour C, knitting every row:
- Knit 50 rows.

*This produces 25cm of back panel in sage green.*

Cut Colour C, leaving a 15cm tail.

---

### Section 5 — Back Underlap with Buttonholes (Burnt Orange)

Join **Colour A (Burnt Orange)**.

- Knit 6 rows in Colour A.

**Buttonhole Row (RS):** K6, [yo, k2tog, k9] twice, yo, k2tog, k4. *(36 sts — buttonholes formed by yo/k2tog pairs)*

*Maths check: 6 + (2 + 9) + (2 + 9) + (2 + 4) = 6 + 11 + 11 + 6 = 34… let's verify: K6 (6 sts) + yo+k2tog (counts as 2 sts worked, 1 st made + 2 worked = net same st count) + k9 (9) + yo+k2tog + k9 + yo+k2tog + k4 = 6 + 2 + 9 + 2 + 9 + 2 + 4 = **34 sts worked, but yo adds 1 st each (3 yos = +3), k2tog removes 1 each (3 k2togs = −3), so net 36 sts** ✓*

- Knit 1 row plain (the yarn-overs become the buttonholes).
- Knit 12 more rows in Colour A.

*Total back underlap: 6 + 1 (buttonhole row) + 1 + 12 = 20 rows = 10cm overlap.*

---

### Cast Off

Cast off all 36 sts knitwise loosely. Cut yarn, leaving a 30cm tail for seaming.

---

### Total Piece Dimensions

- **Front:** 60 rows = 30cm
- **Back overlap (sage):** 50 rows = 25cm
- **Button band (orange):** 20 rows = 10cm
- **Total length:** 130 rows ≈ 65cm
- **Height (cast-on edge):** 36 sts = 30cm

*The back overlap (25cm) + button band (10cm) = 35cm, providing a 5cm overlap behind the front for a secure closure.*

---

## Finishing

### 1. Weave in Ends
Using a tapestry needle, weave in all yarn tails neatly along the colour-change edges on the wrong side. Trim close.

### 2. Block
Pin the piece flat to 30cm × 65cm on a blocking mat. Lightly mist with water and allow to dry fully. Blocking evens out the garter ridges and sharpens the colour-block edges.

### 3. Fold and Position
Lay the piece flat with RS facing down. Fold:
- Fold the **button band (Colour A) end** inward so it lies over the back panel.
- Fold the **front panel (the three stripes)** down over the top, so the WS of the front meets the WS of the back.
- The button band should overlap the sage green back panel by approximately 5cm.

You should now see a 30cm × 30cm square with three vertical stripes on the front, and a horizontal button band closure across the centre back.

### 4. Seam the Side Edges
With Colour C (or a matching colour) and the tapestry needle, use **mattress stitch** or **whip stitch** to sew the top and bottom edges closed, joining front to back through both layers where the button band overlaps.

*Tip: Seam from the right side using mattress stitch for an invisible finish, or from the wrong side using whip stitch for speed.*

### 5. Attach Buttons
- Lay the cover flat and mark the button positions on the sage green underlap directly beneath each buttonhole.
- Sew on 3 buttons securely using sewing thread or split yarn strands.

### 6. Insert Cushion
Unbutton, slide in the 30cm cushion pad, and re-button. Plump and enjoy!

---

## Care Instructions

Hand wash in cool water with wool-friendly detergent. Reshape and dry flat away from direct sunlight to preserve colour vibrancy.

---

**Designer's Tip:** For an even chunkier look, hold two strands of aran-weight yarn together and use 8mm needles — re-swatch and recalculate cast-on accordingly. For a no-button alternative, simply seam all four sides closed after inserting the cushion (note: cover will not be removable for washing).

Happy knitting! 🧶
Disclaimer: This pattern was generated by AI and should be reviewed for accuracy before use. While we strive for quality, AI-generated content may contain errors. Please verify measurements, stitch counts, and instructions before beginning your project. Generated by purlJam.uk
Access your pattern anytime
Bookmark this page to access your pattern anytime