Type
Crochet
Difficulty
intermediate
Category
custom
AI Thinking Process
Planning
Verification
Pattern
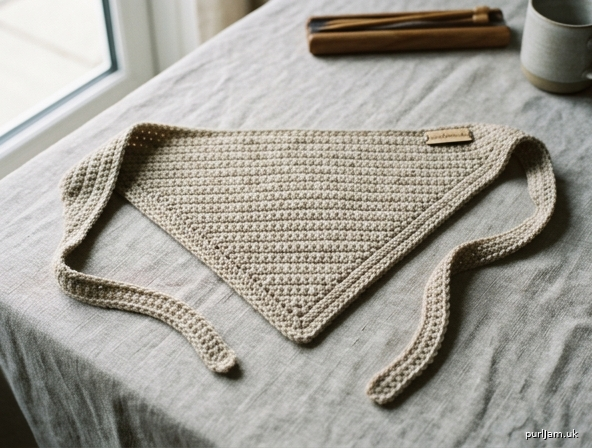
Simple Triangle Bandana
A cozy, beginner-friendly triangular bandana (kerchief) worked flat in single crochet. Wear it as a hair scarf, neckerchief, or pet bandana. The whole piece is made in one triangle with easy edge decreases, then finished with two long chain ties. If you can chain, single crochet, and decrease, you can make this!
Finished Measurements
- Top edge (width): approximately 18" (46 cm)
- Depth (top edge to point): approximately 9" (23 cm)
- Ties: approximately 11" (28 cm) each
One size; easily adjustable — see Pattern Notes.
Materials
- Yarn: Worsted weight (Category 4), approximately 120–150 yards (110–137 m)
- Sample uses ~130 yds of a smooth worsted-weight yarn
- Hook: US H/8 (5 mm)
- Notions: Yarn needle for weaving in ends, scissors, stitch markers (optional)
Gauge
- 14 sc × 16 rows = 4" (10 cm) in single crochet
- This equals 3.5 sc per inch.
- Gauge is not critical for fit, but it affects finished size and yardage. Take a moment to check it if you want to match the measurements above.
Abbreviations (US Terms)
- ch — chain
- sc — single crochet
- sc2tog — single crochet 2 stitches together (decrease)
- st(s) — stitch(es)
- RS — right side
- WS — wrong side
- rep — repeat
Special Stitch
- sc2tog (single crochet decrease): Insert hook into next st, yarn over, pull up a loop (2 loops on hook). Insert hook into following st, yarn over, pull up a loop (3 loops on hook). Yarn over, pull through all 3 loops. One stitch decreased.
Pattern Notes
- The bandana is worked flat, in rows, starting at the wide top edge and decreasing down to a point.
- The turning chain (ch 1) does NOT count as a stitch. Always work your first sc into the very first stitch of the row.
- Work in both loops of each stitch unless otherwise noted.
- Decreases happen at the beginning and end of every right-side row (2 sts decreased per row).
- The starting chain count is odd (63). Because you decrease 2 sts each shaping row, the count stays odd all the way down to a clean single-stitch point.
- To resize: Choose any odd starting stitch count. A wider top = larger bandana. Depth is automatically about half the width because of the triangle shape.
- Stitch counts are given in parentheses at the end of each row.
Instructions
Foundation
Row 1 (WS): Ch 64. Working into the second chain from hook, sc in each ch across. Turn. (63 sc)
(64 chains − 1 for the turning chain = 63 sc ✓)
Body (Shaping the Triangle)
Row 2 (RS — decrease row): Ch 1 (does not count as a st), sc2tog over the first 2 sts, sc in each st across to the last 2 sts, sc2tog over the last 2 sts. Turn. (61 sc)
(63 − 2 = 61 ✓)
Row 3 (WS — plain row): Ch 1, sc in each st across. Turn. (61 sc)
Repeat Rows 2 and 3 — decreasing on every RS row and working plain on every WS row — until 3 sts remain, ending after a WS (plain) row.
Stitch-count map for the RS decrease rows (each removes 2 sts): 63 → 61 → 59 → 57 → 55 → 53 → 51 → 49 → 47 → 45 → 43 → 41 → 39 → 37 → 35 → 33 → 31 → 29 → 27 → 25 → 23 → 21 → 19 → 17 → 15 → 13 → 11 → 9 → 7 → 5 → 3
(That is 30 decrease rows from 63 down to 3 sts: (63 − 3)/2 = 30 ✓, each followed by a plain row.)
Finishing the Point
Next row (RS): Ch 1, sc2tog over the first 2 sts, sc in last st. Turn. (2 sc)
(3 − 1 = 2 ✓)
Next row (WS): Ch 1, sc2tog over the 2 sts. (1 st)
Fasten off, leaving the point neat. This single stitch is the tip of your bandana.
Ties
The ties are added to the two top corners of the wide edge (Row 1).
First tie:
- With RS facing, join yarn with a slip stitch to one top corner of the foundation edge.
- Ch 40 for the tie.
- Working back down the chain, sc in the second chain from hook and in each remaining ch. (39 sc along the tie)
- Slip stitch back into the corner to secure. Fasten off.
Second tie: Repeat Steps 1–4 in the opposite top corner.
Each tie measures approximately 39 sc ÷ 3.5 sc per inch ≈ 11" (28 cm) ✓.
Tip: For simpler ties, you may skip the return row of sc and simply leave a ch-40 chain tie at each corner. Knot the chain ends to prevent unraveling.
Assembly & Finishing
- Weave in all yarn ends securely with the yarn needle.
- Gently steam or wet-block the bandana into a flat triangle, pinning the top edge straight and the two lower edges even. Let dry completely.
- Trim any stray ends.
Wearing & Care
- As a hair scarf: Place the wide edge across your forehead with the point at the back; tie the ties under your hair.
- As a neckerchief: Center the point at your chest and tie behind your neck.
- Care: Follow the care instructions on your yarn label. Most worsted acrylics are machine washable on a gentle cycle; lay flat to dry.
Enjoy your finished bandana! 🧶
Disclaimer: This pattern was generated by AI and should be reviewed for accuracy before use. While we strive for quality, AI-generated content may contain errors. Please verify measurements, stitch counts, and instructions before beginning your project. Generated by purlJam.uk
Love this pattern?
Save this pattern to your free PurlJam libraryAccess your pattern anytime
Bookmark this page to access your pattern anytime