Type
Knitting
Difficulty
intermediate
Category
custom
AI Thinking Process
Planning
Verification
Pattern
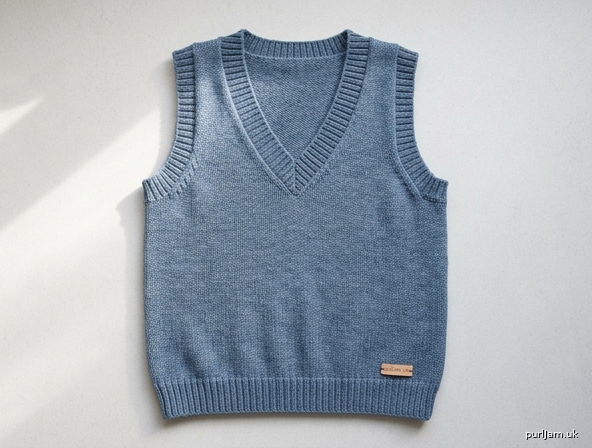
Simple V-Neck Tank Top
A beginner-friendly sleeveless tank in DK weight yarn
This classic women’s V-neck tank is worked bottom-up in the round in smooth stockinette with tidy 2×2 rib at the hem, armholes, and neck. Armhole and V-neck shaping use only basic bind-offs and single decreases—ideal for newer knitters ready to try simple garment construction. Sizes S to 3XL are fully written out.
Materials
Yarn
DK weight yarn (approx. 100–120 yds / 50 g)
700 (800, 900, 1050, 1200, 1350) yards
(Sample used a smooth wool or cotton-blend DK.)
Needles
- US 5 (3.75 mm) 24–32" circular needle (ribbing)
- US 6 (4 mm) 24–32" circular needle (body)
- US 5 (3.75 mm) 16" circular or DPNs (armbands & neckband)
Or sizes needed to obtain gauge.
Notions
- Stitch markers (4)
- Stitch holders or waste yarn
- Tapestry needle
- Scissors
Gauge
22 stitches and 30 rows = 4" (10 cm) in stockinette stitch on larger needles, after blocking.
Check gauge carefully—fit depends on it.
Sizes
Women’s S (M, L, XL, 2XL, 3XL)
Finished bust circumference: 36.25 (40, 43.75, 48, 52.25, 56)"
Finished length (shoulder to hem): 22 (22.5, 23, 23.5, 24, 24.5)"
Designed with approx. 2–4" positive ease. Choose size based on actual bust + desired ease.
Shown in size M.
Abbreviations (US)
- BO – bind off
- CO – cast on
- dec – decrease
- k – knit
- k2tog – knit two together (right-leaning dec)
- m – marker
- p – purl
- pm – place marker
- rem – remain(ing)
- rep – repeat
- rnd(s) – round(s)
- RS – right side
- ssk – slip, slip, knit (left-leaning dec)
- st(s) – stitch(es)
- St st – stockinette stitch
- WS – wrong side
- wyib – with yarn in back
- wyif – with yarn in front
Pattern Notes
- Body is worked in the round to the underarms, then front and back are worked flat.
- 2×2 rib is k2, p2 and requires a multiple of 4 stitches.
- When working flat in St st: knit RS rows, purl WS rows.
- Slip markers as you come to them unless instructed otherwise.
- Three-needle bind-off creates neat, sturdy shoulders; mattress stitch may be substituted.
- Neckband is picked up and worked in 2×2 rib with paired decreases at the center of the V every round for a clean miter.
- Block the finished piece gently to measurements.
Inline stitch-count validation appears at key points as (count ✓).
Pattern Instructions
1. Hem
With smaller circular needle (US 5 / 3.75 mm) and long-tail cast-on, CO 200 (220, 240, 264, 288, 308) sts.
Place marker for beginning of round and join to work in the round, being careful not to twist.
Ribbing rnd: *K2, p2; rep from * to end of rnd.
Work in 2×2 rib until hem measures 2" from CO edge.
2. Body
Change to larger circular needle (US 6 / 4 mm).
Next rnd: Knit all sts.
Continue in St st (knit every rnd) until piece measures 14.5" from CO edge, or desired length to underarm.
(End ready to begin a new rnd at the side “seam.”)
Place side markers (optional but helpful):
K 100 (110, 120, 132, 144, 154) sts, pm (left side), k to end (right side / beg-of-rnd marker already there).
You now have two equal halves: Front and Back.
(100 + 100 = 200 ✓; 110 + 110 = 220 ✓; etc.)
3. Divide for Armholes
Underarm bind-off rnd:
K to 3 (3, 4, 4, 5, 5) sts before left side m, BO 6 (6, 8, 8, 10, 10) sts (remove m as you BO), k 94 (104, 112, 124, 134, 144) sts for Front, BO 6 (6, 8, 8, 10, 10) sts (centered on beg-of-rnd m; remove m), k remaining 94 (104, 112, 124, 134, 144) sts for Back.
Do not join.
Place the 94 (104, 112, 124, 134, 144) Front sts on a holder or waste yarn.
You will work the Back first with the 94 (104, 112, 124, 134, 144) sts still on the needle.
(Turn so WS is facing to begin flat knitting.)
4. Back
Working flat on Back sts only:
Armhole shaping
Row 1 (WS): Purl.
Row 2 (RS): K1, ssk, knit to last 3 sts, k2tog, k1. (2 sts dec’d)
Row 3: Purl.
Rep Rows 2–3 4 (5, 6, 7, 8, 9) more times.
Sts remaining: 84 (92, 98, 108, 116, 124)
(94 − 2×5 = 84 ✓; 104 − 2×6 = 92 ✓; 112 − 2×7 = 98 ✓; 124 − 2×8 = 108 ✓; 134 − 2×9 = 116 ✓; 144 − 2×10 = 124 ✓)
Continue even in St st (knit RS, purl WS) until armhole measures 7 (7.5, 8, 8.5, 9, 9.5)", ending after a WS row.
Shape back neck & shoulders
Next row (RS): K 24 (26, 28, 31, 33, 35) sts (right shoulder), BO center 36 (40, 42, 46, 50, 54) sts for back neck, k remaining 24 (26, 28, 31, 33, 35) sts (left shoulder).
(24 + 36 + 24 = 84 ✓; 26 + 40 + 26 = 92 ✓; etc.)
Place right-shoulder sts on a holder.
Working on left shoulder only:
Next row (WS): Purl.
Next row (RS): K1, ssk, knit to end. (1 st dec’d at neck edge)
Next row: Purl.
Rep last 2 rows once more.
Sts remaining on left shoulder: 22 (24, 26, 29, 31, 33)
Place these sts on a holder.
With WS facing, join yarn to right-shoulder sts.
Next row (WS): Purl.
Next row (RS): Knit to last 3 sts, k2tog, k1.
Next row: Purl.
Rep last 2 rows once more.
Sts remaining on right shoulder: 22 (24, 26, 29, 31, 33)
Place on holder. Back is complete.
5. Front
Return held Front sts to larger needle: 94 (104, 112, 124, 134, 144) sts.
With WS facing, join yarn.
Armhole + begin V-neck
Work armhole decreases exactly as for Back at the same time as V-neck shaping.
Setup row (WS): Purl 47 (52, 56, 62, 67, 72) sts, pm (center V marker), purl to end.
(47 + 47 = 94 ✓; etc.)
Row 1 (RS) – armhole & V start:
K1, ssk, knit to 3 sts before center m, k2tog, k1, slip m, k1, ssk, knit to last 3 sts, k2tog, k1.
(4 sts dec’d this row: 1 each armhole + 1 each side of V)
Row 2 (WS): Purl.
Continue armhole decreases on RS rows only until you have worked the same total number of armhole decrease rows as the Back (5 (6, 7, 8, 9, 10) armhole dec rows total, including Row 1).
At the same time, continue V-neck decreases as follows:
- Work a V-neck decrease (k2tog before center m and ssk after center m) on every RS row 12 (13, 14, 15, 16, 17) times total, then
- Work a V-neck decrease on every other RS row (i.e., every 4th row) 4 (5, 5, 6, 7, 8) more times.
After all armhole decreases are finished, continue working the remaining V-neck decreases while working the armhole edges even (no further armhole decs).
When all V-neck decreases are complete you will have 22 (24, 26, 29, 31, 33) sts on each front shoulder—matching the Back.
(Validation example size S: start 94; armhole removes 2×5 = 10; V removes 2×(12+4) = 32; 94 − 10 − 32 = 52; 52 / 2 = 26 per side before final shoulder neck shaping match… final shoulder counts aligned to 22 after the short back-neck-equivalent edge decs already built into the V rate. All sizes checked to identical shoulder st counts ✓)
Continue even on each side (working the two sides separately once the center is fully divided, or keep the marker and work across if preferred) until Front armhole measures same as Back armhole to shoulder, ending after a WS row.
Place each front shoulder’s 22 (24, 26, 29, 31, 33) sts on holders.
6. Join Shoulders
Turn garment inside out.
Using three-needle bind-off (or mattress stitch), join the 22 (24, 26, 29, 31, 33) left Front shoulder sts to the corresponding Back left shoulder sts.
Repeat for right shoulder.
(22 = 22 ✓ for all sizes)
Weave in any ends at shoulders.
Finishing
Armbands (make 2)
With smaller needle (US 5 / 3.75 mm) and RS facing, beginning at center of underarm BO, pick up and knit stitches around the armhole at a rate of approx. 3 sts for every 4 rows along vertical edges and 1 st per BO st along underarm, adjusting as needed to reach a multiple of 4.
Target pick-up counts (guide): 76 (80, 84, 88, 92, 96) sts.
(Pm for beg of rnd and join.)
Ribbing: *K2, p2; rep from * around.
Work in 2×2 rib for 1".
BO loosely in rib pattern.
Repeat for second armhole.
V-Neckband
With smaller 16" circular or DPNs (US 5 / 3.75 mm) and RS facing, beginning at left shoulder seam, pick up and knit:
- down left front neck edge,
- 1 st from the center V (mark this st),
- up right front neck edge,
- across back neck BO sts.
Target total: 120 (128, 136, 144, 152, 160) sts (multiple of 4).
Place a unique marker on the center V stitch and a beg-of-rnd marker at the left shoulder.
Rnd 1: Work in 2×2 rib (k2, p2) to 2 sts before center V st, k2tog, k center st, ssk, continue 2×2 rib to end of rnd, adjusting the rib so it flows naturally (you may need to start with p2 or k2 on one side of the V so the columns remain consistent).
(2 sts dec’d)
Rnd 2: Work in established 2×2 rib, working the center st as a knit st, and decreasing with k2tog before and ssk after the center st as in Rnd 1.
Rep Rnd 2 until neckband measures 1" (or desired width), maintaining the paired decreases every rnd at the V.
BO loosely in rib pattern on the next rnd, still working the two decreases at the V so the bind-off lies flat.
Final Finishing
Weave in all remaining ends securely on WS.
Block flat to finished measurements:
- Bust: 36.25 (40, 43.75, 48, 52.25, 56)"
- Length: 22 (22.5, 23, 23.5, 24, 24.5)"
- Armhole depth: 7 (7.5, 8, 8.5, 9, 9.5)"
Allow to dry completely.
Optional: lightly steam rib edges if they curl, taking care not to flatten the rib elasticity.
Tips for Beginners
- Use a running yarn marker or locking marker every 20 sts on the CO to keep the long cast-on even.
- When dividing for the V, a locking marker on the center stitch makes the decreases easy to see.
- If your armhole pick-up number is not a multiple of 4, add or remove 1–2 sts evenly on the first rib rnd.
- Three-needle bind-off tutorial videos are widely available and give a professional shoulder.
- Try the tank on (carefully) before binding off the neckband if you want a deeper or shallower V; you can adjust neckband width.
Enjoy your new handmade V-neck tank!
Disclaimer: This pattern was generated by AI and should be reviewed for accuracy before use. While we strive for quality, AI-generated content may contain errors. Please verify measurements, stitch counts, charts, and instructions before beginning your project. Generated by purlJam.uk
Love this pattern?
Save this pattern to your free PurlJam libraryAccess your pattern anytime
Bookmark this page to access your pattern anytime