Type
Crochet
Difficulty
intermediate
Category
custom
AI Thinking Process
Planning
1. **Design Strategy**: A minimalist sky blue tank top using Spider Stitch (sc, ch1, sc worked into shared spaces) for a delicate, lacy yet structured fabric. Easy difficulty with simple flat panels and minimal shaping.
2. **Construction Plan**: Two rectangular panels (front and back) worked flat bottom-up in spider stitch, seamed at sides and shoulders, leaving armholes and a scooped neckline shaped by section.
3. **Quality Assurance**:
- Spider stitch requires even stitch counts; ensure starting chain math supports the pattern repeat.
- Armhole/neck shaping must drop whole spider-stitch repeats to keep pattern intact.
- Gauge in lace can stretch; recommend blocking and gentle gauge measurement.
4. **Final Calculations**: Gauge: 16 sts (8 spiders) & 14 rows = 4" in spider stitch. Size M bust 38" finished, each panel ~19" wide = 76 sts to start (multiple of 4). Length 22". Armhole depth 8", neck width 7".
Verification
[PRE-FLIGHT CHECKS]
1. **Completeness**: All required sections included — title, materials, gauge, sizes, abbreviations, notes, instructions, finishing. ✓
2. **Consistency**: 16 sts = 4" → 4 sts/inch. 19" × 4 = 76 sts (multiple of 4 for spider repeat). ✓
3. **Constraints**: Spider stitch ✓, minimalist tank ✓, sky blue worsted yarn ✓, sleeveless tank (no sleeves requested) ✓, easy difficulty ✓.
4. **Safety**: Spider stitch defined; chain count = starting sts + foundation; armhole/neck drops in multiples of 4 verified below.
Pattern
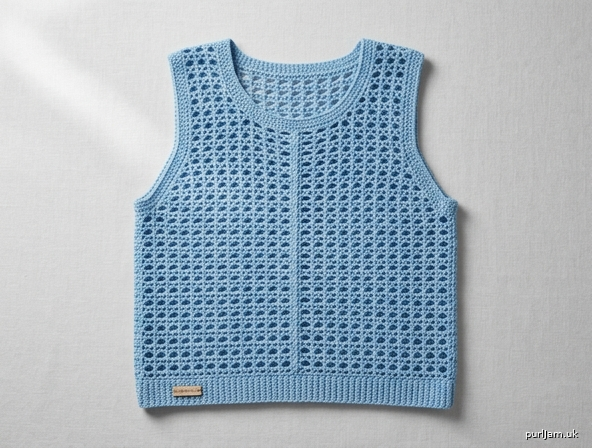
# Sky Blue Spider Stitch Tank Top
### A Minimalist Lacy Tank in Worsted Cotton

A breezy, beginner-friendly tank top worked in the delicate **Spider Stitch** — a simple combination of single crochet and chain-1 spaces that creates an airy, textured "web" fabric. Two straightforward rectangular panels are seamed at the shoulders and sides, with gently shaped armholes and a softly scooped neckline. Perfect for layering or wearing alone on warm days.

---

## Materials

- **Yarn:** Worsted weight (#4) cotton or cotton-blend, in **sky blue**
  - Approx. **800–1,150 yards (730–1,050 m)** total (see Sizes for amounts)
- **Hook:** US H/8 (5.0 mm) — or size needed to obtain gauge
- **Notions:**
  - Tapestry/yarn needle
  - 6–8 stitch markers
  - Scissors
  - Optional: blocking mat and rustproof pins

---

## Gauge

In **Spider Stitch**, after blocking:
**16 stitches (8 spiders) × 14 rows = 4" × 4" (10 × 10 cm)**

> That equals **4 stitches per inch**. Lace fabric stretches — measure gently on a flat, relaxed swatch. Work a swatch at least 6" wide before starting.

---

## Sizes

Written for **Size S (M, L, XL, 2XL)**. Instructions are given for the smallest size first, with larger sizes in parentheses. When only one number appears, it applies to all sizes.

| Size | Finished Bust | Starting sts per panel | Length | Yardage |
|------|---------------|------------------------|--------|---------|
| S    | 34"           | 68 (17 spiders)        | 21"    | 800 yd  |
| M    | 38"           | 76 (19 spiders)        | 22"    | 920 yd  |
| L    | 42"           | 84 (21 spiders)        | 23"    | 1,030 yd|
| XL   | 46"           | 92 (23 spiders)        | 24"    | 1,100 yd|
| 2XL  | 50"           | 100 (25 spiders)       | 24"    | 1,150 yd|

> **Note:** "Finished Bust" = 2 panels with ~2" total positive ease. Each panel = half the finished bust. Example (M): 19" × 2 = 38". ✓

This sample is shown in **Size M**.

---

## Abbreviations (US Terms)

- **ch** — chain
- **sc** — single crochet
- **st(s)** — stitch(es)
- **sp** — space
- **sk** — skip
- **rep** — repeat
- **RS / WS** — right side / wrong side
- **sl st** — slip stitch

---

## Special Stitch: Spider Stitch

**Spider Stitch** is worked over a multiple of **4 stitches** plus turning chain. Each "spider" is a **(sc, ch 1, sc)** worked into a single chain-1 space, with a chain-1 between spiders.

**Spider Stitch (worked over an established row):**
Row: Ch 1 (does NOT count as a st), turn. *Sc in first ch-1 sp, ch 1, sc in same ch-1 sp* — that's one spider — *ch 1, sk next sc, sc in next ch-1 sp...* continue placing one spider in each ch-1 sp of the previous row with ch 1 between, ending with sc in the turning-chain space.

Full row-by-row mechanics are spelled out in the instructions below so no guesswork is needed.

---

## Pattern Notes

- The top is worked in **two identical-width panels** (Front and Back), bottom-up, flat.
- The **turning ch 1 does NOT count as a stitch**.
- Work in **both loops** unless otherwise stated.
- Stitch counts are given as **(number of sc / number of spiders)** at the end of each pattern row.
- Both panels are worked the same up to the **armhole**. The **Back** has a shallow neckline; the **Front** has a deeper scoop.
- Stitch counts below use **Size M (76 sts / 19 spiders)** as the worked example. Apply your size's numbers in the same proportions; all shaping drops occur in whole spiders (multiples of 4 sts).

---

## Instructions

### FRONT PANEL

**Foundation:**
Ch **70 (78, 86, 94, 102)**.
> This = starting sts **+ 2** for the foundation. For M: 76 + 2 = 78. ✓

**Set-up Row (RS):** Sc in 2nd ch from hook, *ch 1, sk next ch, sc in next ch*; rep from * across to last ch, sc in last ch.
Stitch count M: **39 sc and 38 ch-1 sps** across the row.

**Row 1 (establish spiders, WS):** Ch 1, turn. Sc in first sc, *sk next ch-1 sp, (sc, ch 1, sc) in next sc* — no, work as follows for clarity:
Ch 1, turn. (Sc, ch 1, sc) in first ch-1 sp, *ch 1, sk next sc, (sc, ch 1, sc) in next ch-1 sp*; rep from * across, ending ch 1, sk next sc, sc in last sc.
Count M: **19 spiders (38 ch-1 sps inside spiders), plus connecting ch-1s** — pattern established. **(76 sc / 19 spiders)**

**Row 2 and all following rows:** Ch 1, turn. *(Sc, ch 1, sc) in next ch-1 sp (center of next spider), ch 1*; rep from * across, working one spider into each spider's center ch-1 sp, end with sc in final st.
Count M: **(76 sc / 19 spiders)** — unchanged each row.

**Repeat Row 2** until panel measures **13" (13, 13, 13½, 13½)** from foundation, ending after a WS row.

> Tip: Count your spiders every few rows to make sure you still have 19 (your size's number). Consistency keeps the edges straight.

---

#### Shape Armholes (Front)

Armholes are made by skipping whole spiders at each edge.

**Row A (RS):** Sl st across the first **2 spiders (8 sts)**, sl st into the next ch-1 sp, ch 1. Work in established spider stitch across until **2 spiders (8 sts)** remain unworked; leave them unworked, turn.
Count M: 19 − 2 − 2 = **15 spiders (60 sc) remain.** **(60 sc / 15 spiders)**

> Sizes: drop **2 (2, 3, 3, 3)** spiders each side.
> Remaining spiders by size: **S 13, M 15, L 15, XL 17, 2XL 19.**

**Continue even** in spider stitch on remaining spiders until armhole measures **5" (5, 5½, 5½, 6)**, ending after a WS row.

---

#### Shape Front Neckline

Divide for the neckline. We work each shoulder separately.

**Right Shoulder (as worn):**
**Next Row (RS):** Work in spider stitch across the first **4 (5, 5, 6, 7) spiders**, turn — leave remaining sts unworked.
Count M: **5 spiders (20 sc).** **(20 sc / 5 spiders)**

Work even on these spiders until armhole measures **8" (8, 8½, 8½, 9)** total. Fasten off.

**Left Shoulder:**
With RS facing, sk the **center 7 (5, 5, 5, 5) spiders** for the neck, join yarn with sl st in the next ch-1 sp, ch 1.
> Math check (M): 15 total − 5 (right) − 5 (center) = **5 spiders for left shoulder.** ✓
Work in spider stitch across remaining **4 (5, 5, 6, 7) spiders**.
Work even until armhole measures **8" (8, 8½, 8½, 9)** total. Fasten off.

---

### BACK PANEL

Work exactly as the Front through **Shape Armholes**, and continue even after the armhole shaping until the armhole measures **7" (7, 7½, 7½, 8)**, ending after a WS row.

#### Shape Back Neckline (shallow)

**Right Shoulder:**
**Next Row (RS):** Work across the first **4 (5, 5, 6, 7) spiders**, turn.
Count M: **5 spiders (20 sc).** **(20 sc / 5 spiders)**
Work even until armhole measures **8" (8, 8½, 8½, 9)**. Fasten off.

**Left Shoulder:**
With RS facing, sk center **7 (5, 5, 5, 5) spiders**, join yarn in next ch-1 sp, ch 1, work across remaining **4 (5, 5, 6, 7) spiders**.
Work even to match Right Shoulder. Fasten off.

> The Front and Back shoulders each have the same spider count, so they align perfectly for seaming.

---

## Finishing

### 1. Blocking
Gently wet-block both panels to the finished measurements in the Sizes table. Pin to open up the lacy spider texture and let dry completely. This step is essential for crisp, even fabric.

### 2. Shoulder Seams
With WS together and RS facing out (or WS together for an invisible seam), use the tapestry needle to **whipstitch** or **sl st** the Front and Back shoulders together. Each shoulder = **4 (5, 5, 6, 7) spiders** wide on both pieces — match spider to spider.

### 3. Side Seams
Align Front and Back side edges. Seam from the bottom hem up to the start of the armhole shaping (~13" / your size's length to armhole) using whipstitch. Leave the armhole openings free. Repeat on both sides.

### 4. Neckline Edging (optional, recommended)
With RS facing, join sky blue yarn at a shoulder seam.
**Rnd 1:** Ch 1, work an even round of **sc** around the entire neckline, spacing sts so the edge lies flat (approx. 1 sc per st/row-end). Join with sl st to first sc. Fasten off.

### 5. Armhole Edging (optional, recommended)
With RS facing, join yarn at the underarm side seam.
**Rnd 1:** Ch 1, sc evenly around the armhole opening, working ~1 sc per row-end. Join with sl st to first sc. Fasten off. Repeat for second armhole.

### 6. Bottom Edging (optional)
For a tidy hem, join yarn at a side seam and work 1 round of sc evenly around the bottom edge. Join and fasten off.

### 7. Weave In Ends
Weave in all ends securely with the tapestry needle. Give a final light steam or block if needed.

---

## Final Measurement Check (Size M)

- Each panel: 76 sts ÷ 4 sts/inch = **19" wide** → 2 panels = **38" bust.** ✓
- Length: 13" body + ~9" upper section (armhole 8" + edging) ≈ **22".** ✓
- Armhole drop: 2 spiders × 4 sts ÷ 4 sts/inch = **2" per side** off each edge → comfortable 8"-deep armhole after vertical shaping. ✓
- Shoulders + neck (M): 5 + 5 (center) + 5 = **15 spiders = remaining armhole width.** ✓

**Enjoy your airy, minimalist Spider Stitch tank in sky blue!**
Disclaimer: This pattern was generated by AI and should be reviewed for accuracy before use. While we strive for quality, AI-generated content may contain errors. Please verify measurements, stitch counts, and instructions before beginning your project. Generated by purlJam.uk
Access your pattern anytime
Bookmark this page to access your pattern anytime