Type
Crochet
Difficulty
beginner
Category
cardigan
Pattern
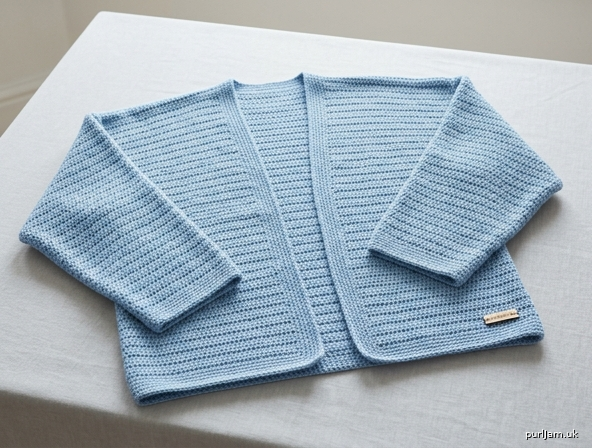
# Mauve Rose Cardigan — Soft Sky Blue Kimono-Style Cardigan
### A Beginner-Friendly T-Shape Crochet Cardigan with Simple Sleeves

A relaxed, boxy cardigan worked flat in five simple rectangles — no complicated shaping! The dropped-shoulder, kimono-style construction makes this an ideal first garment. Worked in soft sky blue cotton, finished with a clean single-crochet border.

---

## SKILL LEVEL
**Beginner** — if you can chain, turn, and work half double crochet, you can make this cardigan.

---

## SIZES
XS · S · M · L · XL · 2XL

Instructions are written for size **XS**, with larger sizes in parentheses:
**XS (S, M, L, XL, 2XL)**

This is an oversized/relaxed fit. For a closer fit, choose the size closest to your actual bust. For an extra-roomy look, size up.

### Finished Measurements

| Measurement | XS | S | M | L | XL | 2XL |
|---|---|---|---|---|---|---|
| Finished Bust (closed) | 38" | 42" | 46" | 50" | 54" | 58" |
| Body Length (shoulder to hem) | 24" | 24" | 25" | 25" | 26" | 26" |
| Sleeve Length | 17" | 17" | 17.5" | 17.5" | 18" | 18" |
| Sleeve Width (flat) | 14" | 14" | 14" | 15" | 15" | 16" |

*Designed with approximately 6–10" of positive ease.*

---

## MATERIALS

- **Yarn:** Worsted weight (Medium / #4) 100% cotton yarn in **Soft Sky Blue**
  - *Suggested:* Lily Sugar 'n Cream, Paintbox Cotton DK doubled, or any worsted cotton
  - **Yardage required (approx):**
    - XS: 1100 yds
    - S: 1250 yds
    - M: 1400 yds
    - L: 1550 yds
    - XL: 1700 yds
    - 2XL: 1850 yds
- **Hook:** US H/8 (5.0 mm) — or size needed to match gauge
- **Notions:**
  - Yarn/tapestry needle (for seaming and weaving ends)
  - Stitch markers (4–6)
  - Scissors
  - Measuring tape
  - Optional: 1 button or fabric tie for closure

---

## GAUGE
**14 hdc × 11 rows = 4" (10 cm)** in half double crochet.

This works out to:
- **3.5 stitches per inch**
- **2.75 rows per inch**

> **Make a gauge swatch!** Chain 20, work hdc rows until you have a 5" square. Adjust hook size as needed. Gauge is forgiving on this relaxed fit, but matching it keeps sizing accurate.

---

## ABBREVIATIONS (US Terms)

| Abbreviation | Meaning |
|---|---|
| ch | chain |
| st(s) | stitch(es) |
| hdc | half double crochet |
| sc | single crochet |
| sl st | slip stitch |
| RS | right side |
| WS | wrong side |
| rep | repeat |
| beg | beginning |
| rem | remaining |

---

## CONSTRUCTION OVERVIEW

This cardigan is a **T-shape kimono** made from **5 flat rectangles**:
- **1 Back panel** (rectangle)
- **2 Front panels** (narrow rectangles)
- **2 Sleeves** (wide rectangles — no tapering)

There is **no armhole shaping** and **no sleeve tapering** — everything is straight and beginner-friendly. Pieces are seamed at the shoulders and sides; sleeves attach at right angles (dropped shoulder).

### Stitch Count Reference Chart

| Piece | XS | S | M | L | XL | 2XL |
|---|---|---|---|---|---|---|
| **Back** starting ch | 69 | 76 | 83 | 90 | 97 | 104 |
| Back hdc sts | 67 | 74 | 81 | 88 | 95 | 102 |
| Back rows | 66 | 66 | 69 | 69 | 72 | 72 |
| **Each Front** starting ch | 35 | 39 | 42 | 46 | 49 | 53 |
| Front hdc sts | 33 | 37 | 40 | 44 | 47 | 51 |
| Front rows | 66 | 66 | 69 | 69 | 72 | 72 |
| **Each Sleeve** starting ch | 51 | 51 | 51 | 55 | 55 | 58 |
| Sleeve hdc sts | 49 | 49 | 49 | 53 | 53 | 56 |
| Sleeve rows | 47 | 47 | 48 | 48 | 50 | 50 |

*Math check (size M): Back 81 sts ÷ 3.5 sts/in = 23.1" ≈ 23" half-bust → 46" full bust ✓. Two fronts 40+40 = 80 sts ≈ back width minus 1 st for overlap balance ✓. Body rows 69 ÷ 2.75 = 25.1" ≈ 25" length ✓. Sleeve 49 sts ÷ 3.5 = 14" wide ✓; 48 rows ÷ 2.75 = 17.5" long ✓.*

---

## PATTERN INSTRUCTIONS

### Notes Before You Begin
- The turning **ch-1 at the start of each row does NOT count as a stitch.**
- Work your first hdc into the first stitch of the row.
- All pieces are worked flat, turning at the end of every row.

---

### BACK PANEL

**Foundation:** Ch **69 (76, 83, 90, 97, 104)**.

**Row 1 (RS):** Working in the 3rd ch from hook (skipped chs do not count as a stitch), hdc in each ch across. *(For a stretchier edge, use a foundation hdc row of the hdc count instead.)*
You should have **67 (74, 81, 88, 95, 102)** hdc.

**Row 2 and all following rows:** Ch 1, turn, hdc in each st across. — **67 (74, 81, 88, 95, 102)** sts.

Repeat Row 2 until the piece measures **24 (24, 25, 25, 26, 26)"** from the foundation, ending after **66 (66, 69, 69, 72, 72)** total rows.

Fasten off. Set aside.

---

### LEFT FRONT PANEL

**Foundation:** Ch **35 (39, 42, 46, 49, 53)**.

**Row 1 (RS):** Hdc in 3rd ch from hook and in each ch across.
You should have **33 (37, 40, 44, 47, 51)** hdc.

**Row 2 onward:** Ch 1, turn, hdc in each st across.

Repeat until the piece measures **24 (24, 25, 25, 26, 26)"**, matching the Back panel's row count of **66 (66, 69, 69, 72, 72)** rows.

Fasten off.

---

### RIGHT FRONT PANEL

Work exactly the same as the Left Front Panel.

Fasten off.

> *Tip:* Because there is no neckline shaping, the front opening is created naturally by the gap between the two fronts. The simple straight edge gives a clean, modern look and is perfect for beginners.

---

### SLEEVES (Make 2) — Simple Straight Sleeves

These sleeves are wide rectangles with **no tapering** — perfectly even from top to bottom for an easy dropped-shoulder fit.

**Foundation:** Ch **51 (51, 51, 55, 55, 58)**.

**Row 1 (RS):** Hdc in 3rd ch from hook and in each ch across.
You should have **49 (49, 49, 53, 53, 56)** hdc.

**Row 2 onward:** Ch 1, turn, hdc in each st across.

Repeat until the sleeve measures **17 (17, 17.5, 17.5, 18, 18)"**, ending after **47 (47, 48, 48, 50, 50)** rows.

Fasten off, leaving a long tail (about 20") for seaming.

Make a **second sleeve** identical to the first.

---

## ASSEMBLY

Block all pieces lightly before seaming to even out stitches and improve drape. Pin to the finished measurements and let dry.

### Step 1 — Seam the Shoulders
Lay the Back panel flat (RS up). Place a Front panel on top, RS together, aligning the top (shoulder) edges and the outer side edge.

Seam across the shoulder using mattress stitch or slip stitch, starting from the outer edge inward:
- Seam **4.5 (5, 5.5, 6, 6.5, 7)"** in from the outer (armhole) edge.

Leave the rest of the top edge open — this forms the back neck and front opening. Repeat with the second Front panel on the other shoulder.

> *Math check (M):* Back 23" wide − front overlap area = ~12" neck opening, with two ~5.5" shoulder seams (5.5 + 5.5 + 12 = 23") ✓

### Step 2 — Mark the Armhole and Attach Sleeves
Lay the joined body flat. From the shoulder seam, measure **7 (7, 7, 7.5, 7.5, 8)"** down the side edge on both the front and back — place a marker. This is your armhole depth.

Center the top edge of a sleeve against the body's side edge, between the two markers (the armhole opening should equal the sleeve width). Pin the sleeve **at a right angle** to the body and seam in place. Repeat for the second sleeve.

> *Math check:* Armhole opening = 2 × 7" = 14" = sleeve width ✓

### Step 3 — Seam the Sides and Sleeves
Fold the cardigan at the shoulders, RS together. In one continuous seam on each side:
- Seam from the **hem up to the armhole marker** (the body side seam), then
- Continue along the **underside of the sleeve** to the cuff.

Repeat on the opposite side.

### Step 4 — Weave in Ends
Weave in all loose ends securely with the tapestry needle.

---

## BORDER PATTERN

A simple single crochet border neatens all the open edges and gives a clean finish.

**Round 1:** With RS facing, join yarn at the bottom corner of one Front. Work **sc evenly** up the Right Front edge, around the back neck, and down the Left Front edge, then along the bottom hem.
- Work approximately **3 sc for every 4 row-ends** along vertical edges, and **1 sc in each st** along the hem.
- Work **3 sc into each corner** to keep them flat.
- Join with a sl st to the first sc.

**Round 2:** Ch 1, sc in each sc around, working 3 sc in each corner again. Join with sl st.

**Round 3 (optional decorative edge — Reverse Single Crochet / Crab Stitch):**
Ch 1, **do not turn.** Working from left to right (backward), sc in each st around for a neat corded edge. Join and fasten off.

### Cuff & Hem Edging (optional)
For a tidy finish, join yarn at a sleeve cuff and work **2 rounds of sc** around each cuff opening. Join and fasten off.

---

## CLOSURE OPTIONS (Optional)

- **Worn open:** No closure needed — the simplest option.
- **Single button:** Sew a button to one front edge about 2" below the neck; use the natural gap in the border as a buttonhole, or chain a small loop on the opposite edge.
- **Fabric tie:** Crochet two chains (ch 40, sc back across) and attach one to each front edge at bust level to tie closed.

---

## FINISHING

1. Give the finished cardigan a final light steam or wet block.
2. Lay flat to dry, shaping to the finished measurements.
3. Cotton softens beautifully after the first wash — enjoy your relaxed, drapey Mauve Rose Cardigan in soft sky blue!

---

### Quick Reference — Finished Garment

| | XS | S | M | L | XL | 2XL |
|---|---|---|---|---|---|---|
| Bust (closed) | 38" | 42" | 46" | 50" | 54" | 58" |
| Length | 24" | 24" | 25" | 25" | 26" | 26" |
| Sleeve Length | 17" | 17" | 17.5" | 17.5" | 18" | 18" |
| Sleeve Width | 14" | 14" | 14" | 15" | 15" | 16" |
| Armhole Depth | 7" | 7" | 7" | 7.5" | 7.5" | 8" |

**Happy crocheting!**
Disclaimer: This pattern was generated by AI and should be reviewed for accuracy before use. While we strive for quality, AI-generated content may contain errors. Please verify measurements, stitch counts, and instructions before beginning your project. Generated by purlJam.uk
Access your pattern anytime
Bookmark this page to access your pattern anytime